

Kubernetes之使用ConfigMap配置Pod
官方参考:https://kubernetes.io/zh/docs/tasks/configure-pod-container/configure-pod-configmap/
创建ConfigMap
可以在 kustomization.yaml 中使用 kubectl create configmap 或 ConfigMap 生成器来创建ConfigMap。注意,从 1.14 版本开始, kubectl 开始支持 kustomization.yaml。
使用kubectl创建ConfigMap
在目录,文件或文字值中使用kubelet create configmap命令创建configmap
1 | kubectl create configmap <map-name> <data-source> |
其中, <map-name> 是要分配给 ConfigMap 的名称,<data-source> 是要从中提取数据的目录,文件或者文字值。
数据源对应于 ConfigMap 中的 key-value (键值对)
- key=在命令行上题库的文件名或者秘钥
- value=在命令行上提供的文件内容或者文字值
可以使用 kubelet describe或者kubelet get检索有关ConfigMap的信息
根据目录创建ConfigMap
你可以使用 kubectl create configmap 从同一目录中的多个文件创建 ConfigMap。
1 2 3 4 5 6 7 | #创建本地目录mkdir -p configure-pod-container/configmap/#将样板文件下载到创建的目录wget https://kubernetes.io/examples/configmap/game.properties -O configure-pod-container/configmap/game.propertieswget https://kubernetes.io/examples/configmap/ui.properties -O configure-pod-container/configmap/ui.properties#创建configmapkubectl create configmap game-config --from-file=configure-pod-container/configmap/ |
合并了以下两个文件的内容
1 2 3 4 5 6 7 8 9 10 11 12 13 | # cat configure-pod-container/configmap/game.properties enemies=alienslives=3enemies.cheat=trueenemies.cheat.level=noGoodRottensecret.code.passphrase=UUDDLRLRBABASsecret.code.allowed=true# cat configure-pod-container/configmap/ui.properties color.good=purplecolor.bad=yellowallow.textmode=truehow.nice.to.look=fairlyNice |
进入以下ConfigMap中
1 | kubectl describe configmaps game-config |
输出类似以下内容
1 2 3 4 5 6 7 8 9 10 11 12 13 14 15 16 17 18 19 20 21 22 23 24 | Name: game-configNamespace: defaultLabels: <none>Annotations: <none>Data====game.properties:----enemies=alienslives=3enemies.cheat=trueenemies.cheat.level=noGoodRottensecret.code.passphrase=UUDDLRLRBABASsecret.code.allowed=truesecret.code.lives=30ui.properties:----color.good=purplecolor.bad=yellowallow.textmode=truehow.nice.to.look=fairlyNiceEvents: <none> |
1 | kubectl get configmap game-config -o yaml |
输出以下内容
1 2 3 4 5 6 7 8 9 10 11 12 13 14 15 16 17 18 19 20 21 22 23 | apiVersion: v1data: game.properties: |- enemies=aliens lives=3 enemies.cheat=true enemies.cheat.level=noGoodRotten secret.code.passphrase=UUDDLRLRBABAS secret.code.allowed=true secret.code.lives=30 ui.properties: | color.good=purple color.bad=yellow allow.textmode=true how.nice.to.look=fairlyNicekind: ConfigMapmetadata: creationTimestamp: "2020-03-17T08:12:49Z" name: game-config namespace: default resourceVersion: "505452" selfLink: /api/v1/namespaces/default/configmaps/game-config uid: 1f3868e4-7a6b-4bf3-9317-00911ebc6e91 |
根据文件创建ConfigMap
可以使用kubelet create configmap从单个文件或多个文件创建ConfigMap
例如
1 | kubectl create configmap game-config-2 --from-file=configure-pod-container/configmap/game.properties |
将产生以下ConfigMap
1 | kubectl describe configmaps game-config-2 |
输出类似以下内容
1 2 3 4 5 6 7 8 9 10 11 12 13 14 15 16 17 | Name: game-config-2Namespace: defaultLabels: <none>Annotations: <none>Data====game.properties:----enemies=alienslives=3enemies.cheat=trueenemies.cheat.level=noGoodRottensecret.code.passphrase=UUDDLRLRBABASsecret.code.allowed=truesecret.code.lives=30Events: <none> |
可以传入多个 --from-file 参数,从多个数据源创建 ConfigMap
1 | kubectl create configmap game-config-2 --from-file=configure-pod-container/configmap/game.properties --from-file=configure-pod-container/configmap/ui.properties |
描述上面创建的game-config-2 configmap
1 | kubectl describe configmaps game-config-2 |
输出类似以下内容
1 2 3 4 5 6 7 8 9 10 11 12 13 14 15 16 17 18 19 20 21 22 23 24 | Name: game-config-2Namespace: defaultLabels: <none>Annotations: <none>Data====game.properties:----enemies=alienslives=3enemies.cheat=trueenemies.cheat.level=noGoodRottensecret.code.passphrase=UUDDLRLRBABASsecret.code.allowed=truesecret.code.lives=30ui.properties:----color.good=purplecolor.bad=yellowallow.textmode=truehow.nice.to.look=fairlyNiceEvents: <none> |
使用 --from-env-file 选项从环境文件创建 ConfigMap,例如:
1 2 3 4 5 6 7 8 9 10 11 12 13 14 15 16 17 | # 环境文件包含环境变量列表。# 语法规则:# env 文件中的每一行必须为 VAR = VAL 格式。# 以#开头的行(即注释)将被忽略。# 空行将被忽略。# 引号没有特殊处理(即它们将成为 ConfigMap 值的一部分)。# 将样本文件下载到 `configure-pod-container/configmap/` 目录wget https://kubernetes.io/examples/configmap/game-env-file.properties -O configure-pod-container/configmap/game-env-file.properties# env文件 `game-env-file.properties` 如下所示cat configure-pod-container/configmap/game-env-file.propertiesenemies=alienslives=3allowed="true"# 注释及其上方的空行将被忽略 |
1 | kubectl create configmap game-config-env-file --from-env-file=configure-pod-container/configmap/game-env-file.properties |
将产生以下ConfigMap
1 | kubectl get configmap game-config-env-file -o yaml |
输出类似以下内容
1 2 3 4 5 6 7 8 9 10 11 12 13 | apiVersion: v1data: allowed: '"true"' enemies: aliens lives: "3"kind: ConfigMapmetadata: creationTimestamp: "2020-03-17T08:25:11Z" name: game-config-env-file namespace: default resourceVersion: "507620" selfLink: /api/v1/namespaces/default/configmaps/game-config-env-file uid: f22b64e7-2232-4c6a-aa85-afbbafb6bcac |
当使用多个 --from-env-file 来从多个数据源创建 ConfigMap 时,仅仅最后一个 env 文件有效:
1 2 3 4 5 6 7 | # 将样本文件下载到 `configure-pod-container/configmap/` 目录wget https://k8s.io/examples/configmap/ui-env-file.properties -O configure-pod-container/configmap/ui-env-file.properties# 创建 configmapkubectl create configmap config-multi-env-files \ --from-env-file=configure-pod-container/configmap/game-env-file.properties \ --from-env-file=configure-pod-container/configmap/ui-env-file.properties |
将产生以下ConfigMap
1 | kubectl get configmap config-multi-env-files -o yaml |
输出类似以下内容
1 2 3 4 5 6 7 8 9 10 11 12 13 | apiVersion: v1data: color: purple how: fairlyNice textmode: "true"kind: ConfigMapmetadata: creationTimestamp: "2020-03-17T08:31:36Z" name: config-multi-env-files namespace: default resourceVersion: "508738" selfLink: /api/v1/namespaces/default/configmaps/config-multi-env-files uid: d09564b2-b683-455c-8360-423edd3dbbbf |
定义从文件创建 ConfigMap时要使用自定义建名
您可以在使用 --from-file 参数时,在 ConfigMap 的 data 部分中定义除文件名以外的其他键:
1 | kubectl create configmap game-config-3 --from-file=<my-key-name>=<path-to-file> |
<my-key-name> 是您要在 ConfigMap 中使用的建名, <path-to-file> 是您想要键表示数据源文件的位置。
例如
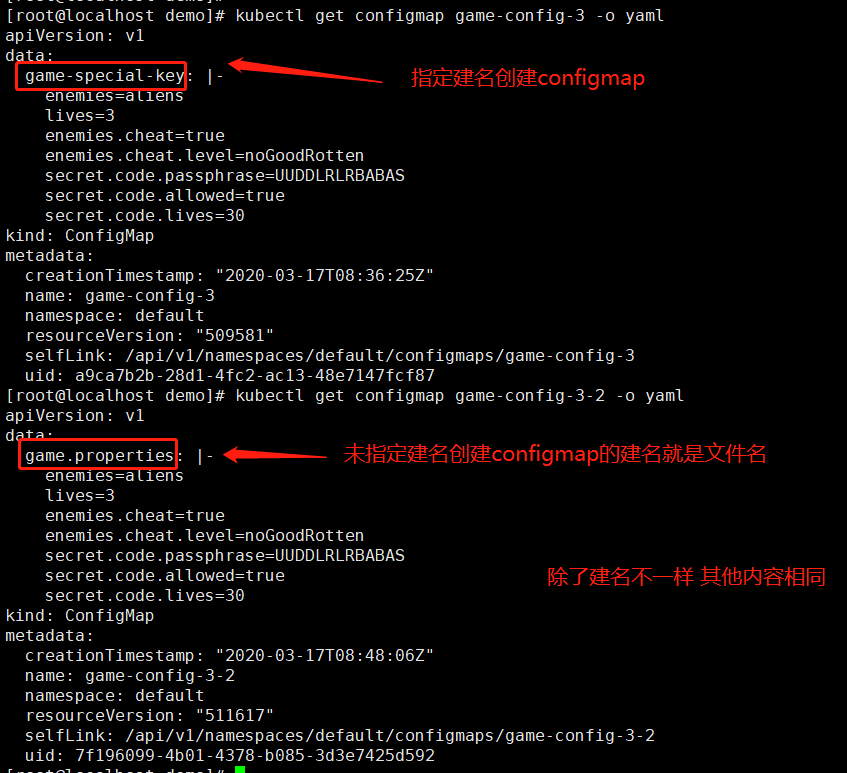
1 | kubectl create configmap game-config-3 --from-file=game-special-key=configure-pod-container/configmap/game.properties |
将产生以下ConfigMap
1 2 3 4 5 6 7 8 9 10 11 12 13 14 15 16 17 18 | apiVersion: v1data: game-special-key: |- enemies=aliens lives=3 enemies.cheat=true enemies.cheat.level=noGoodRotten secret.code.passphrase=UUDDLRLRBABAS secret.code.allowed=true secret.code.lives=30kind: ConfigMapmetadata: creationTimestamp: "2020-03-17T08:36:25Z" name: game-config-3 namespace: default resourceVersion: "509581" selfLink: /api/v1/namespaces/default/configmaps/game-config-3 uid: a9ca7b2b-28d1-4fc2-ac13-48e7147fcf87 |
PS:使用文件创建的configmap默认的建名是文件名,以上自定义了其他建名不指定建名创建做对比
1 | kubectl create configmap game-config-3-2 --from-file=configure-pod-container/configmap/game.properties |
根据文字值生成ConfigMap
您可以将 kubectl create configmap 与 --from-literal 参数一起使用,从命令行定义文字值:
1 | kubectl create configmap special-config --from-literal=special.how=very --from-literal=special.type=charm |
您可以传入多个键值对。命令行中提供的每对在 ConfigMap 的 data 部分中均表示为单独的条目。
1 | kubectl get configmaps special-config -o yaml |
输出类似以下内容
1 2 3 4 5 6 7 8 9 10 11 12 | apiVersion: v1data: special.how: very special.type: charmkind: ConfigMapmetadata: creationTimestamp: "2020-03-17T08:54:43Z" name: special-config namespace: default resourceVersion: "512776" selfLink: /api/v1/namespaces/default/configmaps/special-config uid: b7f972bf-1eef-4c74-b496-8b90cf3476d2 |
根据生成器创建ConfigMap
自 1.14 开始, kubectl 开始支持 kustomization.yaml。 您还可以从生成器创建 ConfigMap,然后将其应用于 Apiserver 创建对象。生成器应在目录内的 kustomization.yaml 中指定。
1 2 3 4 5 6 7 | # 使用 ConfigMapGenerator 创建 kustomization.yaml 文件cat <<EOF >./kustomization.yamlconfigMapGenerator:- name: game-config-4 files: - configure-pod-container/configmap/kubectl/game.propertiesEOF |
使用 kustomization 目录创建 ConfigMap 对象
1 2 | # kubectl apply -k .configmap/game-config-4-m9dm2f92bt created |
PS:文件kustomization.yaml需要与文件夹configure-pod-container在同一个目录并且该文件夹下面没有其他文件
可以检查ConfigMap是这样创建的
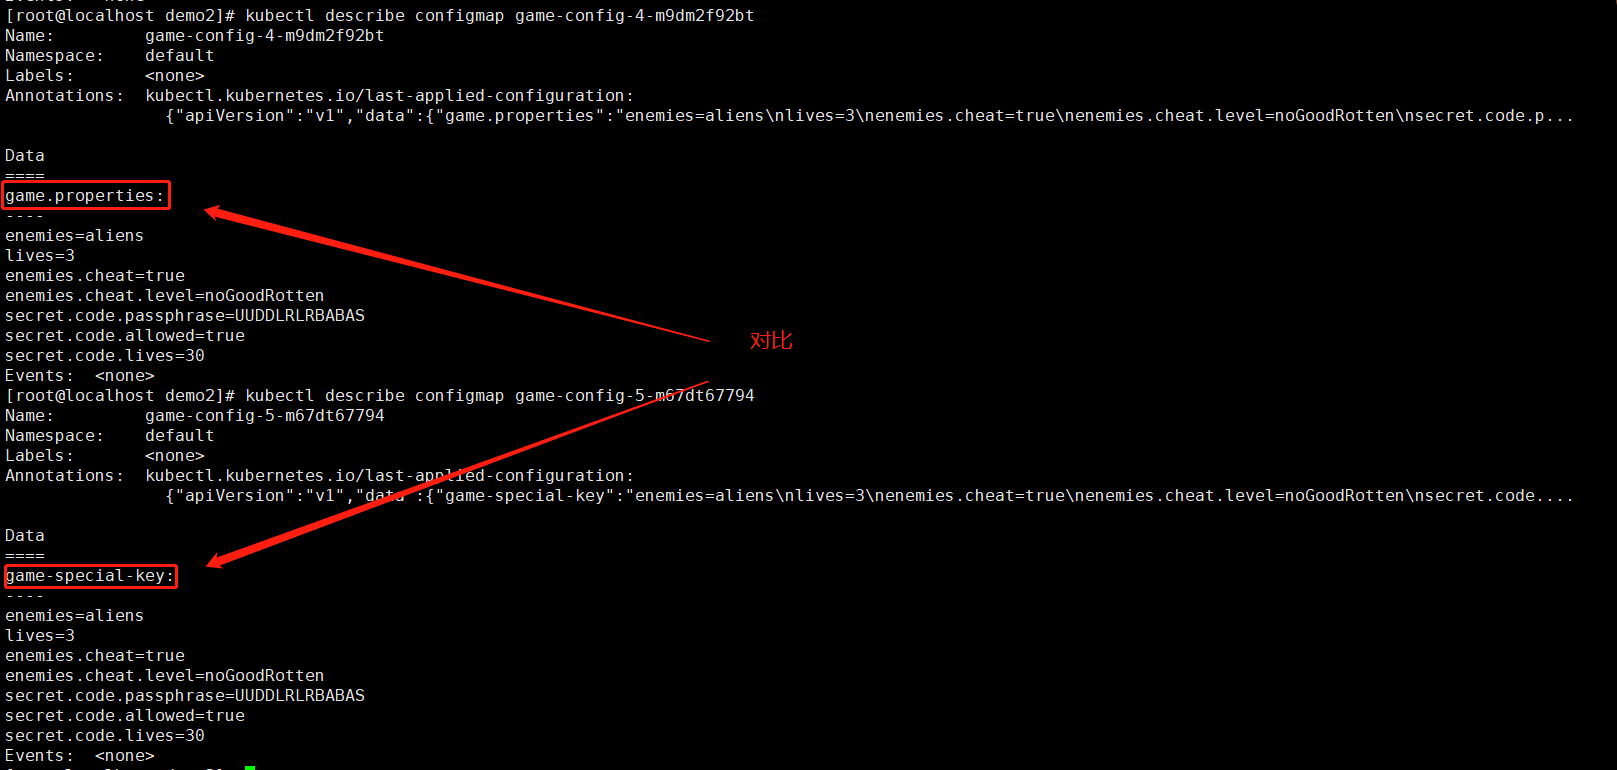
1 2 3 4 5 6 7 8 9 10 11 12 13 14 15 16 17 18 19 | # kubectl describe configmaps/game-config-4-m9dm2f92btName: game-config-4-m9dm2f92btNamespace: defaultLabels: <none>Annotations: kubectl.kubernetes.io/last-applied-configuration: {"apiVersion":"v1","data":{"game.properties":"enemies=aliens\nlives=3\nenemies.cheat=true\nenemies.cheat.level=noGoodRotten\nsecret.code.p...Data====game.properties:----enemies=alienslives=3enemies.cheat=trueenemies.cheat.level=noGoodRottensecret.code.passphrase=UUDDLRLRBABASsecret.code.allowed=truesecret.code.lives=30Events: <none> |
请注意,生成的 ConfigMap 名称具有通过对内容进行散列而附加的后缀,这样可以确保每次修改内容时都会生成新的 ConfigMap。
定义从文件生成ConfigMap是要使用建名
1 2 3 4 5 | # cat kustomization.yaml configMapGenerator:- name: game-config-5 files: - game-special-key=configure-pod-container/configmap/kubectl/game.properties |
使用 Kustomization 目录创建 ConfigMap 对象
1 2 | kubectl apply -k .configmap/game-config-5-m67dt67794 created |
对比
从文字生成CofigMap
1 2 3 4 5 6 | #cat kustomization.yaml configMapGenerator:- name: special-config-2 literals: - special.how=very - special.type=charm |
使用 Kustomization 目录创建 ConfigMap 对象。
1 | kubectl apply -k . |
1 | kubectl describe configmap special-config-2-c92b5mmcf2 |
输出类似以下内容
1 2 3 4 5 6 7 8 9 10 11 12 13 14 15 | Name: special-config-2-c92b5mmcf2Namespace: defaultLabels: <none>Annotations: kubectl.kubernetes.io/last-applied-configuration: {"apiVersion":"v1","data":{"special.how":"very","special.type":"charm"},"kind":"ConfigMap","metadata":{"annotations":{},"name":"special-co...Data====special.how:----veryspecial.type:----charmEvents: <none> |
使用 ConfigMap 数据定义容器环境变量
1.在ConfigMap中将环境变量定义为键值对
1 | kubectl create configmap special-config --from-literal=special.how=very |
查看该键值对
1 2 3 4 5 6 7 8 9 10 11 12 | # kubectl get configmap special-config -o yamlapiVersion: v1data: special.how: verykind: ConfigMapmetadata: creationTimestamp: "2020-03-18T01:47:01Z" name: special-config namespace: default resourceVersion: "689548" selfLink: /api/v1/namespaces/default/configmaps/special-config uid: 89b580f2-714d-4e47-87f6-90d18aa9aa3d |
将 ConfigMap 中定义的 special.how 值分配给 Pod 规范中的 SPECIAL_LEVEL_KEY 环境变量。
下载示例Pod
1 | wget https://kubernetes.io/examples/pods/pod-single-configmap-env-variable.yaml |
1 2 3 4 5 6 7 8 9 10 11 12 13 14 15 16 17 18 19 20 21 22 | apiVersion: v1kind: Podmetadata: name: dapi-test-podspec: containers: - name: test-container image: busybox command: [ "/bin/sh", "-c", "env" ] env: # Define the environment variable # 定义容器内环境变量变量名为SPECIAL_LEVEL_KEY - name: SPECIAL_LEVEL_KEY valueFrom: configMapKeyRef: # The ConfigMap containing the value you want to assign to SPECIAL_LEVEL_KEY # 包含键值映射的configmap为special-config name: special-config # Specify the key associated with the value # 对应的key为special.how该key对应的值为very key: special.how restartPolicy: Never |
创建Pod
1 | kubectl apply -f pod-single-configmap-env-variable.yaml |
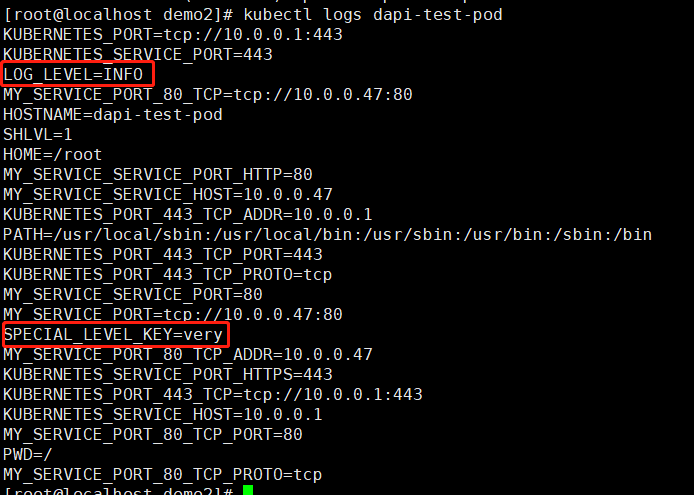
该Pod运行日志输出环境变量,查看日志
1 2 3 4 5 6 7 8 9 10 11 12 13 14 15 16 17 18 19 20 21 22 23 | # kubectl logs dapi-test-podKUBERNETES_PORT=tcp://10.0.0.1:443KUBERNETES_SERVICE_PORT=443MY_SERVICE_PORT_80_TCP=tcp://10.0.0.47:80HOSTNAME=dapi-test-podSHLVL=1HOME=/rootMY_SERVICE_SERVICE_PORT_HTTP=80MY_SERVICE_SERVICE_HOST=10.0.0.47KUBERNETES_PORT_443_TCP_ADDR=10.0.0.1PATH=/usr/local/sbin:/usr/local/bin:/usr/sbin:/usr/bin:/sbin:/binKUBERNETES_PORT_443_TCP_PORT=443KUBERNETES_PORT_443_TCP_PROTO=tcpMY_SERVICE_SERVICE_PORT=80MY_SERVICE_PORT=tcp://10.0.0.47:80SPECIAL_LEVEL_KEY=veryMY_SERVICE_PORT_80_TCP_ADDR=10.0.0.47KUBERNETES_SERVICE_PORT_HTTPS=443KUBERNETES_PORT_443_TCP=tcp://10.0.0.1:443MY_SERVICE_PORT_80_TCP_PORT=80KUBERNETES_SERVICE_HOST=10.0.0.1PWD=/MY_SERVICE_PORT_80_TCP_PROTO=tcp |

该Pod执行完输出环境变量以后因为重启策略是Never就是完成状态了

使用多个ConfigMap定义容器变量
创建ConfigMap
1 2 3 4 5 6 7 8 9 10 11 12 13 14 15 16 | # cat configmaps.yaml apiVersion: v1kind: ConfigMapmetadata: name: special-config namespace: defaultdata: special.how: very---apiVersion: v1kind: ConfigMapmetadata: name: env-config namespace: defaultdata: log_level: INFO |
创建
1 | kubectl apply -f configmaps.yaml |
在Pod中定义环境变量
1 2 3 4 5 6 7 8 9 10 11 12 13 14 15 16 17 18 19 20 21 22 | # cat pod-multiple-configmap-env-variable.yamlapiVersion: v1kind: Podmetadata: name: dapi-test-podspec: containers: - name: test-container image: busybox command: [ "/bin/sh", "-c", "env" ] env: - name: SPECIAL_LEVEL_KEY valueFrom: configMapKeyRef: name: special-config key: special.how - name: LOG_LEVEL valueFrom: configMapKeyRef: name: env-config key: log_level restartPolicy: Never |
创建Pod
1 | kubectl apply -f pod-multiple-configmap-env-variable.yaml |
现在,Pod 的输出包含环境变量 SPECIAL_LEVEL_KEY=very 和 LOG_LEVEL=INFO。
将 ConfigMap 中的所有键值对配置为容器环境变量
注意:Kubernetes v1.16和更高版本提供此功能
创建一个包含多个键值对的ConfigMap
1 2 3 4 5 6 7 8 9 | # cat configmap-multikeys.yaml apiVersion: v1kind: ConfigMapmetadata: name: special-config namespace: defaultdata: SPECIAL_LEVEL: very SPECIAL_TYPE: charm |
创建ConfigMap
1 | kubectl apply -f configmap-multikeys.yaml |
查看创建的ConfigMap
1 2 3 4 5 6 7 8 9 10 11 12 13 14 15 16 | # kubectl get configmap special-config -o yamlapiVersion: v1data: SPECIAL_LEVEL: very SPECIAL_TYPE: charmkind: ConfigMapmetadata: annotations: kubectl.kubernetes.io/last-applied-configuration: | {"apiVersion":"v1","data":{"SPECIAL_LEVEL":"very","SPECIAL_TYPE":"charm"},"kind":"ConfigMap","metadata":{"annotations":{},"name":"special-config","namespace":"default"}} creationTimestamp: "2020-03-18T02:13:48Z" name: special-config namespace: default resourceVersion: "694299" selfLink: /api/v1/namespaces/default/configmaps/special-config uid: 6df7c234-7ec6-4fad-8c5e-c34aa32f948a |
使用 envFrom 将所有 ConfigMap 的数据定义为容器环境变量,ConfigMap 中的键成为 Pod 中的环境变量名称。
1 2 3 4 5 6 7 8 9 10 11 12 13 14 | # cat pod-configmap-envFrom.yaml apiVersion: v1kind: Podmetadata: name: dapi-test-podspec: containers: - name: test-container image: busybox command: [ "/bin/sh", "-c", "env" ] envFrom: - configMapRef: name: special-config restartPolicy: Never |
创建Pod
1 | kubectl apply -f pod-configmap-envFrom.yaml |
现在,Pod 的输出包含环境变量 SPECIAL_LEVEL=very 和 SPECIAL_TYPE=charm。

在 Pod 命令中使用 ConfigMap 定义的环境变量
1 2 3 4 5 6 7 8 9 10 11 12 13 14 15 16 17 18 19 20 21 22 | # cat pod-configmap-env-var-valueFrom.yaml apiVersion: v1kind: Podmetadata: name: dapi-test-podspec: containers: - name: test-container image: busybox command: [ "/bin/sh", "-c", "echo $(SPECIAL_LEVEL_KEY) $(SPECIAL_TYPE_KEY)" ] env: - name: SPECIAL_LEVEL_KEY valueFrom: configMapKeyRef: name: special-config key: SPECIAL_LEVEL - name: SPECIAL_TYPE_KEY valueFrom: configMapKeyRef: name: special-config key: SPECIAL_TYPE restartPolicy: Never |
创建Pod
1 | kubectl apply -f pod-configmap-env-var-valueFrom.yaml |
在 test-container 容器中产生以下输出:
1 2 | # kubectl logs dapi-test-pod very charm |
将ConfigMap数据添加到一个容器中
当您使用 --from-file 创建 ConfigMap 时,文件名成为存储在 ConfigMap 的 data 部分中的key,文件内容成为key的值。
本节中的示例引用了一个名为 special-config 的 ConfigMap,如下所示:
1 2 3 4 5 6 7 8 9 | # cat configmap-multikeys.yaml apiVersion: v1kind: ConfigMapmetadata: name: special-config namespace: defaultdata: SPECIAL_LEVEL: very SPECIAL_TYPE: charm |
创建ConfigMap
1 | kubectl apply -f configmap-multikeys.yaml |
使用存储在 ConfigMap 中的数据填充容器
在 Pod 规范的 volumes 部分下添加 ConfigMap 名称。 这会将 ConfigMap 数据添加到指定为 volumeMounts.mountPath 的目录(在本例中为/etc/config)。 command 引用存储在 ConfigMap 中的 special.level。
1 2 3 4 5 6 7 8 9 10 11 12 13 14 15 16 17 18 19 20 | # cat pod-configmap-volume.yaml apiVersion: v1kind: Podmetadata: name: dapi-test-podspec: containers: - name: test-container image: busybox command: [ "/bin/sh", "-c", "ls /etc/config/" ] volumeMounts: - name: config-volume mountPath: /etc/config volumes: - name: config-volume configMap: # Provide the name of the ConfigMap containing the files you want # to add to the container name: special-config restartPolicy: Never |
创建Pod
1 | kubectl apply -f pod-configmap-volume.yaml |
容器运行命令 ls /etc/config/ 产生下面的输出:
1 2 3 | # kubectl logs dapi-test-pod SPECIAL_LEVELSPECIAL_TYPE |
注意:
如果在/etc/config/目录中有一些文件,他们将被删除
这里ls显示的其实是两个文件名称
可以修改pod-configmap-volume.yaml增加一个sleep这样启动Pod就不会运行完马上退出
1 2 3 4 5 6 7 8 9 10 11 12 13 14 15 16 17 18 19 20 | # cat pod-configmap-volume.yaml apiVersion: v1kind: Podmetadata: name: dapi-test-podspec: containers: - name: test-container image: busybox command: [ "/bin/sh", "-c", "ls /etc/config/ && sleep 3600" ] volumeMounts: - name: config-volume mountPath: /etc/config volumes: - name: config-volume configMap: # Provide the name of the ConfigMap containing the files you want # to add to the container name: special-config restartPolicy: Never |
登录Pod查看
1 2 3 4 5 6 7 8 9 10 11 | # kubectl exec -it dapi-test-pod sh# cd /etc/config/# ls -ltotal 0lrwxrwxrwx 1 root root 20 Mar 18 09:09 SPECIAL_LEVEL -> ..data/SPECIAL_LEVELlrwxrwxrwx 1 root root 19 Mar 18 09:09 SPECIAL_TYPE -> ..data/SPECIAL_TYPE#文件内容就是very和charm# cat SPECIAL_LEVEL very# cat SPECIAL_TYPE charm |
将 ConfigMap 数据添加到容器中的特定路径
使用 path 字段为特定的 ConfigMap 项目指定所需的文件路径。 在这种情况下, SPECIAL_LEVEL 将安装在 /etc/config/keys 目录下的 config-volume 容器中。
1 2 3 4 5 6 7 8 9 10 11 12 13 14 15 16 17 18 19 20 21 | # cat pod-configmap-volume-specific-key.yaml apiVersion: v1kind: Podmetadata: name: dapi-test-podspec: containers: - name: test-container image: busybox command: [ "/bin/sh","-c","cat /etc/config/keys" ] volumeMounts: - name: config-volume mountPath: /etc/config volumes: - name: config-volume configMap: name: special-config items: - key: SPECIAL_LEVEL path: keys restartPolicy: Never |
创建Pod
1 | kubectl apply -f pod-configmap-volume-specific-key.yaml |
当 pod 运行时,命令 cat /etc/config/keys 产生以下输出
1 2 | # kubectl logs dapi-test-podvery |
为什么输出是very 修改yaml文件注释
1 2 3 4 5 6 7 8 9 10 11 12 13 14 15 16 17 18 19 20 21 22 23 24 25 26 27 | # cat pod-configmap-volume-specific-key.yaml apiVersion: v1kind: Podmetadata: name: dapi-test-podspec: containers: - name: test-container image: busybox #增加sleep防止运行完以后Pod处于compled状态 command: [ "/bin/sh","-c","cat /etc/config/keys && sleep 3600 " ] volumeMounts: #挂载对应的名称是volumes对应的config-volume - name: config-volume #挂载的目录是容器内目录/etc/config #以keys名挂载以后的文件名称是/etc/config/keys mountPath: /etc/config volumes: - name: config-volume configMap: name: special-config items: #取ConfigMap的key为SPECIAL_LEVE的值是very - key: SPECIAL_LEVEL #在volumeMount是挂载的名称是keys path: keys restartPolicy: Never |
创建Pod
1 2 | # kubectl apply -f pod-configmap-volume-specific-key.yaml pod/dapi-test-pod created |
登录Pod内部查看
1 2 3 4 5 6 | kubectl exec -it dapi-test-pod shcd /etc/config/lskeyscat keys very |
了解ConfigMap和Pod
ConfigMap API 资源将配置数据存储为键值对。数据可以在 Pod 中使用,也可以提供系统组件(如控制器)的配置。ConfigMap 与 Secrets类似,但是提供了一种使用不包含敏感信息的字符串的方法。用户和系统组件都可以在 ConfigMap 中存储配置数据。
ConfigMap 应该引用属性文件,而不是替换它们。可以将 ConfigMap 表示为类似于 Linux /etc 目录及其内容的东西。例如,如果您从 ConfigMap 创建Kubernetes Volume,则 ConfigMap 中的每个数据项都由该容器中的单个文件表示。
ConfigMap 的 data 字段包含配置数据。如下例所示,它可以很简单 – 就像使用 --from-literal – 定义的单个属性一样,也可以很复杂 – 例如使用 --from-file 定义的配置文件或 JSON blob。
1 2 3 4 5 6 7 8 9 10 11 12 13 14 15 | apiVersion: v1kind: ConfigMapmetadata: creationTimestamp: 2016-02-18T19:14:38Z name: example-config namespace: defaultdata: # example of a simple property defined using --from-literal example.property.1: hello example.property.2: world # example of a complex property defined using --from-file example.property.file: |- property.1=value-1 property.2=value-2 property.3=value-3 |
限制规定
在 Pod 规范中引用它之前,必须先创建一个 ConfigMap(除非将 ConfigMap 标记为”可选”)。如果引用的 ConfigMap 不存在,则 Pod 将不会启动。同样,对 ConfigMap 中不存在的键的引用将阻止容器启动。
如果您使用 envFrom 从 ConfigMap 中定义环境变量,那么将忽略被认为无效的键。可以启动 Pod,但无效名称将记录在事件日志中(InvalidVariableNames)。日志消息列出了每个跳过的键。例如:
1 | kubectl get events |
如果没有key将事件中出现类似以下提示
1 | 15m Warning Failed pod/dapi-test-pod Error: couldn't find key log_level in ConfigMap default/special-config |
ConfigMap 只能由位于相同命令空间中的 Pod 引用。
Kubelet 不支持将 ConfigMap 用于未在 API 服务器上找到的 Pod。这包括通过 Kubelet 的 --manifest-url 参数,--config 参数或者 Kubelet REST API 创建的容器。
使用ConfigMap来配置Redis
目标
创建一个包含以下内容的kustomization.yaml 文件
- 一个ConfigMap生成器
- 一个使用ConfigMap的Pod资源配置
使用kubectl apply -k ./应用整个路径的配置
验证配置是否正确
使用kustomization.yaml Kubernetes版本必须1.14及以上 查看版本信息使用命令
1 | kubectl version |
按照以下步骤,可以使用ConfigMap中的数据类配置Redis缓存
1 2 3 4 5 6 7 8 9 10 11 | curl -OL https://k8s.io/examples/pods/config/redis-config#文件内容如下maxmemory 2mbmaxmemory-policy allkeys-lrucat <<EOF >./kustomization.yamlconfigMapGenerator:- name: example-redis-config files: - redis-configEOF |
将Pod的资源配置添加到kustomization.yaml 文件中
1 2 3 4 5 6 7 8 9 10 11 12 13 14 15 16 17 18 19 20 21 22 23 24 25 26 27 28 29 30 31 32 33 34 | # cat redis-pod.yaml apiVersion: v1kind: Podmetadata: name: redisspec: containers: - name: redis image: redis:5.0.4 command: - redis-server - "/redis-master/redis.conf" env: - name: MASTER value: "true" ports: - containerPort: 6379 resources: limits: cpu: "0.1" volumeMounts: - mountPath: /redis-master-data name: data - mountPath: /redis-master name: config volumes: - name: data emptyDir: {} - name: config configMap: name: example-redis-config items: - key: redis-config path: redis.conf |
1 | curl -OL https://raw.githubusercontent.com/kubernetes/website/master/content/en/examples/pods/config/redis-pod.yaml |
在kustomization.yaml追加
1 2 3 4 | cat <<EOF >>./kustomization.yamlresources:- redis-pod.yamlEOF |
此时完整的kustomization.yaml内容如下
1 2 3 4 5 6 7 | # cat kustomization.yaml configMapGenerator:- name: example-redis-config files: - redis-configresources:- redis-pod.yaml |
应用整个 kustomization 文件夹以创建 ConfigMap 和 Pod 对象:
首先应用文件redis-config文件创建ConfigMap,然后使用文件redis-pod.yaml创建Pod
1 2 3 | # kubectl apply -k .configmap/example-redis-config-dgh9dg555m createdpod/redis created |
使用以下命令检查创建的对象
1 2 3 4 5 6 | # kubectl get -k .NAME DATA AGEconfigmap/example-redis-config-dgh9dg555m 1 36sNAME READY STATUS RESTARTS AGEpod/redis 1/1 Running 0 36s |
在示例中,配置卷挂载在/redis-master下。它使用path将redis-config的key添加到名为redis.conf的文件中。因此,redis配置的文件路径为/redis-master/redis.conf。 这是镜像将在其中查找 redis master 的配置文件的位置。
使用kubectl exec进入Pod并运行redis-cli工具来验证配置已正确应用
1 2 3 4 5 6 7 | # kubectl exec -it redis redis-cli127.0.0.1:6379> CONFIG GET maxmemory1) "maxmemory"2) "2097152"127.0.0.1:6379> CONFIG GET maxmemory-policy1) "maxmemory-policy"2) "allkeys-lru" |
PS:redis使用命令CONFIG GET 参数获取对应配置值 这里最大内存设置的是2mb换算成byte就是2097152即2*1024*1024
删除创建的Pod
1 | kubectl delete pod redis |
不使用kustomization.yaml创建一遍
删除刚刚创建的ConfigMap和Pod
1 2 | kubectl delete pod rediskubectl delete configmap example-redis-config-dgh9dg555m |
使用文件创建ConfigMap
1 2 3 | #创建ConfigMap名为 example-redis-configkubectl create configmap example-redis-config --from-file=redis-config configmap/example-redis-config created |
查看刚刚创建的ConfigMap
1 2 3 4 5 6 7 8 9 10 11 12 13 14 15 | #key为文件名redis-config内容及文件内部内容kubectl get configmap example-redis-config -o yamlapiVersion: v1data: redis-config: | maxmemory 2mb maxmemory-policy allkeys-lrukind: ConfigMapmetadata: creationTimestamp: "2020-03-18T06:06:54Z" name: example-redis-config namespace: default resourceVersion: "735256" selfLink: /api/v1/namespaces/default/configmaps/example-redis-config uid: 35f4baf9-b786-450f-a22c-768fa75a2d08 |
创建Pod
1 2 3 4 5 6 7 8 9 10 11 12 13 14 15 16 17 18 19 20 21 22 23 24 25 26 27 28 29 30 31 32 33 34 35 36 | # cat redis-pod.yaml apiVersion: v1kind: Podmetadata: name: redisspec: containers: - name: redis image: redis:5.0.4 command: - redis-server - "/redis-master/redis.conf" env: - name: MASTER value: "true" ports: - containerPort: 6379 resources: limits: cpu: "0.1" volumeMounts: - mountPath: /redis-master-data name: data #挂载配置文件从ConfigMap挂载目录为容器目录/redis-master最终挂载的文件为/redis-master/redis.conf #内容即文件redis-config内内容 - mountPath: /redis-master name: config volumes: - name: data emptyDir: {} - name: config configMap: name: example-redis-config items: - key: redis-config path: redis.conf |
1 2 | # kubectl apply -f redis-pod.yaml pod/redis created |
可以使用以上redis-cli验证
也可以登录Pod查看配置文件内容是否一致
1 2 3 4 | # kubectl exec -it redis bash# cat /redis-master/redis.conf maxmemory 2mbmaxmemory-policy allkeys-lru |


【推荐】国内首个AI IDE,深度理解中文开发场景,立即下载体验Trae
【推荐】编程新体验,更懂你的AI,立即体验豆包MarsCode编程助手
【推荐】抖音旗下AI助手豆包,你的智能百科全书,全免费不限次数
【推荐】轻量又高性能的 SSH 工具 IShell:AI 加持,快人一步
· SQL Server 2025 AI相关能力初探
· Linux系列:如何用 C#调用 C方法造成内存泄露
· AI与.NET技术实操系列(二):开始使用ML.NET
· 记一次.NET内存居高不下排查解决与启示
· 探究高空视频全景AR技术的实现原理
· 阿里最新开源QwQ-32B,效果媲美deepseek-r1满血版,部署成本又又又降低了!
· AI编程工具终极对决:字节Trae VS Cursor,谁才是开发者新宠?
· 开源Multi-agent AI智能体框架aevatar.ai,欢迎大家贡献代码
· Manus重磅发布:全球首款通用AI代理技术深度解析与实战指南
· 被坑几百块钱后,我竟然真的恢复了删除的微信聊天记录!