第八章 Kubernetes进阶之Volume
Volume和PersistentVolume
数据卷和持久数据卷
1.Volume
kubernetes中的Volume提供了容器中挂载外部存储的能力
Pod需要设置卷来源(spec.volume)和挂载点(spec.containers.volumeMounts)两个信息后才能使用相应的Volume
官方参考文档:https://kubernetes.io/zh/docs/concepts/services-networking/ingress/
emptyDir
创建一个空卷,挂载到Pod中容器。Pod删除该卷也会被删除
应用场景:Pod容器间数据共享
示例
apiVersion: v1
kind: Pod
metadata:
  name: my-pod
spec:
  containers:
  - name: write
    image: centos
    command: ["bash","-c","for i in {1..100};do echo $i >> /data/hello;sleep 1;done"]
    volumeMounts:
      - name: data
        mountPath: /data

  - name: read
    image: centos
    command: ["bash","-c","tail -f /data/hello"]
    volumeMounts:
      - name: data
        mountPath: /data

  volumes:
  - name: data
    #创建空目录,挂载到对应容器的目录/data下
    emptyDir: {}
定义两个容器一个写入,一个读取
应用
kubectl apply -f emptydir.yaml
查看
# kubectl get pod
NAME                          READY   STATUS    RESTARTS   AGE
my-pod                        2/2     Running   0          2m20s
my-service-5575964984-zbmck   1/1     Running   0          4h46m
登录对应容器查看
kubectl exec -it my-pod -c write bash
kubectl exec -it my-pod -c read bash
查看是否在write写入,在read可以读取
tail -f /data/hello
也可以不登录容器直接查看read日志
kubectl logs my-pod -c read -f
在日志收集章节也会使用到该数据卷模式
hostPath
挂载Node文件系统上文件或者目录到Pod中容器
应用场景:Pod容器需要访问宿主机文件
示例
# cat hostpath.yaml
apiVersion: v1
kind: Pod
metadata:
  name: my-pod
spec:
  containers:
  - name: busybox
    image: busybox
    args:
    - /bin/sh
    - -c
    - sleep 36000
    volumeMounts:
    - name: data
      mountPath: /data
  volumes:
  - name: data
    hostPath:
      path: /tmp
      type: Directory
查看一下该pod挂载到哪一个节点
# kubectl get pod -o wide
NAME                          READY   STATUS    RESTARTS   AGE    IP           NODE           NOMINATED NODE   READINESS GATES
my-pod                        1/1     Running   0          91s    172.17.9.3   192.168.1.65   <none>           <none>
my-service-5575964984-zbmck   1/1     Running   0          5h4m   172.17.9.2   192.168.1.65   <none>           <none>
登录容器查看
kubectl exec -it my-pod sh
在对应的node 192.168.1.65的/tmp创建文件测试
touch test
在登录的容器内查看
 # ls /data/
tes
2.PersisterVolume
以上介绍存储卷是挂载在本机上的,如果Pod重启以后宿主机可能会改变所以需要持久化需要挂载网络存储
以NFS网络存储为例 首先安装NFS,安装位置为192.168.1.61
安装参考:https://www.cnblogs.com/minseo/p/10026358.html
node端192.168.1.65 192.168.1.66也需要安装客户端用于挂载NFS
yum -y install nfs-utils
服务端配置文件
# cat /etc/exports
/data/nfs *(rw,no_root_squash)
启动nfs
systemctl restart nfs
设置nfs配置yaml文件 nfs.yaml
apiVersion: apps/v1beta1
kind: Deployment
metadata:
  name: nginx-deployment
spec:
  replicas: 3
  selector:
    matchLabels:
      app: nginx
  template:
    metadata:
      labels:
        app: nginx
    spec:
      containers:
      - name: nginx
        image: nginx
        volumeMounts:
        - name: wwwroot
          mountPath: /usr/share/nginx/html
        ports:
        - containerPort: 80

      volumes:
      - name: wwwroot
        nfs:
          server: 192.168.1.61
          path: /data/nfs
应用
kubectl apply -f nfs.yaml
查看
# kubectl get pod
NAME                                READY   STATUS    RESTARTS   AGE
my-service-5575964984-zbmck         1/1     Running   0          5h54m
nginx-deployment-759484bc6d-jb97p   1/1     Running   0          73s
nginx-deployment-759484bc6d-ml4l8   1/1     Running   0          73s
nginx-deployment-759484bc6d-t9f72   1/1     Running   0          73s
进入其中一个容器
kubectl exec -it nginx-deployment-759484bc6d-ml4l8 bash
查看目录为空
/usr/share/nginx/html
然后在nfs主机创建一个文档index.html内容是Hello World
创建一个svc对应该deployment
kubectl expose deployment nginx-deployment --port=80 --target-port=80 --type=NodePort
查看
# kubectl get svc
NAME               TYPE        CLUSTER-IP   EXTERNAL-IP   PORT(S)        AGE
kubernetes         ClusterIP   10.0.0.1     <none>        443/TCP        23h
my-service         NodePort    10.0.0.130   <none>        80:42291/TCP   5h59m
nginx-deployment   NodePort    10.0.0.42    <none>        80:37946/TCP   3s
页面访问测试

使用其他pod挂载该数据会一直存在,不会因为Pod挂掉重启而丢失
使用glusterfs作为pv
NFS是单点存储可能会出现单点故障,可以使用分布式glusterfs作为存储
参考:https://github.com/kubernetes/examples/tree/master/volumes/glusterfs
需要先配置glusterfs分布式存储
安装glusterfs参考https://www.cnblogs.com/minseo/p/6919421.html
本次已经安装glusterfs节点为192.168.1.61和192.168.1.62挂载点为/gv1
下载yaml文件
# cat glusterfs-endpoints.yaml
apiVersion: v1
kind: Endpoints
metadata:
  name: glusterfs-cluster
subsets:
- addresses:
  #glusterfs节点,端口自定义
  #glusterfs-service.yaml需要配置此端口
  - ip: 192.168.1.61
  ports:
  - port: 1
- addresses:
  - ip: 192.168.1.62
  ports:
  - port: 1
# cat glusterfs-service.yaml
apiVersion: v1
kind: Service
metadata:
  name: glusterfs-cluster
spec:
  ports:
  - port: 1
# cat glusterfs-pod.yaml
apiVersion: v1
kind: Pod
metadata:
  name: glusterfs
spec:
  containers:
  - name: glusterfs
    image: nginx
    volumeMounts:
    - mountPath: "/mnt/glusterfs"
      name: glusterfsvol
  volumes:
  - name: glusterfsvol
    #创建的卷类型是glusterfs
    glusterfs:
      endpoints: glusterfs-cluster
      #创建glusterfs定义的卷名本次为gv1
      path: gv1
      readOnly: true
创建
kubectl apply -f .
查看创建的ep pod svc
# kubectl get ep,pod,svc
NAME                          ENDPOINTS                       AGE
endpoints/glusterfs-cluster   192.168.1.61:1,192.168.1.62:1   48m
endpoints/kubernetes          192.168.1.63:6443               12d
NAME                                        READY   STATUS    RESTARTS   AGE
pod/glusterfs                               1/1     Running   0          42m

NAME                        TYPE        CLUSTER-IP   EXTERNAL-IP   PORT(S)   AGE
service/glusterfs-cluster   ClusterIP   10.0.0.158   <none>        1/TCP     47m
登录容器查看
# kubectl exec -it glusterfs bash
#容器内挂载目录是/mnt/glusterfs/
cd /mnt/glusterfs/
#查看该目录下的文件和glusterfs对应目录文件是一致
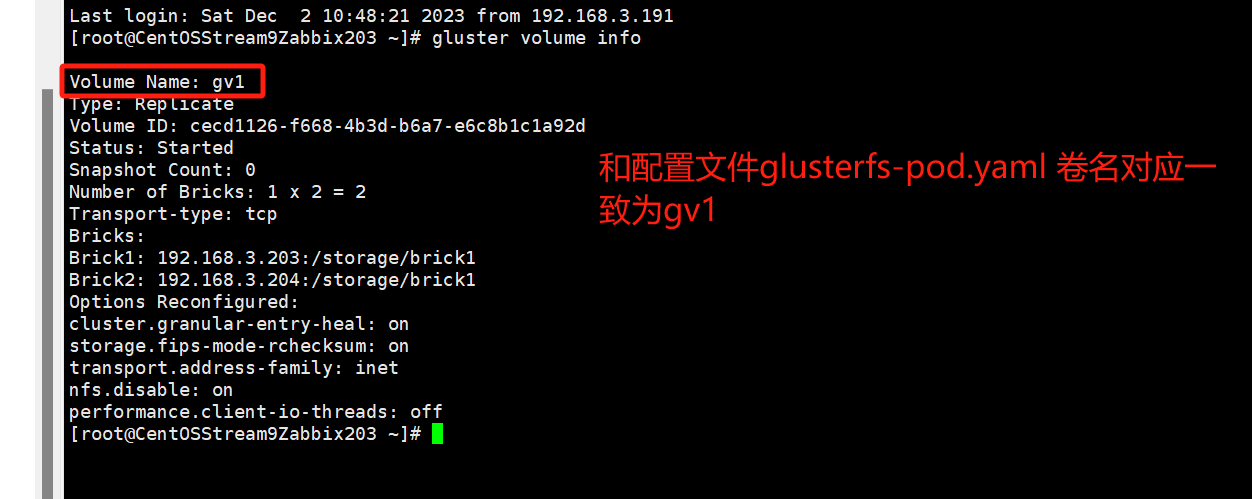
注意:使用gluster作为卷挂载需要事先在gluster上面创建好对应的卷例如本例已经创建好卷名为gv1在glusterfs主机上可以使用以下命令查看
# gluster volume info

Volume Name: gv1
Type: Replicate
Volume ID: cecd1126-f668-4b3d-b6a7-e6c8b1c1a92d
Status: Started
Snapshot Count: 0
Number of Bricks: 1 x 2 = 2
Transport-type: tcp
Bricks:
Brick1: 192.168.3.203:/storage/brick1
Brick2: 192.168.3.204:/storage/brick1
Options Reconfigured:
cluster.granular-entry-heal: on
storage.fips-mode-rchecksum: on
transport.address-family: inet
nfs.disable: on
performance.client-io-threads: off
使用NFS或者Gluster作为存储如果后台挂载较多需要多次创建配置文件和创建卷,生产环境最好使用动态供给方式,下面介绍动态供给
3.PersisterVolume动态供给
nfs动态供给
前提条件:部署好NFS服务器
部署NFS服务器参考:https://www.cnblogs.com/minseo/p/10026358.html
下载NFS动态供给yaml配置文件
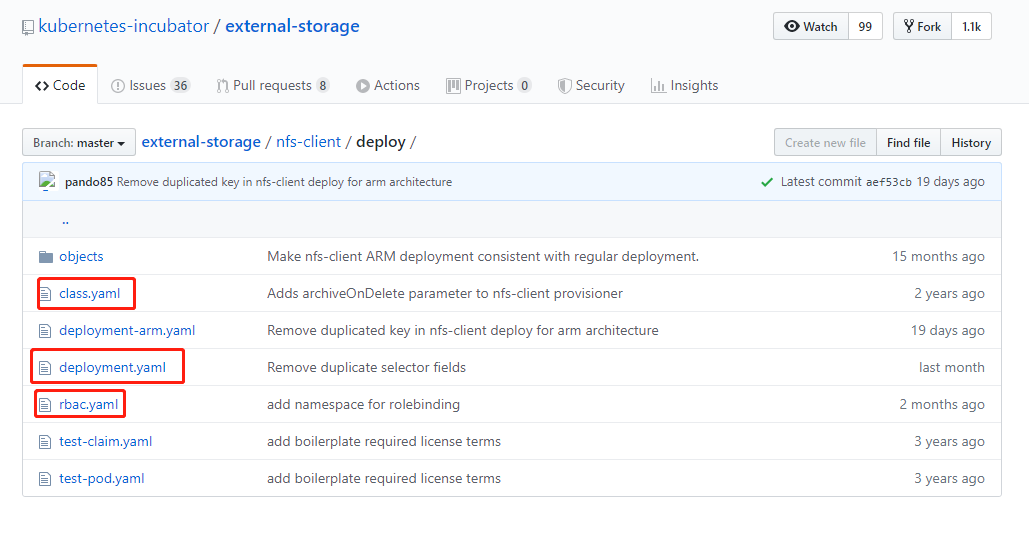
下载地址https://github.com/kubernetes-incubator/external-storage/tree/master/nfs-client/deploy
下载一下3个yaml配置文件
# cat class.yaml
apiVersion: storage.k8s.io/v1
kind: StorageClass
metadata:
  #应用使用哪一个class创建PV
  name: managed-nfs-storage
provisioner: fuseim.pri/ifs # or choose another name, must match deployment's env PROVISIONER_NAME'
parameters:
  archiveOnDelete: "false"
# cat rbac.yaml
apiVersion: v1
kind: ServiceAccount
metadata:
  name: nfs-client-provisioner
  # replace with namespace where provisioner is deployed
  namespace: default
---
kind: ClusterRole
apiVersion: rbac.authorization.k8s.io/v1
metadata:
  name: nfs-client-provisioner-runner
rules:
  - apiGroups: [""]
    resources: ["persistentvolumes"]
    verbs: ["get", "list", "watch", "create", "delete"]
  - apiGroups: [""]
    resources: ["persistentvolumeclaims"]
    verbs: ["get", "list", "watch", "update"]
  - apiGroups: ["storage.k8s.io"]
    resources: ["storageclasses"]
    verbs: ["get", "list", "watch"]
  - apiGroups: [""]
    resources: ["events"]
    verbs: ["create", "update", "patch"]
---
kind: ClusterRoleBinding
apiVersion: rbac.authorization.k8s.io/v1
metadata:
  name: run-nfs-client-provisioner
subjects:
  - kind: ServiceAccount
    name: nfs-client-provisioner
    # replace with namespace where provisioner is deployed
    namespace: default
roleRef:
  kind: ClusterRole
  name: nfs-client-provisioner-runner
  apiGroup: rbac.authorization.k8s.io
---
kind: Role
apiVersion: rbac.authorization.k8s.io/v1
metadata:
  name: leader-locking-nfs-client-provisioner
  # replace with namespace where provisioner is deployed
  namespace: default
rules:
  - apiGroups: [""]
    resources: ["endpoints"]
    verbs: ["get", "list", "watch", "create", "update", "patch"]
---
kind: RoleBinding
apiVersion: rbac.authorization.k8s.io/v1
metadata:
  name: leader-locking-nfs-client-provisioner
  # replace with namespace where provisioner is deployed
  namespace: default
subjects:
  - kind: ServiceAccount
    name: nfs-client-provisioner
    # replace with namespace where provisioner is deployed
    namespace: default
roleRef:
  kind: Role
  name: leader-locking-nfs-client-provisioner
  apiGroup: rbac.authorization.k8s.io
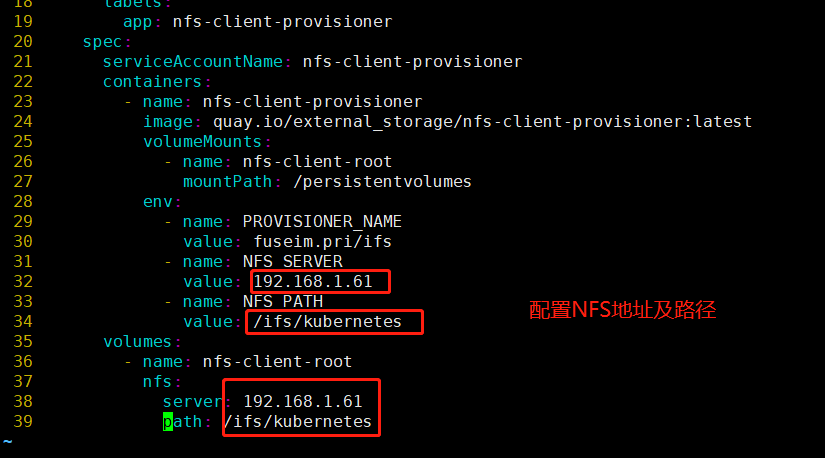
delpoyment.yaml需要修改配置nfs地址及路径
# cat deployment.yaml
apiVersion: apps/v1
kind: Deployment
metadata:
  name: nfs-client-provisioner
  labels:
    app: nfs-client-provisioner
  # replace with namespace where provisioner is deployed
  namespace: default
spec:
  replicas: 1
  strategy:
    type: Recreate
  selector:
    matchLabels:
      app: nfs-client-provisioner
  template:
    metadata:
      labels:
        app: nfs-client-provisioner
    spec:
      serviceAccountName: nfs-client-provisioner
      containers:
        - name: nfs-client-provisioner
          image: quay.io/external_storage/nfs-client-provisioner:latest
          volumeMounts:
            - name: nfs-client-root
              mountPath: /persistentvolumes
          env:
            - name: PROVISIONER_NAME
              value: fuseim.pri/ifs
            - name: NFS_SERVER
              value: 192.168.1.61
            - name: NFS_PATH
              value: /ifs/kubernetes
      volumes:
        - name: nfs-client-root
          nfs:
            server: 192.168.1.61
            path: /ifs/kubernetes
2024-05-16补充开始
故障现象,把docker从24版本升级至26版本之后从客户端pull nfs-client-provisioner镜像时报错报错信息如下
# docker pull quay.io/external_storage/nfs-client-provisioner:latest
latest: Pulling from external_storage/nfs-client-provisioner
[DEPRECATION NOTICE] Docker Image Format v1 and Docker Image manifest version 2, schema 1 support is disabled by default and will be removed in an upcoming release. Suggest the author of quay.io/external_storage/nfs-client-provisioner:latest to upgrade the image to the OCI Format or Docker Image manifest v2, schema 2. More information at https://docs.docker.com/go/deprecated-image-specs/

版本升级原因
解决方法,在老版本的docker下pull该镜像或者是在已经有该镜像的主机打个tag然后push到私有镜像仓库harbor然后从harbor下载
# 打一个tag如果push到私有镜像仓库
# docker tag quay.io/external_storage/nfs-client-provisioner:latest 192.168.3.61/foundation/nfs-client-provisioner
# docker push 192.168.3.61/foundation/nfs-client-provisioner
修改deployment把镜像修改成私有镜像即可正常pull
2024-05-16补充结束
创建
# kubectl apply -f .
storageclass.storage.k8s.io/managed-nfs-storage created
deployment.apps/nfs-client-provisioner created
serviceaccount/nfs-client-provisioner created
clusterrole.rbac.authorization.k8s.io/nfs-client-provisioner-runner created
clusterrolebinding.rbac.authorization.k8s.io/run-nfs-client-provisioner created
role.rbac.authorization.k8s.io/leader-locking-nfs-client-provisioner created
rolebinding.rbac.authorization.k8s.io/leader-locking-nfs-client-provisioner created
查看创建的pod和deploy
# kubectl get pod
NAME                                    READY   STATUS    RESTARTS   AGE
nfs-client-provisioner-7db87779-bcn6j   1/1     Running   0          92s
[root@localhost nfs]# kubectl get deploy
NAME                     READY   UP-TO-DATE   AVAILABLE   AGE
nfs-client-provisioner   1/1     1            1           95s
查看创建的 storageclass名为managed-nfs-storage
# kubectl get storageclass
NAME                  PROVISIONER      RECLAIMPOLICY   VOLUMEBINDINGMODE   ALLOWVOLUMEEXPANSION   AGE
managed-nfs-storage   fuseim.pri/ifs   Delete          Immediate           false                  2m21s
创建PVC
# cat test-claim.yaml
apiVersion: v1
#创建pvc名称为test-claim
kind: PersistentVolumeClaim
metadata:
  name: test-claim
spec:
  #ReadWriteMany可读写并且可以被多个节点使用
  #ReadWriteOnce只能被一个节点使用
  #ReadOnlyMany可以被多个节点读取
  accessModes:
    - ReadWriteMany
  #对应的storageClass名
  storageClassName: "managed-nfs-storage"
  #定义动态分配存储空间大小为10M
  resources:
    requests:
      storage: 10Mi
# kubectl apply -f test-claim.yaml
persistentvolumeclaim/test-claim created
查看创建的pvc
# kubectl get pvc
NAME             STATUS   VOLUME                                     CAPACITY   ACCESS MODES   STORAGECLASS          AGE
test-claim       Bound    pvc-6de65f62-e92f-4a44-85f2-271637e45ce9   10Mi       RWX            managed-nfs-storage   38s
2024-08-26补充开始
针对k8s 1.25版本创建pvc一直处于Pending状态
查看pod报错如下
# kubectl logs -f nfs-client-provisioner-789689bb64-567wk
E0826 03:40:41.589011       1 controller.go:1004] provision "default/test-claim" class "managed-nfs-storage": unexpected error getting claim reference: selfLink was empty, can't make reference
原因1.20版本以后删除该参数
修改配置的方法无法解决该问题
/etc/kubernetes/manifests/kube-apiserver.yaml
解决方法:修改deployment配置文件使用新镜像
image: groundhog2k/nfs-subdir-external-provisioner:v3.2.0

2024-08-26补充结束
NFS服务器对应的共享目录生成一个对应pvc文件夹

创建一个Pod挂载对应的pvc
# cat test-pod.yaml
kind: Pod
apiVersion: v1
metadata:
  name: test-pod
spec:
  containers:
  - name: test-pod
    image: busybox:1.24
    command:
      - "/bin/sh"
    args:
      - "-c"
      - "touch /mnt/SUCCESS && exit 0 || exit 1"
    volumeMounts:
      - name: nfs-pvc
        mountPath: "/mnt"
  restartPolicy: "Never"
  volumes:
    - name: nfs-pvc
      persistentVolumeClaim:
        # 创建卷对应的pvc为上一步创建的pvc名称需对应一致本次为test-claim
        claimName: test-claim
# kubectl apply -f test-pod.yaml
pod/test-pod created
该Pod把对应的pvc挂载在容器目录/mnt并且在该目录创建一个文件SUCCESS,执行完毕处于 Completed状态

在NFS服务器对应目录可以看到创建的文件SUCESS
测试其他Pod挂载
# cat test-pod2.yaml
apiVersion: v1
kind: Pod
metadata:
  name: test-pod2
spec:
  containers:
  - name: nginx
    image: nginx
    volumeMounts:
      - name: nfs-pvc
        mountPath: "/mnt"
  volumes:
    - name: nfs-pvc
      persistentVolumeClaim:
        claimName: test-claim
# kubectl apply -f test-pod2.yaml
pod/test-pod2 created
登录pod查看目录
# kubectl exec -it test-pod2 bash
root@test-pod2:/# ls /mnt
SUCCESS
该Pod挂载的pvc也是test-claim所以对应目录的文件是一样的
glusterfs动态供给
参考:https://www.cnblogs.com/minseo/p/12575604.html

 浙公网安备 33010602011771号