

FastDFS数据迁移
参考:https://blog.csdn.net/frvxh/article/details/56293502
FastDFS安装配置参考:https://www.cnblogs.com/minseo/p/10210428.html
环境介绍
1 2 3 4 5 | 需要同步的tracker:192.168.56.11需要同步的storage:192.168.56.12新的tracker:192.168.56.21新的storage:192.168.56.22 |
停止storage进程
1 | systemctl stop fdfs_storaged |
修改storage配置/etc/fdfs/storage.conf
1 2 3 4 5 6 7 8 9 10 11 12 13 14 15 16 17 18 19 20 21 22 23 24 25 26 27 28 29 30 31 32 33 34 35 36 37 38 39 40 41 42 43 44 45 46 47 48 49 50 51 52 53 54 55 56 | disabled=falsegroup_name=group1bind_addr=192.168.56.22client_bind=trueport=23000connect_timeout=90network_timeout=90heart_beat_interval=90stat_report_interval=60base_path=/opt/fdfsdata/storagemax_connections=256buff_size = 256KBaccept_threads=1work_threads=4disk_rw_separated = truedisk_reader_threads = 1disk_writer_threads = 1sync_wait_msec=50sync_interval=0sync_start_time=00:00sync_end_time=23:59write_mark_file_freq=500store_path_count=1store_path0=/opt/fdfsdata/storagesubdir_count_per_path=256tracker_server=192.168.56.11:22122 #仅仅需要修改此行指向旧的trackerlog_level=inforun_by_group=run_by_user=allow_hosts=*file_distribute_path_mode=0file_distribute_rotate_count=100fsync_after_written_bytes=0sync_log_buff_interval=10sync_binlog_buff_interval=10sync_stat_file_interval=300thread_stack_size=512KBupload_priority=10if_alias_prefix=check_file_duplicate=0file_signature_method=hashkey_namespace=FastDFSkeep_alive=0use_access_log = falserotate_access_log = falseaccess_log_rotate_time=00:00rotate_error_log = falseerror_log_rotate_time=00:00rotate_access_log_size = 0rotate_error_log_size = 0log_file_keep_days = 0file_sync_skip_invalid_record=falseuse_connection_pool = falseconnection_pool_max_idle_time = 3600http.domain_name=http.server_port=80 |
启动storage
1 | systemctl start fdfs_storaged |
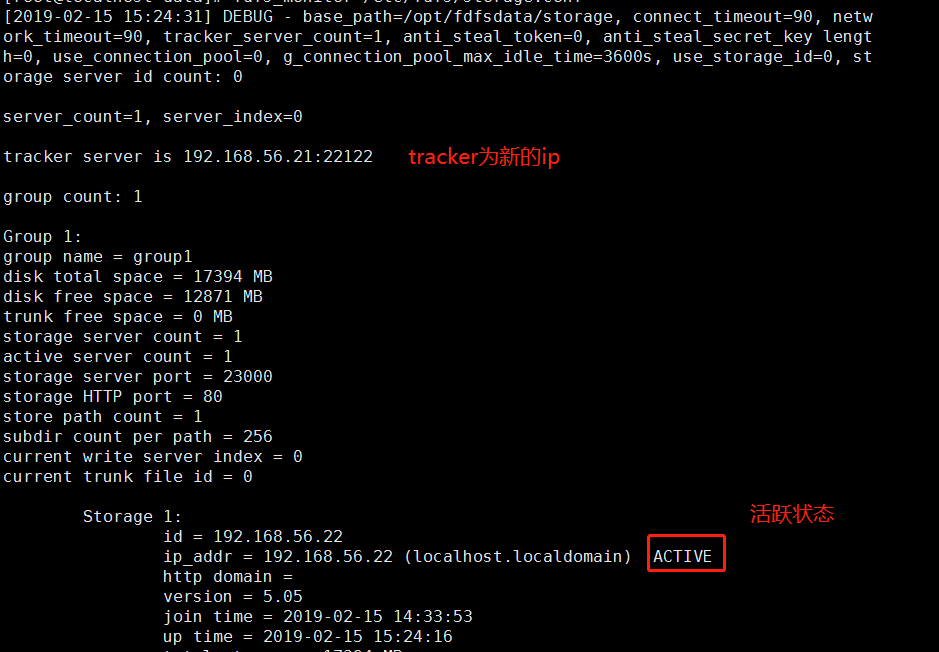
此时数据会同步,查看同步过程 提示ACTIVE则代表同步完成
1 | fdfs_monitor /etc/fdfs/storage.conf |

同步之前在旧的上面上传了一个文件 目录为/opt/fdfsdata/storage/data/00/00
同步完成后在新的storage服务器上面相同目录有相同文件

同步完成后修改配置文件/etc/fdfs/storage.conf仅需要修改一行指向新的tracker服务器
1 | tracker_server=192.168.56.21:22122 |
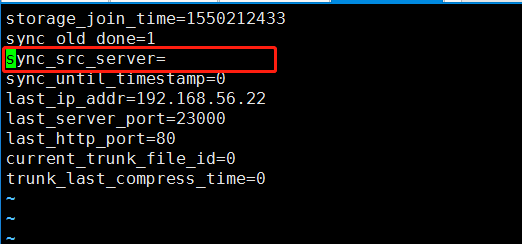
进入storage文件目录修改
1 2 3 | cd /opt/fdfsdata/storage/datavim .data_init_flag sync_src_server= #留空即可 |
重启storage
1 | systemctl restart fdfs_storaged |
web页面验证
1 | http://192.168.56.22/group1/M00/00/00/wKg4DFxmZ4SAbxeYAAAABelE2rQ516.txt |

fastdfs数据同步完成


【推荐】国内首个AI IDE,深度理解中文开发场景,立即下载体验Trae
【推荐】编程新体验,更懂你的AI,立即体验豆包MarsCode编程助手
【推荐】抖音旗下AI助手豆包,你的智能百科全书,全免费不限次数
【推荐】轻量又高性能的 SSH 工具 IShell:AI 加持,快人一步
· SQL Server 2025 AI相关能力初探
· Linux系列:如何用 C#调用 C方法造成内存泄露
· AI与.NET技术实操系列(二):开始使用ML.NET
· 记一次.NET内存居高不下排查解决与启示
· 探究高空视频全景AR技术的实现原理
· 阿里最新开源QwQ-32B,效果媲美deepseek-r1满血版,部署成本又又又降低了!
· AI编程工具终极对决:字节Trae VS Cursor,谁才是开发者新宠?
· 开源Multi-agent AI智能体框架aevatar.ai,欢迎大家贡献代码
· Manus重磅发布:全球首款通用AI代理技术深度解析与实战指南
· 被坑几百块钱后,我竟然真的恢复了删除的微信聊天记录!