FastDFS分布式文件系统
一,FastDFS介绍
1,简介
FastDFS 是一个开源的高性能分布式文件系统(DFS)。 它的主要功能包括:文件存储,文件同步和文件访问,以及高容量和负载平衡。主要解决了海量数据存储问题,特别适合以中小文件(建议范围:4KB < file_size <500MB)为载体的在线服务。
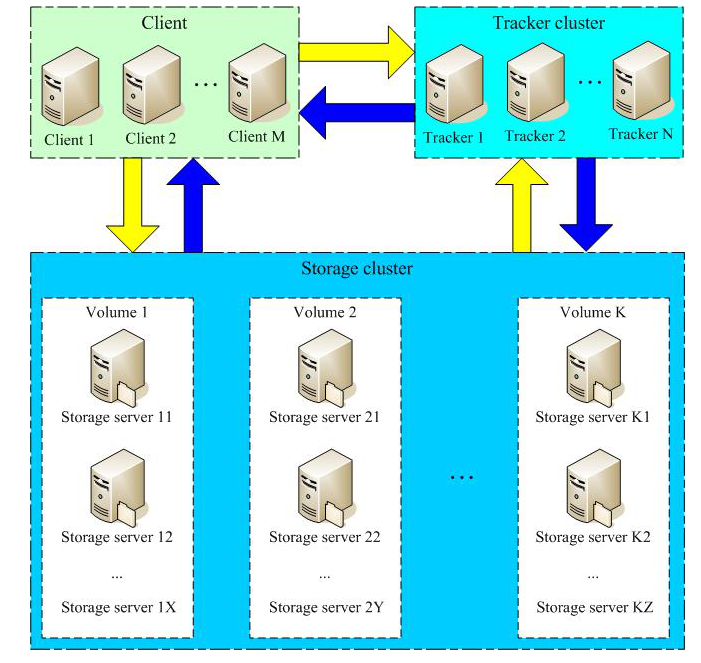
FastDFS 系统有三个角色:跟踪服务器(Tracker Server)、存储服务器(Storage Server)和客户端(Client)。
Tracker Server:跟踪服务器,主要做调度工作,起到均衡的作用;负责管理所有的 storage server和 group,每个 storage 在启动后会连接 Tracker,告知自己所属 group 等信息,并保持周期性心跳。
Storage Server:存储服务器,主要提供容量和备份服务;以 group 为单位,每个 group 内可以有多台 storage server,数据互为备份。
Client:客户端,上传下载数据的服务器,也就是我们自己的项目所部署在的服务器。
2,FastDFS的存储策略
为了支持大容量,存储节点(服务器)采用了分卷(或分组)的组织方式。存储系统由一个或多个卷组成,卷与卷之间的文件是相互独立的,所有卷的文件容量累加就是整个存储系统中的文件容量。一个卷可以由一台或多台存储服务器组成,一个卷下的存储服务器中的文件都是相同的,卷中的多台存储服务器起到了冗余备份和负载均衡的作用。
在卷中增加服务器时,同步已有的文件由系统自动完成,同步完成后,系统自动将新增服务器切换到线上提供服务。当存储空间不足或即将耗尽时,可以动态添加卷。只需要增加一台或多台服务器,并将它们配置为一个新的卷,这样就扩大了存储系统的容量。
3,FastDFS的上传过程
FastDFS向使用者提供基本文件访问接口,比如upload、download、append、delete等,以客户端库的方式提供给用户使用。
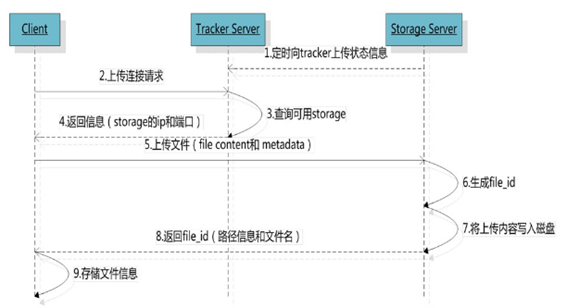
Storage Server会定期的向Tracker Server发送自己的存储信息。当Tracker Server Cluster中的Tracker Server不止一个时,各个Tracker之间的关系是对等的,所以客户端上传时可以选择任意一个Tracker。
当Tracker收到客户端上传文件的请求时,会为该文件分配一个可以存储文件的group,当选定了group后就要决定给客户端分配group中的哪一个storage server。当分配好storage server后,客户端向storage发送写文件请求,storage将会为文件分配一个数据存储目录。然后为文件分配一个fileid,最后根据以上的信息生成文件名存储文件。
4,FastDFS的文件同步
写文件时,客户端将文件写至group内一个storage server即认为写文件成功,storage server写完文件后,会由后台线程将文件同步至同group内其他的storage server。
每个storage写文件后,同时会写一份binlog,binlog里不包含文件数据,只包含文件名等元信息,这份binlog用于后台同步,storage会记录向group内其他storage同步的进度,以便重启后能接上次的进度继续同步;进度以时间戳的方式进行记录,所以最好能保证集群内所有server的时钟保持同步。
storage的同步进度会作为元数据的一部分汇报到tracker上,tracke在选择读storage的时候会以同步进度作为参考。
5,FastDFS文件下载
客户端uploadfile成功后,会拿到一个storage生成的文件名,接下来客户端根据这个文件名即可访问到该文件。

跟upload file一样,在downloadfile时客户端可以选择任意tracker server。tracker发送download请求给某个tracker,必须带上文件名信息,tracke从文件名中解析出文件的group、大小、创建时间等信息,然后为该请求选择一个storage用来服务读请求。
二,安装FastDFS
安装环境查看

主机规划
主机名:fastdfs-tracker IP:192.168.56.11
主机名:fastdfs-storage IP:192.168.56.12
修改/eth/hosts
192.168.56.11 fastdfs.com
1,下载安装libfastcommon
libfastcommon是从 FastDFS 和 FastDHT 中提取出来的公共 C 函数库,基础环境,安装即可 。
下载,两台主机都执行相同的安装步骤
wget https://github.com/happyfish100/libfastcommon/archive/V1.0.7.tar.gz
安装
tar -xf V1.0.7.tar.gz
cd libfastcommon-1.0.7/
./make.sh
yum -y install gcc-c++
./make.sh
./make.sh install
libfastcommon.so 安装到了/usr/lib64/libfastcommon.so,但是FastDFS主程序设置的lib目录是/usr/local/lib,所以需要创建软链接
下载安装FastDFS
wget https://github.com/happyfish100/fastdfs/archive/V5.05.tar.gz
tar -xf V5.05.tar.gz
cd fastdfs-5.05/
./make.sh && ./make.sh  install
安装完成后的启动脚本
/etc/init.d/fdfs_storaged
/etc/init.d/fdfs_trackerd
默认配置文件

命令工具在/usr/bin
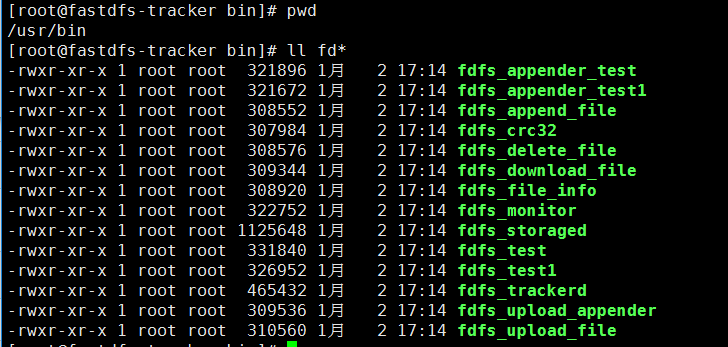
FastDFS脚本服务设置的bin目录是/usr/local/bin但是实际安装在/usr/bin下设置软连接
ln -s /usr/bin/fdfs_trackerd /usr/local/bin/
ln -s /usr/bin/fdfs_storaged /usr/local/bin/
ln -s /usr/bin/stop.sh /usr/local/bin/
ln -s /usr/bin/restart.sh /usr/local/bin/
配置FastDFS跟踪器(Tracker)
cd /etc/fdfs/
cp tracker.conf.sample tracker.conf
vim tracker.conf
编辑配置文档
#配置文件是否不生效,false为生效
disabled=false
#配置IP也可以为代表所有
bind_addr=192.168.56.11
#监听端口
port=22122
connect_timeout=90
network_timeout=90
base_path=/opt/fdfsdata/tracker
max_connections=256
accept_threads=4
work_threads=4
store_lookup=2
#store_group=group1
store_group=0
store_server=0
store_path=0
download_server=0
reserved_storage_space = 10%
log_level=info
run_by_group=
run_by_user=
allow_hosts=*
sync_log_buff_interval = 10
check_active_interval = 120
thread_stack_size = 64KB
storage_ip_changed_auto_adjust = true
storage_sync_file_max_delay = 86400
storage_sync_file_max_time = 300
use_trunk_file = false
slot_min_size = 256
slot_max_size = 16MB
trunk_file_size = 64MB
trunk_create_file_advance = false
trunk_create_file_time_base = 02:00
trunk_create_file_interval = 86400
trunk_create_file_space_threshold = 20G
trunk_init_check_occupying = false
trunk_init_reload_from_binlog = false
trunk_compress_binlog_min_interval = 0
use_storage_id = false
storage_ids_filename = storage_ids.conf
id_type_in_filename = ip
store_slave_file_use_link = false
rotate_error_log = false
error_log_rotate_time=00:00
rotate_error_log_size = 0
log_file_keep_days = 0
use_connection_pool = false
connection_pool_max_idle_time = 3600
#配置http服务端口
http.server_port=80
http.check_alive_interval=90
http.check_alive_type=tcp
http.check_alive_uri=/status.html
创建tracker基础数据目录,即base_path对应的目录
mkdir -p /opt/fdfsdata/tracker
防火墙开启对应端口,这里我们把防火墙关闭
启动tracker
初次成功启动,会在 /ljzsg/fdfsdfs/tracker/ (配置的base_path)下创建 data、logs 两个目录
 /etc/init.d/fdfs_trackerd start
#也可以使用一下方式启动,前提是设置了软连接
systemctl start fdfs_trackerd

tracker server目录及文件结构
.
└── tracker
    ├── data
    │?? ├── fdfs_trackerd.pid     #存储分组信息
    │?? └── storage_changelog.dat #存储服务器列表
    └── logs
        └── trackerd.log         #tracker server日志文件
配置FastDFS存储(storage)在192.168.56.12上
cd /etc/fdfs/
cp storage.conf.sample storage.conf
vim storage.conf
编辑配置文档
#配置是否不生效,这里生效
disabled=false
#组名
group_name=group1
bind_addr=192.168.56.12
client_bind=true
#服务端口
port=23000
connect_timeout=90
network_timeout=90
heart_beat_interval=90
stat_report_interval=60
#Storage数据日志目录地址(跟目录必须存在,子目录会自动生成)
base_path=/opt/fdfsdata/storage
max_connections=256
buff_size = 256KB
accept_threads=1
work_threads=4
disk_rw_separated = true
disk_reader_threads = 1
disk_writer_threads = 1
sync_wait_msec=50
sync_interval=0
# 允许系统同步的时间段 (默认是全天) 。一般用于避免高峰同步产生一些问题而设定
sync_start_time=00:00
sync_end_time=23:59
write_mark_file_freq=500
#存放文件时 storage server 支持多个路径。这里配置存放文件的基路径数目,通常只配一个目录。
store_path_count=1
#逐一配置 store_path_count 个路径,索引号基于 0
#如果不配置 store_path0,那它就和 base_path 对应的路径一样。
store_path0=/opt/fdfsdata/storage
# FastDFS 存储文件时,采用了两级目录。这里配置存放文件的目录个数。
# 如果本参数只为 N(如: 256),那么 storage server 在初次运行时,会在 store_path 下自动创建 N * N 个存放文件的子目录。
subdir_count_per_path=256
# tracker_server 的列表 ,会主动连接 tracker_server
# 有多个 tracker server 时,每个 tracker server 写一行
tracker_server=fastdfs.com:22122
log_level=info
run_by_group=
run_by_user=
allow_hosts=*
file_distribute_path_mode=0
file_distribute_rotate_count=100
fsync_after_written_bytes=0
sync_log_buff_interval=10
sync_binlog_buff_interval=10
sync_stat_file_interval=300
thread_stack_size=512KB
upload_priority=10
if_alias_prefix=
check_file_duplicate=0
file_signature_method=hash
key_namespace=FastDFS
keep_alive=0
use_access_log = false
rotate_access_log = false
access_log_rotate_time=00:00
rotate_error_log = false
error_log_rotate_time=00:00
rotate_access_log_size = 0
rotate_error_log_size = 0
log_file_keep_days = 0
file_sync_skip_invalid_record=false
use_connection_pool = false
connection_pool_max_idle_time = 3600
http.domain_name=
#访问端口
http.server_port=80
创建storage基础数据目录,对应base_path目录
mkdir /opt/fdfsdata/storage -p
启动
etc/init.d/fdfs_storaged start
以后已这种方式启动
systemctl status fdfs_storaged
查看是否已启动

查看storage和tracker是否在通信
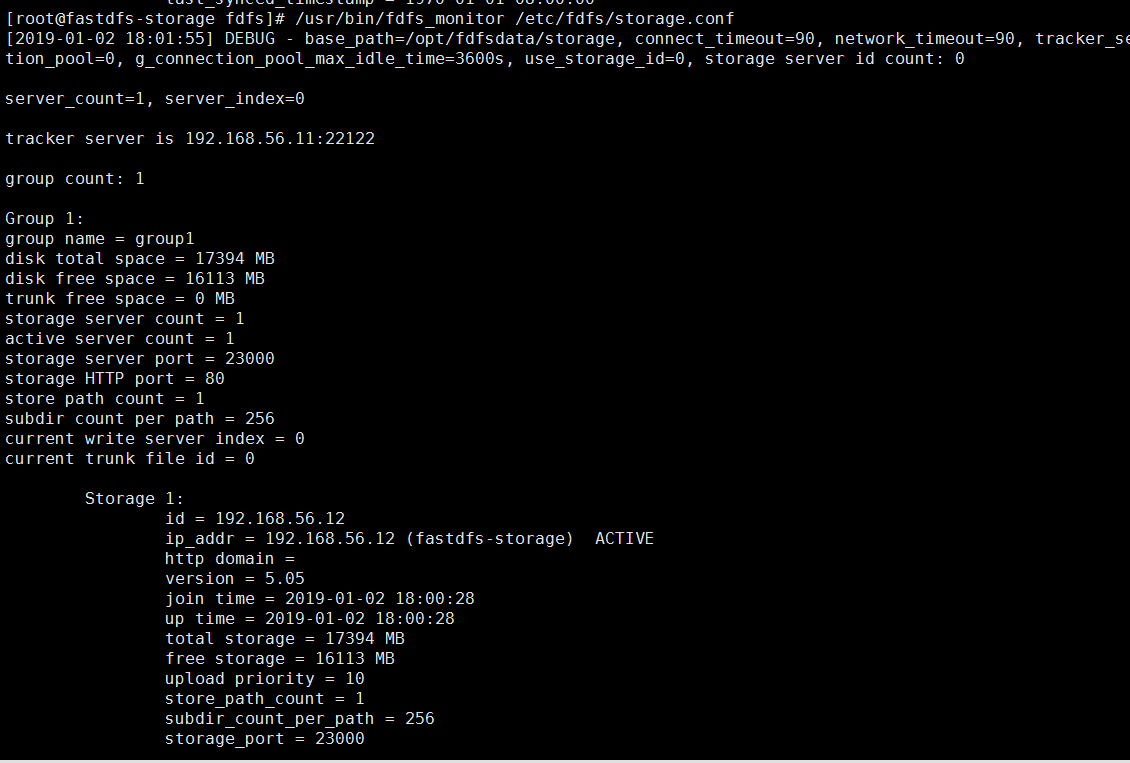
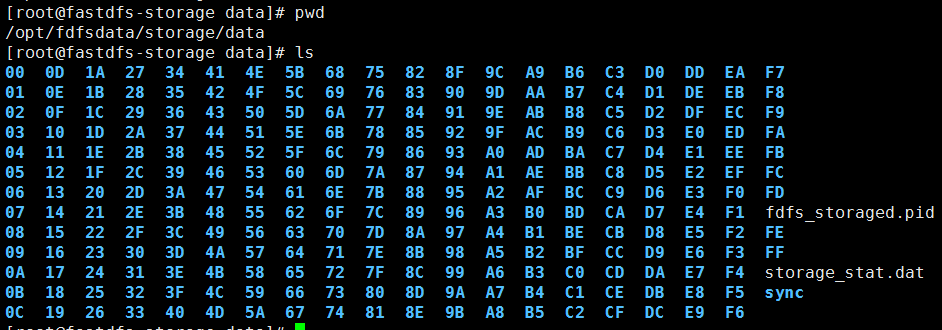
同tracker storage启动成功后在base_path下创建了data,logs目录记录storage server信息
在store_path0目录(这里同base_path目录)下创建了N*N个子目录
文件上传测试
修改tracker服务器中的客户端配置文件
cd /etc/fdfs/
cp client.conf.sample client.conf
vim client.conf
connect_timeout=30
network_timeout=60
#client的数据和日志记录
base_path=/opt/fastdfsdata/client
#tracker端口
tracker_server=fastdfs.com:22122
log_level=info
use_connection_pool = false
connection_pool_max_idle_time = 3600
load_fdfs_parameters_from_tracker=false
use_storage_id = false
storage_ids_filename = storage_ids.conf
http.tracker_server_port=80
上传测试
/usr/bin/fdfs_upload_file /etc/fdfs/client.conf namei.jpeg

返回的文件ID由group、存储目录、两级子目录、fileid、文件后缀名(由客户端指定,主要用于区分文件类型)拼接而成。

PS:以上上传为默认的端口23000如果配置了多个storage,需要上传到不同的storage需要在上传的时候指定对应storage的端口
/usr/bin/fdfs_upload_file /etc/fdfs/client.conf test.txt 192.168.56.11:23001
三,安装Nginx
上面将文件上传成功了,但我们无法下载。因此安装Nginx作为服务器以支持Http方式访问文件。同时,后面安装FastDFS的Nginx模块也需要Nginx环境。
Nginx只需要安装到StorageServer所在的服务器即可,用于访问文件。我这里由于是单机,TrackerServer和StorageServer在一台服务器上。
yum -y install gcc-c++ pcre pcre-devel
yum -y install gcc-c++ pcre pcre-devel zlib zlib-devel
wget -c https://nginx.org/download/nginx-1.12.1.tar.gz
tar -xf nginx-1.12.1.tar.gz
cd nginx-1.12.1
./configure --prefix=/usr/local/nginx
make && make install
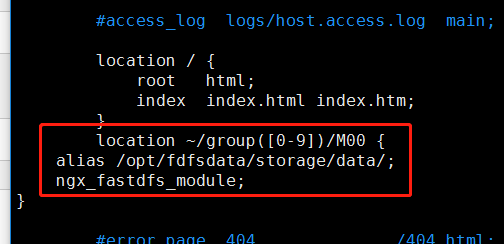
修改配置文件添加一下内容
location /group1/M00 {
    alias /opt/fdfsdata/storage/data/;
}

重启nginx
/usr/local/nginx/sbin/nginx -s reload
访问测试
http://192.168.56.12/group1/M00/00/00/wKg4DFwsjoKAXmKhAACwm4S3uBc21.jpeg
四,FastDFS配置Nginx模块
fastdfs-nginx-module模块说明
FastDFS 通过 Tracker 服务器,将文件放在 Storage 服务器存储, 但是同组存储服务器之间需要进行文件复制, 有同步延迟的问题。
假设 Tracker 服务器将文件上传到了 192.168.51.128,上传成功后文件 ID已经返回给客户端。
此时 FastDFS 存储集群机制会将这个文件同步到同组存储 192.168.51.129,在文件还没有复制完成的情况下,客户端如果用这个文件 ID 在 192.168.51.129 上取文件,就会出现文件无法访问的错误。
而 fastdfs-nginx-module 可以重定向文件链接到源服务器取文件,避免客户端由于复制延迟导致的文件无法访问错误。
下载fastdfs-nginx-module解压
wget https://github.com/happyfish100/fastdfs-nginx-module/archive/5e5f3566bbfa57418b5506aaefbe107a42c9fcb1.zip
unzip 5e5f3566bbfa57418b5506aaefbe107a42c9fcb1.zip
重新编译nginx
cd nginx-1.12.1
./configure --prefix=/usr/local/nginx/ --add-module=/nas/softs/fastdfs/fastdfs-nginx-module/src/
make && make install

复制 fastdfs-nginx-module 源码中的配置文件到/etc/fdfs 目录, 并修改
cd /nas/softs/fastdfs/fastdfs-nginx-module/src
cp mod_fastdfs.conf /etc/fdfs/
修改配置
#连接超时
connect_timeout=10
network_timeout=30
base_path=/tmp
load_fdfs_parameters_from_tracker=true
storage_sync_file_max_delay = 86400
use_storage_id = false
storage_ids_filename = storage_ids.conf
#设置tracker服务器
tracker_server=192.168.56.11:22122
#设置storage端口
storage_server_port=23000
group_name=group1
#如果文件ID的uri中包含/group**,则要设置为true
url_have_group_name = true
store_path_count=1
#Storage 配置的store_path0路径,必须和storage.conf中的一致
store_path0=/opt/fdfsdata/storage
log_level=info
log_filename=
response_mode=proxy
if_alias_prefix=
flv_support = true
flv_extension = flv
group_count = 0
复制FastDFS部分配置文件到/etc/fdfs目录
cd /nas/softs/fastdfs/fastdfs-5.05/conf/
cp anti-steal.jpg http.conf mime.types /etc/fdfs/
修改nginx配置文件添加模块
location ~/group([0-9])/M00 {
    alias /opt/fdfsdata/storage/data/;
    ngx_fastdfs_module;
}
注意:
listen 80 端口值是要与 /etc/fdfs/storage.conf 中的 http.server_port=80 (前面改成80了)相对应。如果改成其它端口,则需要统一,同时在防火墙中打开该端口。
location 的配置,如果有多个group则配置location ~/group([0-9])/M00 ,没有则不用配group。
启动nginx出现以下代表配置成功

在地址栏访问
http://192.168.56.12/group1/M00/00/00/wKg4DFwsjoKAXmKhAACwm4S3uBc21.jpeg
能下载文件就算安装成功。注意和第三点中直接使用nginx路由访问不同的是,这里配置 fastdfs-nginx-module 模块,可以重定向文件链接到源服务器取文件。
设置多个storage
在实际工作中往往需要多个storage下面配置生成secret和public两个storage
secret的fdfs配置
cat /etc/fdfs/secret.conf
disabled=false
group_name=secret
bind_addr=
client_bind=true
port=23001
connect_timeout=90
network_timeout=90
heart_beat_interval=90
stat_report_interval=60
base_path=/opt/fastdfsdata/secret
max_connections=256
buff_size = 256KB
accept_threads=1
work_threads=4
disk_rw_separated = true
disk_reader_threads = 1
disk_writer_threads = 1
sync_wait_msec=50
sync_interval=0
sync_start_time=00:00
sync_end_time=23:59
write_mark_file_freq=500
store_path_count=1
store_path0=/opt/fastdfsdata/secret
subdir_count_per_path=256
tracker_server=192.168.1.227:22122
log_level=info
run_by_group=
run_by_user=
allow_hosts=*
file_distribute_path_mode=0
file_distribute_rotate_count=100
fsync_after_written_bytes=0
sync_log_buff_interval=10
sync_binlog_buff_interval=10
sync_stat_file_interval=300
thread_stack_size=512KB
upload_priority=10
if_alias_prefix=
check_file_duplicate=0
file_signature_method=hash
key_namespace=FastDFS
keep_alive=0
use_access_log = false
rotate_access_log = false
access_log_rotate_time=00:00
rotate_error_log = false
error_log_rotate_time=00:00
rotate_access_log_size = 0
rotate_error_log_size = 0
log_file_keep_days = 0
file_sync_skip_invalid_record=false
use_connection_pool = false
connection_pool_max_idle_time = 3600
http.domain_name=
http.server_port=8081
public的fdfs配置
disabled=false
group_name=public
bind_addr=
client_bind=true
port=23002
connect_timeout=90
network_timeout=90
heart_beat_interval=90
stat_report_interval=60
base_path=/opt/fastdfsdata/public
max_connections=256
buff_size = 256KB
accept_threads=1
work_threads=4
disk_rw_separated = true
disk_reader_threads = 1
disk_writer_threads = 1
sync_wait_msec=50
sync_interval=0
sync_start_time=00:00
sync_end_time=23:59
write_mark_file_freq=500
store_path_count=1
store_path0=/opt/fastdfsdata/public
#store_path1=/opt/fastdfsdata/public/M01
subdir_count_per_path=256
tracker_server=192.168.1.227:22122
log_level=info
run_by_group=
run_by_user=
allow_hosts=*
file_distribute_path_mode=0
file_distribute_rotate_count=100
fsync_after_written_bytes=0
sync_log_buff_interval=10
sync_binlog_buff_interval=10
sync_stat_file_interval=300
thread_stack_size=512KB
upload_priority=10
if_alias_prefix=
check_file_duplicate=0
file_signature_method=hash
key_namespace=FastDFS
keep_alive=0
use_access_log = false
rotate_access_log = false
access_log_rotate_time=00:00
rotate_error_log = false
error_log_rotate_time=00:00
rotate_access_log_size = 0
rotate_error_log_size = 0
log_file_keep_days = 0
file_sync_skip_invalid_record=false
use_connection_pool = false
connection_pool_max_idle_time = 3600
http.domain_name=
http.server_port=8082
启动
/usr/local/bin/fdfs_storaged /etc/fdfs/public.conf
/usr/local/bin/fdfs_storaged /etc/fdfs/secret.conf
其中secret配置的http端口是8081 storage端口是23001 public配置的http端口是8082 storage端口是23002
修改配置文件
cat /etc/fdfs/mod_fastdfs.conf
#include http.conf
connect_timeout=2
network_timeout=30
storage_sync_file_max_delay = 86400
tracker_server=192.168.1.227:22122
load_fdfs_parameters_from_tracker=true
log_level=info
log_filename=/var/log/mod.log
url_have_group_name=true
response_mode=redirect
if_alias_prefix=
flv_support = true
flv_extension = flv
group_count = 3
[group1]
group_name=group1
storage_server_port=23000
store_path_count=1
store_path0=/opt/fdfsdata/storage
#base_path=/opt/fastdfsdata/fastdfs_nginx
[group2]
group_name=secret
storage_server_port=23001
store_path_count=1
store_path0=/opt/fastdfsdata/secret
[group3]
group_name=public
storage_server_port=23002
store_path_count=1
store_path0=/opt/fastdfsdata/public
#store_path1=/opt/fastdfsdata/public/M01
注意:如果有多个组需要配置[gropu1][group2]并且需要安装顺序配置不能跳过例如不能配置[group1]和[gropu3]如果这样配置了nginx的错误日志会报以下错误
[2020-05-18 16:00:26] ERROR - file: /root/fastdfs-nginx-module/src//common.c, line: 103, section: group2, you must set parameter: group_name!
2020/05/18 16:00:26 [alert] 9086#9086: worker process 9087 exited with fatal code 2 and cannot be respawned
修nginx添加两个server配置
# cat /usr/local/nginx/conf/conf.d/secret.conf
server {
        listen       8081;
        server_name  localhost;
        access_log  logs/host.access.log  main;
        location / {
            root   html;
            index  index.html index.htm;
        }
        error_page   500 502 503 504  /50x.html;
        location = /50x.html {
            root   html;
        }

        location ~/secret/M00 {
            root /opt/fastdfsdata/secret/data;
            ngx_fastdfs_module;
         }
    }
# cat /usr/local/nginx/conf/conf.d/public.conf
server {
        listen       8082;
        server_name  localhost;
        access_log  logs/public.log;
        error_log  logs/public.err;

        location ~/public/M00 {
            root /opt/fastdfsdata/public/data;
            ngx_fastdfs_module;
            add_header Access-Control-Allow-Origin *;
            add_header Access-Control-Allow-Methods 'GET, POST, OPTIONS';
            add_header Access-Control-Allow-Credentials: true;
            add_header Access-Control-Allow-Headers 'DNT,X-Mx-ReqToken,Keep-Alive,User-Agent,X-Requested-With,If-Modified-Since,Cache-Control,Content-Type,Authorization';
            proxy_set_header X-Real-IP $remote_addr;
         }
       #location ~/public/M01 {
       #     root /opt/fastdfsdata/public/M01/data;
       #     ngx_fastdfs_module;
       #     add_header Access-Control-Allow-Origin *;
       #     add_header Access-Control-Allow-Methods 'GET, POST, OPTIONS';
       #     add_header Access-Control-Allow-Credentials: true;
       #     add_header Access-Control-Allow-Headers 'DNT,X-Mx-ReqToken,Keep-Alive,User-Agent,X-Requested-With,If-Modified-Since,Cache-Control,Content-Type,Authorization';
       #  }

    }
重启nginx
上传及访问测试,注意上传和访问的端口号
secret
# fdfs_upload_file /etc/fdfs/client.conf test.txt 192.168.1.228:23001
secret/M00/00/00/wKgB5F7CRNWAKjrrAAAABelE2rQ621.txt
[root@localhost ~]# curl 192.168.1.228:8081/secret/M00/00/00/wKgB5F7CRNWAKjrrAAAABelE2rQ621.txt
test
public
# fdfs_upload_file /etc/fdfs/client.conf test.txt 192.168.1.228:23002
public/M00/00/00/wKgB5F7CRQCAKSKGAAAABelE2rQ860.txt
[root@localhost ~]# curl 192.168.1.228:8082/public/M00/00/00/wKgB5F7CRQCAKSKGAAAABelE2rQ860.txt
test
注意:如果 /etc/fdfs/mod_fastdfs.conf配置错误会导致nginx错误日志报以下错误,会导致访问nginx没有任何反应
ERROR - file: ../common/fdfs_http_shared.c, line: 148, param "http.mime_types_filename" not exist or is empty
2020/05/18 15:46:09 [alert] 8960#8960: worker process 8961 exited with fatal code 2 and cannot be respawned

 浙公网安备 33010602011771号