Linux监控
第三十次课 Linux监控
目录
一、 Linux监控平台介绍
二、 zabbix监控介绍
三、 安装zabbix
四、 忘记Admin密码如何做
五、 主动模式和被动模式
六、 添加监控主机
七、 添加自定义模板
八、 处理图形中的乱码
九、 自动发现
十、 添加自定义监控项目
十一、 配置邮件告警
十二、 测试告警
十三、 不发邮件的问题处理
十四、 扩展
一、 Linux监控平台介绍
常见开源监控方案有cacti、nagios、zabbix、smokeping、open-falcon等
cacti、smokeping偏向于基础监控,成图非常漂亮
cacti、nagios、zabbix服务端监控中心,需要php环境支持,其中zabbix和cacti都需要mysql作为数据存储,nagios不用存储历史数据,注重服务或者监控项的状态,zabbix会获取服务或者监控项目的数据,会把数据记录到数据库里,从而可以成图.
open-falcon为小米公司开发,开源后受到诸多大公司和运维工程师的追捧,适合大企业,滴滴、360、新浪微博、京东等大公司在使用这款监控软件,值得研究
二、 zabbix监控介绍
Zabbix 是一个企业级的分布式开源监控方案。
Zabbix是一款能够监控各种网络参数以及服务器健康性和完整性的软件。Zabbix使用灵活的通知机制,允许用户为几乎任何事件配置基于邮件的告警。这样可以快速反馈服务器的问题。基于已存储的数据,Zabbix提供了出色的报告和数据可视化功能。这些功能使得Zabbix成为容量规划的理想方案。
Zabbix支持主动轮询和被动捕获。Zabbix所有的报告、统计信息和配置参数都可以通过基于Web的前端页面进行访问。基于Web的前端页面可以确保您从任何方面评估您的网络状态和服务器的健康性。适当的配置后,Zabbix可以在IT基础架构监控方面扮演重要的角色。对于只有少量服务器的小型组织和拥有大量服务器的大型公司也同样如此。
Zabbix是免费的。Zabbix是根据GPL通用公共许可证第2版编写和发行的。这意味着它的源代码都是免费发行的,可供公众任意使用。
C/S架构,基于C++开发,监控中心支持web界面配置和管理,单server节点可以支持上万台客户端
最新版本3.4,官方文档https://www.zabbix.com/documentation/3.4/zh/manual
5个组件
zabbix-server 监控中心,接收客户端上报信息,负责配置、统计、操作数据
数据库存储 存放数据,比如mysql
web界面 也叫web UI,在web界面下操作配置是zabbix简单易用的主要原因
zabbix-proxy 可选组件,它可以代替zabbix-server的功能,减轻server的压力
zabbix-agent 客户端软件,负责采集各个监控服务或项目的数据,并上报
zabbix监控流程
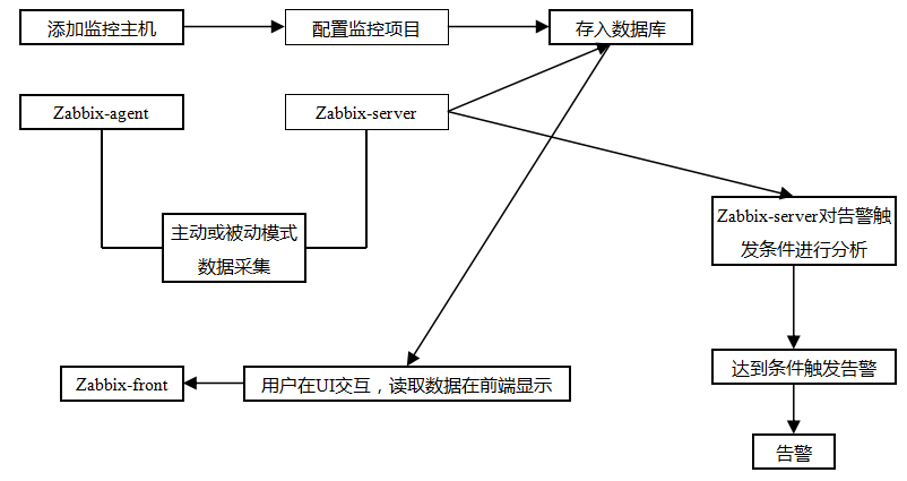
三、 安装zabbix
1.配置zabbix下载源
进入https://www.zabbix.com/download?zabbix=3.2&os_distribution=centos&os_version=7&db=MySQL
按提示操作
[root@zabbix-server ~]# rpm -i http://repo.zabbix.com/zabbix/3.2/rhel/7/x86_64/zabbix-release-3.2-1.el7.noarch.rpm
warning: /var/tmp/rpm-tmp.aMjxcE: Header V4 RSA/SHA512 Signature, key ID a14fe591: NOKEY
[root@zabbix-server ~]# ls -l /etc/yum.repos.d/zabbix.repo
-rw-r--r--. 1 root root 410 Sep 14  2016 /etc/yum.repos.d/zabbix.repo
2.安装mysql数据库,步骤略。
3.安装zabbix、httpd和php
ix.com; Unknown error"
[root@zabbix-server ~]# yum install -y zabbix-agent zabbix-get zabbix-server-mysql zabbix-web zabbix-web-mysql
Loaded plugins: fastestmirror
base                                                                                                | 3.6 kB  00:00:00
epel/x86_64/metalink                                                                                | 5.6 kB  00:00:00
epel                                                                                                | 3.2 kB  00:00:00
extras                                                                                              | 3.4 kB  00:00:00
updates                                                                                             | 3.4 kB  00:00:00
zabbix                                                                                              | 2.9 kB  00:00:00
zabbix-non-supported                                                                                |  951 B  00:00:00
zabbix/x86_64/primary_db                                                                            |  87 kB  00:00:01
zabbix-non-supported/x86_64/primary                                                                 | 1.6 kB  00:00:06
Determining fastest mirrors
 * base: mirrors.cn99.com
 * epel: mirrors.ustc.edu.cn
 * extras: centos.ustc.edu.cn
 * updates: centos.ustc.edu.cn
zabbix-non-supported
...中间略...

Installed:
  zabbix-agent.x86_64 0:3.2.11-1.el7   zabbix-get.x86_64 0:3.2.11-1.el7         zabbix-server-mysql.x86_64 0:3.2.11-1.el7
  zabbix-web.noarch 0:3.2.11-1.el7     zabbix-web-mysql.noarch 0:3.2.11-1.el7

Dependency Installed:
  OpenIPMI-libs.x86_64 0:2.0.23-2.el7                          OpenIPMI-modalias.x86_64 0:2.0.23-2.el7
  dejavu-fonts-common.noarch 0:2.33-6.el7                      dejavu-sans-fonts.noarch 0:2.33-6.el7
  fontpackages-filesystem.noarch 0:1.44-8.el7                  fping.x86_64 0:3.10-4.el7
  httpd.x86_64 0:2.4.6-80.el7.centos.1                         httpd-tools.x86_64 0:2.4.6-80.el7.centos.1
  iksemel.x86_64 0:1.4-2.el7.centos                            libX11.x86_64 0:1.6.5-1.el7
  libX11-common.noarch 0:1.6.5-1.el7                           libXau.x86_64 0:1.0.8-2.1.el7
  libXpm.x86_64 0:3.5.12-1.el7                                 libpng.x86_64 2:1.5.13-7.el7_2
  libxcb.x86_64 0:1.12-1.el7                                   libzip.x86_64 0:0.10.1-8.el7
  mailcap.noarch 0:2.1.41-2.el7                                net-snmp-libs.x86_64 1:5.7.2-33.el7_5.2
  php.x86_64 0:5.4.16-45.el7                                   php-bcmath.x86_64 0:5.4.16-45.el7
  php-cli.x86_64 0:5.4.16-45.el7                               php-common.x86_64 0:5.4.16-45.el7
  php-gd.x86_64 0:5.4.16-45.el7                                php-ldap.x86_64 0:5.4.16-45.el7
  php-mbstring.x86_64 0:5.4.16-45.el7                          php-mysql.x86_64 0:5.4.16-45.el7
  php-pdo.x86_64 0:5.4.16-45.el7                               php-xml.x86_64 0:5.4.16-45.el7
  t1lib.x86_64 0:5.1.2-14.el7                                  unixODBC.x86_64 0:2.3.1-11.el7

Complete!
4.在mysql数据库中新建zabbix库及执行初始化脚本
//修改/etc/my.cnf,增加如下内容
character_set_server = utf8
//初始化zabbix数据库
[root@zabbix-server ~]# mysql
Welcome to the MySQL monitor.  Commands end with ; or \g.
Your MySQL connection id is 1
Server version: 5.6.36 MySQL Community Server (GPL)

Copyright (c) 2000, 2017, Oracle and/or its affiliates. All rights reserved.

Oracle is a registered trademark of Oracle Corporation and/or its
affiliates. Other names may be trademarks of their respective
owners.

Type 'help;' or '\h' for help. Type '\c' to clear the current input statement.

mysql> create database zabbix character set utf8;

Query OK, 1 row affected (0.00 sec)

mysql> grant all on zabbix.* to 'zabbix'@'localhost' identified by '123456';
Query OK, 0 rows affected (0.00 sec)

mysql> flush privileges;
Query OK, 0 rows affected (0.00 sec)

mysql> exit
Bye

Bye
[root@zabbix-server ~]# rpm -ql zabbix-server-mysql
/etc/logrotate.d/zabbix-server
/etc/zabbix/zabbix_server.conf
/usr/lib/systemd/system/zabbix-server.service
/usr/lib/tmpfiles.d/zabbix-server.conf
/usr/lib/zabbix/alertscripts
/usr/lib/zabbix/externalscripts
/usr/sbin/zabbix_server_mysql
/usr/share/doc/zabbix-server-mysql-3.2.11
/usr/share/doc/zabbix-server-mysql-3.2.11/AUTHORS
/usr/share/doc/zabbix-server-mysql-3.2.11/COPYING
/usr/share/doc/zabbix-server-mysql-3.2.11/ChangeLog
/usr/share/doc/zabbix-server-mysql-3.2.11/NEWS
/usr/share/doc/zabbix-server-mysql-3.2.11/README
/usr/share/doc/zabbix-server-mysql-3.2.11/create.sql.gz
/usr/share/man/man8/zabbix_server.8.gz
/var/log/zabbix
/var/run/zabbix
[root@zabbix-server ~]# cd /usr/share/doc/zabbix-server-mysql-3.2.11
[root@zabbix-server zabbix-server-mysql-3.2.11]# gunzip create.sql.gz
[root@zabbix-server zabbix-server-mysql-3.2.11]# ls
AUTHORS  ChangeLog  COPYING  create.sql  NEWS  README
[root@zabbix-server zabbix-server-mysql-3.2.11]# mysql -uroot -p zabbix < create.sql
Enter password:

[root@zabbix-server zabbix-server-mysql-3.2.11]#
[root@zabbix-server zabbix-server-mysql-3.2.11]# mysql
Welcome to the MySQL monitor.  Commands end with ; or \g.
Your MySQL connection id is 3
Server version: 5.6.36 MySQL Community Server (GPL)

Copyright (c) 2000, 2017, Oracle and/or its affiliates. All rights reserved.

Oracle is a registered trademark of Oracle Corporation and/or its
affiliates. Other names may be trademarks of their respective
owners.

Type 'help;' or '\h' for help. Type '\c' to clear the current input statement.

mysql> use zabbix;
Reading table information for completion of table and column names
You can turn off this feature to get a quicker startup with -A

Database changed
mysql> show tables;
+----------------------------+
| Tables_in_zabbix           |
+----------------------------+
| acknowledges               |
| actions                    |
| alerts                     |
| application_discovery      |
| application_prototype      |
| application_template       |
| applications               |
| auditlog                   |
| auditlog_details           |
| autoreg_host               |
| conditions                 |
| config                     |
| corr_condition             |
| corr_condition_group       |
| corr_condition_tag         |
| corr_condition_tagpair     |
| corr_condition_tagvalue    |
| corr_operation             |
| correlation                |
| dbversion                  |
| dchecks                    |
| dhosts                     |
| drules                     |
| dservices                  |
| escalations                |
| event_recovery             |
| event_tag                  |
| events                     |
| expressions                |
| functions                  |
| globalmacro                |
| globalvars                 |
| graph_discovery            |
| graph_theme                |
| graphs                     |
| graphs_items               |
| group_discovery            |
| group_prototype            |
| groups                     |
| history                    |
| history_log                |
| history_str                |
| history_text               |
| history_uint               |
| host_discovery             |
| host_inventory             |
| hostmacro                  |
| hosts                      |
| hosts_groups               |
| hosts_templates            |
| housekeeper                |
| httpstep                   |
| httpstepitem               |
| httptest                   |
| httptestitem               |
| icon_map                   |
| icon_mapping               |
| ids                        |
| images                     |
| interface                  |
| interface_discovery        |
| item_application_prototype |
| item_condition             |
| item_discovery             |
| items                      |
| items_applications         |
| maintenances               |
| maintenances_groups        |
| maintenances_hosts         |
| maintenances_windows       |
| mappings                   |
| media                      |
| media_type                 |
| opcommand                  |
| opcommand_grp              |
| opcommand_hst              |
| opconditions               |
| operations                 |
| opgroup                    |
| opinventory                |
| opmessage                  |
| opmessage_grp              |
| opmessage_usr              |
| optemplate                 |
| problem                    |
| problem_tag                |
| profiles                   |
| proxy_autoreg_host         |
| proxy_dhistory             |
| proxy_history              |
| regexps                    |
| rights                     |
| screen_user                |
| screen_usrgrp              |
| screens                    |
| screens_items              |
| scripts                    |
| service_alarms             |
| services                   |
| services_links             |
| services_times             |
| sessions                   |
| slides                     |
| slideshow_user             |
| slideshow_usrgrp           |
| slideshows                 |
| sysmap_element_url         |
| sysmap_url                 |
| sysmap_user                |
| sysmap_usrgrp              |
| sysmaps                    |
| sysmaps_elements           |
| sysmaps_link_triggers      |
| sysmaps_links              |
| task                       |
| task_close_problem         |
| timeperiods                |
| trends                     |
| trends_uint                |
| trigger_depends            |
| trigger_discovery          |
| trigger_tag                |
| triggers                   |
| users                      |
| users_groups               |
| usrgrp                     |
| valuemaps                  |
+----------------------------+
127 rows in set (0.00 sec)

mysql>
5.启动http,并设为自动启动
[root@zabbix-server ~]# systemctl start httpd.service
[root@zabbix-server ~]# systemctl enable httpd.service
Created symlink from /etc/systemd/system/multi-user.target.wants/httpd.service to /usr/lib/systemd/system/httpd.service.
[root@zabbix-server ~]# lsof -i :80
COMMAND  PID   USER   FD   TYPE DEVICE SIZE/OFF NODE NAME
httpd   2698   root    4u  IPv6  29556      0t0  TCP *:http (LISTEN)
httpd   2700 apache    4u  IPv6  29556      0t0  TCP *:http (LISTEN)
httpd   2701 apache    4u  IPv6  29556      0t0  TCP *:http (LISTEN)
httpd   2702 apache    4u  IPv6  29556      0t0  TCP *:http (LISTEN)
httpd   2703 apache    4u  IPv6  29556      0t0  TCP *:http (LISTEN)
httpd   2704 apache    4u  IPv6  29556      0t0  TCP *:http (LISTEN)
6.配置zabbix
//只需配置DBPassword即可
[root@zabbix-server ~]# vim /etc/zabbix/zabbix_server.conf
//修改DBPasssword的值为之前设定的123456
DBPassword=123456
[root@zabbix-server ~]# systemctl start zabbix-server.service
//提示无法启动
Job for zabbix-server.service failed because a configured resource limit was exceeded. See "systemctl status zabbix-server.service" and "journalctl -xe" for details.
//查看日志,显示没有权限
[root@zabbix-server ~]# cat /var/log/zabbix/zabbix_server.log
  2831:20180724:220827.653 Starting Zabbix Server. Zabbix 3.2.11 (revision 76339).
  2831:20180724:220827.653 ****** Enabled features ******
  2831:20180724:220827.653 SNMP monitoring:           YES
  2831:20180724:220827.653 IPMI monitoring:           YES
  2831:20180724:220827.653 Web monitoring:            YES
  2831:20180724:220827.653 VMware monitoring:         YES
  2831:20180724:220827.653 SMTP authentication:       YES
  2831:20180724:220827.653 Jabber notifications:      YES
  2831:20180724:220827.653 Ez Texting notifications:  YES
  2831:20180724:220827.653 ODBC:                      YES
  2831:20180724:220827.653 SSH2 support:              YES
  2831:20180724:220827.653 IPv6 support:              YES
  2831:20180724:220827.654 TLS support:               YES
  2831:20180724:220827.654 ******************************
  2831:20180724:220827.654 using configuration file: /etc/zabbix/zabbix_server.conf
  2831:20180724:220827.654 cannot set resource limit: [13] Permission denied
  2831:20180724:220827.654 cannot disable core dump, exiting...
  2837:20180724:220837.804 Starting Zabbix Server. Zabbix 3.2.11 (revision 76339).
  2837:20180724:220837.804 ****** Enabled features ******
  2837:20180724:220837.804 SNMP monitoring:           YES
  2837:20180724:220837.804 IPMI monitoring:           YES
  2837:20180724:220837.804 Web monitoring:            YES
  2837:20180724:220837.804 VMware monitoring:         YES
  2837:20180724:220837.804 SMTP authentication:       YES
  2837:20180724:220837.804 Jabber notifications:      YES
  2837:20180724:220837.804 Ez Texting notifications:  YES
  2837:20180724:220837.804 ODBC:                      YES
  2837:20180724:220837.804 SSH2 support:              YES
  2837:20180724:220837.804 IPv6 support:              YES
  2837:20180724:220837.804 TLS support:               YES
  2837:20180724:220837.804 ******************************
  2837:20180724:220837.804 using configuration file: /etc/zabbix/zabbix_server.conf
  2837:20180724:220837.804 cannot set resource limit: [13] Permission denied
  2837:20180724:220837.804 cannot disable core dump, exiting...
//查看selinux状态
[root@zabbix-server ~]# getenforce
Enforcing
//临时关闭selinux,永久关闭selinux
[root@zabbix-server ~]# sed -i 's/SELINUX=enforcing/SELINUX=disabled/' /etc/selinux/config
[root@zabbix-server ~]# cat /etc/selinux/config

# This file controls the state of SELinux on the system.
# SELINUX= can take one of these three values:
#     enforcing - SELinux security policy is enforced.
#     permissive - SELinux prints warnings instead of enforcing.
#     disabled - No SELinux policy is loaded.
SELINUX=disabled
# SELINUXTYPE= can take one of three two values:
#     targeted - Targeted processes are protected,
#     minimum - Modification of targeted policy. Only selected processes are protected.
#     mls - Multi Level Security protection.
SELINUXTYPE=targeted

//再次重启zabbix-server.service,仍提示错误,查看日志
 3089:20180724:221742.303 using configuration file: /etc/zabbix/zabbix_server.conf
  3089:20180724:221742.307 [Z3001] connection to database 'zabbix' failed: [2002] Can't connect to local MySQL server through socket '/var/lib/mysql/mysql.sock' (2)
  3089:20180724:221742.307 database is down: reconnecting in 10 seconds
  3089:20180724:221752.310 [Z3001] connection to database 'zabbix' failed: [2002] Can't connect to local MySQL server through socket '/var/lib/mysql/mysql.sock' (2)
  3089:20180724:221752.310 database is down: reconnecting in 10 seconds

[root@zabbix-server ~]# mkdir /var/lib/mysql
[root@zabbix-server ~]# chown -R mysql.mysql /var/lib/mysql
[root@zabbix-server ~]# ln -s /tmp/mysql.sock /var/lib/mysql/mysql.sock
[root@zabbix-server ~]# systemctl stop zabbix-server.service
[root@zabbix-server ~]# systemctl start zabbix-server.service
[root@zabbix-server ~]# netstat -nltup

[root@zabbix-server ~]# netstat -nltup | grep :10051
tcp        0      0 0.0.0.0:10051           0.0.0.0:*               LISTEN      3316/zabbix_server
tcp6       0      0 :::10051                :::*                    LISTEN      3316/zabbix_server
7.配置zabbix-web
登录配置网页
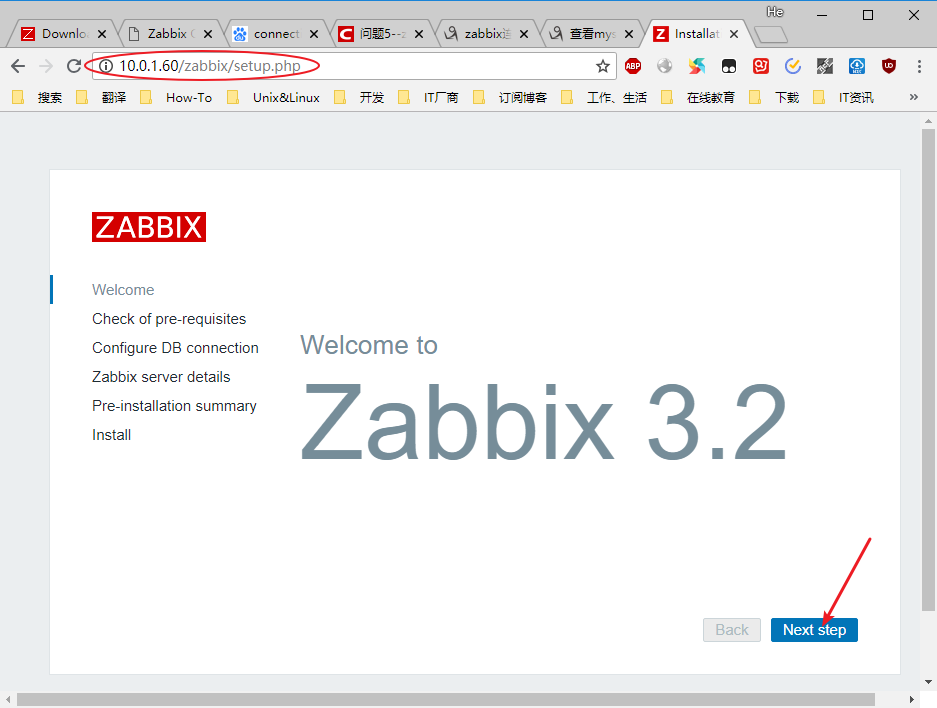
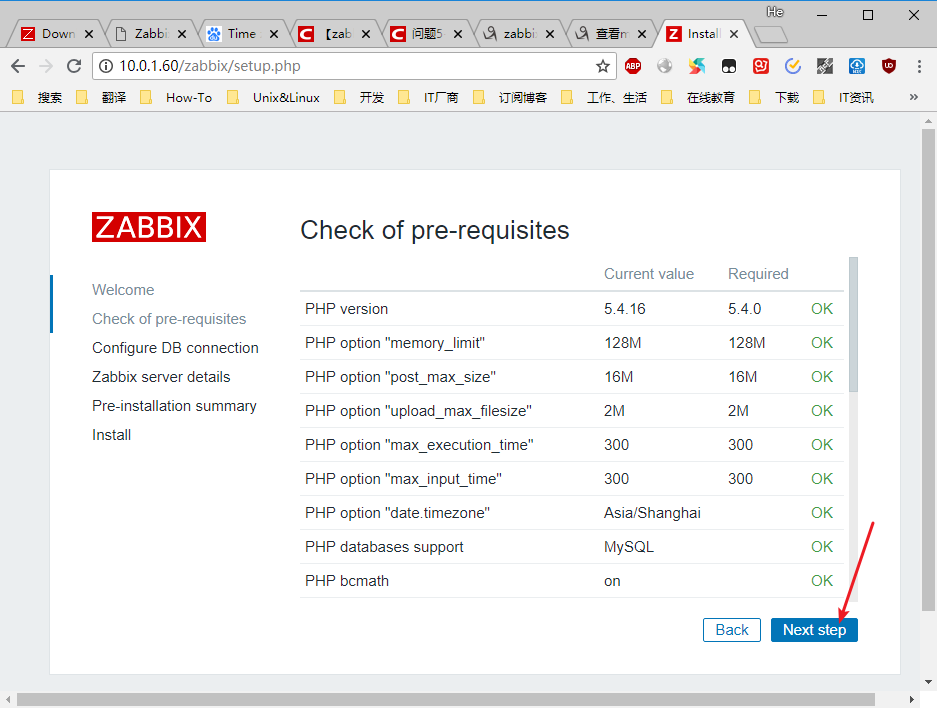
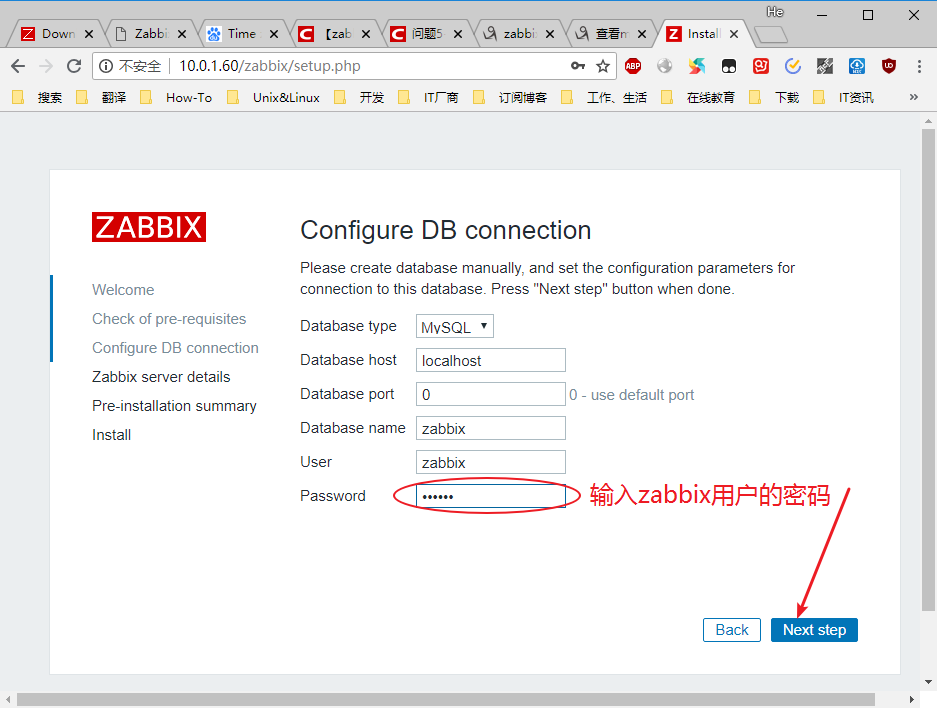
输入数据库连接信息
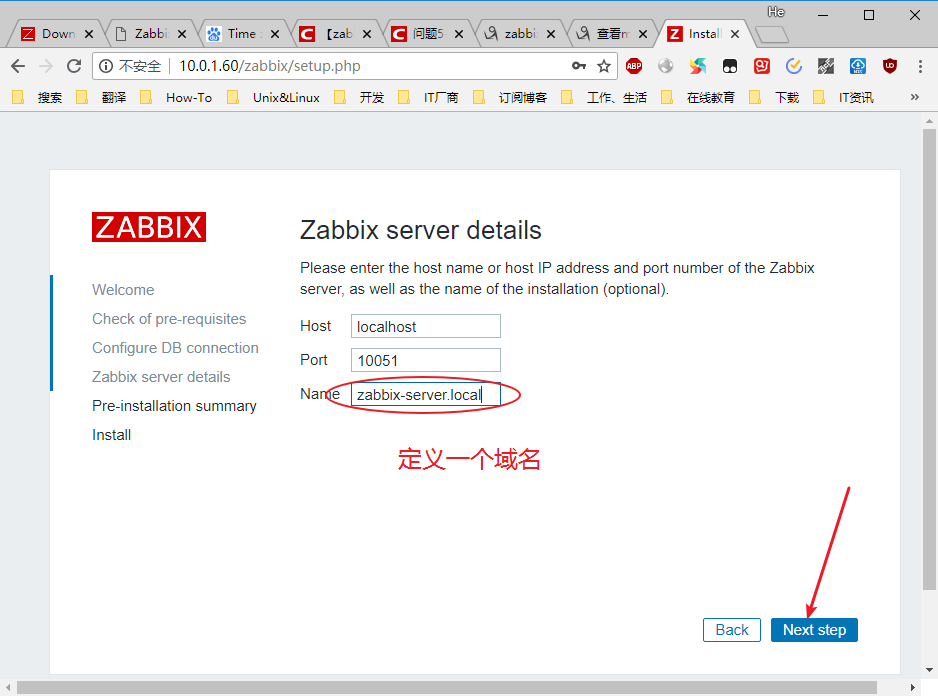
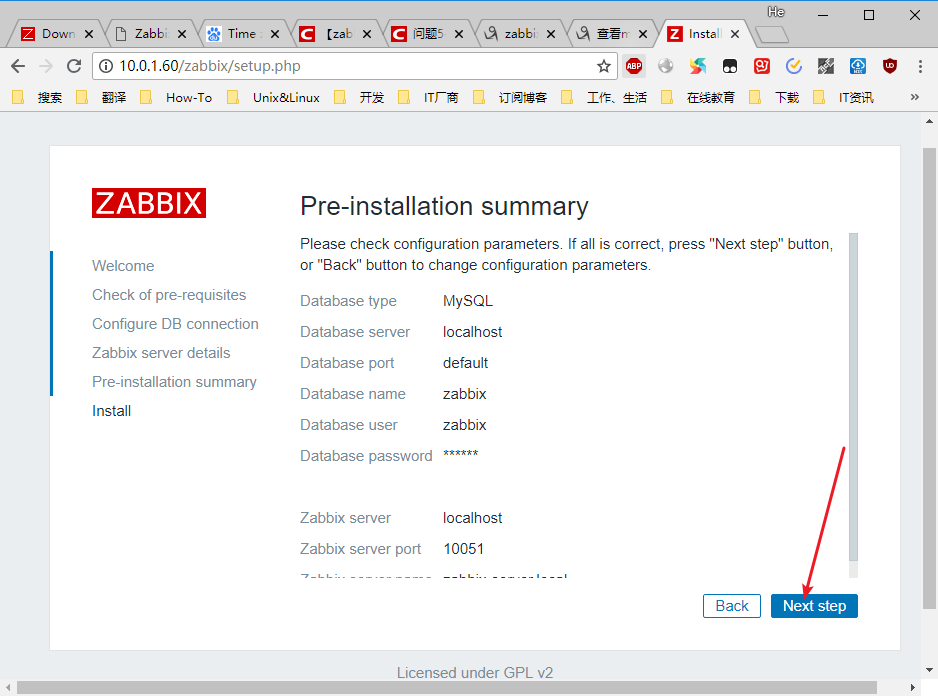
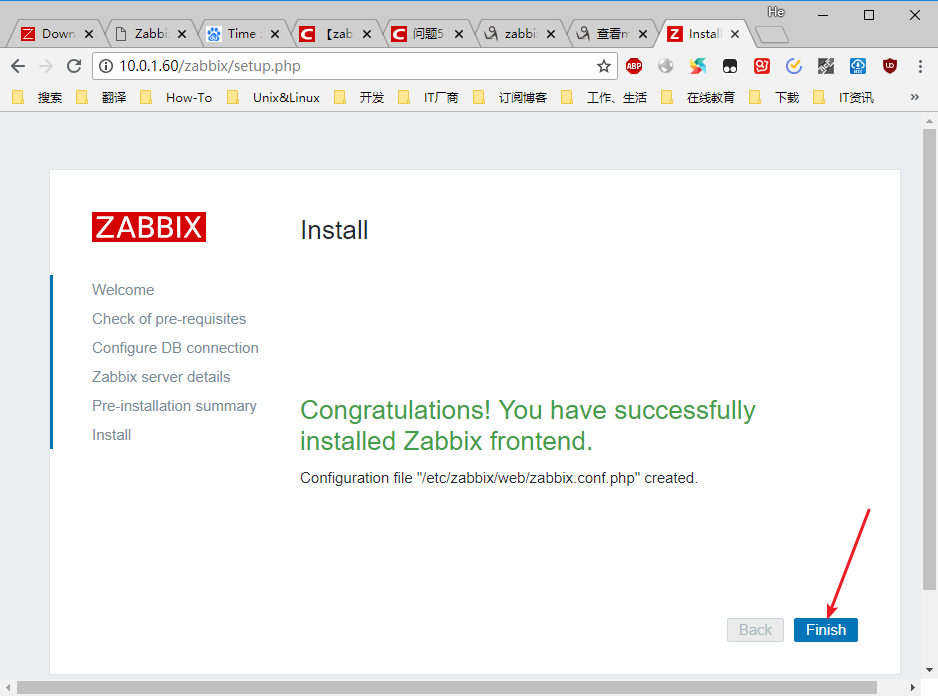
第一次登录
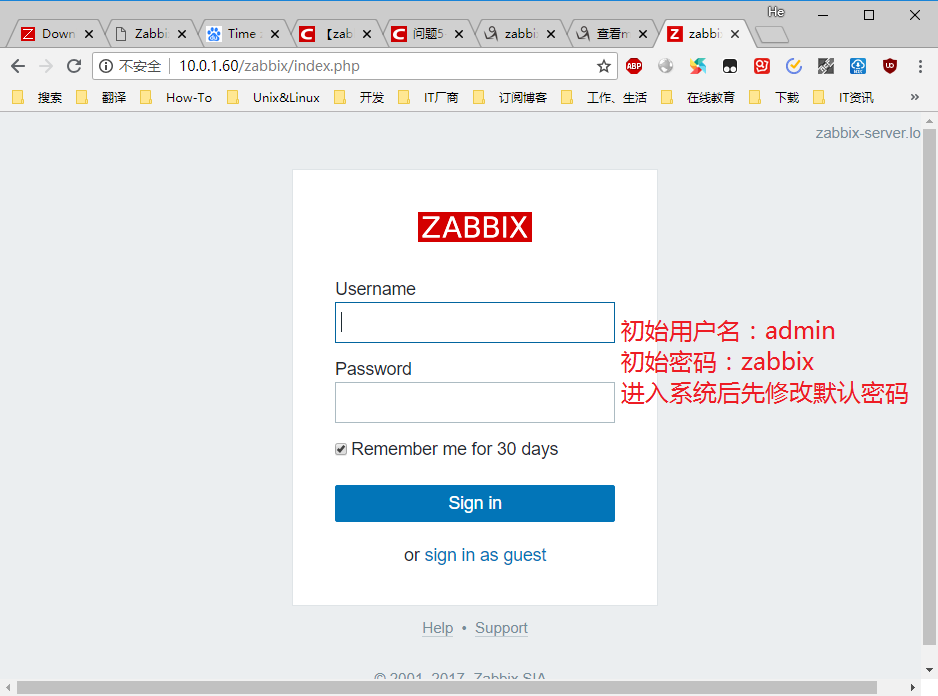
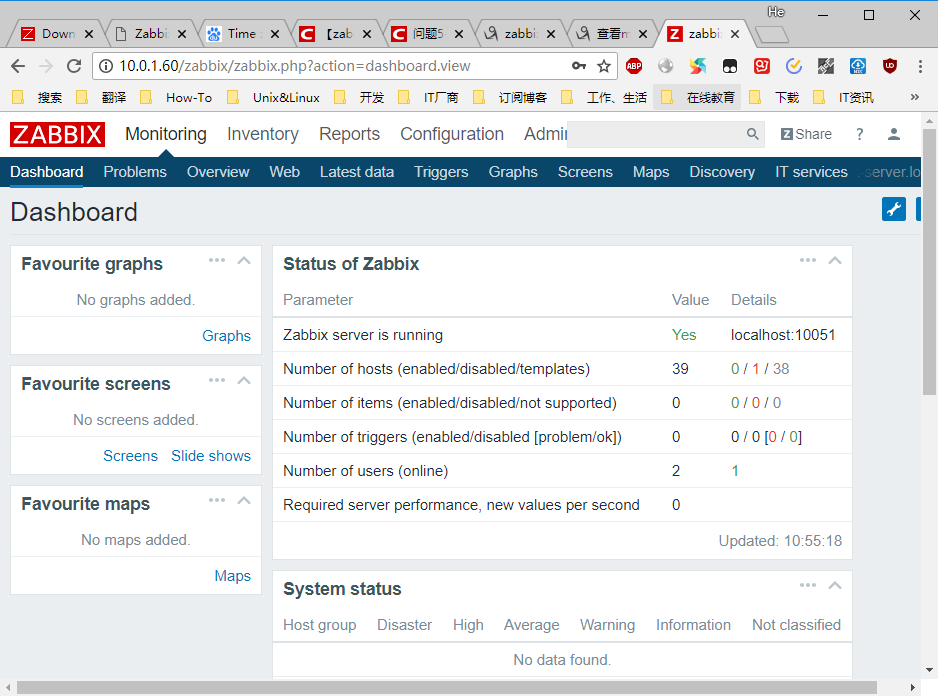
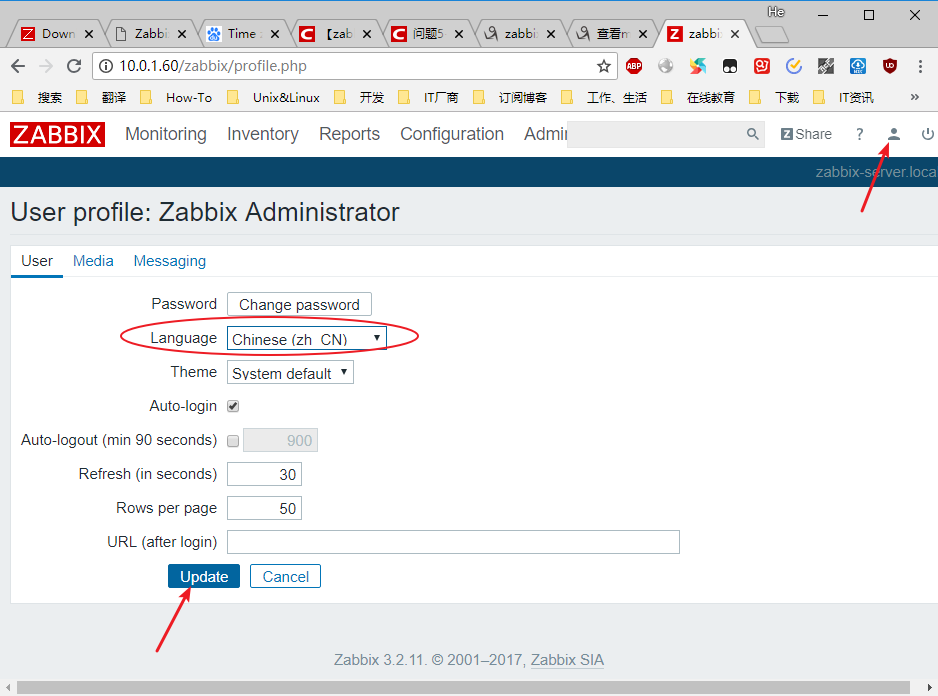
修改界面语言
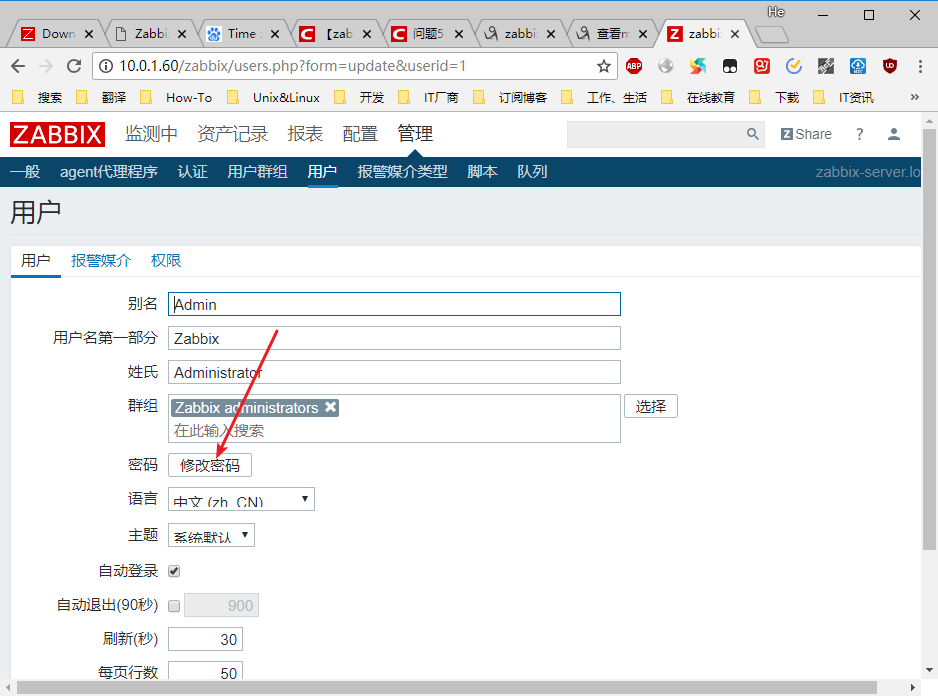
修改默认管理员密码
zabbix客户端
1.在客户端配置zabbix源
[root@zabbix-client1 ~]# rpm -i http://repo.zabbix.com/zabbix/3.2/rhel/7/x86_64/zabbix-release-3.2-1.el7.noarch.rpm
warning: /var/tmp/rpm-tmp.8ox8dZ: Header V4 RSA/SHA512 Signature, key ID a14fe591: NOKEY
[root@zabbix-client1 ~]# ls -l /etc/yum.repos.d/zabbix.repo
-rw-r--r-- 1 root root 410 Sep 14  2016 /etc/yum.repos.d/zabbix.repo
2.安装zabbix-agent,zabbix-sender
[root@zabbix-client1 ~]# yum -y install zabbix-agent zabbix-sender
Loaded plugins: fastestmirror
base                                                                                                | 3.6 kB  00:00:00
epel/x86_64/metalink                                                                                | 5.6 kB  00:00:00
epel                                                                                                | 3.2 kB  00:00:00
extras                                                                                              | 3.4 kB  00:00:00
updates                                                                                             | 3.4 kB  00:00:00
zabbix                                                                                              | 2.9 kB  00:00:00
zabbix-non-supported                                                                                |  951 B  00:00:00
(1/3): epel/x86_64/updateinfo                                                                       | 930 kB  00:00:00
(2/3): epel/x86_64/primary                                                                          | 3.5 MB  00:00:00
(3/3): zabbix/x86_64/primary_db                                                                     |  87 kB  00:00:14
zabbix-non-supported/x86_64/primary                                                                 | 1.6 kB  00:00:02
...中间略...
Warning: RPMDB altered outside of yum.
  Installing : zabbix-sender-3.2.11-1.el7.x86_64                                                                       1/2
  Installing : zabbix-agent-3.2.11-1.el7.x86_64                                                                        2/2
  Verifying  : zabbix-agent-3.2.11-1.el7.x86_64                                                                        1/2
  Verifying  : zabbix-sender-3.2.11-1.el7.x86_64                                                                       2/2

Installed:
  zabbix-agent.x86_64 0:3.2.11-1.el7                          zabbix-sender.x86_64 0:3.2.11-1.el7

Complete!
3.编译zabbix-agent配置文件
[root@zabbix-client1 ~]# vim /etc/zabbix/zabbix_agentd.conf
//在主动模式和被动模式下配置zabbix-server的地址
##### Passive checks related
Server=10.0.1.60
##### Active checks related
ServerActive=10.0.1.60
//修改
Hostname=Zabbix-client1.local

[root@zabbix-client1 ~]# systemctl status zabbix-agent.service
● zabbix-agent.service - Zabbix Agent
   Loaded: loaded (/usr/lib/systemd/system/zabbix-agent.service; disabled; vendor preset: disabled)
   Active: active (running) since Wed 2018-07-25 11:57:16 CST; 8s ago
  Process: 1865 ExecStart=/usr/sbin/zabbix_agentd -c $CONFFILE (code=exited, status=0/SUCCESS)
 Main PID: 1867 (zabbix_agentd)
   CGroup: /system.slice/zabbix-agent.service
           ├─1867 /usr/sbin/zabbix_agentd -c /etc/zabbix/zabbix_agentd.conf
           ├─1868 /usr/sbin/zabbix_agentd: collector [idle 1 sec]
           ├─1869 /usr/sbin/zabbix_agentd: listener #1 [waiting for connection]
           ├─1870 /usr/sbin/zabbix_agentd: listener #2 [waiting for connection]
           ├─1871 /usr/sbin/zabbix_agentd: listener #3 [waiting for connection]
           └─1872 /usr/sbin/zabbix_agentd: active checks #1 [idle 1 sec]

Jul 25 11:57:16 zabbix-client1 systemd[1]: Starting Zabbix Agent...
Jul 25 11:57:16 zabbix-client1 systemd[1]: Started Zabbix Agent.
[root@zabbix-client1 ~]# systemctl enable zabbix-agent.service
Created symlink from /etc/systemd/system/multi-user.target.wants/zabbix-agent.service to /usr/lib/systemd/system/zabbix-agent.service.
四、 忘记Admin密码如何做
如遗忘admin用户密码,可登录mysql后台修改其用户名密码
[root@zabbix-server ~]# mysql -uroot
Welcome to the MySQL monitor.  Commands end with ; or \g.
Your MySQL connection id is 304
Server version: 5.6.36 MySQL Community Server (GPL)

Copyright (c) 2000, 2017, Oracle and/or its affiliates. All rights reserved.

Oracle is a registered trademark of Oracle Corporation and/or its
affiliates. Other names may be trademarks of their respective
owners.

Type 'help;' or '\h' for help. Type '\c' to clear the current input statement.

mysql> use zabbix;
Reading table information for completion of table and column names
You can turn off this feature to get a quicker startup with -A

Database changed
mysql> select alias,passwd,name from users;
+-------+----------------------------------+--------+
| alias | passwd                           | name   |
+-------+----------------------------------+--------+
| Admin | 3f58ad914e9a289cb81402b47abb4c84 | Zabbix |
| guest | d41d8cd98f00b204e9800998ecf8427e |        |
+-------+----------------------------------+--------+
//newpasswd替换为新的密码即可
update users set passwd=md5(‘newpasswd’) where alias=‘Admin’;
五、 主动模式和被动模式
主动或者被动是相对于zabbix-agent来讲的
被动模式,服务端会主动连接客户端获取监控项目数据,客户端被动地接受连接,并把监控信息传递给服务端
主动模式,客户端会主动把监控数据汇报给服务端,服务端只负责接收即可。
当客户端数量非常多时,建议使用主动模式,这样可以降低服务端的压力。
服务端有公网ip,客户端只有内网ip,但却能连外网,这种场景适合主动模式
六、 添加监控主机
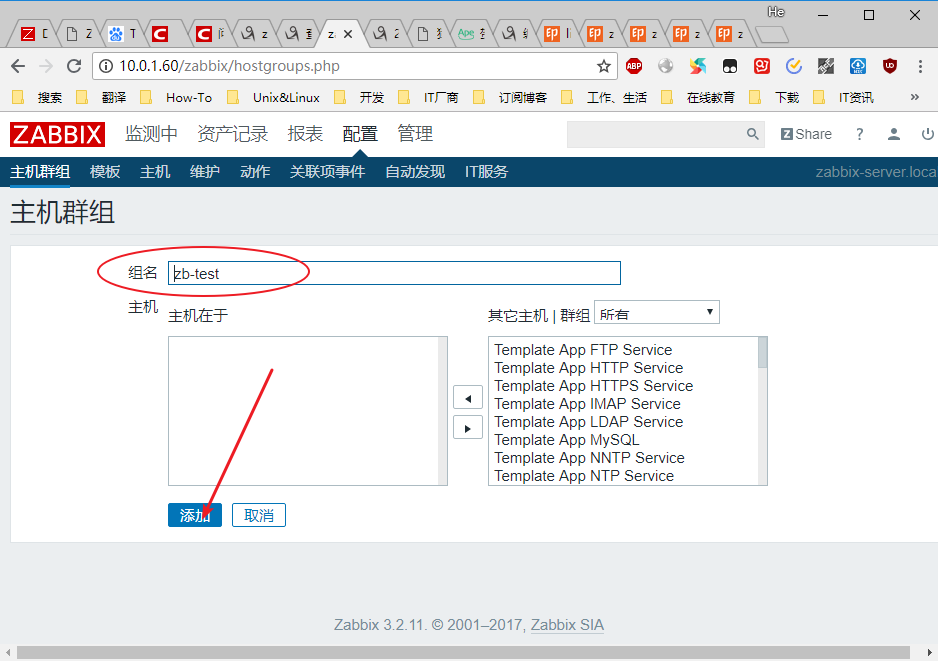
1.添加主机群组zb-test
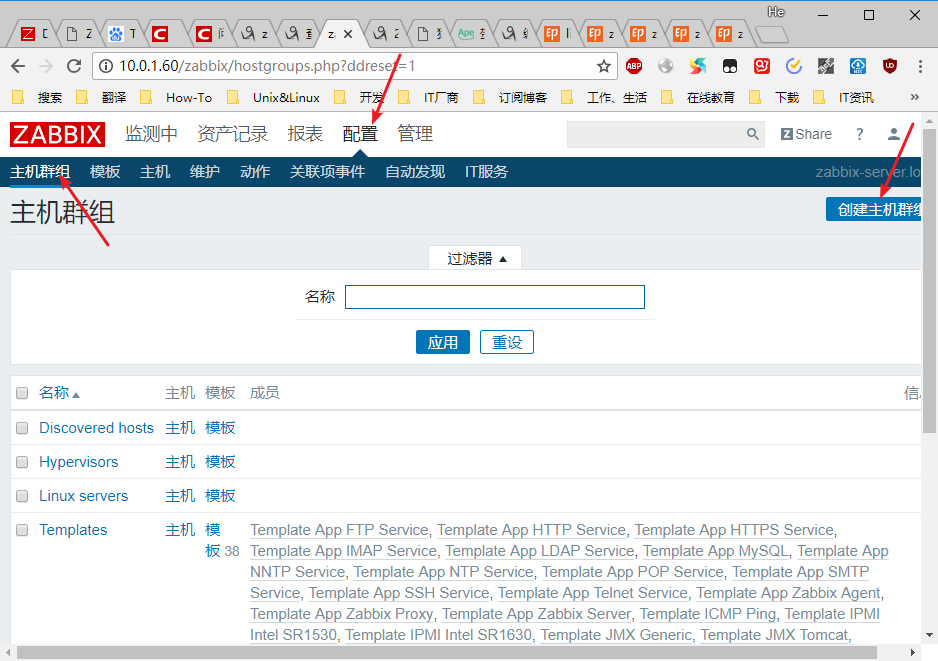
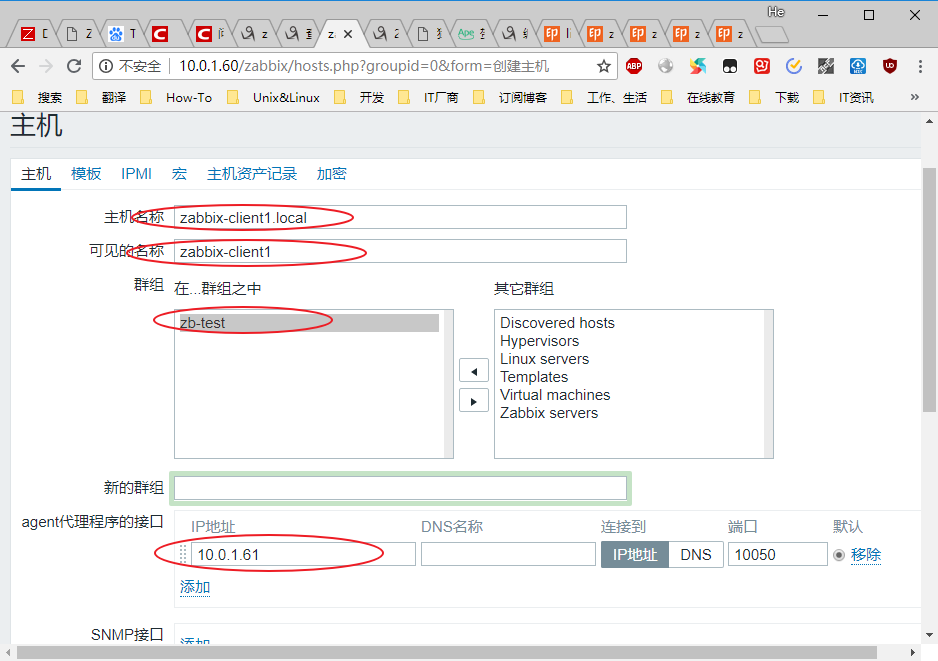
2.添加主机
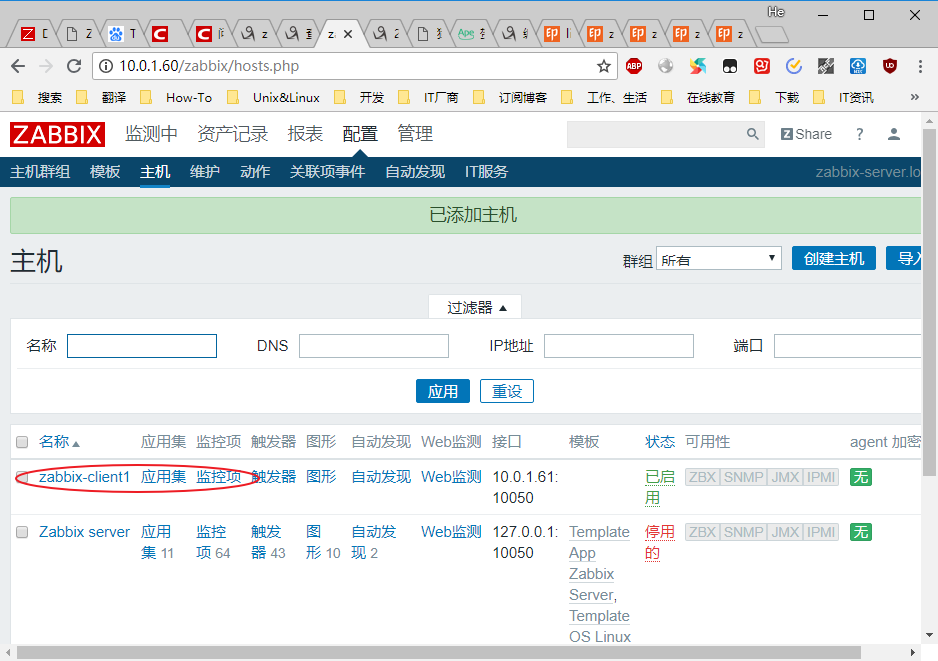
几个概念
应用 (application)
一组监控项组成的逻辑分组
监控项 (item)
你想要接收的主机的特定数据,一个度量数据。
触发器 (trigger)
一个被用于定义问题阈值和“评估”监控项接收到的数据的逻辑表达式
图形(graph)
监控数据的图形化展示
自动发现(auto discovery)
通过预设的规则,zabbix自动添加主机及相关监控内容。
七、 添加自定义模板
添加模板可以通过复制其他预设模板中的监控项来生成,但是自动发现无法复制,需要导出预设模板设置,修改后再导入。比较容易出错。不推荐。
这里介绍链接的方式生成自定义模板。
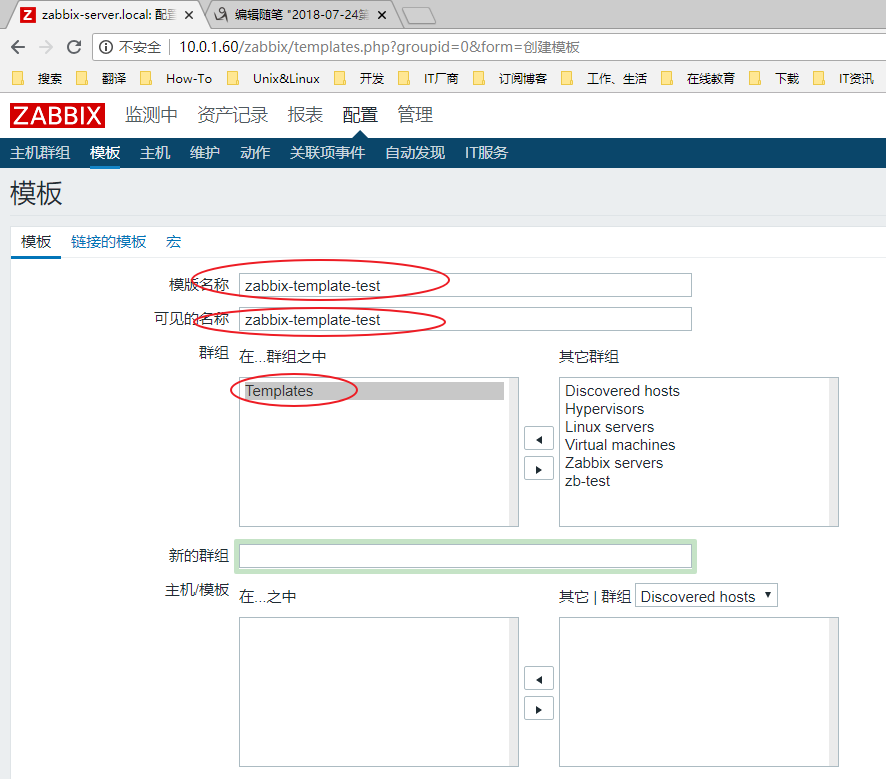
1.配置→模板→创建模板
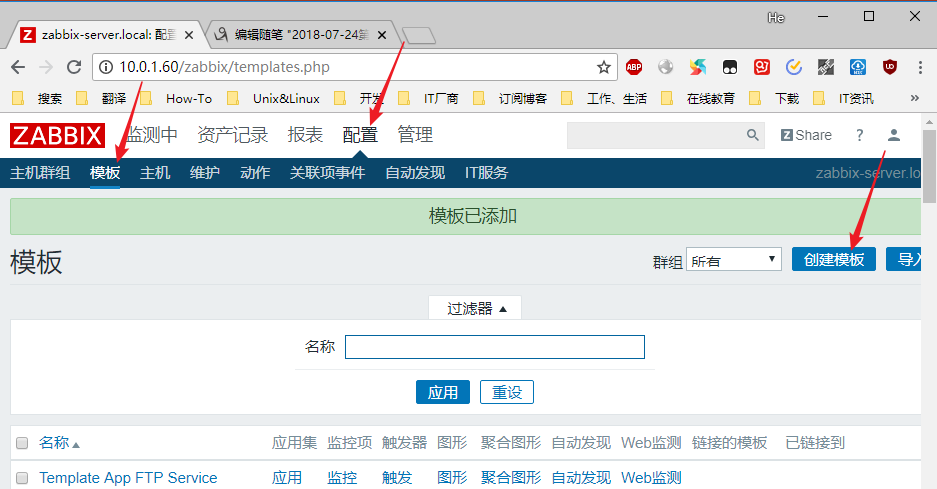
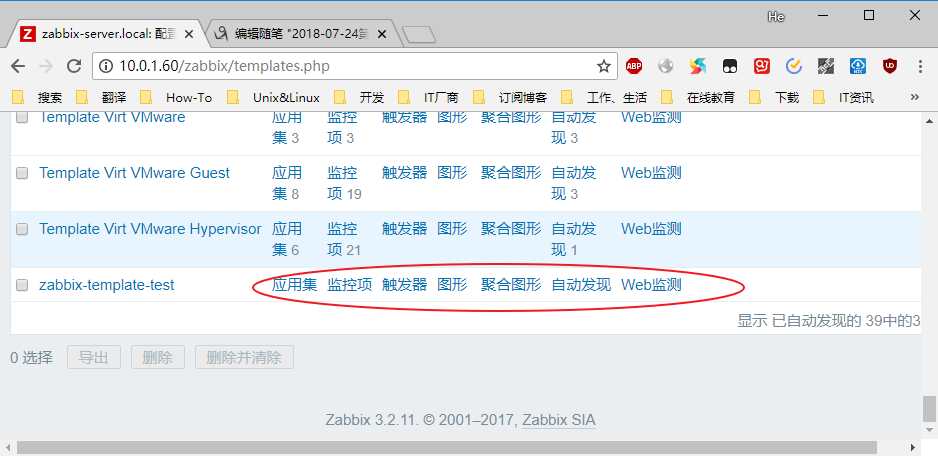
填入相应的信息,点击最下方的添加即可添加模板,但是这时候的新添加的模板是空的,没有监控项,触发器等内容。
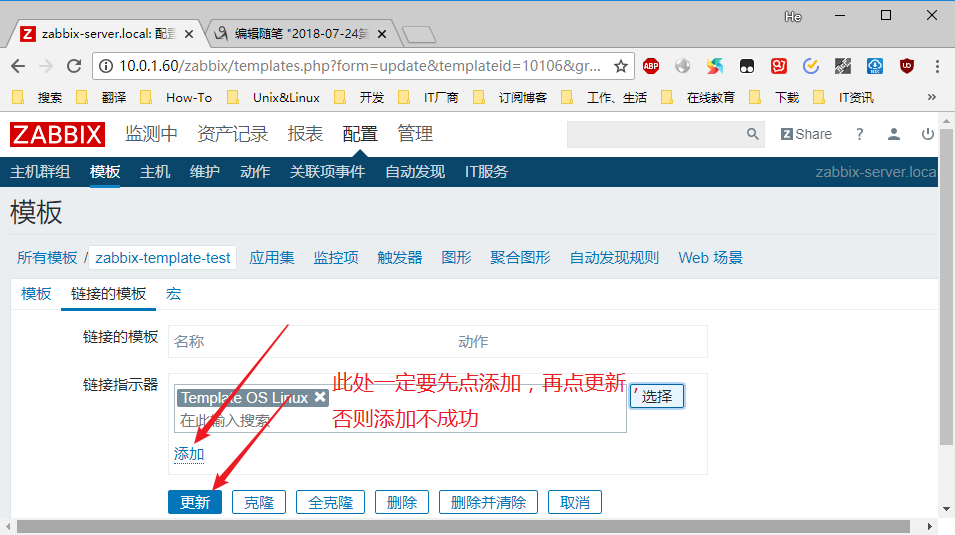
2.给新添加的模板添加链接模板

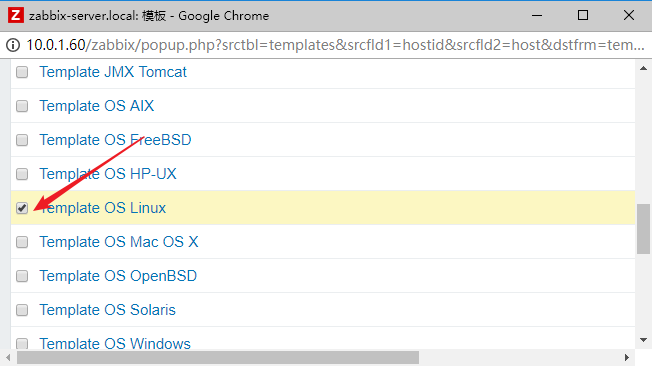
勾选想要链接的模板,点击下方的选择
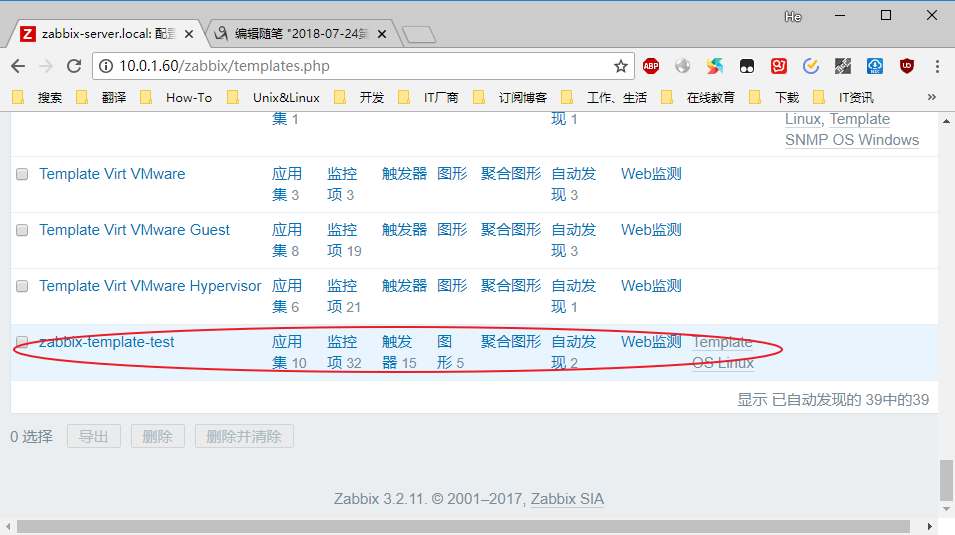
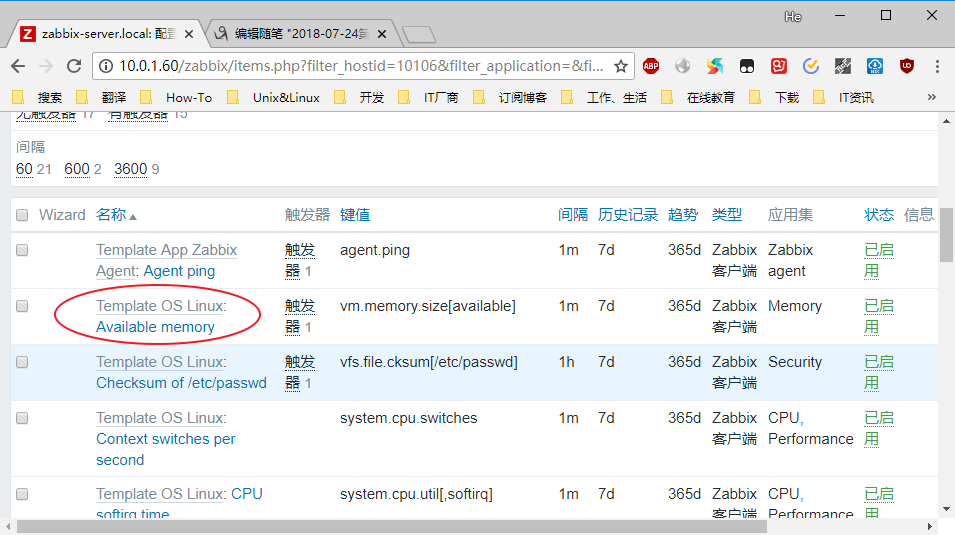
3.修改,删除不必要的监控项,程序集等内容
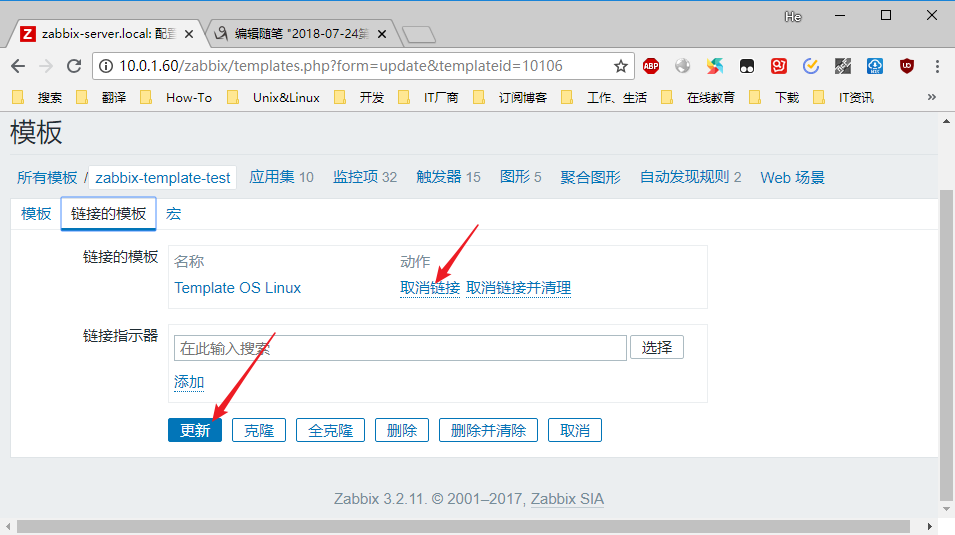
取法链接,但是保留之前链接的内容
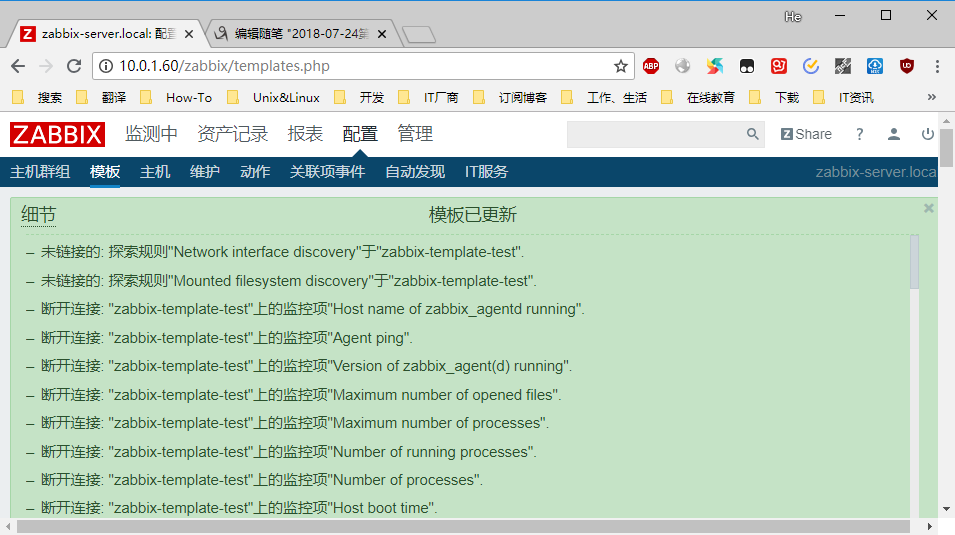
4.现在可以在监控项删除不需要的项,然后可以删除不需要的程序集,修改图形,自动发现等
选中不需要的,点最下方的删除
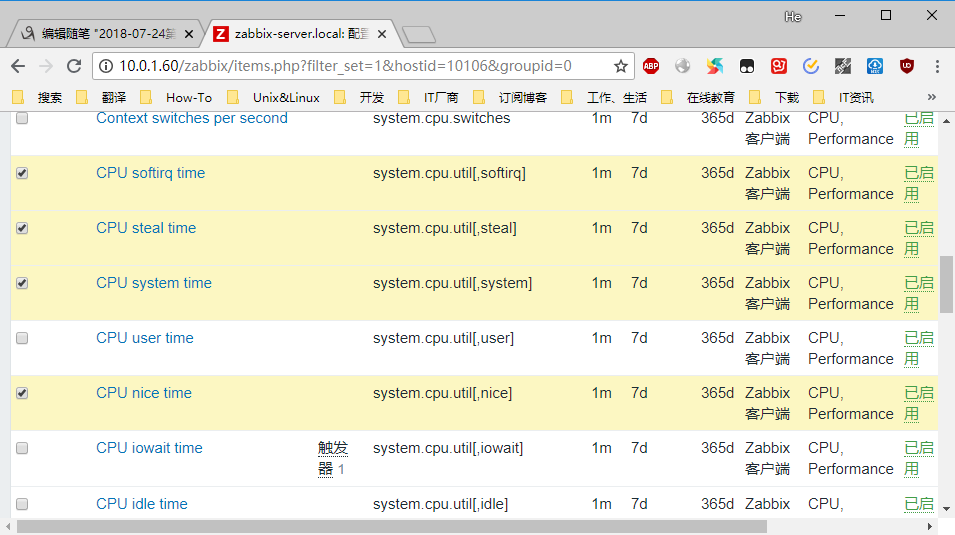
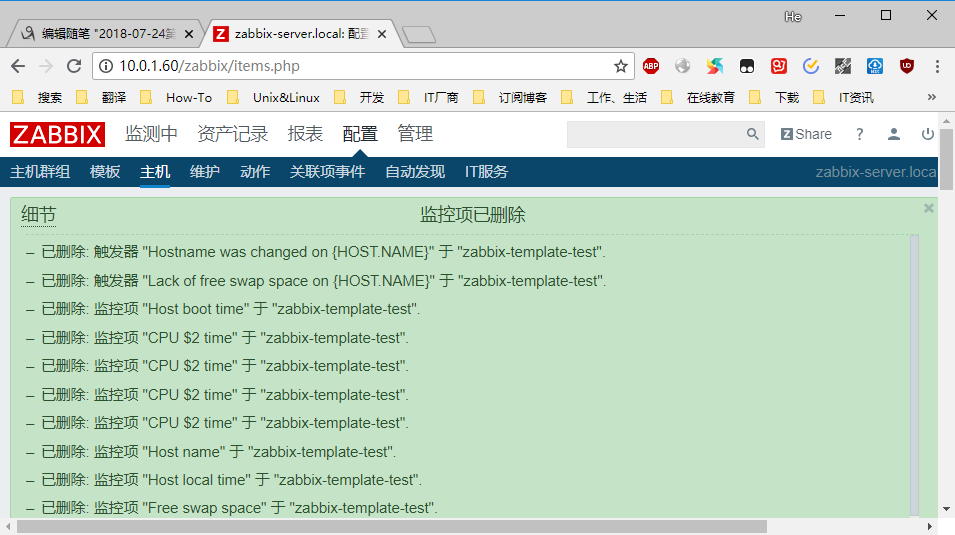
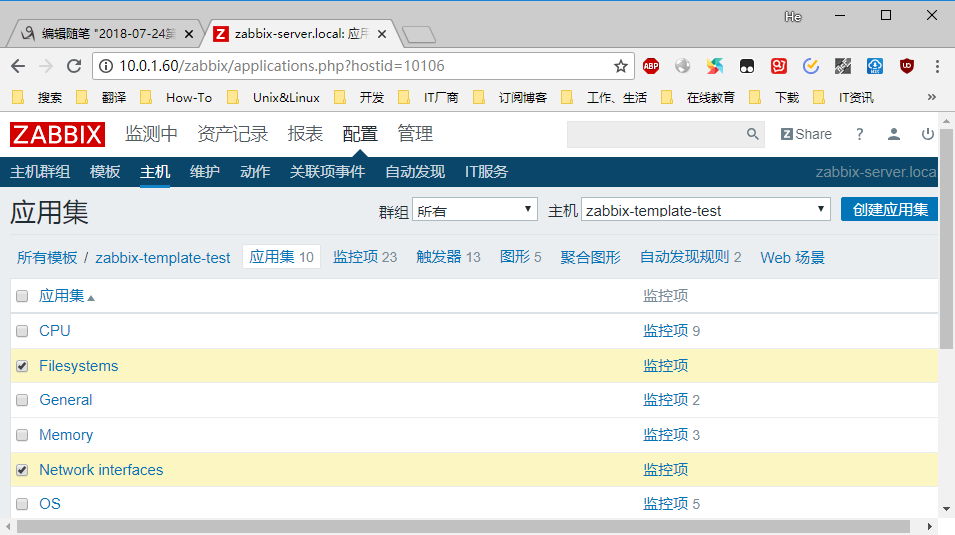
删除无用的应用集
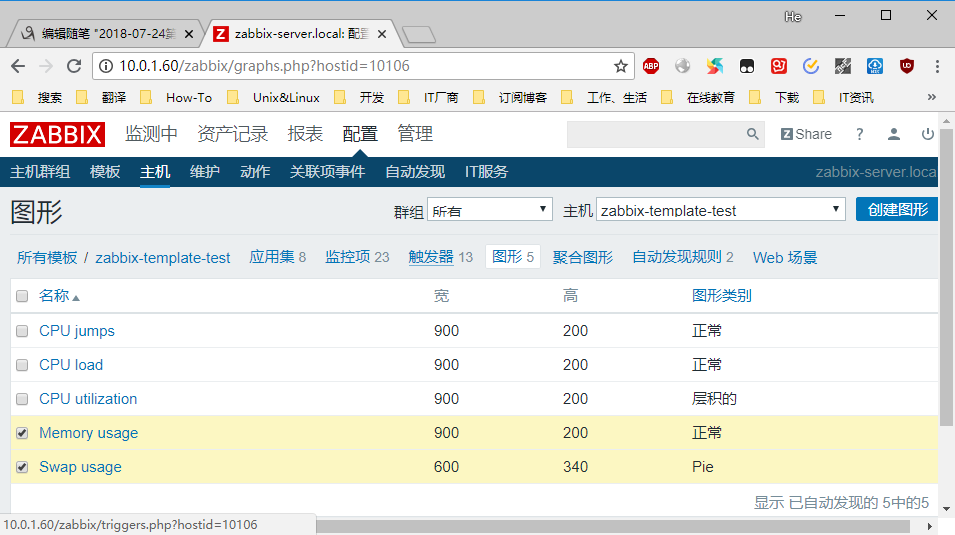
删除图形
其他项的删除动作类似。至些我们就得到了一个我们想要的模板。
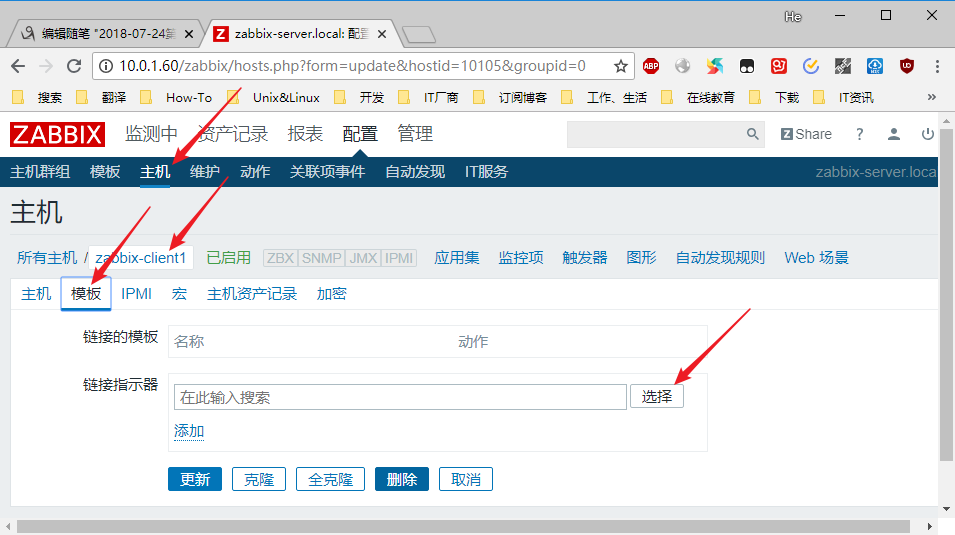
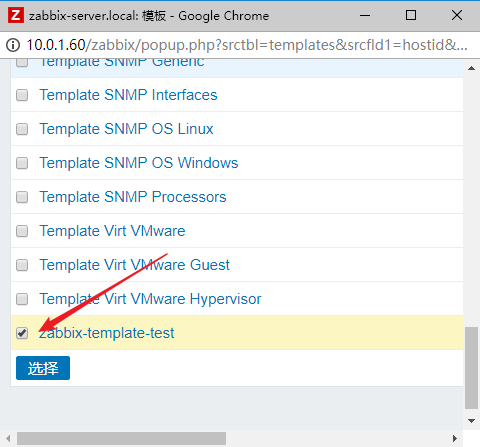
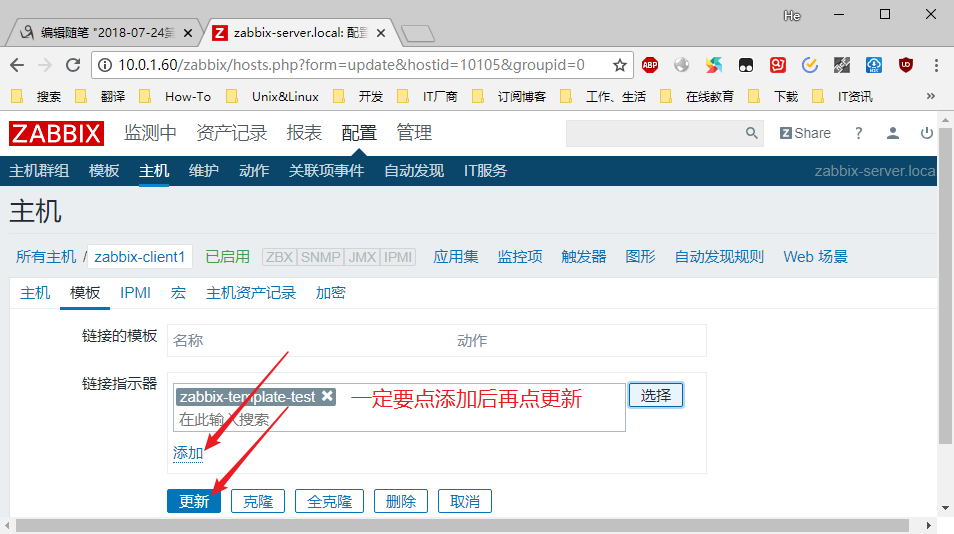
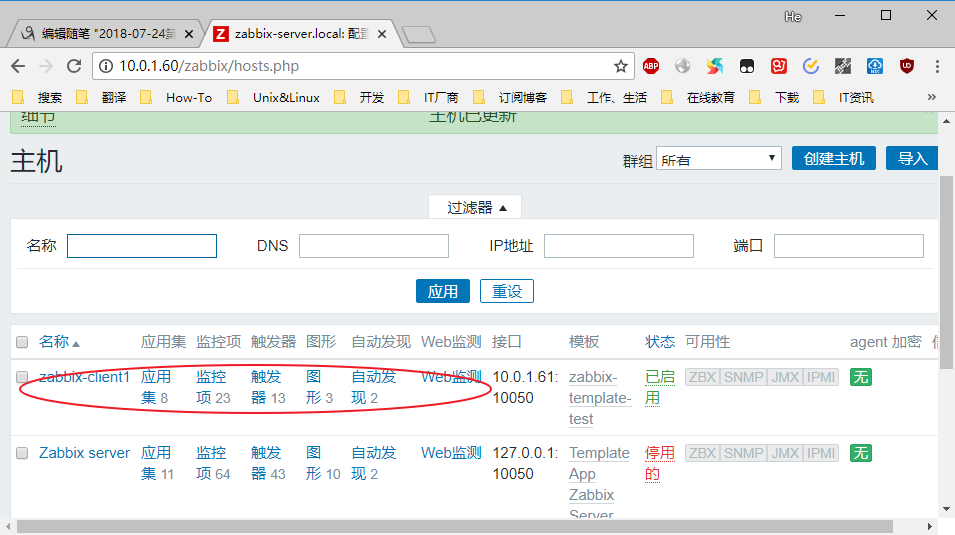
添加好以后,我们可以将模板应用到我们新添加的主机上。
八、 处理图形中的乱码
浏览图形时发现中文显示不了,因为缺少中文字符
解决办法
- 从windows系统下复制一种中文字体上传到zabbix-server的/usr/share/zabbix/fonts/目录下。上传可用winscp或xftp实现。
[root@zabbix-server fonts]# ls
graphfont.ttf  simsun.ttc
2.修改simsun.ttc为simsun.ttf
[root@zabbix-server fonts]# ls -l
total 17788
lrwxrwxrwx. 1 root root       33 Jul 25 09:35 graphfont.ttf -> /etc/alternatives/zabbix-web-font
-rw-r--r--  1 root root 18214356 Jul 27 10:10 simsun.ttf
3.修改字体链接
[root@zabbix-server fonts]# mv graphfont.ttf graphfont.ttf.bak
[root@zabbix-server fonts]# ln -s simsun.ttf graphfont.ttf
[root@zabbix-server fonts]# ls -l
total 17788
lrwxrwxrwx  1 root root       10 Jul 27 10:12 graphfont.ttf -> simsun.ttf
lrwxrwxrwx. 1 root root       33 Jul 25 09:35 graphfont.ttf.bak -> /etc/alternatives/zabbix-web-font
-rw-r--r--  1 root root 18214356 Jul 27 10:10 simsun.ttf
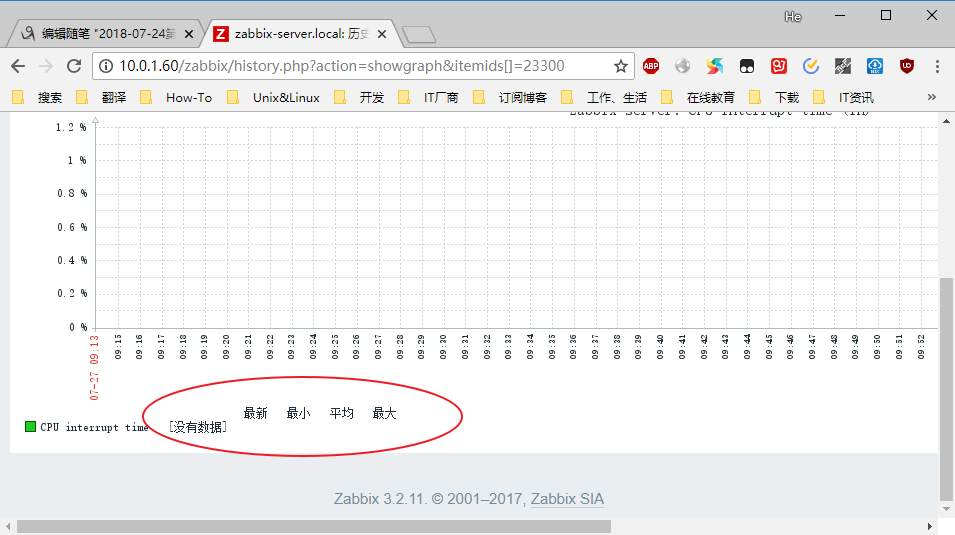
4.再查看,已经正常
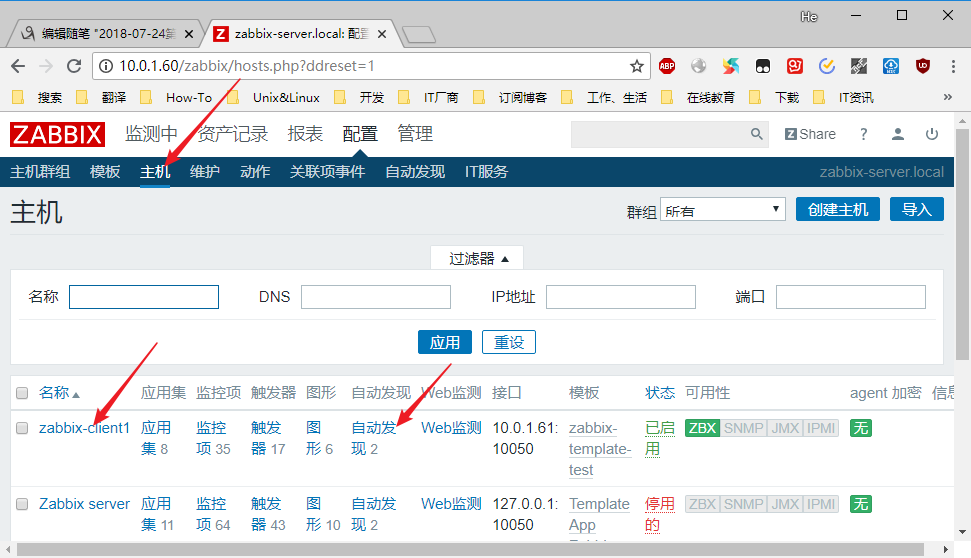
九、 自动发现
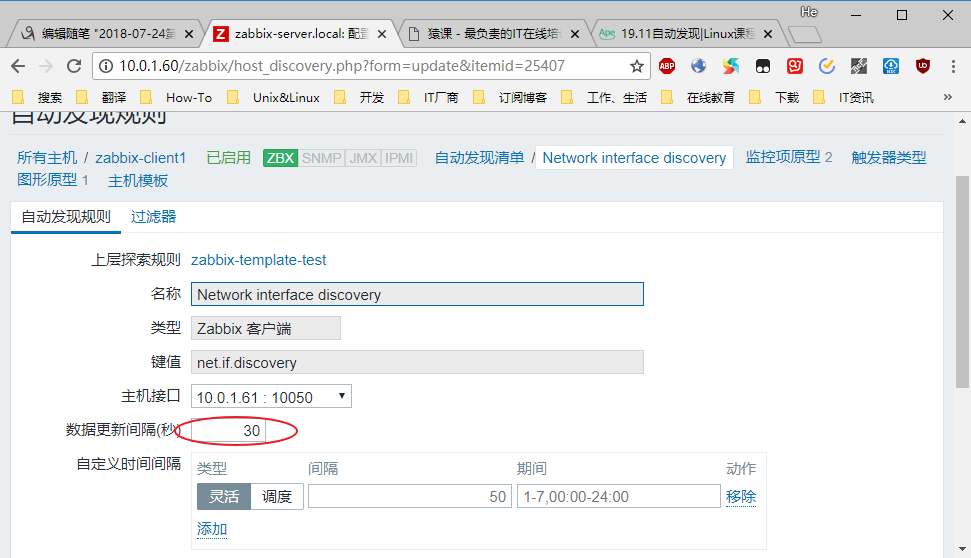
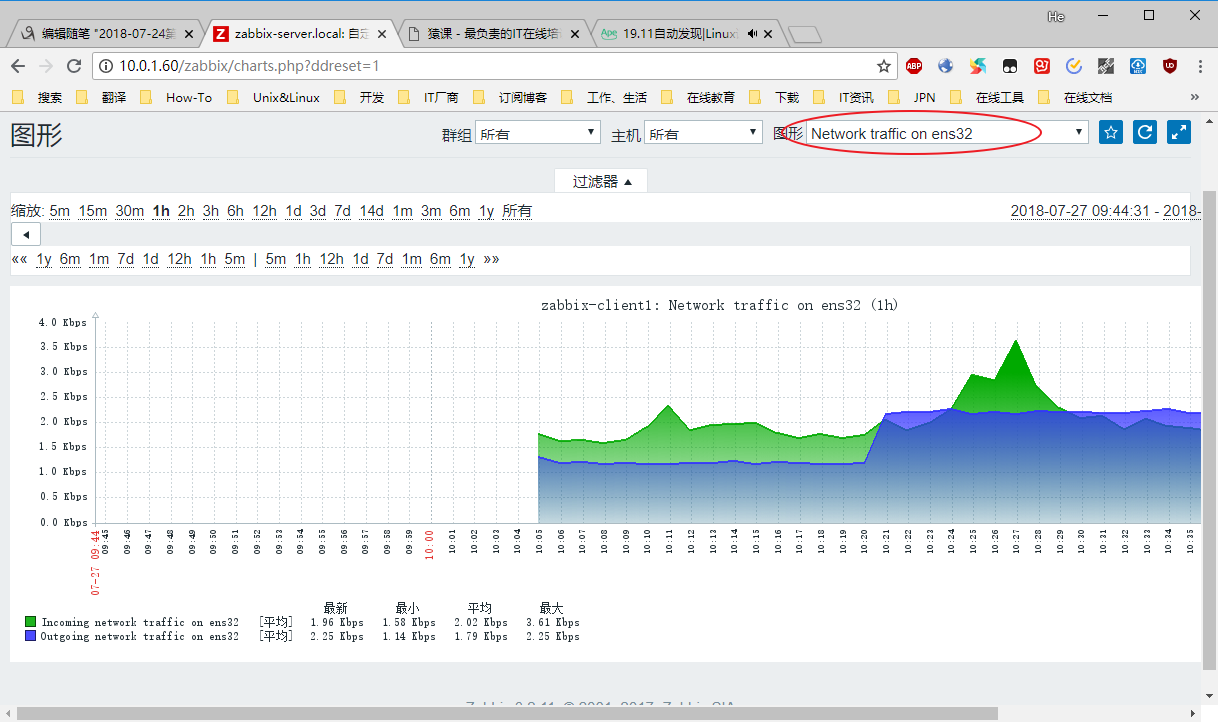
因为默认是1小时的间隔,为了实验效果,这里改成30秒
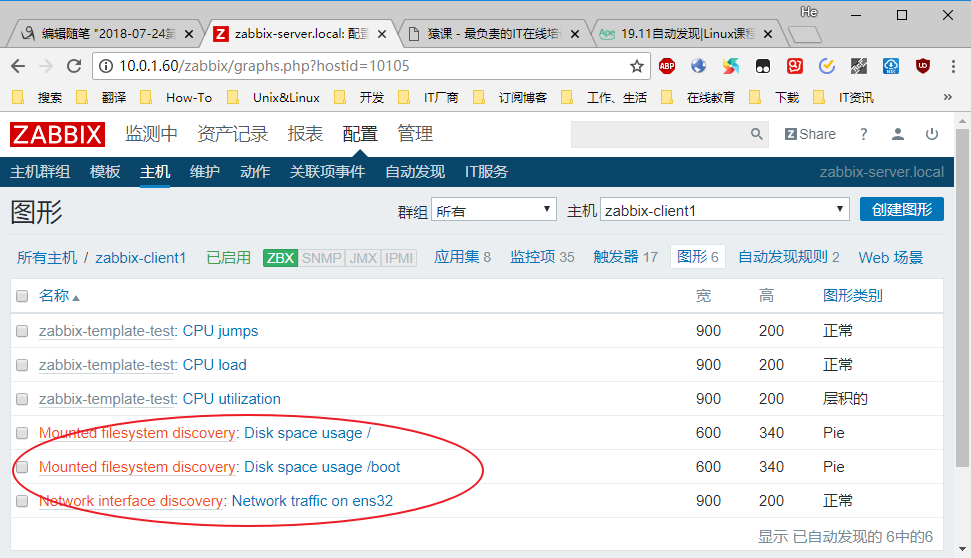
此时在图形里已经可看到网卡的流量信息
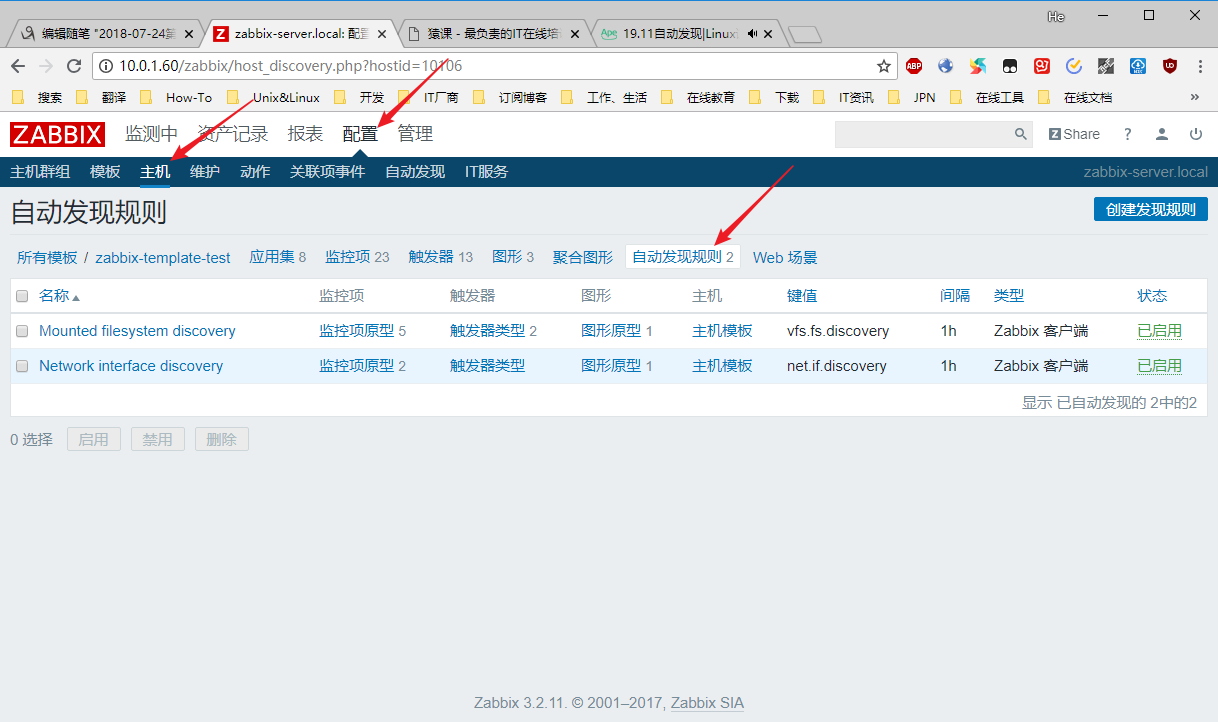
如果需要更改图形的参数,可以在模板里修改

十、 添加自定义监控项目
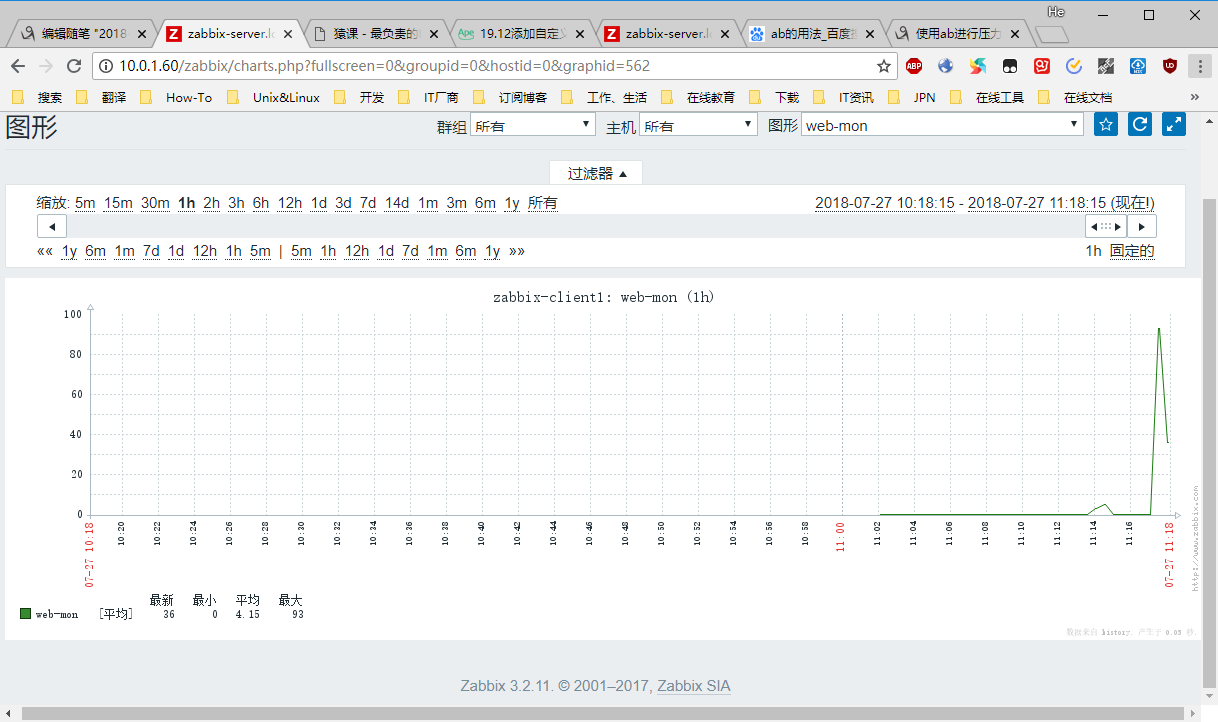
需求:监控某台web的80端口连接数,并出图
1.在被监控端新建脚本
[root@zabbix-client1 ~]# vim /usr/local/sbin/estab.sh
#!/bin/bash

# 获取80端口并发连接数
netstat -ant | grep ':80' | grep -c ESTABLISHED

//赋予755权限
[root@zabbix-client1 ~]# chmod 755 /usr/local/sbin/estab.sh
2.编译被监控端的配置文件
[root@zabbix-client1 ~]# vim /etc/zabbix/zabbix_agentd.conf
//增加
//表示使用自定义脚本
UnsafeUserParameters=1
UserParameter=my.estab.count[*],/usr/local/sbin/estab.sh
//重启服务
[root@zabbix-client1 ~]# systemctl restart zabbix-agent.service
3.在服务器上验证客户端脚本配置成功
[root@zabbix-server fonts]# zabbix_get -s 10.0.1.61 -p 10050 -k 'my.estab.count'
0
4.服务器端配置
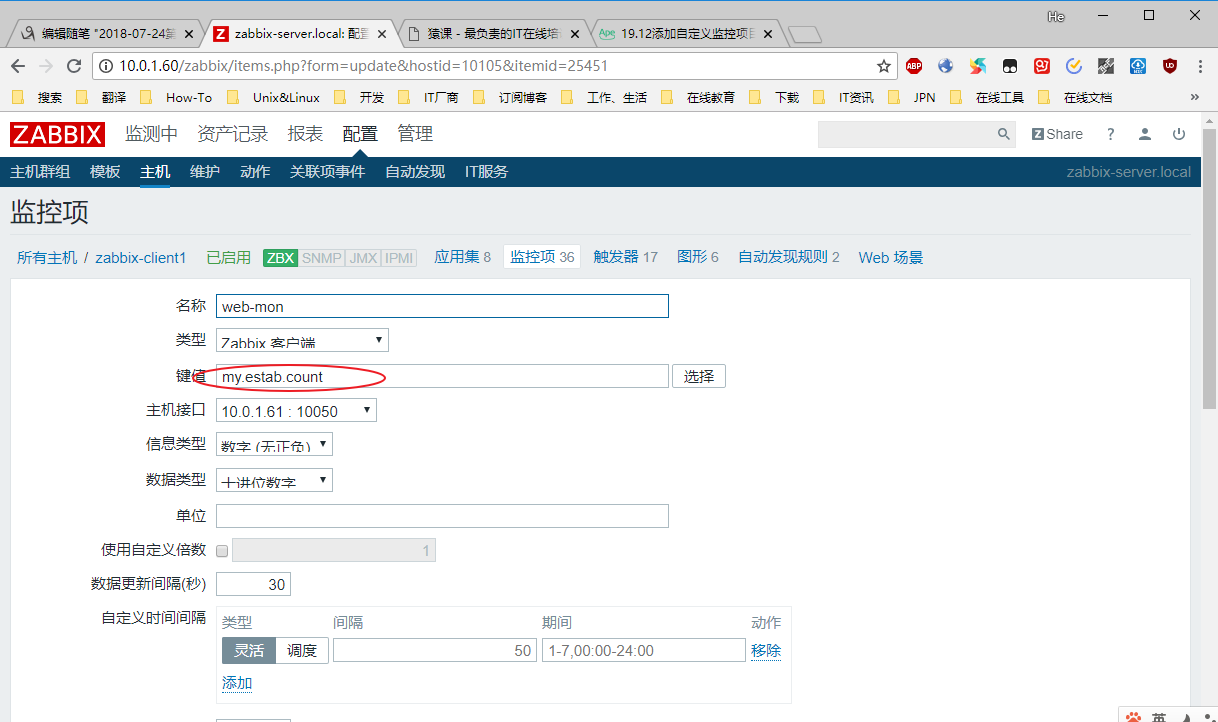
创建监控项
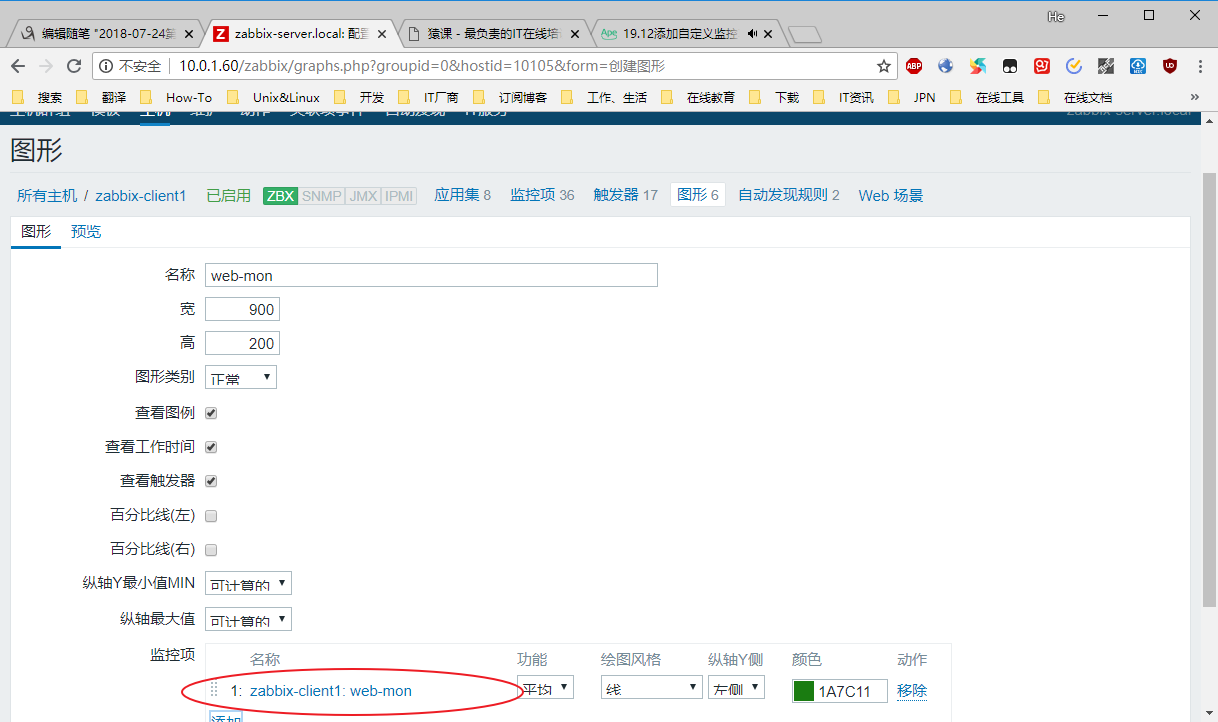
创建图形
在客户端进行压力测试
十一、 配置邮件告警及测试
1.使用163邮箱发告警邮件
首先登录你的163邮箱,设置开启POP3、IMAP、SMTP服务, 然后开启并记录授权码
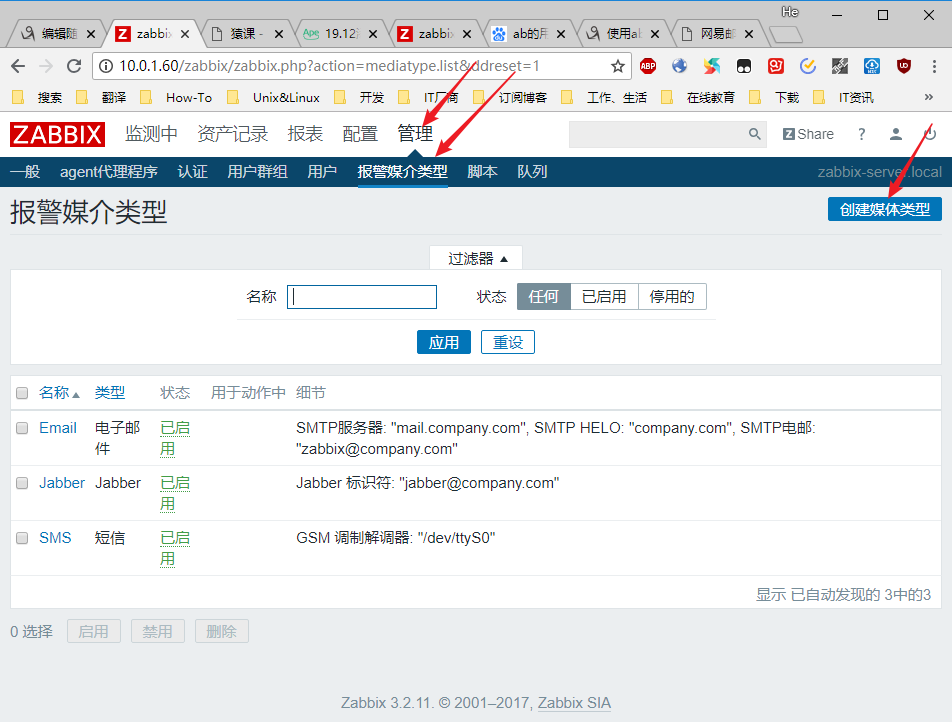
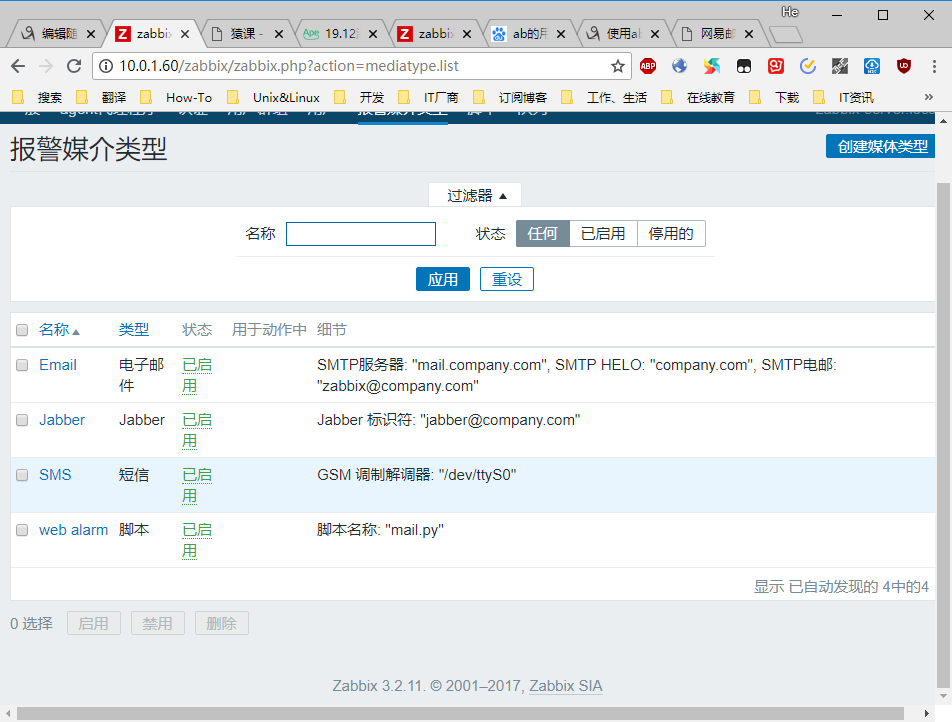
2.在监控中心设置邮件告警
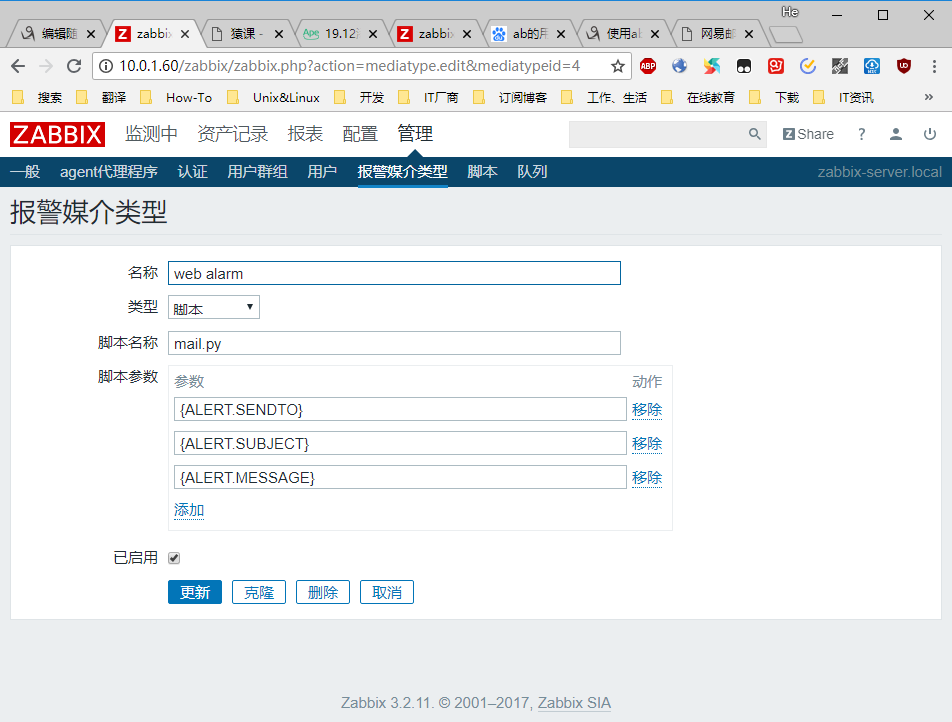
3.创建报警脚本mail.py
[root@zabbix-server fonts]# vim vim /usr/lib/zabbix/alertscripts/mail.py
//内容参考https://coding.net/u/aminglinux/p/aminglinux-book/git/blob/master/D22Z/mail.py
#!/usr/bin/env python
#-*- coding: UTF-8 -*-
import os,sys
reload(sys)
sys.setdefaultencoding('utf8')
import getopt
import smtplib
from email.MIMEText import MIMEText
from email.MIMEMultipart import MIMEMultipart
from  subprocess import *

def sendqqmail(username,password,mailfrom,mailto,subject,content):
    gserver = 'smtp.qq.com'
    gport = 25

    try:
        msg = MIMEText(unicode(content).encode('utf-8'))
        msg['from'] = mailfrom
        msg['to'] = mailto
        msg['Reply-To'] = mailfrom
        msg['Subject'] = subject

        smtp = smtplib.SMTP(gserver, gport)
        smtp.set_debuglevel(0)
        smtp.ehlo()
        smtp.login(username,password)

        smtp.sendmail(mailfrom, mailto, msg.as_string())
        smtp.close()
    except Exception,err:
        print "Send mail failed. Error: %s" % err


def main():
    to=sys.argv[1]
    subject=sys.argv[2]
    content=sys.argv[3]
##定义QQ邮箱的账号和密码,你需要修改成你自己的账号和密码(请不要把真实的用户名和密码放到网上公开,否则你会死的很惨)
    sendqqmail('1234567@qq.com','aaaaaaaaaa','1234567@qq.com',to,subject,content)

if __name__ == "__main__":
    main()

[root@zabbix-server fonts]# chmod 755 !$
chmod 755 /usr/lib/zabbix/alertscripts/mail.py
[root@zabbix-server fonts]# ls -l !$
ls -l /usr/lib/zabbix/alertscripts/mail.py
-rwxr-xr-x 1 root root 1220 Jul 27 11:38 /usr/lib/zabbix/alertscripts/mail.py
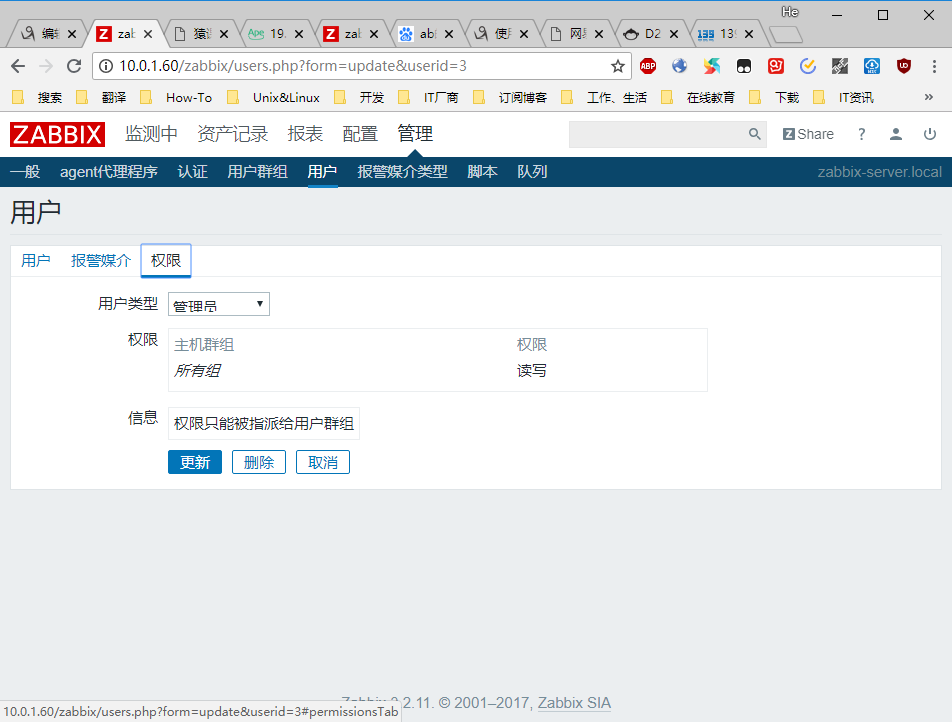
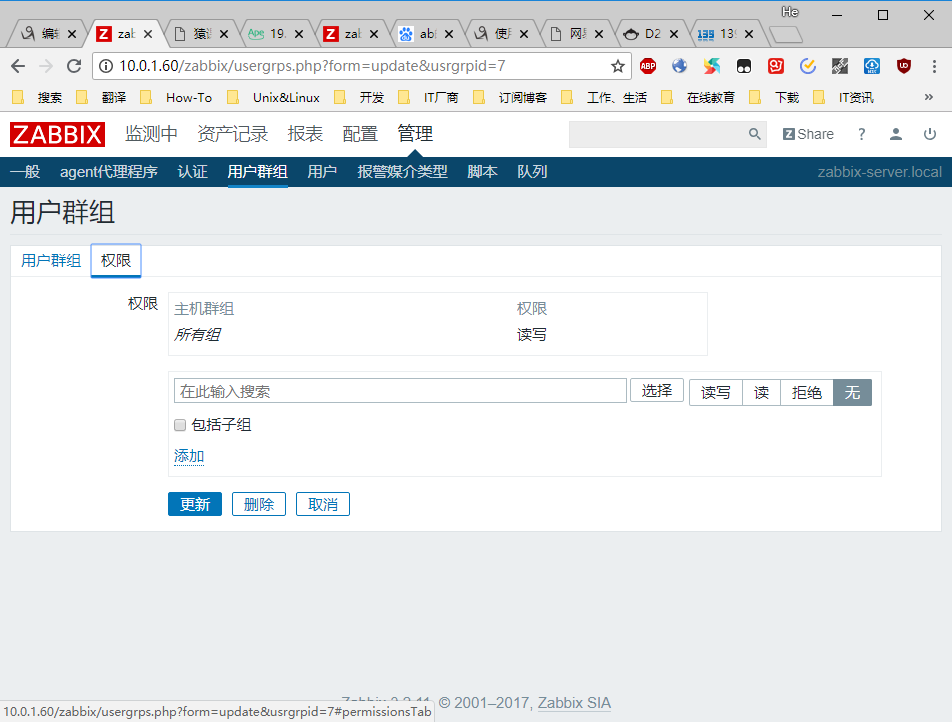
4.创建告警用户
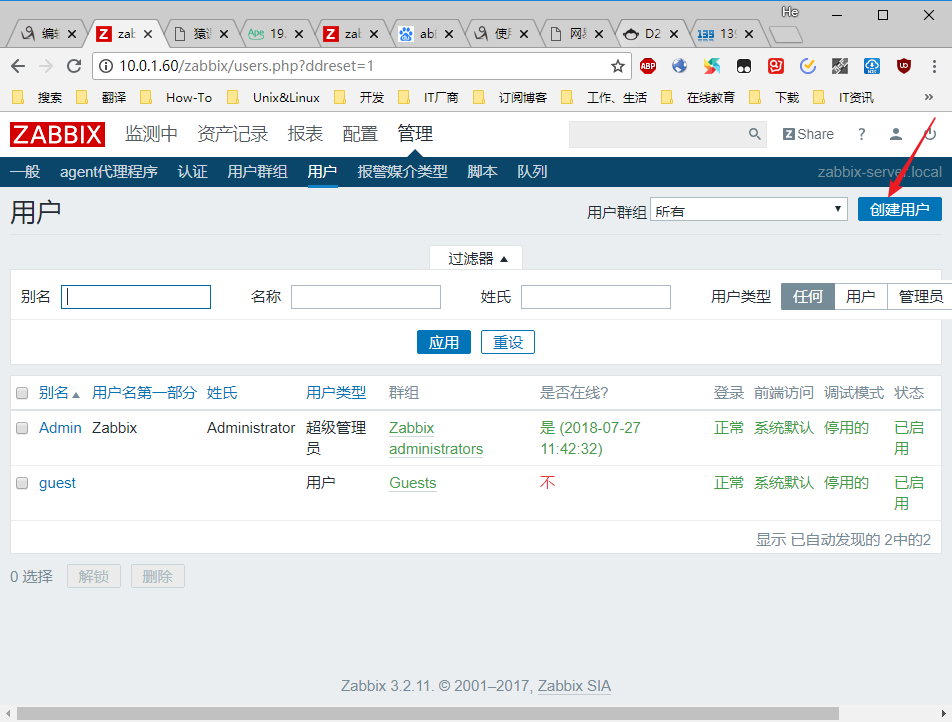
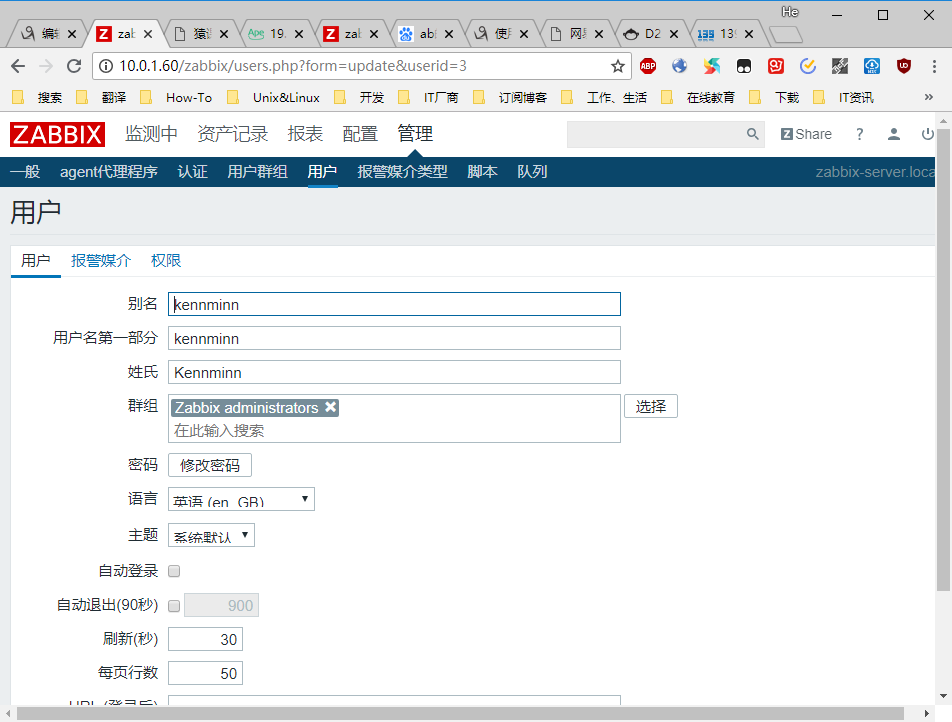
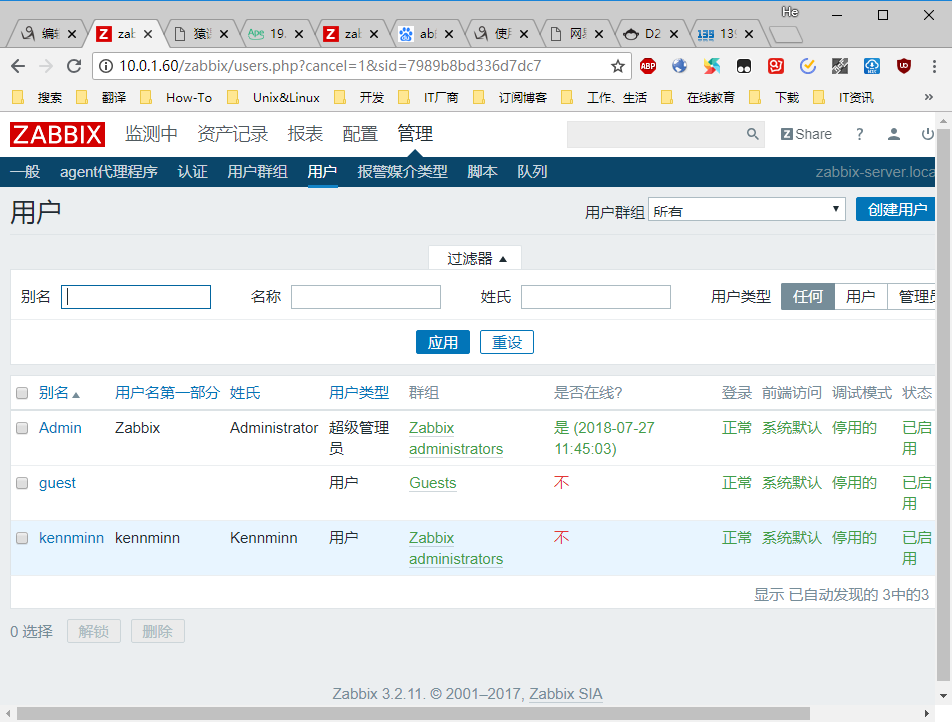
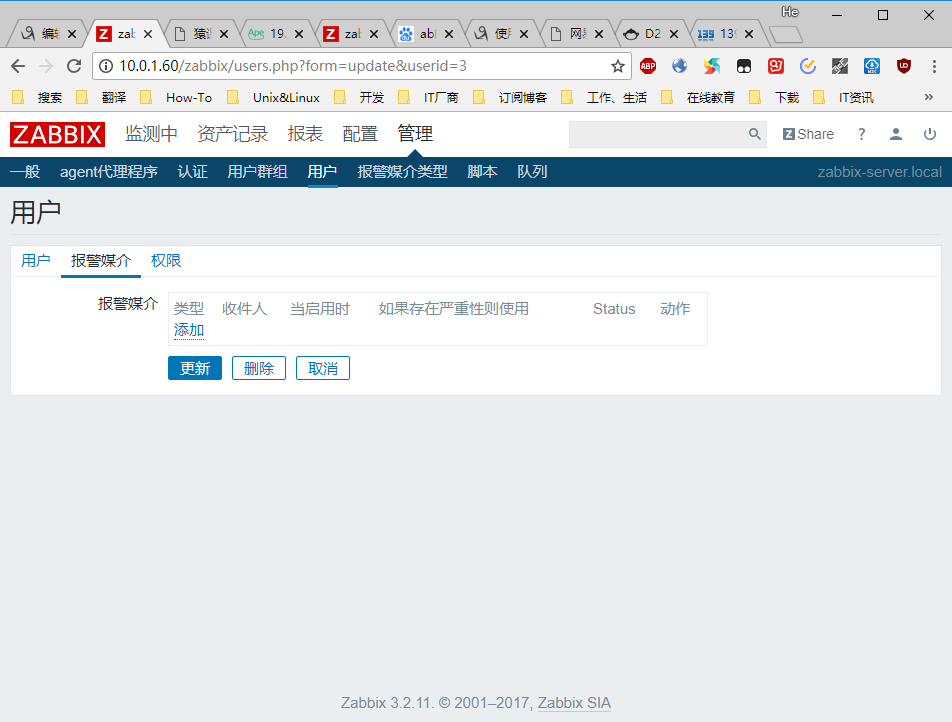
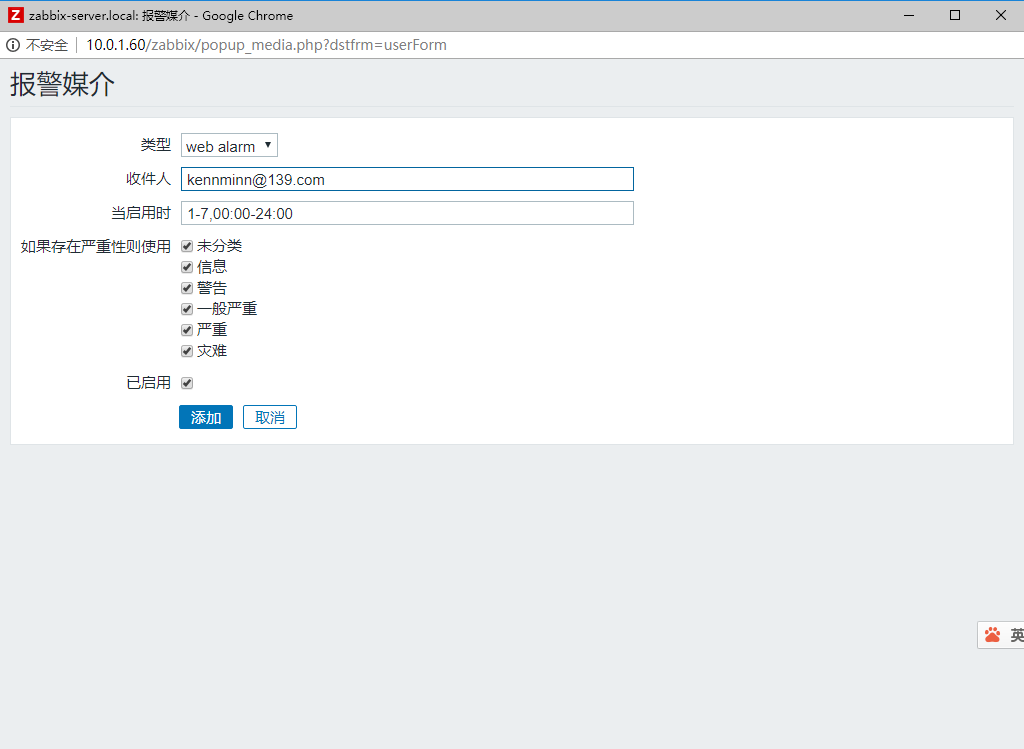
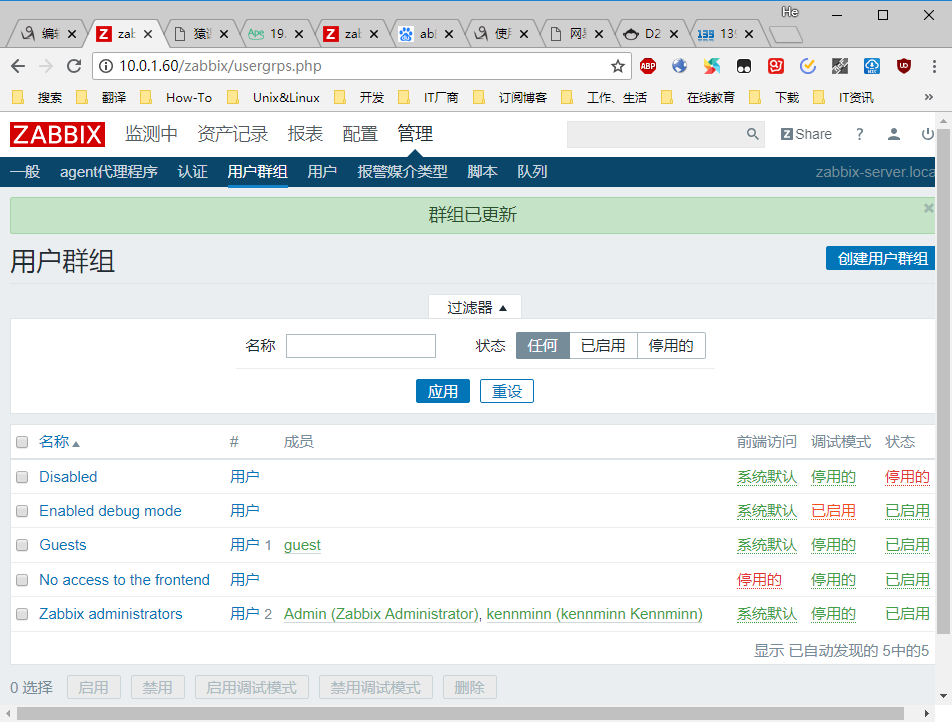
将新添加用户添加到管理员组,然后设定拥有读写权限。权限需要在群组里设置
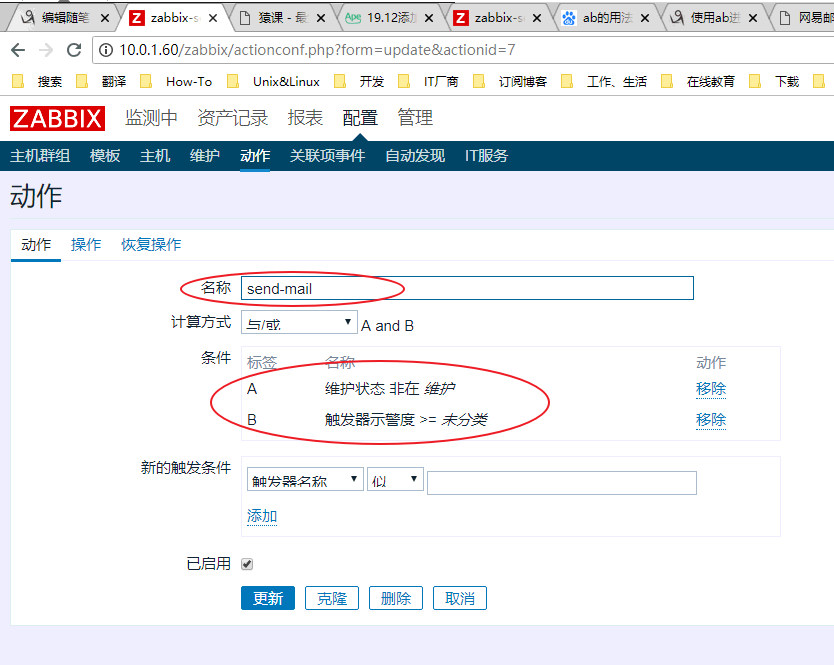
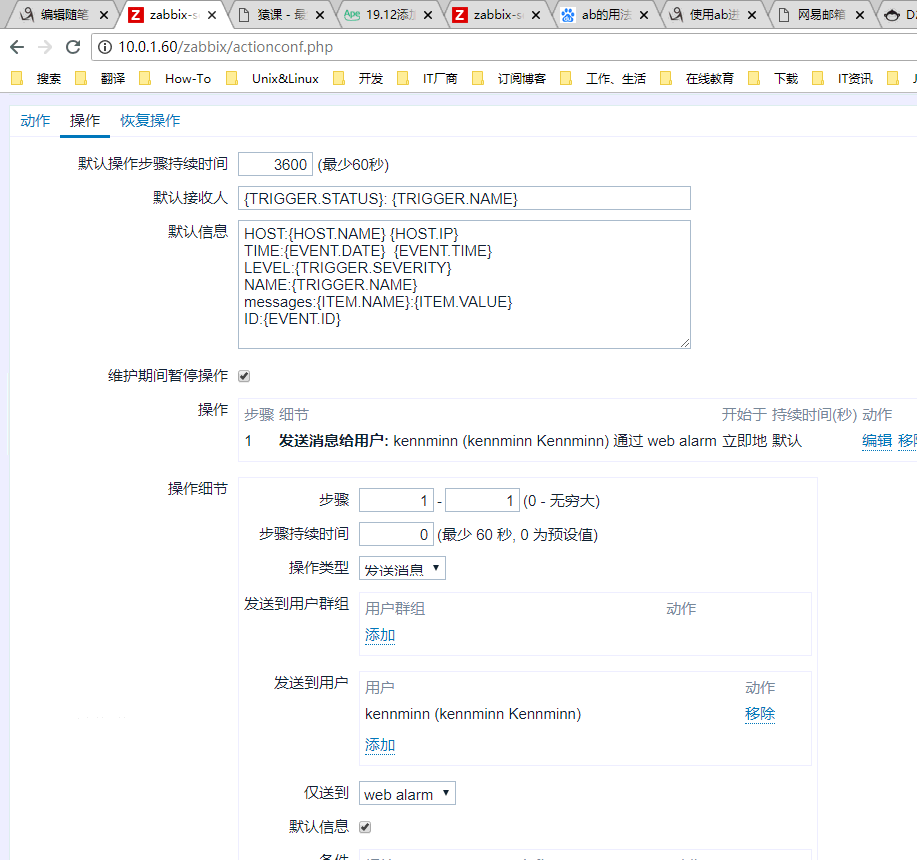
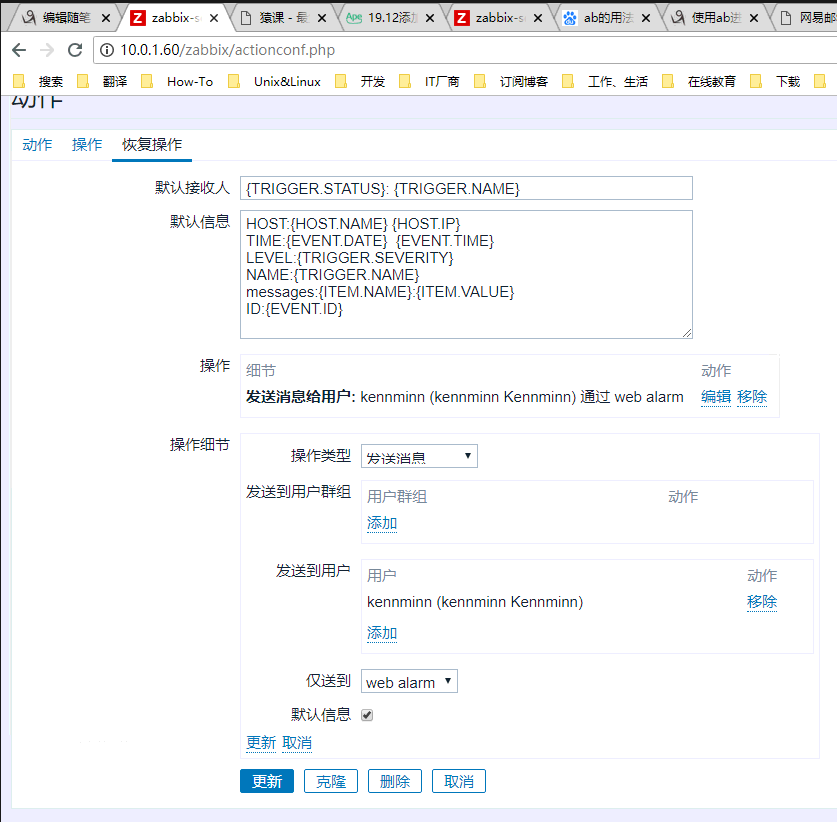
5.设置动作

6.测试报警
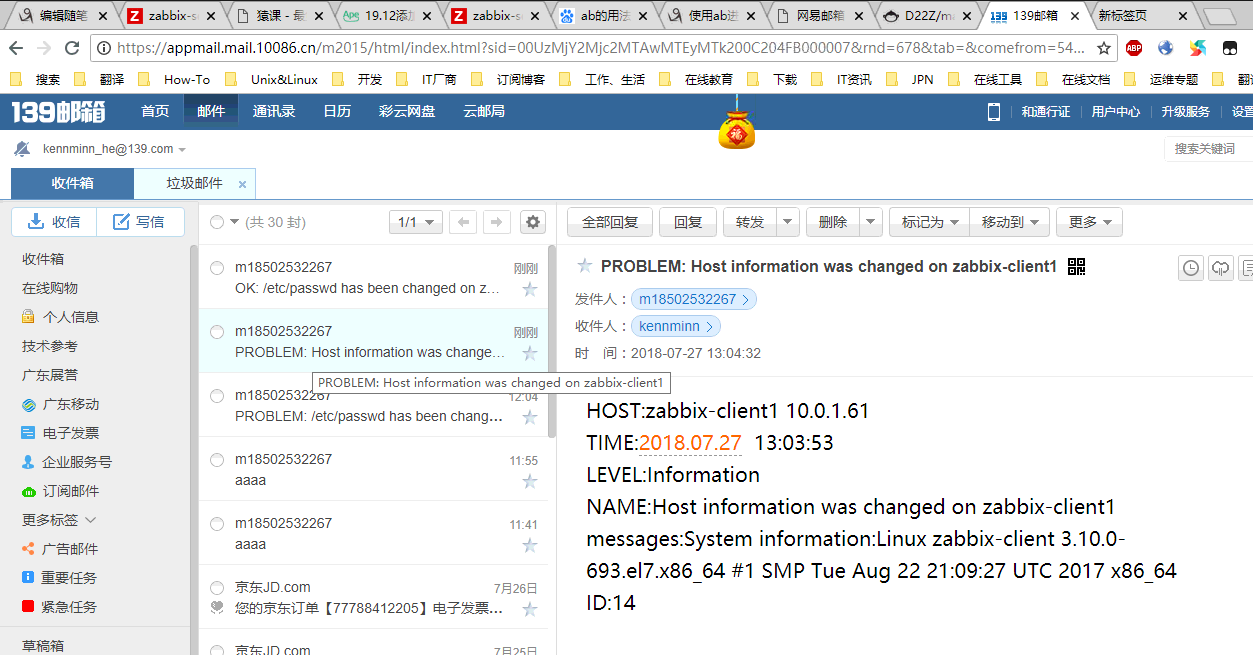
根据触发器的定义来测试达到报警条件
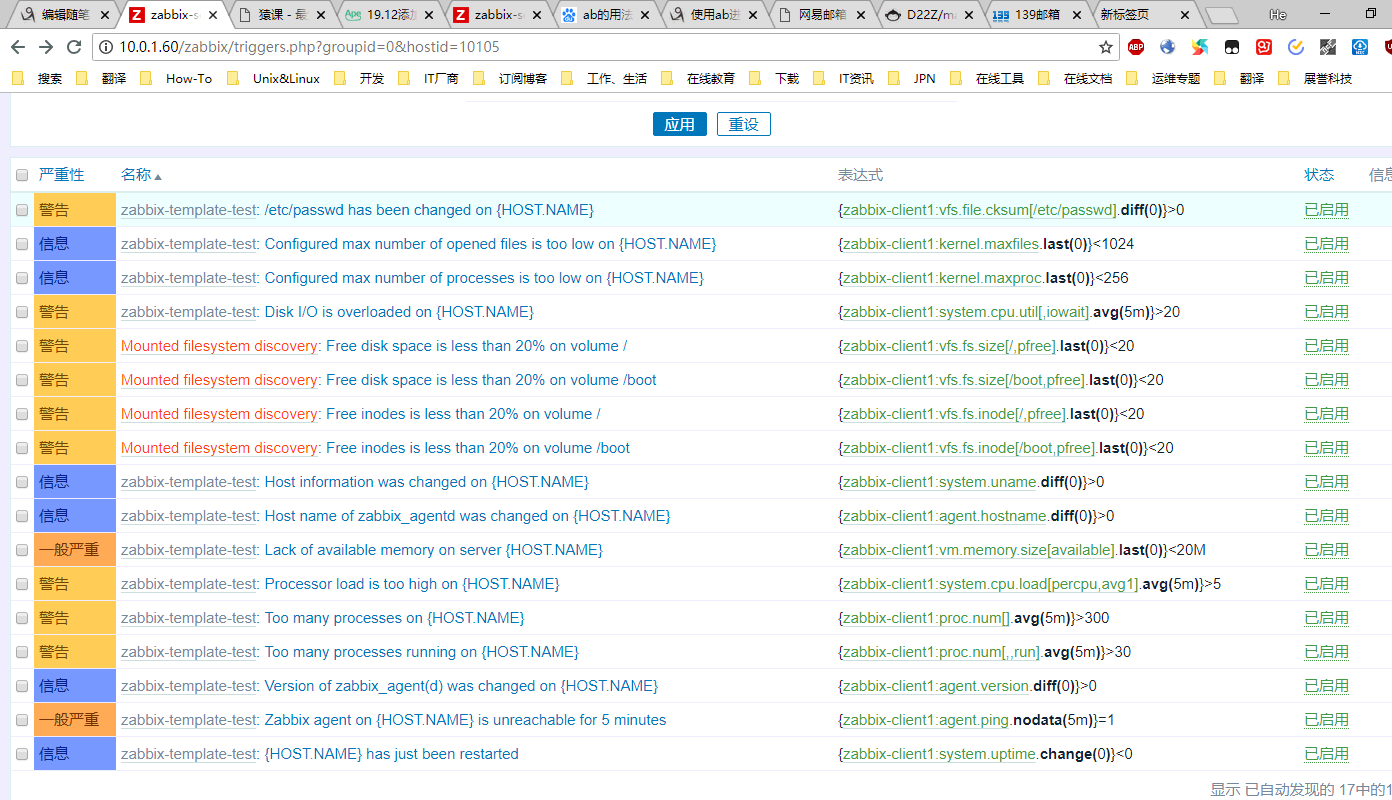
以zabbix-template-test: /etc/passwd has been changed on {HOST.NAME}为例 ,修改后

邮件系统中正常收到报警邮件
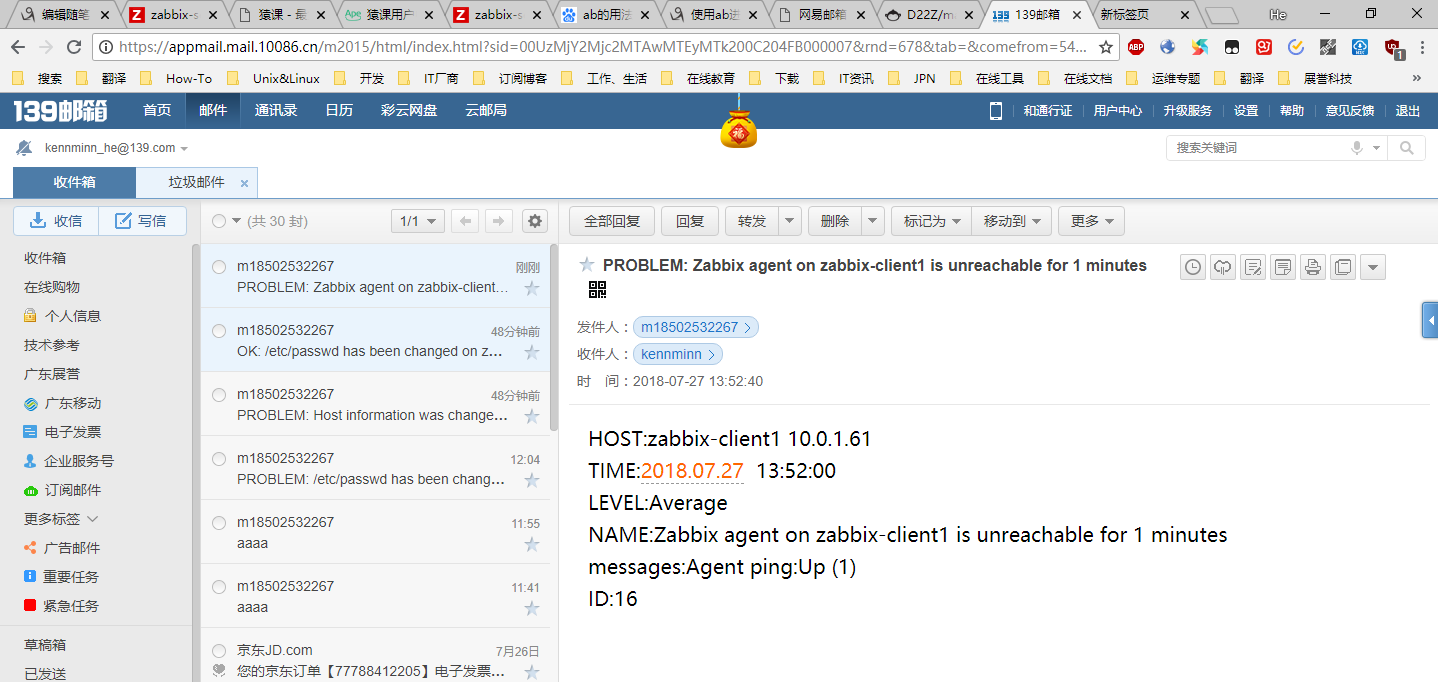
将被监控端断网1分钟,根据触发器定义,产生报警。

邮件web端正常收到报警邮件
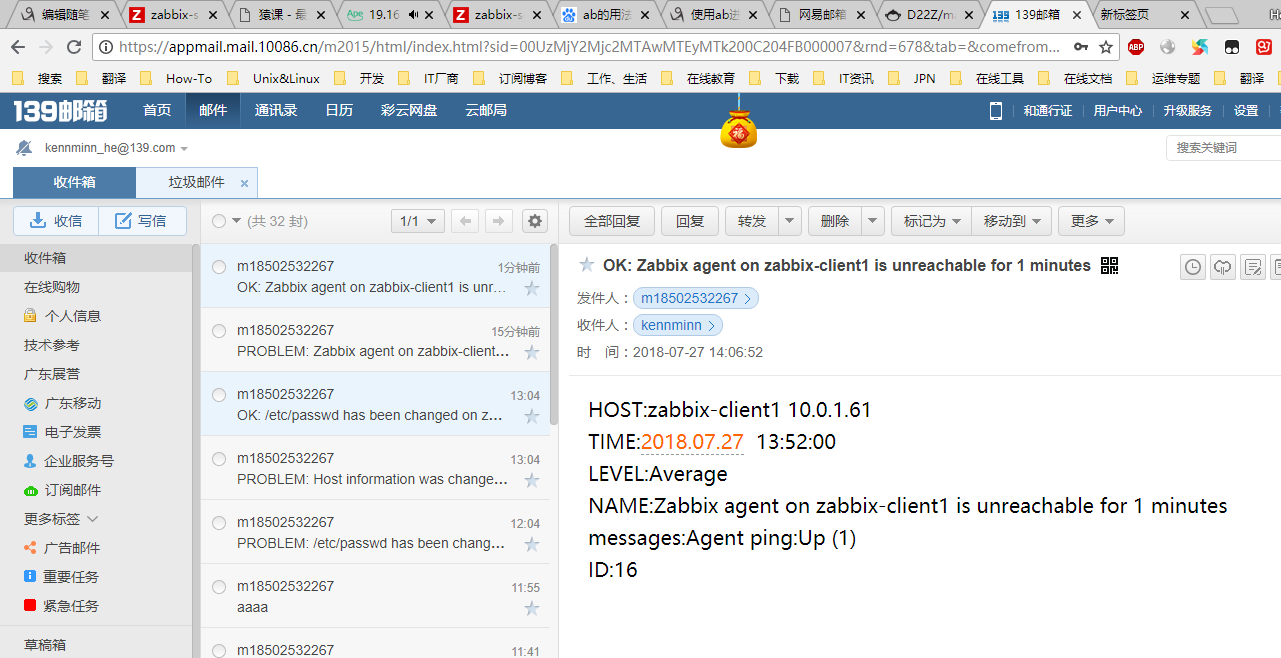
恢复被监控端的网络

十二、 不发邮件的问题处理
可能原因
1.用户权限
2.用户媒介有没有设置邮箱
3.发邮件脚本的权限是否755
4.脚本的位置是否在/usr/lib/zabbix/alertscripts/下
5.发邮件脚本正不正常,最好事先测试一下。格式: mail.py ‘收件人地址’ ‘主题’ ‘内容’
脚本参考https://coding.net/u/aminglinux/p/aminglinux-book/git/blob/master/D22Z/mail.py
十三、 扩展
zabbix监控交换机(思科)
http://tryrus.blog.51cto.com/10914693/1789847
zabbix远程执行命令
zabbix分布式部署
http://sfzhang88.blog.51cto.com/4995876/1364399
zabbix监控tomcat(版本有点老,大家只需要参考步骤,不能照搬)


 浙公网安备 33010602011771号