


Jetpack compose学习笔记之ConstraintLayout(布局)
一,简介
Jetpack compose中没有提供ConstraintLayout支持,所以需要添加下面的依赖来导入。
// build.gradle
implementation "androidx.constraintlayout:constraintlayout-compose:1.0.0-alpha07"
在Compose中,ConstraintLayout需要通过DSL来使用。
- createRefs()或者createRef()创建references,ConstraintLayout中的每一个composable都需要创建(guidelines,barriers不需要)
- constrainAs可以把reference当作参数,然后在lambda中设置约束关系
- linkTo来表明约束关系
- parent是已经存在的reference,标识ConstraintLayout本身
二,示例
效果一:约束Button和Text的关系
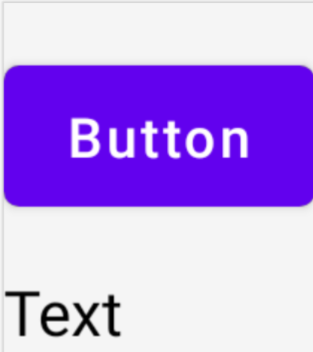
@Composable
fun ConstraintLayoutContent() {
    ConstraintLayout {
        // 创建references
        val (button, text) = createRefs()

        Button(
            onClick = {},
            // reference "button"相当于原来的id
            // 约束在constraintlayout的top,margin为16dp
            modifier = Modifier.constrainAs(button) {
                top.linkTo(parent.top, margin = 16.dp)
            }
        ) {
            Text("Button")
        }
        // reference "text"
        // 约束Text在Button的下面,margin为16dp
        Text("Text", Modifier.constrainAs(text) {
            top.linkTo(button.bottom, margin = 16.dp)
        })
    }
}
效果二:Text在parent中居中显示
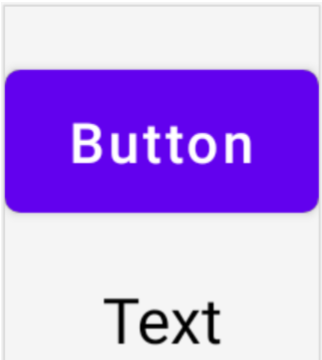
@Composable
fun ConstraintLayoutContent() {
    ConstraintLayout {
        // 和上面的例子一致
         ...

        // reference "text"
        // 约束Text在Button的下面,margin为16dp
        Text("Text", Modifier.constrainAs(text) {
            top.linkTo(button.bottom, margin = 16.dp)
            // Text在parent居中
            // ConstraintLayout默认是wrap_content的
            centerHorizontallyTo(parent)
        })
    }
}
效果三:创建Barrier
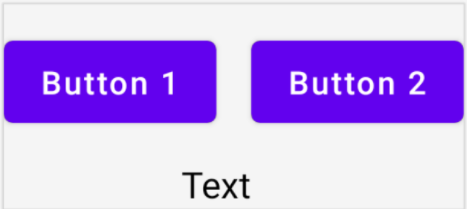
@Composable
fun ConstraintLayoutContent() {
    ConstraintLayout {
        // 创建references
        val (button1, button2, text) = createRefs()

        Button(
            onClick = {},
            modifier = Modifier.constrainAs(button1) {
                top.linkTo(parent.top, margin = 16.dp)
            }
        ) {
            Text("Button1")
        }
        // Text显示在Button1的下方,Text的中线和Button1的end对齐
        Text("Text", Modifier.constrainAs(text) {
            top.linkTo(button1.bottom, margin = 16.dp)
            centerAround(button1.end)
        })
        // 根据button1和text的end(取其长)创建barrier
        val barrier = createEndBarrier(button1, text)
        // Button2显示在barrier开始处
        Button(
            onClick = {},
            modifier = Modifier.constrainAs(button2) {
                top.linkTo(parent.top, margin = 16.dp)
                start.linkTo(barrier)
            }
        ) {
            Text("Button2")
        }
    }
}
效果四:创建guideline

@Composable
fun LargeConstraintLayout() {
    ConstraintLayout {
        val text = createRef()
        // 设置为屏幕宽度的一半
        val guideline = createGuidelineFromStart(fraction = 0.5f)
        Text(
            "This is a very very very very very very long text",
            Modifier.constrainAs(text) {
                linkTo(start = guideline, end = parent.end)
            }
        )
    }
}
效果五:设置Text的宽度为wrap_content

@Composable
fun LargeConstraintLayout() {
    ConstraintLayout {
        val text = createRef()

        val guideline = createGuidelineFromStart(fraction = 0.5f)
        Text(
            "This is a very very very very very very long text",
            Modifier.constrainAs(text) {
                linkTo(start = guideline, end = parent.end)
                width = Dimension.preferredWrapContent
            }
        )
    }
}
除了preferredWrapContent,还有其他几个设置项
| preferredWrapContent | the layout is wrap content, subject to the constraints in that dimension. |
| wrapContent | the layout is wrap content even if the constraints would not allow it. |
| fillToConstraints | the layout will expand to fill the space defined by its constraints in that dimension. |
| preferredValue | the layout is a fixed dp value, subject to the constraints in that dimension. |
| value | the layout is a fixed dp value, regardless of the constraints in that dimension. |
也可以设置在固定值范围内,如
width = Dimension.preferredWrapContent.atLeast(100.dp)
效果六:横屏和纵屏的情况下,margin不一样
在ConstraintSet中通过createRefFor创建reference,创建不同的ConstraintSet,传递给ConstraintLayout。
@Composable
fun DecoupledConstraintLayout() {
    BoxWithConstraints {
        val constraints = if (maxWidth < maxHeight) {
            // 竖屏
            decoupledConstraints(margin = 16.dp)
        } else {
            // 横屏
            decoupledConstraints(margin = 32.dp)
        }

        ConstraintLayout(constraints) {
            Button(
                onClick = {},
                modifier = Modifier.layoutId("button")
            ) {
                Text("Button")
            }
            Text("Text", Modifier.layoutId("text"))
        }
    }
}

private fun decoupledConstraints(margin: Dp): ConstraintSet {
    return ConstraintSet {
        val button = createRefFor("button")
        val text = createRefFor("text")

        constrain(button) {
            top.linkTo(parent.top, margin = margin)
        }
        constrain(text) {
            top.linkTo(button.bottom, margin)
        }
    }
}
更多内容请参看Layouts in Jetpack Compose (google.cn)
