How To Install Oracle Java 7 (JDK) In Ubuntu(or linuxdeepin12)
As you probably know, Oracle Java (JVM/JDK) will not be available in the Debian / Ubuntu repositories anymore because Oracle retired the "Operating System Distributor License for Java" (JDL) and the only release available in the repositories will be OpenJDK.
But of course, Oracle Java can still be downloaded from its website if you really need it and don't want to use OpenJDK:
But of course, Oracle Java can still be downloaded from its website if you really need it and don't want to use OpenJDK:
Linux users who prefer to use the thoroughly tested Oracle JDK 6 or Oracle JDK 7 binaries over OpenJDK builds packaged in their Linux distributions of choice can of course as usual simply get the gratis download at http://oracle.com/java under the same terms as users on other platforms.
- more info @ robilad
However, installing it in Ubuntu is not that easy, so here is how to install the latest Sun Oracle Java JDK 7 (at the time I'm writing this post) in Ubuntu.
Install Oracle Java JDK 7 in Ubuntu
Warning: JDK 7 is available as a developer preview release, so use it at your own risk.
For the installation we'll be using an old script created by WebUpd8 reader Bruce Ingalls which I've updated to work with the latest Oracle JDK 7 (just a minor modification). The installation instructions below only work for Oracle JDK.
For the installation we'll be using an old script created by WebUpd8 reader Bruce Ingalls which I've updated to work with the latest Oracle JDK 7 (just a minor modification). The installation instructions below only work for Oracle JDK.
Let's begin!
1. Download the latest Oracle JDK 7 from HERE (you must click "accept license" and then download the .tar.gz package for your computer architecture - jdk-7-linux-i586.tar.gz or jdk-7-linux-x64.tar.gz; these filenames are just examples, they will change on future releases). You can use these instructions for older JDK versions too, but make sure you use the appropriate folder names, etc.
2. Extract the downloaded Oracle Java JDK archive in your home folder and rename the newly created folder to "java-7-oracle" - we must move this folder to /usr/lib/jvm using the following commands:
$ cd
$ sudo mkdir -p /usr/lib/jvm/ #just in case
$ sudo mv java-7-oracle/ /usr/lib/jvm/
$ sudo mkdir -p /usr/lib/jvm/ #just in case
$ sudo mv java-7-oracle/ /usr/lib/jvm/
3. Install Update Java package created by Bruce Ingalls (packages available for Ubuntu 11.10, 11.04, 10.10 and 10.04):
$ sudo add-apt-repository ppa:nilarimogard/webupd8
$ sudo apt-get update
$ sudo apt-get install update-java
$ sudo apt-get update
$ sudo apt-get install update-java
If you don't want to add the WebUpd8 PPA, you can also manually download the script. The script may work with other Linux distributions, but it has only been tested on Ubuntu.
4. Now run the following command in a terminal to install Oracle Java JDK:
4. Now run the following command in a terminal to install Oracle Java JDK:
$ sudo update-java
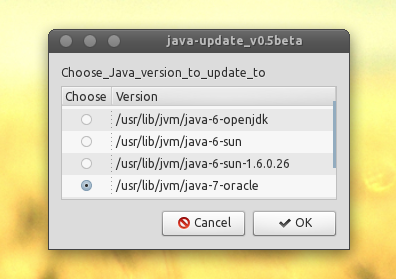
The script will ask you to select the Java version - select "java-7-oracle" for Oracle Java JDK 7, click OK and wait for it to finish:
After a few minutes, Oracle Java JDK should be successfully installed on your Ubuntu machine. You can check out the version by running these commands in a terminal:
$ java -version
$ javac -version
$ javac -version
The version should be "1.7.0".
原文地址:
http://www.webupd8.org/2011/09/how-to-install-oracle-java-7-jdk-in.html


