04-webdriver基本操作
1、webdriver原理与组成

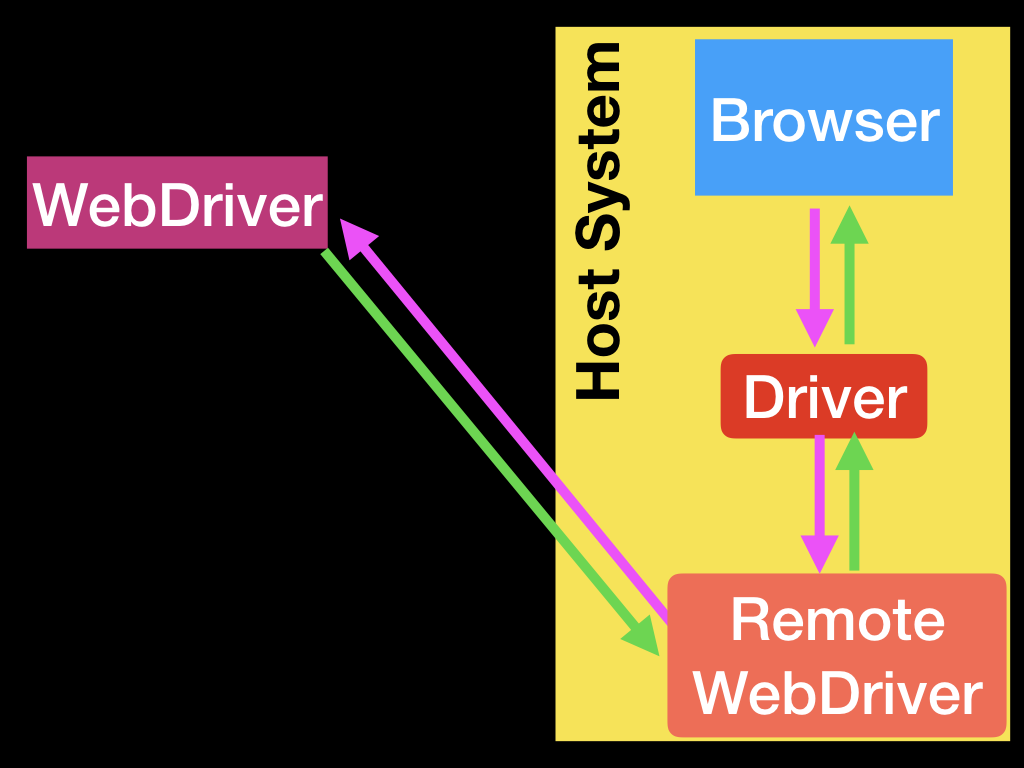
总的来说,webdriver以命令的方式通过driver告诉浏览器想要做什么,同样的通过driver获得信息
这里的driver指的是具体的driver,比如chromeDriver,
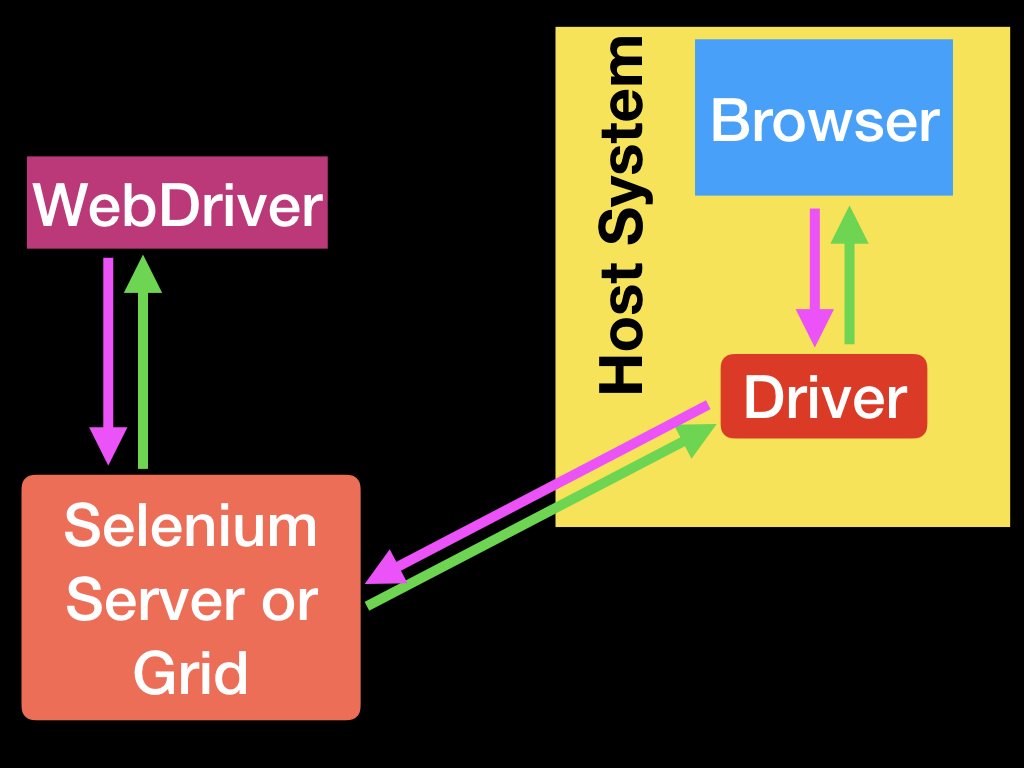
上面是直接交流的方式,也可以通过selenium服务器和Romotewebserver远程交流

远程交流方式可以替换成selenium server和selenium grid的形式,

2、webdriver下载:
| Browser | Supported OS | Maintained by | Download | Issue Tracker |
|---|---|---|---|---|
| Chromium/Chrome | Windows/macOS/Linux | Downloads | Issues | |
| Firefox | Windows/macOS/Linux | Mozilla | Downloads | Issues |
| Edge | Windows 10 | Microsoft | Downloads | Issues |
| Internet Explorer | Windows | Selenium Project | Downloads | Issues |
| Safari | macOS El Capitan and newer | Apple | Built in | Issues |
| Opera | Windows/macOS/Linux | Opera | Downloads | Issues |
各驱动下载地址:
Chrome
3、使用
JAVA:
import org.openqa.selenium.WebDriver;
import org.openqa.selenium.chrome.ChromeDriver;

WebDriver driver = new ChromeDriver();
指定webdriver地址
System.setProperty("webdriver.chrome.driver", "/path/to/chromedriver");
Python:
#Simple assignment
from selenium.webdriver import Chrome

driver = Chrome()

#Or use the context manager
from selenium.webdriver import Chrome

with Chrome() as driver:
    #your code inside this indent
指定webdriver
Chrome(executable_path='/path/to/chromedriver')
JavaScript:
const {Builder} = require('selenium-webdriver');

(async function myFunction() {
    let driver = await new Builder().forBrowser('chrome').build();
    //your code inside this block
})();
指定webdriver
chrome.setDefaultService(new chrome.ServiceBuilder('path/to/chromedriver').build());
4、浏览器操作
| 操作 | 代码 |
|
navigate to |
JAVA:
|
|
获取当前URL |
JAVA:
|
|
退回上一页 |
JAVA:
|
|
前进一页 |
JAVA: |
|
刷新当前页面 |
JAVA: |
|
获取title |
JAVA: |
|
获取当前窗口句柄 |
JAVA: |
|
切换窗口 |
JAVA: //Store the ID of the original window String originalWindow = driver.getWindowHandle(); //Check we don't have other windows open already assert driver.getWindowHandles().size() == 1; //Click the link which opens in a new window driver.findElement(By.linkText("new window")).click(); //Wait for the new window or tab wait.until(numberOfWindowsToBe(2)); //Loop through until we find a new window handle for (String windowHandle : driver.getWindowHandles()) { if(!originalWindow.contentEquals(windowHandle)) { driver.switchTo().window(windowHandle); break; } } //Wait for the new tab to finish loading content wait.until(titleIs("Selenium documentation"));
from selenium import webdriver
from selenium.webdriver.support.ui import WebDriverWait
from selenium.webdriver.support import expected_conditions as EC

# Start the driver
with webdriver.Firefox() as driver:
    # Open URL
    driver.get("https://seleniumhq.github.io")

    # Setup wait for later
    wait = WebDriverWait(driver, 10)

    # Store the ID of the original window
    original_window = driver.current_window_handle

    # Check we don't have other windows open already
    assert len(driver.window_handles) == 1

    # Click the link which opens in a new window
    driver.find_element(By.LINK_TEXT, "new window").click()

    # Wait for the new window or tab
    wait.until(EC.number_of_windows_to_be(2))

    # Loop through until we find a new window handle
    for window_handle in driver.window_handles:
        if window_handle != original_window:
            driver.switch_to.window(window_handle)
            break

    # Wait for the new tab to finish loading content
    wait.until(EC.title_is("SeleniumHQ Browser Automation"))
|
|
切换到新窗口或新标签页 |
JAVA: // Opens a new tab and switches to new tab driver.switchTo().newWindow(WindowType.TAB); // Opens a new window and switches to new window driver.switchTo().newWindow(WindowType.WINDOW);
# Opens a new tab and switches to new tab
driver.switch_to.new_window('tab')

# Opens a new window and switches to new window
driver.switch_to.new_window('window')
|
|
关闭标签页 |
JAVA: //Close the tab or window driver.close(); //Switch back to the old tab or window driver.switchTo().window(originalWindow); Python: #Close the tab or window driver.close() #Switch back to the old tab or window driver.switch_to.window(original_window)
|
|
关闭浏览器 |
JAVA:driver.quit(); |
|
Frames-使用webElement |
JAVA: //Store the web element WebElement iframe = driver.findElement(By.cssSelector("#modal>iframe")); //Switch to the frame driver.switchTo().frame(iframe); //Now we can click the button driver.findElement(By.tagName("button")).click();
# Store iframe web element
iframe = driver.find_element(By.CSS_SELECTOR, "#modal > iframe")

# switch to selected iframe
driver.switch_to.frame(iframe)

# Now click on button
driver.find_element(By.TAG_NAME, 'button').click()
|
|
Frames-使用id或name |
JAVA: //Using the ID driver.switchTo().frame("buttonframe"); //Or using the name instead driver.switchTo().frame("myframe"); //Now we can click the button driver.findElement(By.tagName("button")).click();
# Switch frame by id
driver.switch_to.frame('buttonframe')

# Now, Click on the button
driver.find_element(By.TAG_NAME, 'button').click()
|
|
Frames-使用下标 |
JAVA:
|
|
离开iframe |
JAVA: // Return to the top level
driver.switchTo().defaultContent();
# switch back to default content
driver.switch_to.default_content()
|
|
获取窗口大小 |
JAVA: //Access each dimension individually int width = driver.manage().window().getSize().getWidth(); int height = driver.manage().window().getSize().getHeight(); //Or store the dimensions and query them later Dimension size = driver.manage().window().getSize(); int width1 = size.getWidth(); int height1 = size.getHeight(); Python: # Access each dimension individually width = driver.get_window_size().get("width") height = driver.get_window_size().get("height") # Or store the dimensions and query them later size = driver.get_window_size() width1 = size.get("width") height1 = size.get("height") |
|
设置窗口大小 |
JAVA:driver.manage().window().setSize(new Dimension(1024, 768));
|
|
获取窗口位置 |
JAVA: // Access each dimension individually int x = driver.manage().window().getPosition().getX(); int y = driver.manage().window().getPosition().getY(); // Or store the dimensions and query them later Point position = driver.manage().window().getPosition(); int x1 = position.getX(); int y1 = position.getY(); Python: # Access each dimension individually x = driver.get_window_position().get('x') y = driver.get_window_position().get('y') # Or store the dimensions and query them later position = driver.get_window_position() x1 = position.get('x') y1 = position.get('y') |
|
设置窗口位置 |
JAVA: // Move the window to the top left of the primary monitor
driver.manage().window().setPosition(new Point(0, 0));
Python: # Move the window to the top left of the primary monitor driver.set_window_position(0, 0) |
|
窗口最大化 |
JAVA: |
|
窗口最小化 |
JAVA: |
|
窗口全屏 |
JAVA: |
|
截屏 |
JAVA: import org.apache.commons.io.FileUtils; import org.openqa.selenium.chrome.ChromeDriver; import java.io.*; import org.openqa.selenium.*; public class SeleniumTakeScreenshot { public static void main(String args[]) throws IOException { WebDriver driver = new ChromeDriver(); driver.get("http://www.example.com"); File scrFile = ((TakesScreenshot)driver).getScreenshotAs(OutputType.FILE); FileUtils.copyFile(scrFile, new File("./image.png")); driver.quit(); } }
from selenium import webdriver driver = webdriver.Chrome() # Navigate to url driver.get("http://www.example.com") # Returns and base64 encoded string into image driver.save_screenshot('./image.png') driver.quit() |
|
截取一个元素的图 |
JAVA: import org.apache.commons.io.FileUtils; import org.openqa.selenium.*; import org.openqa.selenium.chrome.ChromeDriver; import java.io.File; import java.io.IOException; public class SeleniumelementTakeScreenshot { public static void main(String args[]) throws IOException { WebDriver driver = new ChromeDriver(); driver.get("https://www.example.com"); WebElement element = driver.findElement(By.cssSelector("h1")); File scrFile = element.getScreenshotAs(OutputType.FILE); FileUtils.copyFile(scrFile, new File("./image.png")); driver.quit(); } } Python: from selenium import webdriver from selenium.webdriver.common.by import By driver = webdriver.Chrome() # Navigate to url driver.get("http://www.example.com") ele = driver.find_element(By.CSS_SELECTOR, 'h1') # Returns and base64 encoded string into image ele.screenshot('./image.png') driver.quit()
|
|
执行JS |
JAVA: Python: # code sample not available please raise a PR
|
|
复制页面 |
JAVA: import org.openqa.selenium.print.PrintOptions; driver.get("https://www.selenium.dev"); printer = (PrintsPage) driver; PrintOptions printOptions = new PrintOptions(); printOptions.setPageRanges("1-2"); Pdf pdf = printer.print(printOptions); String content = pdf.getContent();
Python: from selenium.webdriver.common.print_page_options import PrintOptions print_options = PrintOptions() print_options.page_ranges = ['1-2'] driver.get("printPage.html") base64code = driver.print_page(print_options)
|
5 定位元素
| 操作 | 代码 | ||||||||||||||||||
| 定位一个元素 |
JAVA: WebElement cheese = driver.findElement(By.id("cheese")); driver.findElement(By.cssSelector("#cheese #cheddar")); Python: driver.find_element(By.ID, "cheese") cheddar = driver.find_element_by_css_selector("#cheese #cheddar") |
||||||||||||||||||
| 定位多个元素 |
JAVA: List<WebElement> muchoCheese = driver.findElements(By.cssSelector("#cheese li")); Python: mucho_cheese = driver.find_elements_by_css_selector("#cheese li") 元素定位策略:
|
||||||||||||||||||
| 相对定位 |
python: above() from selenium.webdriver.support.relative_locator import with_tag_name passwordField = driver.find_element(By.ID, "password") emailAddressField = driver.find_element(with_tag_name("input").above(passwordField)) below from selenium.webdriver.support.relative_locator import with_tag_name emailAddressField = driver.find_element(By.ID, "email") passwordField = driver.find_element(with_tag_name("input").below(emailAddressField)) toLeftOf()from selenium.webdriver.support.relative_locator import with_tag_name submitButton = driver.find_element(By.ID, "submit") cancelButton = driver.find_element(with_tag_name("button"). to_left_of(submitButton)) toRightOf()
from selenium.webdriver.support.relative_locator import with_tag_name

cancelButton = driver.find_element(By.ID, "cancel")
submitButton = driver.find_element(with_tag_name("button").
                                   to_right_of(cancelButton))
near()
from selenium.webdriver.support.relative_locator import with_tag_name

emailAddressLabel = driver.find_element(By.ID, "lbl-email")
emailAddressField = driver.find_element(with_tag_name("input").
                                       near(emailAddressLabel))
|
||||||||||||||||||
|
突变观察 就是DOM中突然有一个元素时可以通过突变观察捕获 |
JAVA: WebDriver driver = new FirefoxDriver(); HasLogEvents logger = (HasLogEvents) driver; AtomicReference<DomMutationEvent> seen = new AtomicReference<>(); CountDownLatch latch = new CountDownLatch(1); logger.onLogEvent(domMutation(mutation -> { seen.set(mutation); latch.countDown(); })); driver.get("http://www.google.com"); WebElement span = driver.findElement(By.cssSelector("span")); ((JavascriptExecutor) driver).executeScript("arguments[0].setAttribute('cheese', 'gouda');", span); assertThat(latch.await(10, SECONDS)).isTrue(); assertThat(seen.get().getAttributeName()).isEqualTo("cheese"); assertThat(seen.get().getCurrentValue()).isEqualTo("gouda"); Python: from selenium import webdriver from selenium.webdriver.common.by import By from selenium.webdriver.support.wait import WebDriverWait driver = webdriver.Chrome() async with driver.log.mutation_events() as event: pages.load("dynamic.html") driver.find_element(By.ID, "reveal").click() WebDriverWait(driver, 5)\ .until(EC.visibility_of(driver.find_element(By.ID, "revealed"))) assert event["attribute_name"] == "style" assert event["current_value"] == "" assert event["old_value"] == "display:none;"
|
||||||||||||||||||
| 等待 |
1、显示等待: webdriver的针对某个元素的明确等待 from selenium.webdriver.support.ui import WebDriverWait driver.navigate("file:///race_condition.html") el = WebDriverWait(driver).until(lambda d: d.find_element_by_tag_name("p")) assert el.text == "Hello from JavaScript!" 设置超时:WebDriverWait(driver, timeout=3).until(some_condition) 预期条件:
您可以参考每个客户端绑定的API文档,以找到预期条件的详尽列表:
2、强制等待 import time sleep(1000) 3、隐式等待 是指对整个页面的加载 driver = Firefox() driver.implicitly_wait(10) driver.get("http://somedomain/url_that_delays_loading") my_dynamic_element = driver.find_element(By.ID, "myDynamicElement") 4、流畅等待FluentWait driver = Firefox() driver.get("http://somedomain/url_that_delays_loading") wait = WebDriverWait(driver, 10, poll_frequency=1, ignored_exceptions=[ElementNotVisibleException, ElementNotSelectableException]) element = wait.until(EC.element_to_be_clickable((By.XPATH, "//div")))
|
||||||||||||||||||
| alert |
# Click the link to activate the alert
driver.find_element(By.LINK_TEXT, "See an example alert").click()

# Wait for the alert to be displayed and store it in a variable
alert = wait.until(expected_conditions.alert_is_present())

# Store the alert text in a variable
text = alert.text

# Press the OK button
alert.accept()
|
||||||||||||||||||
|
Confirm |
# Click the link to activate the alert
driver.find_element(By.LINK_TEXT, "See a sample confirm").click()

# Wait for the alert to be displayed
wait.until(expected_conditions.alert_is_present())

# Store the alert in a variable for reuse
alert = driver.switch_to.alert

# Store the alert text in a variable
text = alert.text

# Press the Cancel button
alert.dismiss()
|
||||||||||||||||||
|
Prompt |
# Click the link to activate the alert
driver.find_element(By.LINK_TEXT, "See a sample prompt").click()

# Wait for the alert to be displayed
wait.until(expected_conditions.alert_is_present())

# Store the alert in a variable for reuse
alert = Alert(driver)

# Type your message
alert.send_keys("Selenium")

# Press the OK button
alert.accept()
|
||||||||||||||||||
| 代理 |
from selenium import webdriver

PROXY = "<HOST:PORT>"
webdriver.DesiredCapabilities.FIREFOX['proxy'] = {
    "httpProxy": PROXY,
    "ftpProxy": PROXY,
    "sslProxy": PROXY,
    "proxyType": "MANUAL",

}

with webdriver.Firefox() as driver:
    # Open URL
    driver.get("https://selenium.dev")
|
||||||||||||||||||
| 页面加载方式 |
from selenium import webdriver
from selenium.webdriver.chrome.options import Options
options = Options()
options.page_load_strategy = 'normal'  # 'eager','none'
driver = webdriver.Chrome(options=options)
# Navigate to url
driver.get("http://www.google.com")
driver.quit()
|
||||||||||||||||||
| 寻找元素find element|find elements |
python: from selenium import webdriver from selenium.webdriver.common.by import By driver = webdriver.Firefox() driver.get("http://www.google.com") # Get search box element from webElement 'q' using Find Element search_box = driver.find_element(By.NAME, "q") search_box.send_keys("webdriver") from selenium import webdriver from selenium.webdriver.common.by import By driver = webdriver.Firefox() # Navigate to Url driver.get("https://www.example.com") # Get all the elements available with tag name 'p' elements = driver.find_elements(By.TAG_NAME, 'p') for e in elements: print(e.text)
|
||||||||||||||||||
|
Find Element From Element |
python:
from selenium import webdriver
from selenium.webdriver.common.by import By

driver = webdriver.Firefox()
driver.get("http://www.google.com")
search_form = driver.find_element(By.TAG_NAME, "form")
search_box = search_form.find_element(By.NAME, "q")
search_box.send_keys("webdriver")
from selenium import webdriver from selenium.webdriver.common.by import By driver = webdriver.Chrome() driver.get("https://www.example.com") # Get element with tag name 'div' element = driver.find_element(By.TAG_NAME, 'div') # Get all the elements available with tag name 'p' elements = element.find_elements(By.TAG_NAME, 'p') for e in elements: print(e.text)
|
||||||||||||||||||
| 获取active 元素 |
from selenium import webdriver
  from selenium.webdriver.common.by import By

  driver = webdriver.Chrome()
  driver.get("https://www.google.com")
  driver.find_element(By.CSS_SELECTOR, '[name="q"]').send_keys("webElement")

  # Get attribute of current active element
  attr = driver.switch_to.active_element.get_attribute("title")
  print(attr)
|
||||||||||||||||||
| 元素是否禁止 |
# Navigate to url
driver.get("http://www.google.com")

# Returns true if element is enabled else returns false
value = driver.find_element(By.NAME, 'btnK').is_enabled()
|
||||||||||||||||||
| 元素是否选择 |
# Navigate to url
driver.get("https://the-internet.herokuapp.com/checkboxes")

# Returns true if element is checked else returns false
value = driver.find_element(By.CSS_SELECTOR, "input[type='checkbox']:first-of-type").is_selected()
|
||||||||||||||||||
| 获取选择的tag标签 |
# Navigate to url
driver.get("https://www.example.com")

# Returns TagName of the element
attr = driver.find_element(By.CSS_SELECTOR, "h1").tag_name
|
||||||||||||||||||
| 获取元素的位置 |
# Navigate to url
driver.get("https://www.example.com")

# Returns height, width, x and y coordinates referenced element
res = driver.find_element(By.CSS_SELECTOR, "h1").rect
|
||||||||||||||||||
| 获取元素的css属性 |
# Navigate to Url
driver.get('https://www.example.com')

# Retrieves the computed style property 'color' of linktext
cssValue = driver.findElement(By.LINK_TEXT, "More information...").value_of_css_property('color')
|
||||||||||||||||||
| 获取元素的text值 |
# Navigate to url
driver.get("https://www.example.com")

# Retrieves the text of the element
text = driver.find_element(By.CSS_SELECTOR, "h1").text
|

