【Vue】MineData 地图接入
一、文档资料:
MineData开放平台:
https://minedata.cn/md-platform/login/login
MineData V2.1.0 接口文档:
http://113.108.157.29:7070/support/static/api/doc/js/v2.1.0/api-reference/index.html#map
MineData 在线实例:
http://113.108.157.29:7070/support/api/demo/js-api/zh/map/base/map-show
二、上手案例:
- 1、引入方式:
1、可以直接在打包的index.html页面写script脚本接入
<!DOCTYPE html>
<html>
<head>
  <meta charset="utf-8">
  <meta http-equiv="X-UA-Compatible" content="IE=edge,chrome=1">
  <meta name="renderer" content="webkit">
  <meta name="viewport" content="width=device-width, initial-scale=1, maximum-scale=1, user-scalable=no">
  <title>projectName</title>
  <script type="text/javascript" src="static/config.js"></script>
  <!-- 引入MineMap API插件 -->
  <link rel="stylesheet" href="http://minedata.cn/minemapapi/v2.1.1/minemap.css">
  <script src="http://minedata.cn/minemapapi/v2.1.1/minemap.js"></script>
</head>
<body style="background: #f5f7f8">
<div id="app"></div>
</body>
</html>
2、或者在Vue编写动态接入的方法 import-js.js
import axios from 'axios'

const loadJs = src => {
  return new Promise((resolve, reject) => {
    const script = document.createElement('script')
    script.type = 'text/javascript'
    script.src = src
    document.body.appendChild(script)

    script.onload = () => {
      resolve(script)
    }
    script.onerror = err => {
      console.log(`loadJsFail: ${err}`)
      reject()
    }
  })
}

const loadCss = src => {
  return new Promise((resolve, reject) => {
    axios.get(src).then(res => {
      const css = document.createElement('style')
      css.type = 'text/css'
      css.innerHTML = res.data
      document.head.appendChild(css)
      resolve(css)
    }).catch(err => {
      console.log(`loadCssFail: ${err}`)
      reject()
    })
  })
}

export {
  loadJs,
  loadCss
}
在具体某个需要使用的组件中初始化资源:
import { loadCss, loadJs } from './存放路径/import-js.js'

async created() {
  await loadCss('http://minedata.cn/minemapapi/v2.1.1/minemap.css')
  await loadJs('http://minedata.cn/minemapapi/v2.1.1/minemap.js')
}
- 2、地图初始化:
需要先赋值默认的参数变量,这里先用配置文件放好加载的变量 config.js
window._config = {
  MAP_LAT: 29.670908,
  MAP_LNG: 115.963214,

  minemapKey: '应用key,开放平台账号创建',
  minemapWhiteSolution: '地图样式id',
  minemapBlackSolution: '地图样式id',
  minemapDomainUrl: 'https://minemap.minedata.cn',
  minemapDataDomainUrl: 'https://minemap.minedata.cn',
  minemapServerDomainUrl: 'https://sd-data.minedata.cn',
  minemapSpriteUrl: 'https://minemap.minedata.cn/minemapapi/v2.1.1/sprite/sprite',
  minemapServiceUrl: 'https://service.minedata.cn/service'
}
地图初始化还是基于dom对象创建的,所以所有关于地图加载的方法一定要放到mounted周期下执行
mounted() {
  this.initialMapContainer()
},
methods: {
  async initialMapContainer() {
    window.minemap.domainUrl = window._config.minemapDomainUrl
    window.minemap.dataDomainUrl = window._config.minemapDataDomainUrl
    window.minemap.serverDomainUrl = window._config.minemapServerDomainUrl
    window.minemap.spriteUrl = window._config.minemapSpriteUrl
    window.minemap.serviceUrl = window._config.minemapServiceUrl
    window.minemap.key = window._config.minemapKey
    window.minemap.solution = window._config.minemapBlackSolution
    this.mapInstance = new window.minemap.Map({
      container: 'mapContainer',
      style: `https://service.minedata.cn/map/solu/style/${window.minemap.solution}`,
      center: [window._config.MAP_LNG, window._config.MAP_LAT],
      zoom: 12, // 缩放大小直
      pitch: 0, // 倾斜度参数
      projection: window.minemap.ProjectionType.LATLON // 经纬度投影(根据实际项目情况使用,线上环境点位偏移,坐标参数不是配套的)
    })
  }
}
- 3、打点位:
addStationMarker(station) {
  // 创建点位的元素
  const isOnline = station['runStatus'] === 1
  const markerDom = window.document.createElement('div')
  markerDom.id = `station${station.id}`
  markerDom.style['background-image'] = `url(${isOnline ? this.stationIconPath2 : this.stationIconPath})`
  markerDom.style.width = '50px'
  markerDom.style.height = '50px'
  markerDom.style['border-radius'] = '2px'

  // 入参dom元素, 和元素的偏离参数(基于图标像素调整)
  const mineMarker = new window.minemap.Marker(markerDom, { offset: [-25, -50] })
  // 点位经纬度参数对象
  const markerLngLat = new window.minemap.LngLat(station.longitude, station.latitude)
  mineMarker.setLngLat(markerLngLat)
  // addTo方法将点位展示在地图上
  mineMarker.addTo(this.mapInstance)
}
图片资源我使用require直接转为具体对象来渲染的
stationIconPath: require('@/assets/image/station-point-1.png'),
stationIconPath2: require('@/assets/image/station-point-2.png'),
如果在非打包的public目录下,可以直接写路径访问
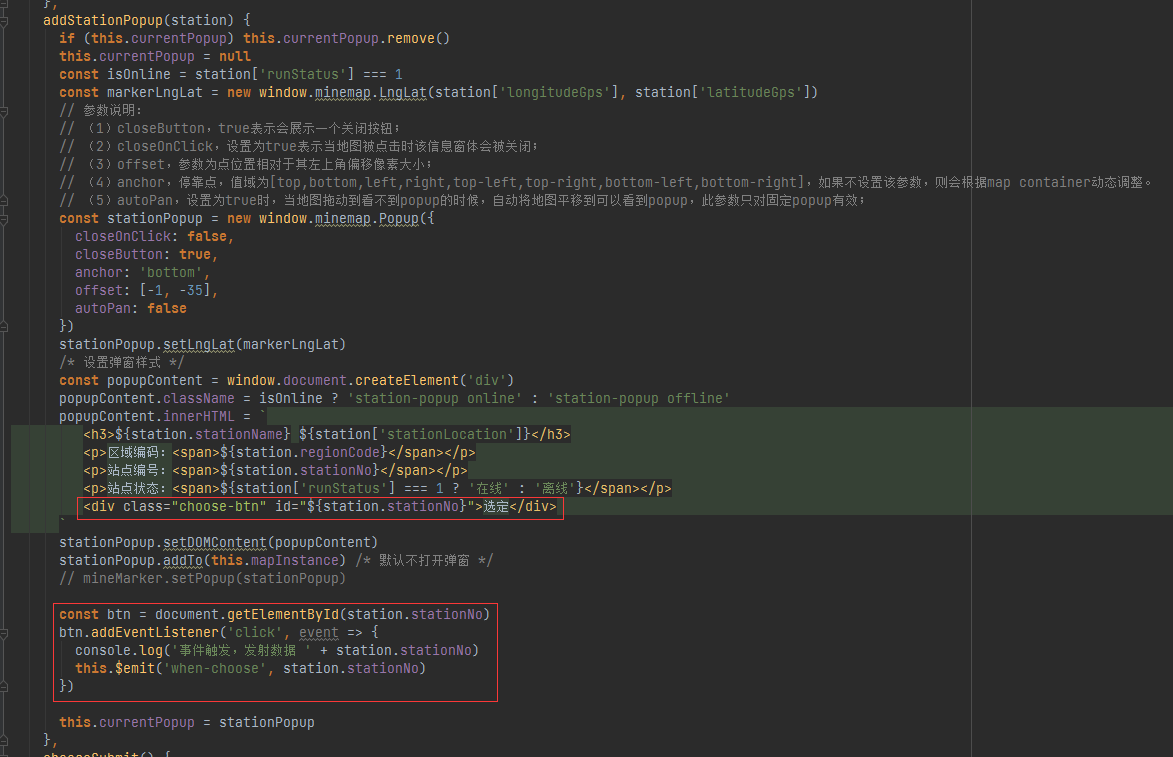
- 4、创建点位信息窗体:
在点位创建的基础上追加弹窗窗体
addStationPopup(station, mineMarker) {
  const isOnline = station['runStatus'] === 1
  const markerLngLat = new window.minemap.LngLat(station.longitude, station.latitude)
  // 参数说明:
  // (1)closeButton,true表示会展示一个关闭按钮;
  // (2)closeOnClick,设置为true表示当地图被点击时该信息窗体会被关闭;
  // (3)offset,参数为点位置相对于其左上角偏移像素大小;
  // (4)anchor,停靠点,值域为[top,bottom,left,right,top-left,top-right,bottom-left,bottom-right],如果不设置该参数,则会根据map container动态调整。
  // (5)autoPan,设置为true时,当地图拖动到看不到popup的时候,自动将地图平移到可以看到popup,此参数只对固定popup有效;
  const stationPopup = new window.minemap.Popup({
    closeOnClick: false,
    closeButton: true,
    anchor: 'bottom',
    offset: [0, -40],
    autoPan: false
  })
  stationPopup.setLngLat(markerLngLat)

  // 弹窗内容创建
  const popupContent = window.document.createElement('div')
  popupContent.className = isOnline ? 'station-popup online' : 'station-popup offline'
  popupContent.innerHTML = `
     <h3>${station.stationName} ${station['stationLocation']}</h3>
     <p>区域编码:${station.regionCode}</p>
     <p>站点编号:${station.stationNo}</p>
     <p>站点状态:${station['runStatus'] === 1 ? '在线' : '离线'}</p>
  `
  stationPopup.setDOMContent(popupContent)
  // stationPopup.addTo(this.mapInstance) /* 默认不打开弹窗 */
  mineMarker.setPopup(stationPopup)
}
预览内容:
窗体的样式可以直接修改:
  /* mineMap地图窗体样式设置 */
  /deep/ .minemap-popup-content {
    background: rgba(26,32,62,.7) !important;
    min-height: 100px;
    padding-top: 10px;
    overflow-y: auto;
    min-width: 200px;
    max-width: 500px !important;
    color: #D0D3DA;
  }

  /* 关闭按钮调整 */
  /deep/ .minemap-popup-close-button {
    font-size: 20px;
    color: #D0D3DA;
    right: 8px;
    top: 6px;
  }
  /* 窗体下标箭头的颜色调整 */
  /deep/ .minemap-popup-tip {
    border-top-color: rgba(26,32,62,.7) !important;
  }
  /* 窗体内部容器元素样式设置 */
  /deep/ .station-popup {
    padding: 5px;
    width: 250px;
    font-size: 14px;
  }
  /deep/ .station-popup > p {
    margin-top: 10px;
  }
- 3.1 移动居中的点位:
地图平移API,有两种,相对平移和绝对平移:
http://113.108.157.29:7070/support/api/demo/js-api/zh/map/state/map-move
panBy基于相对位置平移,panTo基于点位绝对平移
    function moveMap(vPixel, hPixel) {
        if (map) {
            map.panBy([vPixel, hPixel]);
        }
    }

    function moveMapCenter() {
        if (map) {
            map.panTo([116.46, 39.92]);
        }
    }
- 4.1 特殊窗体信息样式开发:
真是想不通为啥一定要这个样式,写起来真麻烦
可以发现这里是需要两种窗体样式的,一个是入口样式,一个是出口展示
所以不能直接对mineData的样式设置的,这样就不支持两种或多个窗体样式了
解决思路也是参考原型系统来的,我发现原型系统的默认弹窗是隐藏不展示的
这样就按我们自己声明的类名实现动态效果
第一步先把mineData的信息弹窗隐藏
/* 弹窗信息弹层不支持动态样式,隐藏展示 */
/deep/ .minemap-popup-content {
  max-width: none; /* 移除最大宽度 */
  overflow: visible !important; /* 溢出的时直接展示,不要滚动条 */
  background: none; /* 元素无背景 */
  box-shadow: none; /* 元素无阴影 */
  padding: 0; /* 内边距0 */
}
然后再是弹窗边框,内部布局这些内容:
/* 驶入弹窗边框 */
/deep/ .drive-in{
  border: 1px solid #62b500;
  box-shadow: 0 0 10px 0 #62b50045;
}
/* 驶入小箭头 */
/deep/ .station-popup.drive-in:after {
  border-color: #62b500 transparent transparent transparent;
}
/* 驶出弹窗边框 */
/deep/ .drive-out{
  border: 1px solid #f54336;
  box-shadow: 0 0 10px 0 #f5433645;
}
/* 驶出小箭头 */
/deep/ .station-popup.drive-out:after {
  border-color: #f54336 transparent transparent transparent;
}
/* 移除默认的下标箭头 */
/deep/ .minemap-popup-tip {
  display: none;
}
/* 入 */
/deep/ .station-popup.drive-in > div:first-child {
  background: #62b500;
  color: white;
  width: 40px;
  float: left;
  line-height: 120px;
  text-align: center;
  font-size: 16px;
}
/* 出 */
/deep/ .station-popup.drive-out > div:first-child {
  background: #f54336;
  width: 40px;
  color: white;
  line-height: 120px;
  text-align: center;
  font-size: 16px;
}
/deep/ .sfz_name {
  font-weight: 800;
}
/deep/ .station-pop-info {
  padding: 5px;
}
/* 关闭按钮调整 */
/deep/ .minemap-popup-close-button {
  font-size: 18px;
  right: 0;
  top: 5px;
}
弹窗初始化方法:
addStationPopup(station, mineMarker) {
  const isDriveIn = station.type === '1'
  const markerLngLat = new window.minemap.LngLat(station.longitude, station.latitude)
  const stationPopup = new window.minemap.Popup({
    closeOnClick: false,
    closeButton: true,
    anchor: 'bottom',
    offset: [0, isDriveIn ? -48 : -51],
    autoPan: false /* 关闭自动拖动 */
  })
  stationPopup.setLngLat(markerLngLat)
  const popupContent = window.document.createElement('div')
  popupContent.className = isDriveIn ? 'station-popup drive-in' : 'station-popup drive-out'
  popupContent.innerHTML = `
    <div>${isDriveIn ? '入' : '出'}</div>
    <div class="station-pop-info">
     <p class="sfz_name">${isDriveIn ? this.record.cashName : this.record.outCashName}</p>
     <p><span>所在区划:</span>${isDriveIn ? this.record.cashArea : this.record.outCashArea}</p>
     <p><span>所在高速:</span>${isDriveIn ? this.record.highwayName : this.record.outHighwayName}</p>
     <p>时间:${isDriveIn ? this.record.driveTime : this.record.outDriveTime}</p>
    </div>
  `
  stationPopup.setDOMContent(popupContent)
  stationPopup.addTo(this.mapInstance)
  mineMarker.setPopup(stationPopup)
}
2023年11月02日更新:
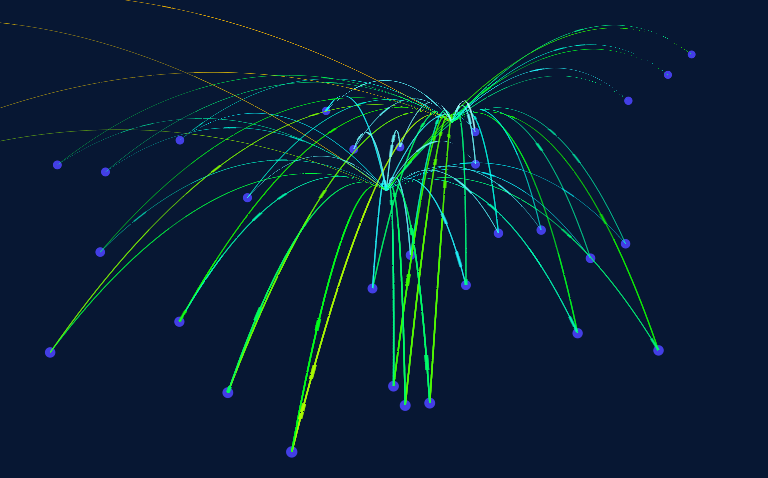
- 5 迁徙图 / 飞行图
新功能有一个飞行图的要求,同事是说在Echarts里面有,叫迁徙图,不过我没在文档实例上看到
我想了下这个东西在mineData应该提供了支持,找了下确实有的
http://113.108.157.29:7070/support/api/demo/js-api/zh/layer/plugin/od-1
归类在这图层插件里面:
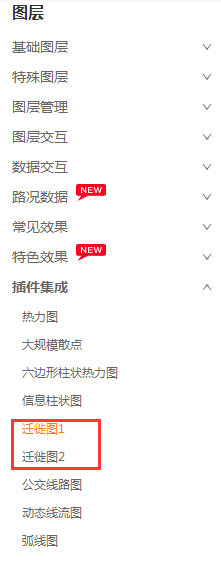
还有一个是动态航线的图层,效果类似
http://113.108.157.29:7070/support/api/demo/js-api/zh/layer/special/airline-layer
注意要先引入echarts的插件js,不然找不到这个对象
<script src="http://minedata.cn/minemapapi/v2.1.0/plugins/echarts/echarts.3.8.5.min.js"></script>
<script src="http://minedata.cn/minemapapi/v2.1.0/plugins/template/template.js"></script>
2023年11月28日更新:
功能进入测试阶段发现了一个问题,因为迁徙图的轨迹记录要随着主查询的数量不同而更新地图的展示
结果忘了写更新操作,这里又追补查看了下文档
要每次渲染图层之前,先删除之前渲染的图层
一、先说线图层的:
    /**
     * 创建地图对象后,开始加载地图资源,地图资源加载完成后触发load事件
     */
    map.on('load', function () {
        // 增加自定义数据源、自定义图层
        addSources();
        addLayers();
    });
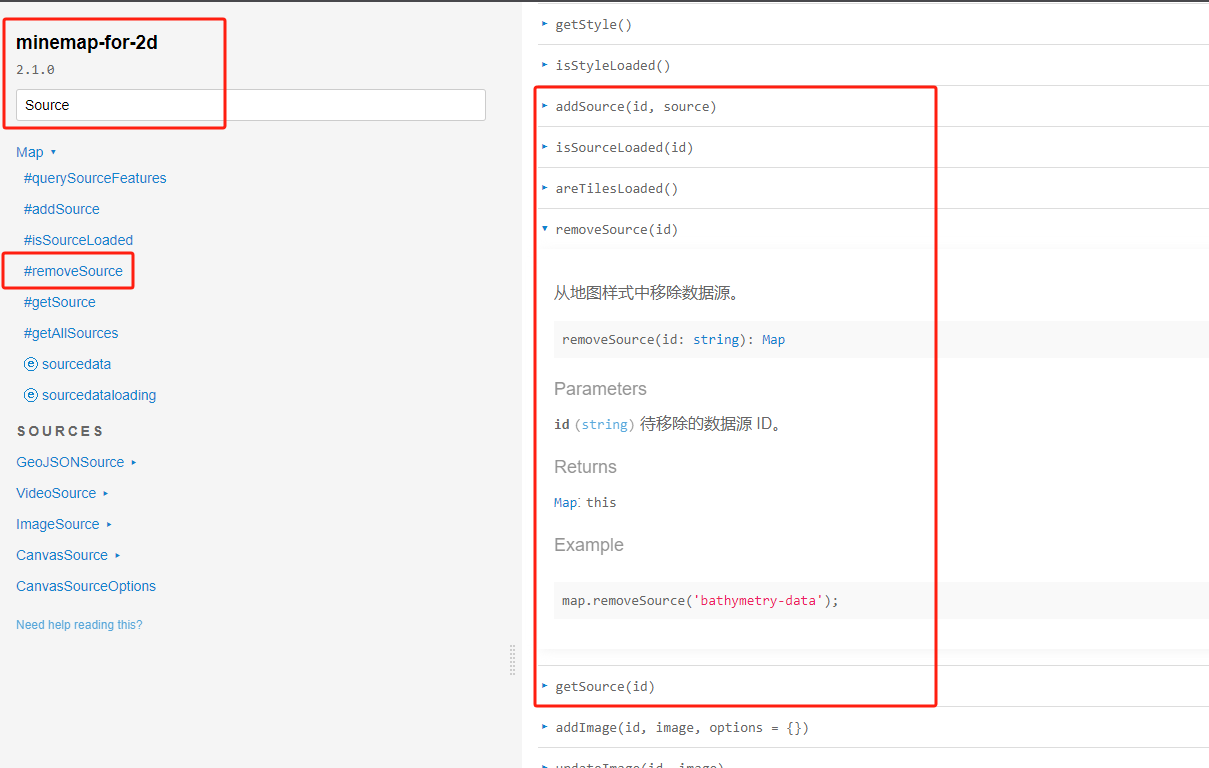
线图层是通过追加Source和Layer实现的,所以肯定有对应的删除方法
按ID获取Layer,如果存在时再删除即可,不要直接删除,有可能Layer对象没有初始化
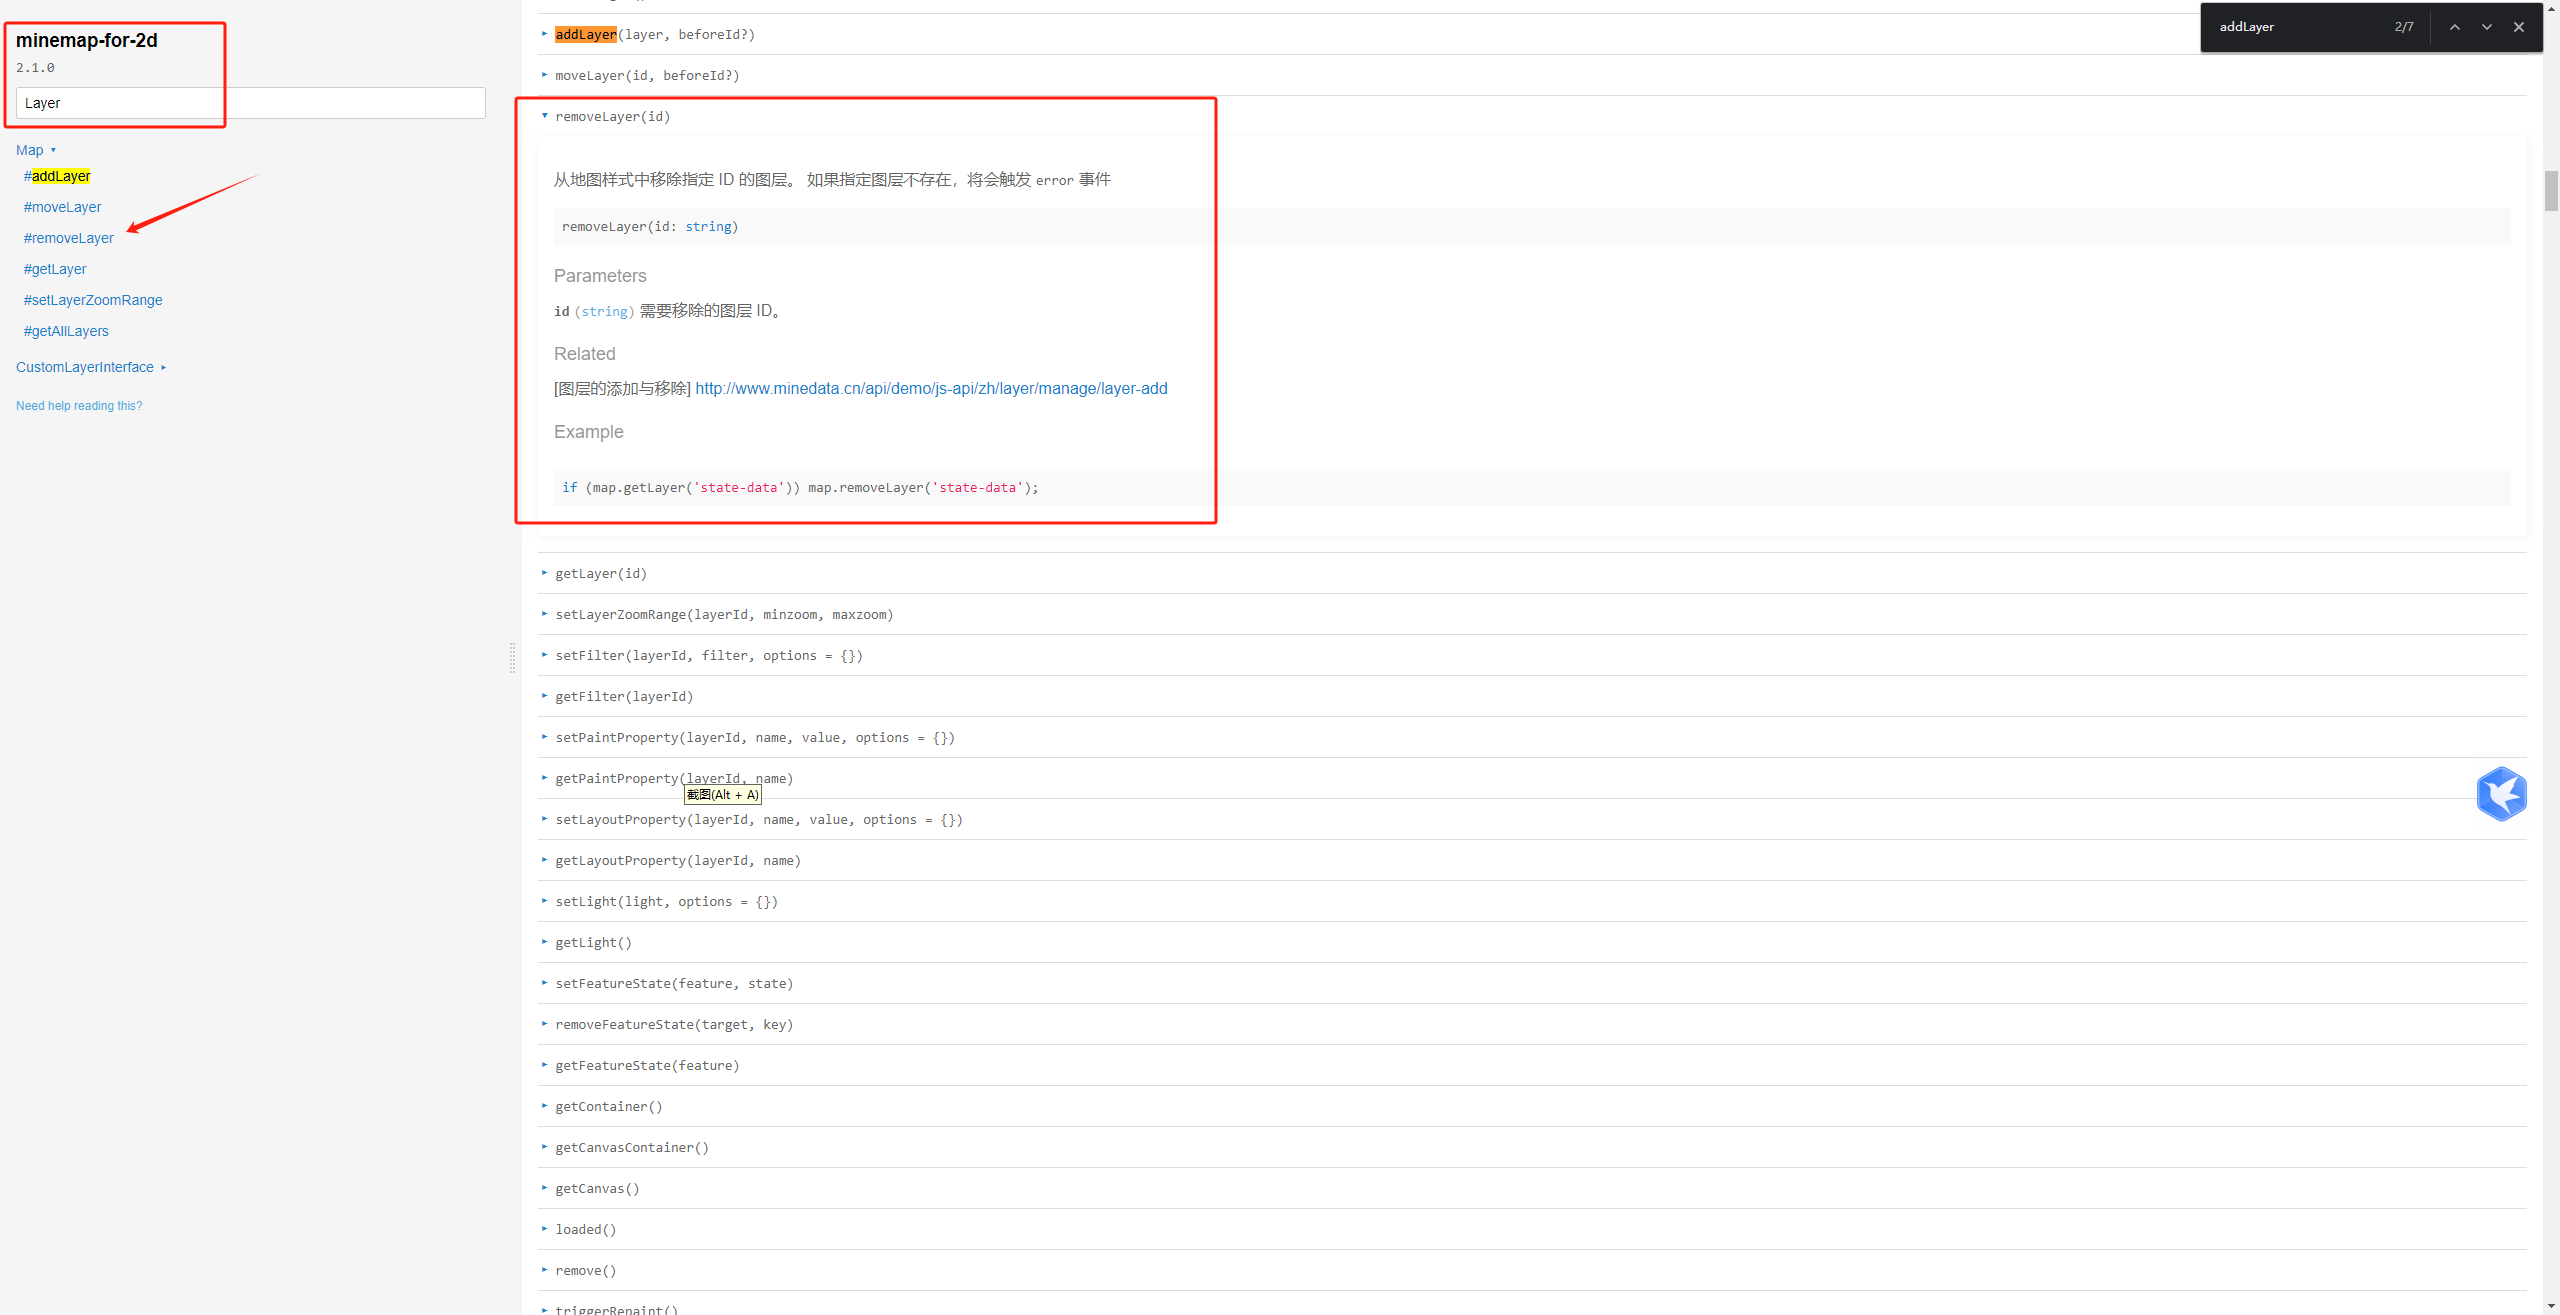
同理Sources也是一样的
迁徙图是在地图中嵌入了Echarts实现的,这个方法已经写好了尚未测试结果...
主要是在文档里面也没找到,待后续更新
2023年11月21日更新:
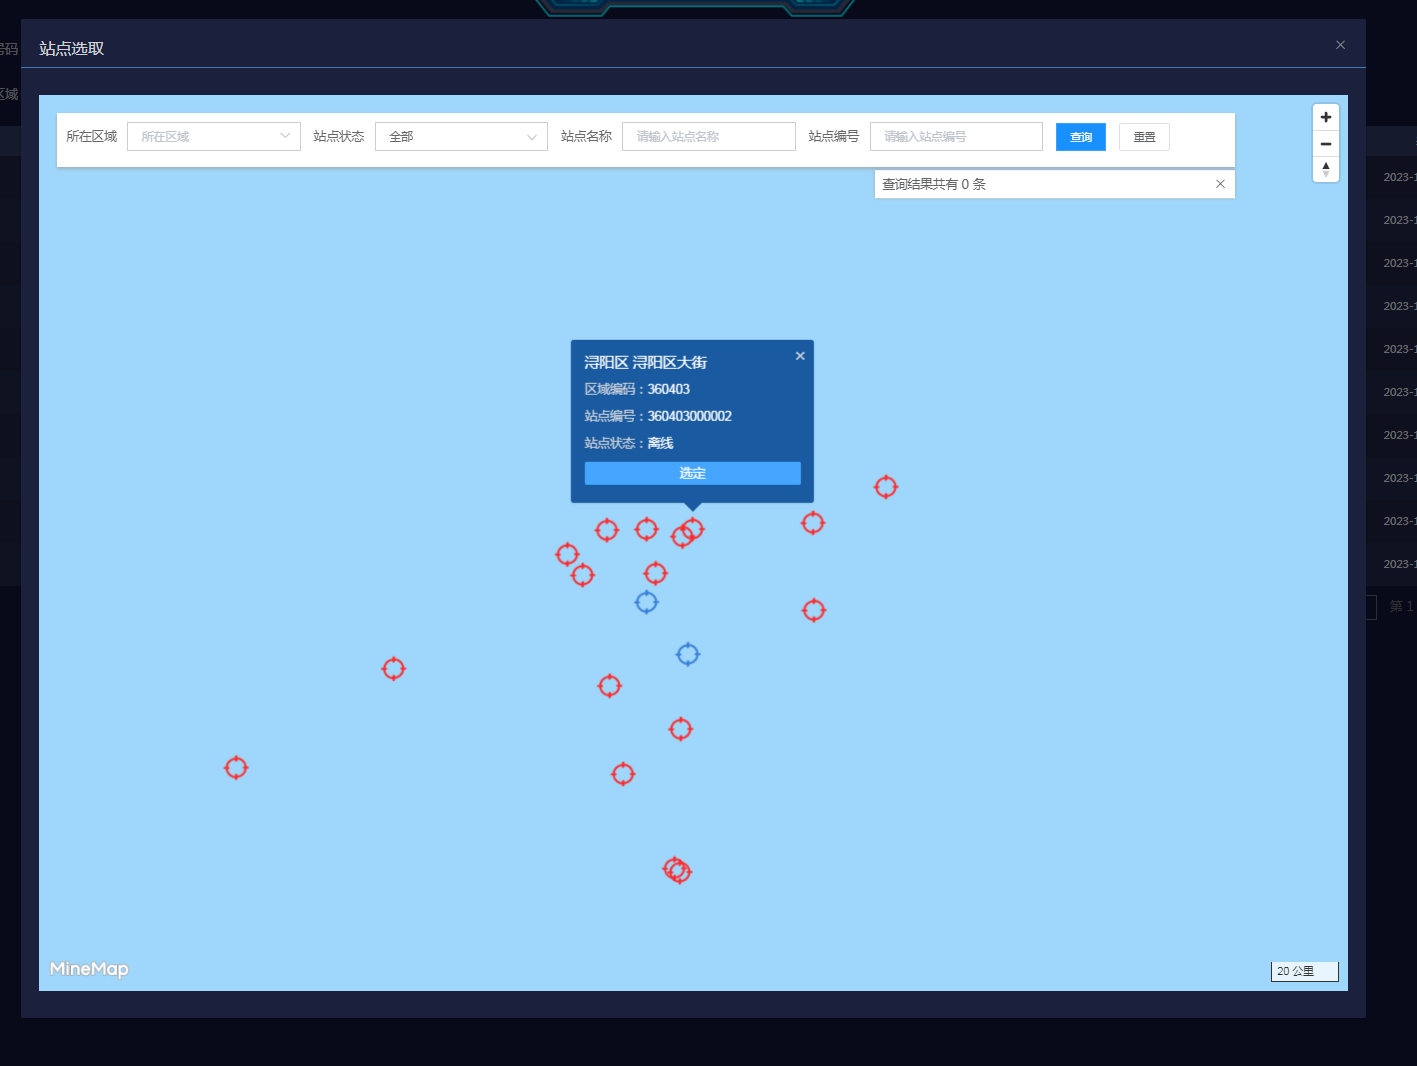
- 6 点位选取功能
需求是这样,主查询有个采集点位下拉选择,检索方式有两种
在下拉列表中选取

在点位图上选取
查询条件项设置:
<el-form-item label="采集点位">
  <el-select v-model="queryForm.stationNo" placeholder="请选择" clearable>
    <el-option v-for="(item, idx) in stationList" :key="`station${idx}`" :label="`${item.stationNo} | ${item.stationName}`" :value="`${item.stationNo}`" />
  </el-select>
  <el-button round type="default" size="small" icon="el-icon-map-location" circle @click="openStationChoose" />
</el-form-item>
点位选取弹窗和组件:
<el-dialog
  title="站点选取"
  :append-to-body="true"
  :close-on-click-modal="false"
  :visible="stationChooseVisible"
  width="75vw"
  custom-class="fixed-dialog"
  @close="stationChooseVisible = false"
>
  <station-choose v-if="stationChooseVisible" @when-choose="whenStationChoose" />
</el-dialog>
弹窗样式控制:
/* 弹层高度固定 80vh */
/deep/ .fixed-dialog .el-dialog__body {
  height: calc(70vh + 60px);
  /*max-height: 80vh;*/
  overflow-y: auto;
}
/* 弹层顶部间距固定 5vh */
/deep/ .fixed-dialog.el-dialog {
  margin-top: 5vh !important;
}
方法块:
    whenStationChoose(stationNo) {
      this.queryForm.stationNo = stationNo
      this.stationChooseVisible = false
    },
    openStationChoose() {
      this.stationChooseVisible = true
    },
点位选取组件:
<template>
  <div id="choosePanel">
    <div id="container" />

    <div id="chooseForm">
      <el-form :ref="chooseFormRef" :model="chooseForm" :rules="chooseRules" inline>
        <el-form-item label="所在区域" size="small">
          <el-cascader
            v-model="chooseForm.regionCode"
            size="small"
            :options="regionTree"
            :props="regionProps"
            placeholder="所在区域"
            clearable
            @change="handleRegionChange"
          />
        </el-form-item>

        <el-form-item label="站点状态" size="small">
          <el-select v-model="chooseForm.runStatus" placeholder="请选择" clearable size="small">
            <el-option v-for="item in runStatusList" :key="item.diCode" :label="item.diName" :value="item.diCode" />
          </el-select>
        </el-form-item>

        <el-form-item label="站点名称" size="small">
          <el-input v-model.trim="chooseForm.stationName" clearable placeholder="请输入站点名称" size="small" />
        </el-form-item>

        <el-form-item label="站点编号" size="small">
          <el-input v-model.trim="chooseForm.stationNo" clearable placeholder="请输入站点编号" size="small" />
        </el-form-item>

        <el-form-item size="small">
          <el-button type="primary" size="small" @click="chooseSubmit">查询</el-button>
          <el-button size="small" @click="chooseReset">重置</el-button>
        </el-form-item>
      </el-form>

      <div v-show="resultVisible" id="resultList">
        <span>查询结果共有 {{ resultList.length }} 条  <i class="el-icon-close result-close-btn" @click="resultVisible = false" /></span>
        <div v-for="(result, idx) in resultList" :key="`result${idx}`" class="result-info">
          <i class="result-seq">{{ idx + 1 }}</i>
          <div class="result-link">
            <div>
              <el-link type="primary" @click="locateStationInMap(result)">
                {{ result.stationName }} ({{ result['stationLocation'] }})
              </el-link>
            </div>
            <div style="color: #8C8C8C; margin-top: 5px;">{{ result.stationNo }}</div>
          </div>
        </div>
      </div>
    </div>

  </div>
</template>

<script>
import { getSysRegionCascadeList } from '../../api/perception/basic/region'
import { getAllStation, getStationListByChoose } from '../../api/perception/basic/station'

export default {
  name: 'StationChoose',
  data() {
    return {
      stationIconOnline: require('@/assets/image/station-online.png'),
      stationIconOffline: require('@/assets/image/station-offline.png'),
      mapInstance: null,
      currentPopup: null,
      stationList: [],
      runStatusList: [
        { diCode: '', diName: '全部' },
        { diCode: 1, diName: '在线' },
        { diCode: -1, diName: '离线' }
      ],
      chooseFormRef: 'chooseFormRefKey',
      chooseRules: {},
      chooseForm: {
        regionCode: '',
        runStatus: '',
        stationName: '',
        stationNo: ''
      },
      resultList: [],
      resultVisible: true,
      regionTree: [],
      regionProps: {
        label: 'regionName',
        value: 'regionCode',
        children: 'subRegions',
        checkStrictly: true,
        emitPath: false,
        lazy: true,
        async lazyLoad(node, resolve) {
          if (node.root) {
            const { data: regionTree } = await getSysRegionCascadeList({ levelNo: 0 })
            resolve(regionTree)
          } else {
            const { data: subRegions } = await getSysRegionCascadeList({ parentCode: node.data.regionCode })
            if (subRegions && subRegions.length > 0) {
              const mapList = subRegions.map(x => ({ ... x, leaf: x.levelNo === 2 }))
              return resolve(mapList)
            } else return resolve([])
          }
        }
      }
    }
  },
  mounted() {
    this.mapInitialize()
  },
  methods: {
    handleRegionChange(val) {},
    async mapInitialize() {
      window.minemap.domainUrl = window._config.minemapDomainUrl
      window.minemap.dataDomainUrl = window._config.minemapDataDomainUrl
      window.minemap.serverDomainUrl = window._config.minemapServerDomainUrl
      window.minemap.spriteUrl = window._config.minemapSpriteUrl
      window.minemap.serviceUrl = window._config.minemapServiceUrl
      window.minemap.key = window._config.minemapKey
      window.minemap.solution = window._config.minemapWhiteSolution

      this.mapInstance = new window.minemap.Map({
        container: 'container',
        style: `${window._config.minemapSolutionUrl}/${window.minemap.solution}`,
        center: [window._config.MAP_LNG, window._config.MAP_LAT],
        zoom: 8,
        pitch: 0,
        projection: window.minemap.ProjectionType.LATLON // 经纬度投影
      })

      /* 添加控件 */
      const mineMapScale = new window.minemap.Scale()
      const mineMapNavigation = new window.minemap.Navigation()
      this.mapInstance.addControl(mineMapScale, 'bottom-right')
      this.mapInstance.addControl(mineMapNavigation, 'top-right')

      await this.initialAllStation()
    },
    async initialAllStation() {
      const { data: stationList } = await getAllStation()
      this.stationList = stationList
      stationList.forEach(station => {
        this.addStationMarker(station)
      })
    },
    addStationMarker(station) {
      const isOnline = station['runStatus'] === 1
      const markerDom = window.document.createElement('div')
      markerDom.id = `station${station.id}`
      markerDom.style['background-image'] = `url(${isOnline ? this.stationIconOnline : this.stationIconOffline})`
      markerDom.style.width = '32px'
      markerDom.style.height = '30px'
      markerDom.style['border-radius'] = '2px'

      const mineMarker = new window.minemap.Marker(markerDom, { offset: [-16, -30] })
      const markerLngLat = new window.minemap.LngLat(station['longitudeGps'], station['latitudeGps'])
      mineMarker.setLngLat(markerLngLat)
      mineMarker.addTo(this.mapInstance)

      markerDom.addEventListener('click', event => {
        this.mapInstance.panTo([station['longitudeGps'], station['latitudeGps']])
        this.addStationPopup(station)
      })
    },
    addStationPopup(station) {
      if (this.currentPopup) this.currentPopup.remove()
      this.currentPopup = null
      const isOnline = station['runStatus'] === 1
      const markerLngLat = new window.minemap.LngLat(station['longitudeGps'], station['latitudeGps'])
      // 参数说明:
      // (1)closeButton,true表示会展示一个关闭按钮;
      // (2)closeOnClick,设置为true表示当地图被点击时该信息窗体会被关闭;
      // (3)offset,参数为点位置相对于其左上角偏移像素大小;
      // (4)anchor,停靠点,值域为[top,bottom,left,right,top-left,top-right,bottom-left,bottom-right],如果不设置该参数,则会根据map container动态调整。
      // (5)autoPan,设置为true时,当地图拖动到看不到popup的时候,自动将地图平移到可以看到popup,此参数只对固定popup有效;
      const stationPopup = new window.minemap.Popup({
        closeOnClick: false,
        closeButton: true,
        anchor: 'bottom',
        offset: [-1, -35],
        autoPan: false
      })
      stationPopup.setLngLat(markerLngLat)
      /* 设置弹窗样式 */
      const popupContent = window.document.createElement('div')
      popupContent.className = isOnline ? 'station-popup online' : 'station-popup offline'
      popupContent.innerHTML = `
         <h3>${station.stationName} ${station['stationLocation']}</h3>
         <p>区域编码:<span>${station.regionCode}</span></p>
         <p>站点编号:<span>${station.stationNo}</span></p>
         <p>站点状态:<span>${station['runStatus'] === 1 ? '在线' : '离线'}</span></p>
         <div class="choose-btn" id="${station.stationNo}">选定</div>
      `
      stationPopup.setDOMContent(popupContent)
      stationPopup.addTo(this.mapInstance) /* 默认不打开弹窗 */
      // mineMarker.setPopup(stationPopup)

      const btn = document.getElementById(station.stationNo)
      btn.addEventListener('click', event => {
        console.log('事件触发,发射数据 ' + station.stationNo)
        this.$emit('when-choose', station.stationNo)
      })

      this.currentPopup = stationPopup
    },
    chooseSubmit() {
      this.$refs[this.chooseFormRef].validate(async(valid) => {
        if (!valid) return
        const withoutName = !this.chooseForm.stationName
        const withoutNo = !this.chooseForm.stationNo
        if (withoutName && withoutNo) return this.$message.warning('站点名称和站点编号不能同时为空')

        const { data: resultList } = await getStationListByChoose(this.chooseForm)
        this.resultList = resultList
        this.resultVisible = true
      })
    },
    chooseReset() {
      this.resultVisible = false
      this.chooseForm = {
        regionCode: '',
        runStatus: '',
        stationName: '',
        stationNo: ''
      }
    },
    locateStationInMap(station) {
      this.mapInstance.panTo([station['longitudeGps'], station['latitudeGps']])
      this.addStationPopup(station)
    }
  }
}
</script>

<style scoped>
  #choosePanel {
    width: 100%;
    height: 100%;
    background-color: white;
    position: relative;
  }
  #container {
    width: 100%;
    height: 100%;
  }
  #chooseForm {
    width: 90%;
    position: absolute;
    top: 20px;
    left: 20px;
    padding: 10px 10px 0 10px;
    background-color: white;
    box-shadow: 0 2px 4px #9e9e9ec2;
  }
  #resultList {
    position: absolute;
    bottom: 0;
    right: 0;
    transform: translateY(110%);
    background: #fff;
    box-shadow: 0 0 4px #9e9e9ec2;
    padding: 8px;
    width: 400px;
  }
  .result-close-btn {
    float: right;
    font-size: 16px;
    cursor: pointer;
  }
  .result-info {
    display: flex;
    flex-direction: row;
    align-items: center;
    justify-content: space-between;
    margin: 15px 0;
  }
  .result-seq {
    display: block;
    font-style: italic;
    width: 15px;
    font-weight: bolder;
  }
  .result-link {
    width: 365px;
    text-align: left;
  }
  /* 替换回原本颜色 */
  /deep/ .el-form-item__label {
    color: #666666 !important;
  }
  /deep/ #chooseForm .el-input__inner {
    color: #666666 !important;
    border-color: #CBCFD5 !important;
    border-radius: 0 !important;
  }
  /deep/ #chooseForm .el-input__inner:hover, .el-textarea__inner:hover {
    border-color: #CBCFD5 !important;
  }
  /deep/ #chooseForm .el-range-input {
    background-color: transparent;
    color: rgba(255, 255, 255, 0.6) !important;
  }

  /* 地图样式 */
  /* mineMap地图样式设置 */
  /deep/ .minemap-popup-content {
    background: rgb(10,76,150,.9) !important;
    min-height: 100px;
    padding-top: 10px;
    overflow-y: auto;
    min-width: 200px;
    max-width: 500px !important;
    color: #D0D3DA;
  }

  /* 关闭按钮调整 */
  /deep/ .minemap-popup-close-button {
    font-size: 20px;
    color: #D0D3DA;
    right: 8px;
    top: 6px;
  }
  /* 移除默认的箭头 */
  /deep/ .minemap-popup-tip {
    /*background: rgb(10,76,150,.7) !important;*/
  }
  /deep/ .station-popup {
    padding: 5px;
    width: 250px;
    font-size: 14px;
  }
  /deep/ .station-popup > .choose-btn {
    cursor: pointer;
    background: #46a6ff;
    color: #fff;
    text-align: center;
    border-radius: 2px;
    padding: 4px 2px 2px 2px;
  }

  /deep/ .station-popup > p,
  /deep/ .station-popup > .choose-btn {
    margin-top: 10px;
  }

  /deep/ .station-popup > p > span,
  /deep/ .station-popup > h3 {
    color: white !important;
  }
  .zdgk-statistic-val {
    color: #f1ba05;
    font-size: 12px;
    font-weight: bold;
  }
  /deep/.minemap-popup-anchor-bottom .minemap-popup-tip {
    border-top-color: rgb(10, 76, 150, 0.9) !important;
  }
</style>
其实主要难点是在点位信息窗体上加事件传递信息,这个是手写的dom元素,不会给vue去绑定处理
没有啥好办法,就直接用id属性设置站点编号,然后加个点击事件来触发方法
调用发射器给业务组件用
2023年12月13日更新内容:
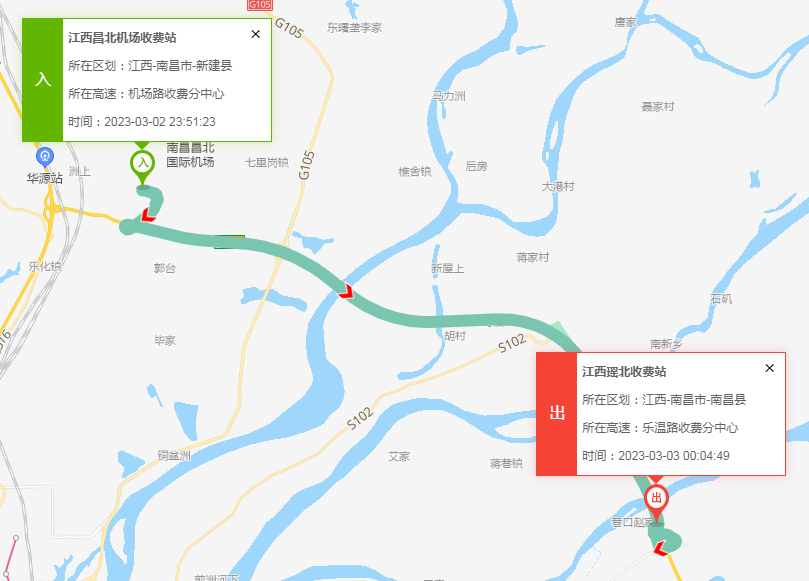
1、真实路线需求
产品对线图层的效果不满意,因为无法得知真实路线的走线情况
这里同事追加了一个细腻点位的接口,传入原始点位集合,返回真实路线的点位集合
如果使用投射参数偏移了定位,路线是无效的,因为要依据地图路线映射
效果预览:
接口地址:
minemapCarLocus: 'https://service.minedata.cn/service/lbs/route/v1/driving?key=#####',
调用方法:
getCarPath: async function (path) {
  let realPath = []
  let lastRoute = path
  for (; lastRoute.length > 0;) {
    const first = lastRoute[0]
    let last = ''
    const waypoints = []
    if (lastRoute.length > 52) {
      last = lastRoute[51]
      for (let i = 1; i < 51; i++) {
        waypoints.push(lastRoute[i])
      }
      lastRoute = lastRoute.slice(52, lastRoute.length)
    } else {
      last = lastRoute[lastRoute.length - 1]
      for (let i = 1; i < lastRoute.length - 1; i++) {
        waypoints.push(lastRoute[i])
      }
      lastRoute = []
    }
    /* 调用四维接口获取真实路径轨迹 */
    const { data: data } = await window.$Axios.get(window._config.minemapCarLocus + '&origin=' + first + '&destination=' + last + '&waypoints=' + waypoints.join(';'))
    const steps = data.result.routes[0].steps
    steps.forEach(e => {
      const polyline = e.polyline
      if (polyline) {
        const polylines = polyline.split(';')
        polylines.forEach(loc => {
          const locs = loc.split(',')
          realPath.push([locs[0], locs[1]])
        })
      }
    })
  }
  return realPath;
}
2、解决投射参数配置问题:
/**
 * 是否使用投影参数
 * http://113.108.157.29:7070/support/static/api/doc/js/v2.1.0/api-reference/index.html#map
 * true -> projection: window.minemap.ProjectionType.LATLON
 * false -> projection: window.minemap.ProjectionType.MERCATOR
 */
projectionFlag: false,
所有地图初始化之前访问flag变量检查是否启用投射
因为线上环境需要投射,但是本地环境和测试环境不需要投射展示
this.highwayMapInstance = new window.minemap.Map({
  container: 'highwayMapContainer',
  style: `${window._config.minemapSolutionUrl}/${window._config.minemapBlackSolution}`,
  center: [window._config.MAP_LNG, window._config.MAP_LAT],
  zoom: 12,
  pitch: 0,
  projection: window._config.projectionFlag ? 'LATLON' : 'MERCATOR' // 经纬度投影
})
2023年12月21日 更新:
新增了一个地图绘制布控区域的需求
- 1、用户可以在地图上绘制一片区域,并输入文本表示是什么区域
- 2、区域回显之后,光标悬浮区域时,显示信息窗体,展示该区域内的站点统计信息
先看图层编辑的案例:
https://minedata.com.cn/support/api/demo/js-api/zh/edit/data/data-add
提供了一套编辑的API和交互案例
但是案例没有说清楚是怎么读取编辑的图层对象
然后在注释里找到了:

http://113.108.157.29:7070/minemapapi/v2.1.0/plugins/edit/api.html
因为不关心编辑时如何,只要拿到所有编辑好的图层信息即可

要回显之前编辑的图层,用案例的setFeatures的API
但是一定要放到地图的加载周期里面:
因为有多用户操作布控区域的可能,所以要区分用户,表结构:
CREATE TABLE `bk_features` (
  `id` int NOT NULL AUTO_INCREMENT COMMENT '记录主键',
  `features` text COLLATE utf8mb4_general_ci COMMENT '布控区域矢量信息',
  `creator` varchar(32) COLLATE utf8mb4_general_ci NOT NULL COMMENT '创建人',
  `create_time` datetime DEFAULT NULL COMMENT '创建时间',
  PRIMARY KEY (`id`)
) ENGINE=InnoDB AUTO_INCREMENT=2 DEFAULT CHARSET=utf8mb4 COLLATE=utf8mb4_general_ci COMMENT='布控区域记录表';
业务逻辑暂时想的简单,无非是查询用户有没有编辑图层信息
有就回显,如果重复编辑就更新
/**
 * @author OnCloud9
 * @version 1.0
 * @project road-perception-server
 * @date 2023年12月18日 19:17
 */
@Service("bkFeaturesService")
public class BkFeaturesServiceImpl extends ServiceImpl<BkFeaturesDAO, BkFeaturesDTO> implements IBkFeaturesService {
    @Override
    public void saveCurrentFeatures(BkFeaturesDTO dto) {
        UserContext user = LoginUserContext.getUser();
        String id = user.getId();
        dto.setCreator(id);
        dto.setCreateTime(new Date());
        List<BkFeaturesDTO> list = lambdaQuery().eq(BkFeaturesDTO::getCreator, id).list();
        boolean hasOne = CollectionUtils.isNotEmpty(list);
        if (hasOne) {
            BkFeaturesDTO one = list.get(0);
            one.setFeatures(dto.getFeatures());
            baseMapper.updateById(one);
        } else {
            baseMapper.insert(dto);
        }
    }
    @Override
    public BkFeaturesDTO getCurrentFeatures() {
        UserContext user = LoginUserContext.getUser();
        String id = user.getId();
        List<BkFeaturesDTO> list = lambdaQuery().eq(BkFeaturesDTO::getCreator, id).list();
        return CollectionUtils.isEmpty(list) ? null : list.get(0);
    }
}
控制器:
因为保存前端提交的json数据不被转义,就加上转义逃逸注解处理
/**
 * @author OnCloud9
 * @version 1.0
 * @project road-perception-server
 * @date 2023年12月18日 19:18
 */
@RestController
@RequestMapping("${api.path}/features")
public class BkFeaturesController extends BaseController {

    @Resource
    private IBkFeaturesService bkFeaturesService;

    /**
     * @author OnCloud9
     * @date 2023/12/18 19:21
     * @description
     * @params [dto]
     * @return void
     */
    @ActiveDeXss
    @PostMapping("/save")
    public void saveCurrentFeatures(@RequestBody BkFeaturesDTO dto) {
        bkFeaturesService.saveCurrentFeatures(dto);
    }

    @GetMapping("/current")
    public BkFeaturesDTO getCurrentFeatures() {
        return bkFeaturesService.getCurrentFeatures();
    }
}
地图前端方法:
1、初始化处理
 async initialMapContainer() {
  window.minemap.domainUrl = window._config.minemapDomainUrl
  window.minemap.dataDomainUrl = window._config.minemapDataDomainUrl
  window.minemap.serverDomainUrl = window._config.minemapServerDomainUrl
  window.minemap.spriteUrl = window._config.minemapSpriteUrl
  window.minemap.serviceUrl = window._config.minemapServiceUrl
  window.minemap.key = window._config.minemapKey
  window.minemap.solution = window._config.minemapBlackSolution

  this.mapInstance = new window.minemap.Map({
    container: 'mapContainer',
    style: `${window._config.minemapSolutionUrl}/${window._config.minemapBlackSolution}`,
    center: [window._config.MAP_LNG, window._config.MAP_LAT],
    zoom: 12,
    pitch: 0,
    projection: window._config.projectionFlag ? 'LATLON' : 'MERCATOR' // 经纬度投影
  })
  this.initialMapEditor()

  this.mapInstance.on('load', () => {
    // 向编辑池增加数据
    this.initialMapFeatures()
  })
  this.initialAllStation()
},
async initialMapFeatures() {
  const { data } = await getCurrentFeatures()
  console.log(data)
  if (!data) return
  const featuresCollection = JSON.parse(data['features'])
  console.log(featuresCollection)
  if (!featuresCollection) return
  /* 回显编辑内容 */
  this.mapEditor.setFeatures(featuresCollection)
},
2、保存方法:
saveFeatures() {
  const allFeatures = this.mapEditor.draw.getAll()
  saveCurrentFeatures({ features: JSON.stringify(allFeatures) })
  this.$message.success('保存成功')
},
3、文本编辑问题
因为案例是写死的,这个肯定要交给用户输入处理
文本输入弹窗
<el-dialog title="添加文字" width="400px" :visible.sync="textVisible" :close-on-click-modal="false" append-to-body>
  <el-form size="small">
    <el-form-item>
      <el-input v-model.trim="featureText" />
    </el-form-item>
    <el-form-item align="center">
      <el-button type="primary" @click="featureTextConfirm">确定</el-button>
      <el-button type="default" @click="textVisible = false">取消</el-button>
    </el-form-item>
  </el-form>
</el-dialog>
确认文本后再触发编辑器交互:
featureTextConfirm() {
  if (!this.featureText) return this.$message.error('请填写文字内容')
  this.textVisible = false
  this.mapEditor.onBtnCtrlActive('text', {
    style: {
      'textField': this.featureText + '',
      'textColor': '#00FF00',
      'textSize': 24,
      'custom_style': 'true' // 此参数为string类型
    }
  })
},
4、回显展示图层的问题:
因为首页和编辑功能不一样,这里需要做图层转换处理
面图层和图标图层的绘制方式不一样,我们先用分组方法进行分组处理:
/* 分为面图层渲染(el.geometry.type 'Polygon')和图标图层渲染(el.geometry.type 'Point') */
const fcTypeMap = groupBy(featureCollection['features'], el => el.geometry.type)
const polygonList = fcTypeMap['Polygon']
const pointList = fcTypeMap['Point']
分组方法仿照Java的Stream方法实现:
/**
 * 集合分组方法
 * @param collect
 * @param groupFun
 */
const groupBy = (collect, groupFun) => {
  return collect.reduce((groupedMap, el) => {
    const keyVal = groupFun(el)
    if (!keyVal) return groupedMap
    if (!groupedMap[keyVal]) groupedMap[keyVal] = []
    groupedMap[keyVal].push(el)
    return groupedMap
  }, {})
}
面图层相对简单,直接丢进去就可以了
因为可能绘制多个区域,每个区域追加点击事件,所以这样循环添加Source和Layer
方便后面的事件绑定处理,
Source和Layer的逻辑还是比较好理解的,现有Source矢量信息,然后Layer创建时绑定Source信息
而Feature对象是编辑器edit对象创建的,可以交给Source转换
Feature对象的id创建时自动分配,应该是唯一的
这里可以把 Source-Id, Layer-Id Feature-Id 统一使用,方便维护
polygonList.forEach((el, idx) => {
  const featureId = el.id
  const coordinates = el.geometry.coordinates
  this.mapInstance.addSource(featureId, {
    type: 'geojson',
    data: { type: 'FeatureCollection', features: [el] }
  })

  this.mapInstance.addLayer({
    'id': featureId,
    'type': 'fill',
    'source': featureId,
    'layout': { 'visibility': 'visible' },
    'paint': {
      'fill-color': '#00ff00',
      'fill-opacity': 0.4,
      'fill-outline-color': '#ff0000'
    },
    'minzoom': 7,
    'maxzoom': 17.5
  })
})
给图层绑定鼠标事件,鼠标进入,鼠标离开两个事件
https://minedata.com.cn/support/static/api/doc/js/v2.1.0/api-reference/index.html#mapon
但是要统计绘制区域内的站点信息,就要知道我们的打的站点是否在这个区域内,这个API正好还被我找到了哈哈哈
http://113.108.157.29:7070/support/api/demo/js-cmpt/zh/geometry/relation/point-in-polygon
我找到的这个是带了一个地图工具库对象的方法
默认的案例中是使用turf对象判断的,还需要转换coordinates信息
http://113.108.157.29:7070/support/api/demo/js-api/zh/geometry/relation/point-in-polygon
这里挂载事件的时候和上面说的一样,直接丢featureId进来
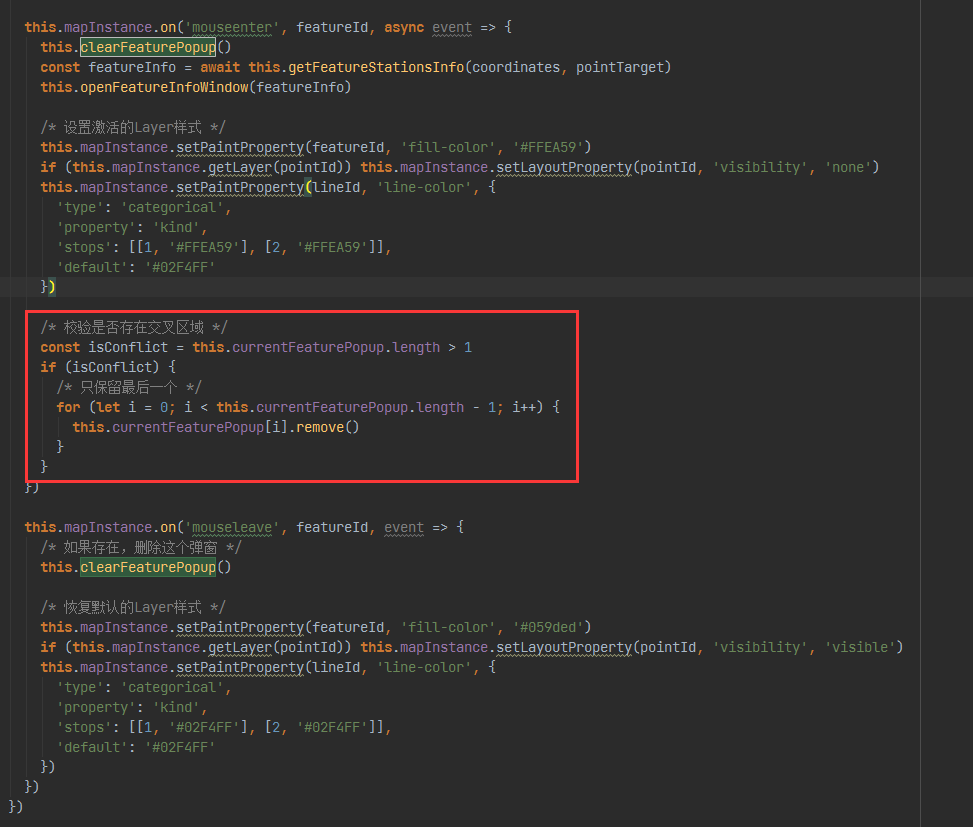
this.mapInstance.on('mouseenter', featureId, async event => {
console.log(`鼠标移入触发! ${featureId} ${event.lngLat.lng} ${event.lngLat.lat}`)
if (this.currentFeaturePopup) this.currentFeaturePopup.remove()
/* 计算站点信息统计 */
const featureStations = []
this.allStations.forEach(station => {
const stationCoord = [station['longitudeGps'], station['latitudeGps']]
const isInPolygon = window.minemaputil.SpaceUtil.pointWithinPolygon(stationCoord, coordinates)
if (isInPolygon) featureStations.push(station)
})
/* 统计设备信息 */
const deviceCount = featureStations.length
const onlineCount = featureStations.filter(s => s['runStatus'] === 1).length
const offlineCount = featureStations.filter(s => s['runStatus'] !== 1).length
/* 统计在线站点采集数 */
const stationNoList = featureStations.map(x => x.stationNo)
let carCount = 0
let bleCount = 0
if (deviceCount !== 0) {
const { data } = await getFeaturesAreaOverView({ stationNoList: stationNoList })
carCount = data['carCount']
bleCount = data['bleCount']
}
/* 区域名称提取 */
const target = pointList.find(p => window.minemaputil.SpaceUtil.pointWithinPolygon(p.geometry.coordinates, coordinates))
let title = target.properties.textField
title = title || '未命名'
/* 设置弹窗样式 */
const popupContent = window.document.createElement('div')
popupContent.className = 'station-popup'
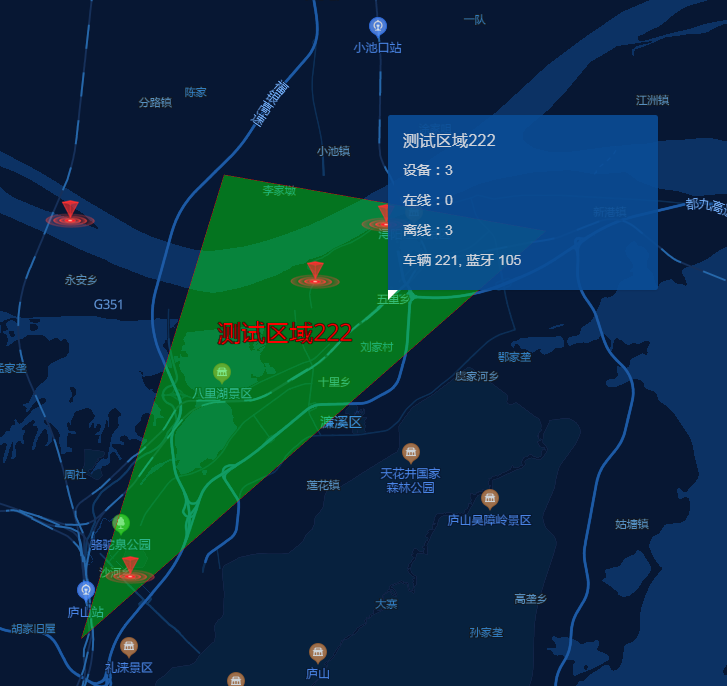
popupContent.innerHTML = `
<h3>${title}</h3>
<p>设备:${deviceCount}</p>
<p>在线:${onlineCount}</p>
<p>离线:${offlineCount}</p>
<p>车辆 ${carCount}, 蓝牙 ${bleCount}</p>
`
const popup = new window.minemap.Popup({
closeOnClick: true,
closeButton: false,
anchor: 'bottom-left',
offset: [5, 10],
autoPan: false
})
popup.setDOMContent(popupContent)
popup.trackPointer() // 此方法可以让popup跟随鼠标指针,使用此方法就不再需要使用setLngLat()方法
popup.addTo(this.mapInstance)
this.currentFeaturePopup = popup
})
this.mapInstance.on('mouseleave', featureId, event => {
console.log(`鼠标移触发触发! ${featureId}`)
/* 如果存在,删除这个弹窗 */
if (this.currentFeaturePopup) this.currentFeaturePopup.remove()
})
图标图层渲染文字时,发现它是带了一个种类,有个锚点图标
案例地址:
https://minedata.com.cn/support/api/demo/js-api/zh/layer/base/symbol-layer
这个事情问了下维护人员,他说你就删掉icon信息就可以了.... (这里可以对比我的代码和案例代码)
但是feature对象不能直接套用,要按照demo的结构重新构造一遍,麻烦
pointList.forEach(el => {
  const featureId = el.id
  /* 原feature对象无法适配,创建一个适配的feature对象 */
  const adaptFeature = {
    id: featureId,
    type: 'Feature',
    geometry: el.geometry,
    properties: {
      title: el.properties.textField,
      kind: 'label'
    }
  }
  this.mapInstance.addSource(featureId, {
    type: 'geojson',
    data: { type: 'FeatureCollection', features: [adaptFeature] }
  })

  this.mapInstance.addLayer({
    'id': featureId,
    'type': 'symbol',
    'source': featureId,
    'layout': {
      'visibility': 'visible',
      'text-field': '{title}',
      'text-offset': [0, 0.6],
      'text-anchor': 'top',
      'text-size': 24,
      'icon-allow-overlap': true, // 图标允许压盖
      'text-allow-overlap': true // 图标覆盖文字允许压盖
    },
    'paint': {
      'text-color': {
        'type': 'categorical',
        'property': 'kind',
        'stops': [['label', '#ff0000'], ['park', '#00ff00'], ['hospital', '#0000ff']],
        'default': '#ff0000'
      },
      'text-halo-color': '#000000',
      'text-halo-width': 0.5
    },
    'minzoom': 7,
    'maxzoom': 17.5
  })
})
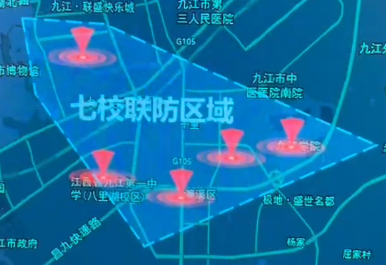
实现效果:
2023年12月25日 更新:
下一步是样式设置的问题,弹窗的样式设置在上面有提到过
但是图层样式没有,这个得自己找找了
问题一:面图层的边框线条只能设置颜色
面图层样式参数文档:
https://minedata.com.cn/support/static/api/doc/js/v2.1.0/style-specification/index.html#/layers/fill/*
但是产品的原型效果是这样的
于是继续问那边的维护人员,解决方案的话是在面图层的基础上添加一个线图层来实现
虚线的实现就是多加了一个虚线数组参数: 'line-dasharray': [1, 4],
/**
  * 线图层绘制方法
  */
drawLineLayer(layerId, coordinates) {
  /* 额外追加线图层来设置样式 */
  this.mapInstance.addSource(layerId, {
    'type': 'geojson',
    'data': {
      'type': 'FeatureCollection',
      'features': [{
        'type': 'Feature',
        'geometry': { 'type': 'LineString', 'coordinates': coordinates },
        'properties': { 'title': '路线一', 'kind': 1 }
      }]
    }
  })
  this.mapInstance.addLayer({
    'id': layerId,
    'type': 'line',
    'source': layerId,
    'layout': {
      'line-join': 'round',
      'line-cap': 'round',
      'border-visibility': 'visible' // 是否开启线边框
    },
    'paint': {
      'line-width': 6,
      'line-dasharray': [1, 4],
      'line-color': {
        'type': 'categorical',
        'property': 'kind',
        'stops': [[1, '#02F4FF'], [2, '#02F4FF']],
        'default': '#02F4FF'
      },
      'line-border-width': 2, // 设置线边框宽度
      'line-border-opacity': 1, // 设置线边框透明度
      'line-border-color': 'blue' // 设置线边框颜色
    },
    'minzoom': 7,
    'maxzoom': 17.5
  })
},
面图层的坐标信息不能直接挪用到线图层去,因为面图层的坐标是三维数组,但是线图层是二维数组
问题二:样式切换问题
参考图层样式设置demo:
https://minedata.com.cn/support/api/demo/js-api/zh/layer/manage/layer-opacity-setting
之前有提到利用鼠标监听事件来实现,所以设置一定是在监听事件中执行的
async initialEditorFeature() {
const { data } = await getCurrentFeatures()
if (!data) return
const featureCollection = JSON.parse(data['features'])
if (!featureCollection) return
/* 分为面图层渲染(el.geometry.type 'Polygon')和图标图层渲染(el.geometry.type 'Point') */
const fcTypeMap = groupBy(featureCollection['features'], el => el.geometry.type)
const polygonList = fcTypeMap['Polygon']
const pointList = fcTypeMap['Point']
polygonList.forEach((el, idx) => {
const featureId = el.id
const lineId = `line-${featureId}`
const pointId = `point-${featureId}`
const coordinates = el.geometry.coordinates
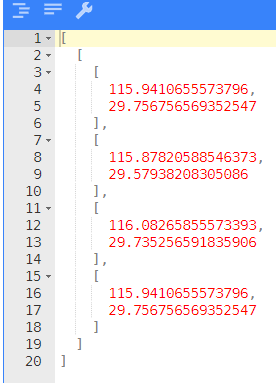
console.log(`coordinates ${JSON.stringify(coordinates)}`)
const pointTarget = pointList.find(p => window.minemaputil.SpaceUtil.pointWithinPolygon(p.geometry.coordinates, coordinates))
/* 原feature对象无法适配,创建一个适配的feature对象 */
const adaptFeature = {
id: pointId,
type: 'Feature',
geometry: pointTarget.geometry,
properties: {
title: pointTarget.properties.textField,
kind: 'label'
}
}
this.drawLineLayer(lineId, coordinates[0])
this.drawPolygonLayer(featureId, el)
this.drawPointLayer(pointId, adaptFeature)
this.mapInstance.on('mouseenter', featureId, async event => {
if (this.currentFeaturePopup) this.currentFeaturePopup.remove()
const featureInfo = await this.getFeatureStationsInfo(coordinates, pointTarget)
this.openFeatureInfoWindow(featureInfo)
/* 设置激活的Layer样式 */
this.mapInstance.setPaintProperty(featureId, 'fill-color', '#FFEA59')
this.mapInstance.setLayoutProperty(pointId, 'visibility', 'none')
this.mapInstance.setPaintProperty(lineId, 'line-color', {
'type': 'categorical',
'property': 'kind',
'stops': [[1, '#FFEA59'], [2, '#FFEA59']],
'default': '#02F4FF'
})
})
this.mapInstance.on('mouseleave', featureId, event => {
/* 如果存在,删除这个弹窗 */
if (this.currentFeaturePopup) this.currentFeaturePopup.remove()
/* 恢复默认的Layer样式 */
this.mapInstance.setPaintProperty(featureId, 'fill-color', '#059ded')
this.mapInstance.setLayoutProperty(pointId, 'visibility', 'visible')
this.mapInstance.setPaintProperty(lineId, 'line-color', {
'type': 'categorical',
'property': 'kind',
'stops': [[1, '#02F4FF'], [2, '#02F4FF']],
'default': '#02F4FF'
})
})
})
},
拆分出来的方法代码:
openFeatureInfoWindow(featureInfo) {
  /* 设置弹窗样式 */
  const popupContent = window.document.createElement('div')
  popupContent.className = 'bk-area-popup'
  popupContent.innerHTML = `
          <h3>${featureInfo.title}</h3>
          <p>设备:${featureInfo.deviceCount} 在线:${featureInfo.onlineCount} 离线:${featureInfo.offlineCount}</p>
          <p>车辆:${featureInfo.carCount} 蓝牙:${featureInfo.bleCount}</p>
      `

  const popup = new window.minemap.Popup({
    closeOnClick: true,
    closeButton: false,
    anchor: 'bottom-left',
    offset: [5, 0],
    autoPan: false
  })
  popup.setDOMContent(popupContent)
  popup.trackPointer() // 此方法可以让popup跟随鼠标指针,使用此方法就不再需要使用setLngLat()方法
  popup.addTo(this.mapInstance)
  this.currentFeaturePopup = popup
},
/**
 * 获取弹窗信息
 */
async getFeatureStationsInfo(rangeCoordinates, pointTarget) {
  /* 1、计算站点信息统计 */
  const featureStations = []
  this.allStations.forEach(station => {
    const stationCoord = [station['longitudeGps'], station['latitudeGps']]
    const isInPolygon = window.minemaputil.SpaceUtil.pointWithinPolygon(stationCoord, rangeCoordinates)
    if (isInPolygon) featureStations.push(station)
  })

  /* 2、统计设备信息 */
  const deviceCount = featureStations.length
  const onlineCount = featureStations.filter(s => s['runStatus'] === 1).length
  const offlineCount = featureStations.filter(s => s['runStatus'] !== 1).length

  /* 3、统计在线站点采集数 */
  const stationNoList = featureStations.map(x => x.stationNo)
  let carCount = 0
  let bleCount = 0
  if (deviceCount !== 0) {
    const { data } = await getFeaturesAreaOverView({ stationNoList: stationNoList })
    carCount = data['carCount']
    bleCount = data['bleCount']
  }

  /* 4、区域名称提取 */
  let title = pointTarget.properties.textField
  title = title || '未命名'

  return {
    deviceCount,
    onlineCount,
    offlineCount,
    carCount,
    bleCount,
    title,
    pointTarget
  }
},
/**
 * 面(多边形)图层绘制方法
 */
drawPolygonLayer(layerId, featureObj) {
  this.mapInstance.addSource(layerId, {
    type: 'geojson',
    data: { type: 'FeatureCollection', features: [featureObj] }
  })

  this.mapInstance.addLayer({
    'id': layerId,
    'type': 'fill',
    'source': layerId,
    'layout': { 'visibility': 'visible' },
    'paint': {
      'fill-antialias': true, /* 启用抗锯齿 */
      'fill-color': '#059ded',
      'fill-opacity': 0.4,
      'fill-outline-color': '#059ded'
    },
    'minzoom': 7,
    'maxzoom': 17.5
  })
},
/**
 * 线图层绘制方法
 */
drawLineLayer(layerId, coordinates) {
  /* 额外追加线图层来设置样式 */
  this.mapInstance.addSource(layerId, {
    'type': 'geojson',
    'data': {
      'type': 'FeatureCollection',
      'features': [{
        'type': 'Feature',
        'geometry': { 'type': 'LineString', 'coordinates': coordinates },
        'properties': { 'title': '路线一', 'kind': 1 }
      }]
    }
  })
  this.mapInstance.addLayer({
    'id': layerId,
    'type': 'line',
    'source': layerId,
    'layout': {
      'line-join': 'round',
      'line-cap': 'round',
      'border-visibility': 'visible' // 是否开启线边框
    },
    'paint': {
      'line-width': 6,
      'line-dasharray': [1, 4],
      'line-color': {
        'type': 'categorical',
        'property': 'kind',
        'stops': [[1, '#02F4FF'], [2, '#02F4FF']],
        'default': '#02F4FF'
      },
      'line-border-width': 2, // 设置线边框宽度
      'line-border-opacity': 1, // 设置线边框透明度
      'line-border-color': 'blue' // 设置线边框颜色
    },
    'minzoom': 7,
    'maxzoom': 17.5
  })
},
drawPointLayer(layerId, featureObj) {
  this.mapInstance.addSource(layerId, {
    type: 'geojson',
    data: { type: 'FeatureCollection', features: [featureObj] }
  })

  this.mapInstance.addLayer({
    'id': layerId,
    'type': 'symbol',
    'source': layerId,
    'layout': {
      'visibility': 'visible',
      'text-field': '{title}',
      'text-offset': [0, 0.6],
      'text-anchor': 'top',
      'text-size': 24,
      'icon-allow-overlap': true, // 图标允许压盖
      'text-allow-overlap': true // 图标覆盖文字允许压盖
    },
    'paint': {
      'text-color': {
        'type': 'categorical',
        'property': 'kind',
        'stops': [['label', '#48D4FF'], ['park', '#fff'], ['hospital', '#fff']],
        'default': '#fff'
      },
      'text-halo-color': '#fff',
      'text-halo-width': 0.2
    },
    'minzoom': 7,
    'maxzoom': 17.5
  })
},
这里涉及到了一个深度对象设置参数的问题,但是我懒得解决了,直接整个对象丢进来
那边是提供了一个表达式文档,可以参考看看:
https://minedata.com.cn/support/static/api/doc/js/v2.1.0/style-specification/index.html#/expressions
效果实现:
悬停在绘制区域内时
 ‘
‘
脱离悬停区域时:
目前来说对这个效果还算满意哈哈哈
2023年12月26日更新:
昨天还遗留了这个问题,就是跟随光标的弹窗留了一个箭头样式没修复
之前我们设置的样式是这么处理的:
/deep/.minemap-popup-anchor-bottom > .minemap-popup-tip {
  border-top-color: rgba(10,76,150,0.9) !important;
}
对应的achor参数是bottom,但是这个光标跟随的是bottom-left
我就想应该是对应的一个class类名,试了下还真是这样
悬浮样式的箭头是不需要的,所以这个边框头直接不要任何样式
/* 悬浮弹窗箭头样式移除 */
/deep/.minemap-popup-anchor-bottom-left > .minemap-popup-tip {
  border-top: none !important;
}
这样就修好了
2024年01月22日更新:
因为存在编辑图层交叉区域的情况,还存在打点信息交互的点图层
这里就出现了悬浮区域信息展示的BUG,会多次重复展示,直接进入交叉区域会将两个区域的信息重叠展示
之前是以为只有一个区域弹窗信息出现:
currentFeaturePopup: null
那么现在我们改为:
currentFeaturePopup: []
清除弹窗信息方法:
之前是用forEach处理的好像,这里老老实实用api的方式处理
clearFeaturePopup() {
  for (let i = 0; i < this.currentFeaturePopup.length; i++) this.currentFeaturePopup[i].remove()
  this.currentFeaturePopup = []
},
所有涉及地图交互的事件,建议调用清除方法:
因为首页只有一个区域和点位展示,这里打开点位时的事件追加清除方法
包括鼠标移入移出这个点位也要清除
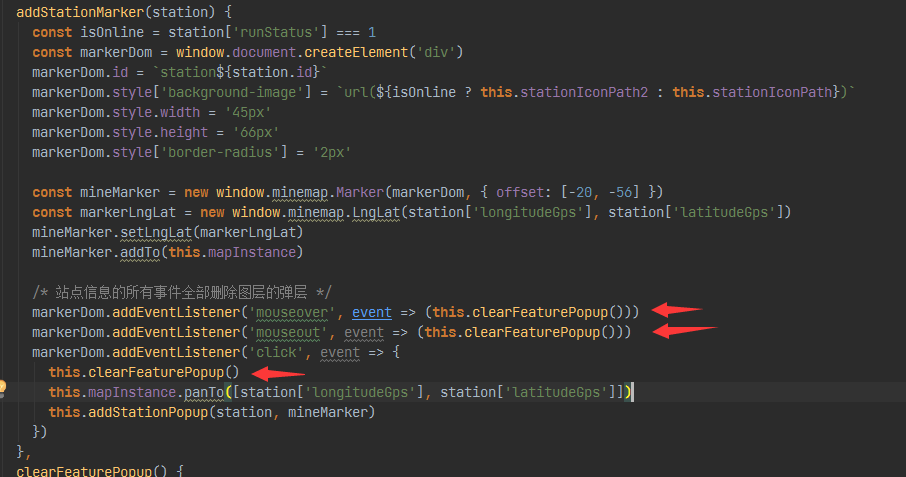
处理交叉区域的事件,通过console打印发现,交叉区域会同时触发两个图层的事件
无法避免的,所以这里我补加了一个之后的判断,检查弹层是不是超出1个,不是的话只保留最新的那个
2024年01月30日更新:
1、失焦BUG问题
产品测试发现展示弹窗的时候如果光标处在图层的边界位置时,弹窗的坐标定位失焦
这个bug在去年就提了,我改了好几个事件的处理都发现没有用,最后定位是这个API有BUG
要不要处理就看产品和测试要求了,我个人认为是能接受的
这里跟那边人员沟通写了demo看效果:
编辑器地址:
https://minedata.com.cn/support/api/demo/js-api/zh/layer/base/fill-layer
bug-demo.html 源码 (丢到上面的编辑器里面运行看效果):
<!DOCTYPE html>
<html lang="en">
<head>
<meta charset="UTF-8">
<title>面图层</title>
<link rel="stylesheet" href="//minedata.com.cn/support/static/api/demo/js-api/zh/css/demo.css">
<!-- 引入MineMap API插件 -->
<link rel="stylesheet" href="//minedata.com.cn/minemapapi/v2.1.0/minemap.css">
<script src="//minedata.com.cn/minemapapi/v2.1.0/minemap.js"></script>
<style>
#map {
width: 100%;
height: 100%;
}
</style>
</head>
<body>
<div id="map"></div>
<script>
/**
* 全局参数设置
*/
minemap.domainUrl = '//minedata.com.cn';
minemap.dataDomainUrl = '//minedata.com.cn';
minemap.serverDomainUrl = '//minedata.com.cn';
minemap.spriteUrl = '//minedata.com.cn/minemapapi/v2.1.0/sprite/sprite';
minemap.serviceUrl = '//minedata.com.cn/service/';
minemap.key = '16be596e00c44c86bb1569cb53424dc9';
minemap.solution = 12877;
var popups = [];
var map = new minemap.Map({
container: 'map',
style: '//minedata.com.cn/service/solu/style/id/12877',
center: [116.46,39.92],
zoom: 14,
pitch: 0,
maxZoom: 17,
minZoom: 3,
projection: 'MERCATOR'
});
/**
* 创建地图对象后,开始加载地图资源,地图资源加载完成后触发load事件
*/
map.on('load', function () {
// 增加自定义数据源、自定义图层
addSources();
addLayers();
addMouseEvent();
});
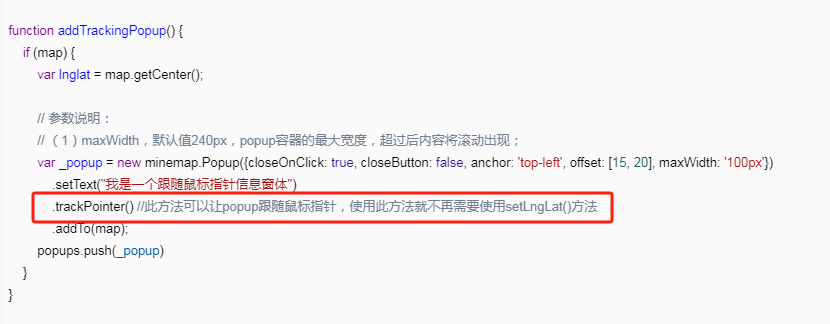
function addMouseEvent() {
var layerId = 'fillLayer'
map.on('mouseenter', layerId, function(event) {
// 参数说明:
// (1)maxWidth,默认值240px,popup容器的最大宽度,超过后内容将滚动出现;
var _popup = new minemap.Popup({closeOnClick: true, closeButton: false, anchor: 'top-left', offset: [15, 20], maxWidth: '100px'})
.setText("我是一个跟随鼠标指针信息窗体")
.trackPointer() //此方法可以让popup跟随鼠标指针,使用此方法就不再需要使用setLngLat()方法
.addTo(map);
popups.push(_popup);
})
map.on('mouseleave', layerId, function(event) {
for (let i = 0; i < popups.length; i++) popups[i].remove();
popups = []
})
}
function addSources() {
var center = map.getCenter();
var jsonData = {
"type": "FeatureCollection",
"features": [
{
"type": "Feature",
"geometry": {
"type": "Polygon",
"coordinates": [[[center.lng, center.lat], [center.lng, center.lat + 0.006], [center.lng - 0.006, center.lat + 0.006], [center.lng - 0.006, center.lat], [center.lng, center.lat]]]
}
}
]
};
map.addSource("fillSource", {
"type": "geojson",
"data": jsonData
});
}
function addLayers() {
map.addLayer({
"id": "fillLayer",
"type": "fill",
"source": "fillSource",
"layout": {
"visibility": "visible",
},
"paint": {
"fill-color": "#00ff00",
"fill-opacity": 0.8,
"fill-outline-color": "#ff0000"
},
"minzoom": 7,
"maxzoom": 17.5
});
}
</script>
</body>
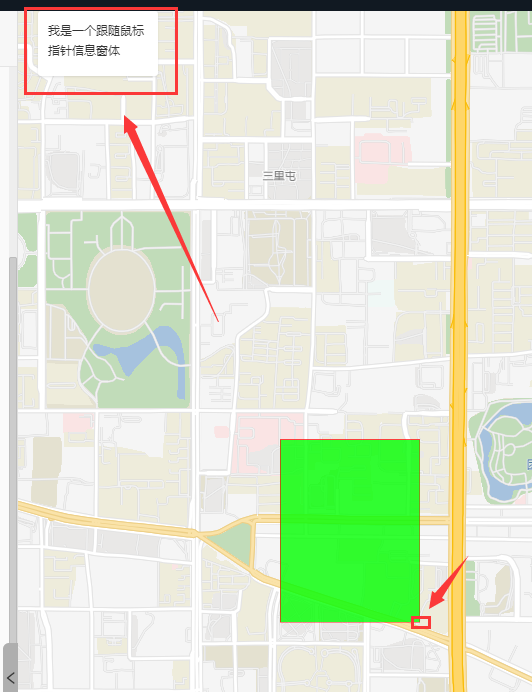
bug效果:
2、解决方案
他那边给的建议时换成move事件监听,持续的刷新弹窗展示
<!DOCTYPE html>
<html lang="en">
<head>
    <meta charset="UTF-8">
    <title>面图层</title>
    <link rel="stylesheet" href="http://minedata.com.cn/support/static/api/demo/js-api/zh/css/demo.css">
    <!-- 引入MineMap API插件 -->
    <link rel="stylesheet" href="http://minedata.com.cn/minemapapi/v2.1.0/minemap.css">
    <script src="http://minedata.com.cn/minemapapi/v2.1.0/minemap.js"></script>
    <style>
        #map {
            width: 100%;
            height: 100%;
        }
    </style>
</head>
<body>
<div id="map"></div>
<script>
    /**
     * 全局参数设置
     */
    minemap.domainUrl = 'http://minedata.com.cn';
	minemap.dataDomainUrl = 'http://minedata.com.cn';
	minemap.serverDomainUrl = 'http://minedata.com.cn';
	minemap.spriteUrl = 'http://minedata.com.cn/minemapapi/v2.1.0/sprite/sprite';
	minemap.serviceUrl = 'http://minedata.com.cn/service/';

    minemap.key = '16be596e00c44c86bb1569cb53424dc9';
    minemap.solution = 12877;
    var popups = [];
    var map = new minemap.Map({
        container: 'map',
        style: 'http://minedata.com.cn/service/solu/style/id/12877',
        center: [116.46,39.92],
        zoom: 14,
        pitch: 0,
        maxZoom: 17,
        minZoom: 3,
        projection: 'MERCATOR'
    });

    /**
     * 创建地图对象后,开始加载地图资源,地图资源加载完成后触发load事件
     */
    map.on('load', function () {
        // 增加自定义数据源、自定义图层
        addSources();
        addLayers();
        addMouseEvent();
    });
    function addMouseEvent() {
      var layerId = 'fillLayer'
      map.on('mousemove', layerId, function(event) {
		   for (let i = 0; i < popups.length; i++) popups[i].remove();
        popups = []
                    // 参数说明:
            // (1)maxWidth,默认值240px,popup容器的最大宽度,超过后内容将滚动出现;
            var _popup = new minemap.Popup({closeOnClick: true, closeButton: false, anchor: 'top-left', offset: [15, 20], maxWidth: '1000px'})
                .setText("我是一个跟随鼠标指针信息窗体")
			   .setLngLat(event.lngLat)
                //.trackPointer() //此方法可以让popup跟随鼠标指针,使用此方法就不再需要使用setLngLat()方法
                .addTo(map);
            popups.push(_popup);
            console.log(popups.length)
      })
      map.on('mouseleave', layerId, function(event) {
        for (let i = 0; i < popups.length; i++) popups[i].remove();
        popups = []
      })
    }

    function addSources() {
        var center = map.getCenter();
        var jsonData = {
            "type": "FeatureCollection",
            "features": [
                {
                    "type": "Feature",
                    "geometry": {
                        "type": "Polygon",
                        "coordinates": [[[center.lng, center.lat], [center.lng, center.lat + 0.006], [center.lng - 0.006, center.lat + 0.006], [center.lng - 0.006, center.lat], [center.lng, center.lat]]]
                    }
                }
            ]
        };
        map.addSource("fillSource", {
            "type": "geojson",
            "data": jsonData
        });
    }

    function addLayers() {
        map.addLayer({
            "id": "fillLayer",
            "type": "fill",
            "source": "fillSource",
            "layout": {
                "visibility": "visible",
            },
            "paint": {
                "fill-color": "#00ff00",
                "fill-opacity": 0.8,
                "fill-outline-color": "#ff0000"
            },
            "minzoom": 7,
            "maxzoom": 17.5
        });
    }

</script>
</body>
3、数据加载的处理
我直接替换事件名称,改成事件源获取的坐标赋值处理弹窗
结果发现弹窗加载阻塞了.... 移动时会连续出现多个没关闭的弹窗

因为之前是enter进入事件,只有一次加载的时候
现在换成move事件会持续触发,请求就一直在执行,再加上async / await阻塞中持续
我感觉这个方式有点不对,然后猜测是接口响应阻塞导致的
那就这样,把接口的数据缓存起来,move事件有featureId挂着,那接口数据和featureId匹配即可
缓存池没找到这个区域的数据,就加载一次,放到池里面,然后渲染
下次触发时继续在池子找数据,不用再请求接口了
所以这个逻辑又拆成现在这段:
渲染的逻辑并不阻塞,效果是正常的了
this.mapInstance.on('mouseenter', featureId, async event => {
  /* 设置激活的Layer样式 */
  this.mapInstance.setPaintProperty(featureId, 'fill-color', '#FFEA59')
  if (this.mapInstance.getLayer(pointId)) this.mapInstance.setLayoutProperty(pointId, 'visibility', 'none')
  this.mapInstance.setPaintProperty(lineId, 'line-color', {
    'type': 'categorical',
    'property': 'kind',
    'stops': [[1, '#FFEA59'], [2, '#FFEA59']],
    'default': '#02F4FF'
  })
})

this.mapInstance.on('mousemove', featureId, async event => {
  this.clearFeaturePopup()
  let featureInfo = this.featureWindowDataList.find(x => x['featureId'] === featureId)
  if (!featureInfo) {
    featureInfo = await this.getFeatureStationsInfo(coordinates, pointTarget)
    featureInfo['featureId'] = featureId
    this.featureWindowDataList.push(featureInfo)
  }
  this.openFeatureInfoWindow(featureInfo, event['lngLat'])

  /* 校验是否存在交叉区域 */
  this.fixConflictFeaturePopup()
})

this.mapInstance.on('mouseleave', featureId, event => {
  /* 如果存在,删除这个弹窗 */
  this.clearFeaturePopup()

  /* 恢复默认的Layer样式 */
  this.mapInstance.setPaintProperty(featureId, 'fill-color', '#059ded')
  if (this.mapInstance.getLayer(pointId)) this.mapInstance.setLayoutProperty(pointId, 'visibility', 'visible')
  this.mapInstance.setPaintProperty(lineId, 'line-color', {
    'type': 'categorical',
    'property': 'kind',
    'stops': [[1, '#02F4FF'], [2, '#02F4FF']],
    'default': '#02F4FF'
  })
})

 浙公网安备 33010602011771号