【Vant】Vant 开发笔记
手机端元素高度控制:
界面div标签超出了可视区域时,一定要设置高度:
让元素保持在可视区域滑动,Popup组件从底部渲染时才能正常
<div style="height: 100vh; overflow-y: auto;">
Van-Form 表单组件:
文档地址:
https://vant-contrib.gitee.io/vant/v2/#/zh-CN/form
1、提交方法
官方文档默认的方式是使用nativeType,非常不理解
可以改用按照elmentui的方式使用refs手动调用校验方法
标签设置ref值
<van-form :ref="vanFormRef">
  <van-field v-model="form.ivVisitor" :label-width="labelWidth" name="访问人" label="访问人" placeholder="访问人" required :rules="rules.ivVisitor" />
  <van-field readonly clickable :label-width="labelWidth" label="项目名称" :value="inName" placeholder="项目名称" :rules="rules.salPrInId" required @click="salPrInIdVisible = true" />
  <van-field v-model="form.ivWay" :label-width="labelWidth" name="访问形式" label="访问形式" placeholder="访问形式" required :rules="rules.ivWay" />
  <van-field readonly clickable :label-width="labelWidth" label="访问时间" :value="form.ivTime" placeholder="访问时间" required @click="ivTimeVisible = true" />
  <van-field readonly clickable :label-width="labelWidth" label="访问成果类型" :value="ivGainTypeName" placeholder="访问成果类型" :rules="rules.ivGainType" @click="ivGainTypeVisible = true" />
  <van-field readonly clickable :label-width="labelWidth" label="拟再次访问日期" :value="form.ivNextTime" placeholder="拟再次访问日期" @click="ivNextTimeVisible = true" />
  <van-field v-model="form.ivItvwName" :label-width="labelWidth" name="被访人姓名" label="被访人姓名" placeholder="被访人姓名" :rules="rules.ivItvwName" />
  <van-field v-model="form.ivItvwPhone" :label-width="labelWidth" name="被访人联系方式" label="被访人联系方式" placeholder="被访人联系方式" :rules="rules.ivItvwPhone" />
  <van-field v-model="form.ivGainDesc" :label-width="labelWidth" name="访问成果" label="访问成果" placeholder="访问成果" type="textarea" rows="1" :rules="rules.ivGainDesc" />
  <van-field v-model="form.ivLocus" :label-width="labelWidth" name="面对面地点" label="面对面地点" placeholder="面对面地点" type="textarea" rows="1" :rules="rules.ivLocus" />
  <van-field v-model="form.ivRemark" :label-width="labelWidth" name="备注" label="备注" placeholder="备注" type="textarea" rows="1" :rules="rules.ivRemark" />
</van-form>
数据属性设置:
vanFormRef: 'vanFormRefKey',
底部栏提交标签:
<!-- 底部栏 -->
<div class="form-tab-bar">
  <van-button class="form-tab-bar-btn" type="info" @click="submit">确定</van-button>
</div>
提交方法:
submit() {
  this.$refs[this.vanFormRef].validate().then(async() => {
    if (this.isUpdate) {
      await updateInvisit(this.form)
      this.$dialog({ message: '更新成功!', confirmButtonColor: '#025BFF' }).then(() => {
        this.$parent.$parent.editVisible = false
        this.$parent.$parent['onRefresh']()
      })
    } else {
      await addInvisit(this.form)
      this.$dialog({ message: '新增成功!', confirmButtonColor: '#025BFF' }).then(() => {
        this.$parent.$parent.editVisible = false
        this.$parent.$parent['onRefresh']()
      })
    }
  })
},
2、表单内按钮触发提交操作
表单内的按钮点击事件会冒泡操作
不要触发默认的表单提交,需要追加 [ 阻止 ] 后缀来控制
<van-form :ref="vanFormRef">
<van-field v-model="empty" center readonly clearable label="用款明细" placeholder="" required>
  <template #button>
    <van-button size="mini" block :color="$ui.color" icon="plus" @click.stop="openEditPopup(null)" />
  </template>
</van-field>
</van-form>
Van-Field 输入项组件
文档地址:
https://vant-contrib.gitee.io/vant/v2/#/zh-CN/field
1、做下拉选择组件
vant 没有elementui那种封装好的组建,需要自己独立维护
1、制作下拉选择项
设置输入项只能为【只读】,【可以点击】 ,追加一个【点击事件】
注意这里value值是label标签值,非实际选中的value值, Visible变量是为了控制下拉列表的弹层展开关闭
<van-field readonly clickable label="所属公司" :value="coName" placeholder="所属公司" :rules="rules.sysArCoId" required @click="coNameVisible = true" />
2、制作下拉列表弹层
弹层绑定Visible变量打开和关闭
picker组件就是实际的el-select组件,
colums属性用来放下拉的数据集合,
value-key就是这个picker组件要展示的label值,
分别设置【取消事件】和【确认事件】
<van-popup v-model="coNameVisible" round position="bottom">
  <van-picker title="请选择所属公司" show-toolbar :columns="corpList" value-key="coName" @cancel="coNameVisible = false" @confirm="sysArCoIdConfirm" />
</van-popup>
3、编写【确认事件】的逻辑:
async sysArCoIdConfirm(val) {
  /* val 返回数据集合选中的元素,元素是什么类型,val就是什么类型 */
  this.form.sysArCoId = val.id
   /* 设置好上面的value值之后,还要回显下拉的label值 */
  this.coName = this.form.coName = val.coName

   /* 然后关闭下拉弹层 */
  this.coNameVisible = false

  /* 下面这些逻辑是联动其它选项的 */

  /* 重置所属部门 */
  this.deName = ''
  this.deptList = []
  this.form.sysArDeId = ''

  /* 重新初始化 */
  await this.initialAllocatedDepartmentList(val.id)
}
2、做查询条件,时间范围查询组件
1、组件标签
<div style="display: block;">
<span>申请时间</span>
<span style="position: relative;display: block;">
  <van-field v-model="dateRange" style="width: 91vw;" placeholder="请选择申请时间范围" :clearable="true" readonly @click="dateVisible = true" />
  <van-icon name="clear" class="search-clear-icon" @click="clearDateRange" />
</span>
</div>
2、data属性变量:
dateRange: '',
dateVisible: false,
/* 时间范围设置 */
minDate: new Date(2022, 1, 1),
maxDate: new Date(2099, 12, 31)
3、时间范围选择弹层:
<!-- 时间范围筛选 -->
<van-popup v-model="dateVisible" position="bottom">
  <van-calendar v-model="dateVisible" :color="$ui.color" type="range" :min-date="minDate" :max-date="maxDate" :allow-same-day="true" @confirm="addDateRange" />
</van-popup>
4、确认事件的赋值操作:
addDateRange(values) {
  this.dateRange = values[0].getFullYear() + '/' + (values[0].getMonth() + 1) + '/' + values[0].getDate() + ' ~ ' + values[1].getFullYear() + '/' + (values[1].getMonth() + 1) + '/' + values[1].getDate()
  this.dateVisible = false
  this.onRefresh()
}
3、下拉列表可搜索选项:
预览效果:
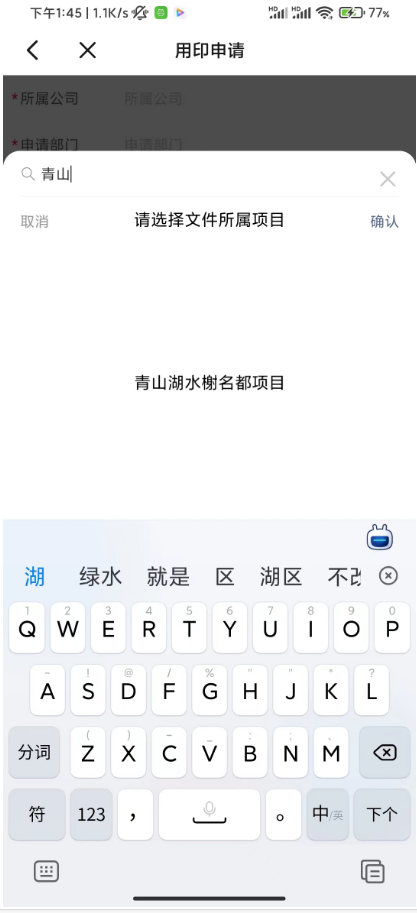
参考博客:
https://blog.csdn.net/qq_41426442/article/details/124567038
这里我封装成一个组件:
只是组合了一下,Props参数通过Field和Picker对象传入
包括事件的方法,注意这里方法传入
需要组件声明一个方法提供到Vant组件进行调用,然后再通过Props参数传给这个组件(否则无法调用)
<template>
  <div>
    <!-- 表单项 -->
    <van-field readonly clickable :label="field.label" :value="field.value" :placeholder="field.placeholder" :rules="field.rule" required @click="selectVisible = true" />

    <!-- 选择器 -->
    <van-popup v-model="selectVisible" round position="bottom" closeable>
      <van-field v-model="searchInput" :placeholder="picker.placeholder" left-icon="search" @input="pickerSearch" />
      <van-picker :title="picker.title" show-toolbar :columns="picker.data" :value-key="picker.valueKey" @cancel="selectVisible = false" @confirm="pickerConfirm" />
    </van-popup>
  </div>
</template>

<script>
export default {
  name: 'SearchSelect',
  props: {
    field: {
      type: Object,
      required: true,
      default() {
        return {
          label: '选项名称',
          placeholder: '选项名称',
          value: '',
          rule: []
        }
      }
    },
    picker: {
      type: Object,
      required: true,
      default() {
        return {
          title: '选择器标题',
          placeholder: '选择器文本',
          valueKey: '',
          data: [],
          inputMethod: (search) => {},
          confirmMethod: () => {}
        }
      }
    }
  },
  data() {
    return {
      selectVisible: false,
      searchInput: ''
    }
  },
  methods: {
    pickerSearch(search) {
      this.picker.inputMethod(search)
    },
    pickerConfirm(val) {
      this.picker.confirmMethod(val)
      this.selectVisible = false
    }
  }
}
</script>
使用组件:
1、使用标签,绑定参数对象
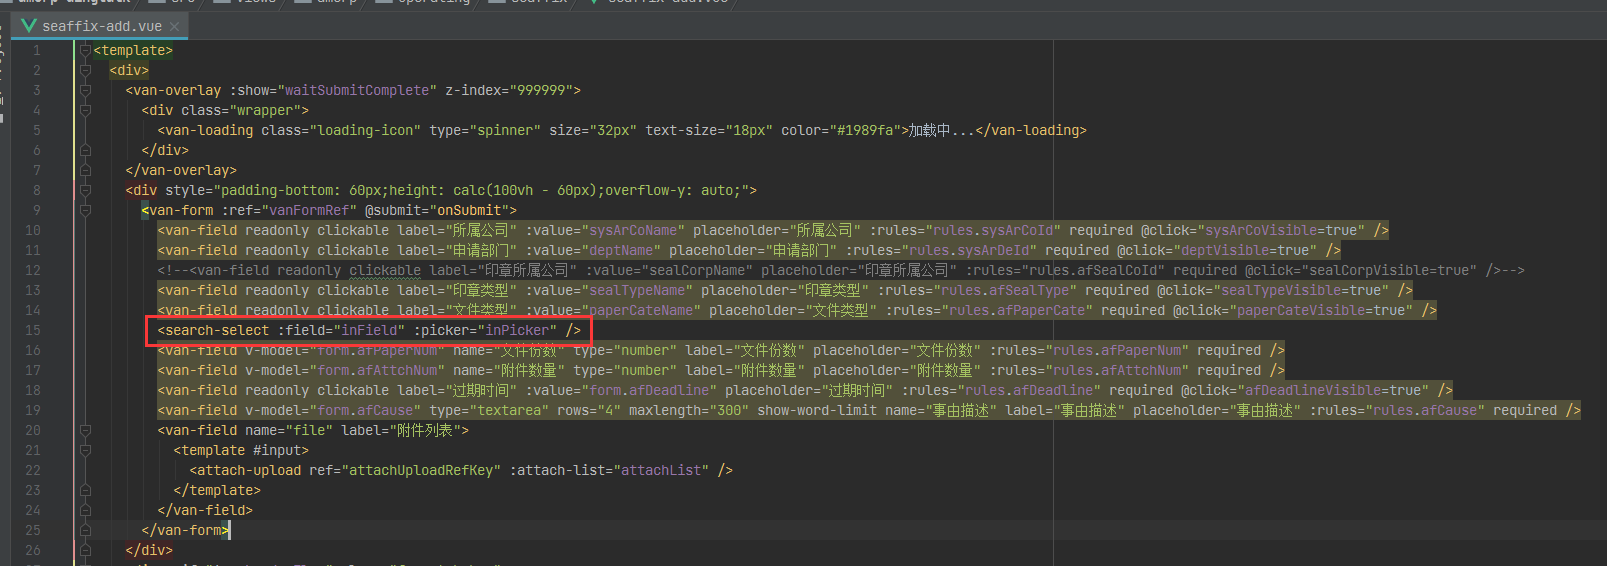
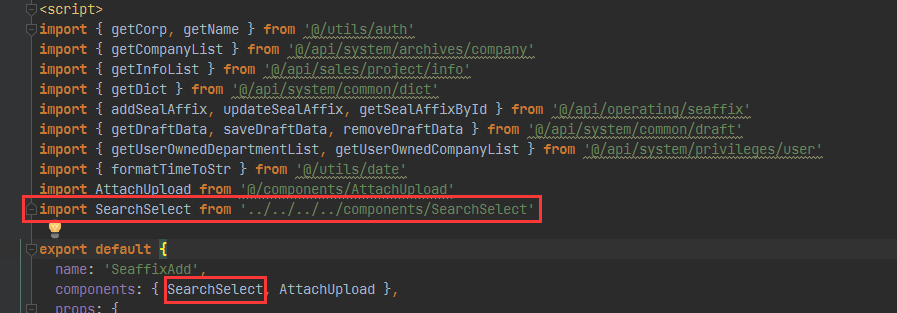
2、组件注册:
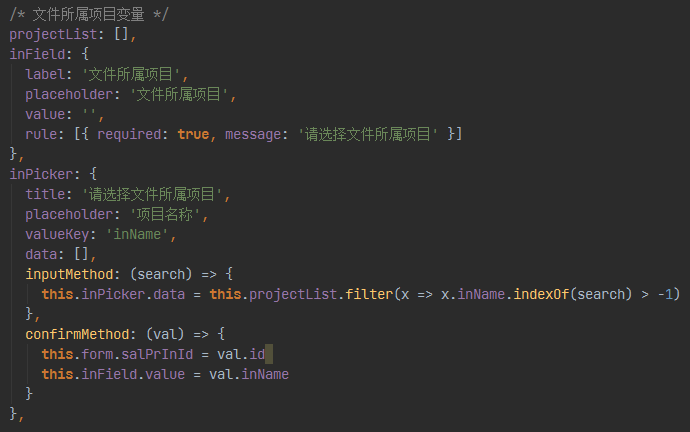
3、Data属性填写:
直接在属性中将方法作为固定变量
/* 文件所属项目变量 */
projectList: [],
inField: {
  label: '文件所属项目',
  placeholder: '文件所属项目',
  value: '',
  rule: [{ required: true, message: '请选择文件所属项目' }]
},
inPicker: {
  title: '请选择文件所属项目',
  placeholder: '项目名称',
  valueKey: 'inName',
  data: [],
  inputMethod: (search) => {
    this.inPicker.data = this.projectList.filter(x => x.inName.indexOf(search) > -1)
  },
  confirmMethod: (val) => {
    this.form.salPrInId = val.id
    this.inField.value = val.inName
  }
},
4、数据属性问题:
可以看inputMethod的写法,需要一份原数据和展示数据
这里贴上数据获取的接口:
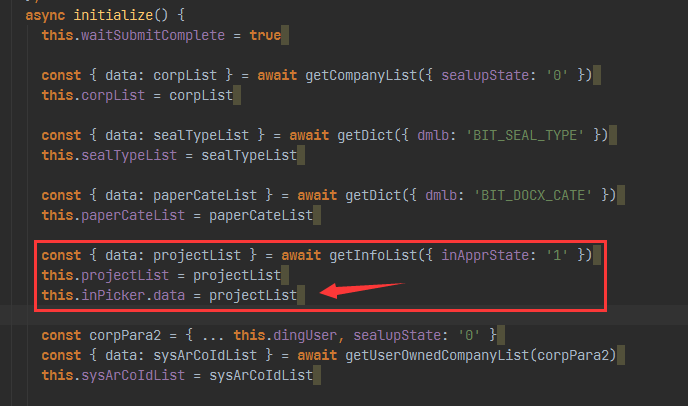
const { data: projectList } = await getInfoList({ inApprState: '1' })
this.projectList = projectList
this.inPicker.data = projectList
4、多选下拉列表:
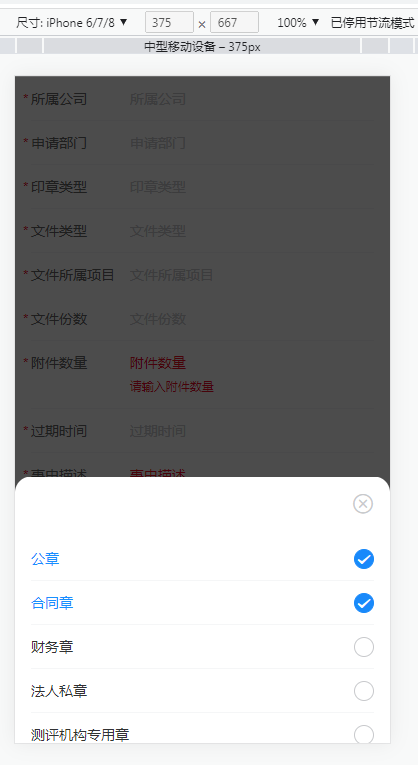
组件标签:
<!-- 表单组件 -->
<van-field readonly clickable label="印章类型" :value="sealTypeName" placeholder="印章类型" :rules="rules.afSealType" required @click="sealTypeVisible=true" />

<!-- 多选选择器 -->
<van-popup v-model="sealTypeVisible" round position="bottom" closeable close-icon="close" style="height: 40vh" @close="closeSealTypeSelect">
  <van-checkbox-group ref="checkboxGroup" v-model="checkedValue" style="margin-top: 60px" @change="change">
    <van-cell-group>
      <van-cell v-for="(item, idx) in sealTypeList" :key="`sealType${idx}`" clickable @click="cbxToggle(idx)">
        <template #title>
          <span :class="item.checked ? 'custom-title' : ''">{{ item.diName }}</span>
        </template>
        <template #right-icon>
          <van-checkbox ref="checkboxes" v-model="item.checked" :name="item" />
        </template>
      </van-cell>
    </van-cell-group>
  </van-checkbox-group>
</van-popup>
data变量:
/* 印章类型变量 */
sealTypeName: '',
sealTypeVisible: false,
sealTypeList: [],
checkedValue: []
方法变量:
/* 关闭下拉时设置选中的下拉项和回显翻译值 */
closeSealTypeSelect() {
  this.sealTypeName = this.checkedValue.map(el => el.diName).toString()
  this.form.afSealType = this.checkedValue.map(el => el.diCode).toString()
  this.sealTypeVisible = false
},

/* 监听Change事件变化 */
change() {},

/* 复选框勾选切换事件 */
cbxToggle(index) {
  this.$refs.checkboxes[index].toggle()
  this.sealTypeList[index].checked = !this.sealTypeList[index].checked
},
文本跟随选中时颜色变化:
<style scoped>
  .custom-title {
    color: #1890FF
  }
</style>
5、行政区域联动下拉选择
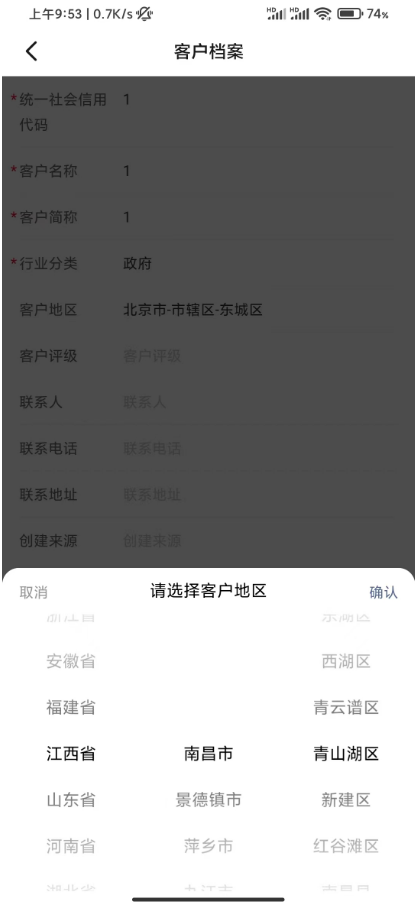
行政区域选择,我看到有van-cascader做下拉,但是同事用的还是picker来做,查看文档发现
下级的联动是读取children属性实现,但是我返回的数据不是children属性,是treeNodeChildren
查看文档之后发现没有专门声明children指定的配置参数,可恶啊,那我这里只能想到替换js对象属性来完成了
参考方法:
https://blog.csdn.net/qq_40055200/article/details/127413479
我的方法:
找到treeNodeChilren属性,然后赋值给新的属性
第二步,删掉原属性
第三步,判断新赋值属性是否存在子集合,有则递归方法继续替换
methods: {
  changeTreePropRecursive(children) {
    children.forEach(el => {
      el['children'] = el['treeNodeChildren']
      delete el['treeNodeChildren']
      if (el['children'] && el['children'].length > 0) this.changeTreePropRecursive(el['children'])
    })
  }
}
组件标签使用:
<van-field readonly clickable label="客户地区" :value="cuCityName" placeholder="客户地区" @click="cuCityVisible=true" />

<van-popup v-model="cuCityVisible" round position="bottom">
  <van-picker title="请选择客户地区" show-toolbar :columns="cuCityList" value-key="arName" @cancel="cuCityVisible = false" @confirm="cuCityConfirm" />
</van-popup>
数据变量:
/* 客户地区变量 */
cuCityName: '',
cuCityVisible: false,
cuCityList: [],
确认点击事件:
cuCityConfirm(val, idx) {
  this.form.cuCityCode = this.cuCityList[idx[0]].children[idx[1]].children[idx[2]].arCode
  this.cuCityName = val[0] + '-' + val[1] + '-' + val[2]
  this.cuCityVisible = false
},
区域树加载的数据:
async initArea() {
  const { data: cuCityList } = await getCachedAreaTree()
  this.changeTreePropRecursive(cuCityList)
  this.cuCityList = cuCityList
}
移动端表格组件的解决方案
Vxe-Table 官方文档地址:
https://vxetable.cn/v3/#/table/start/install
安装教程见文档:
https://blog.csdn.net/qq_40323256/article/details/127717133
发现在单独操作数据时,表格会不更新渲染
解决办法是手动调用重新加载方法:
this.$refs.xTable.reloadData(this.form.cuBankList)
xTable是ref属性的值:
<vxe-table
  ref="xTable"
  class="table-scrollbar"
  border
  resizable
  show-overflow
  size="mini"
  show-footer
  width="1200"
  :row-config="{ isHover: true }"
  :data="form.cuBankList"
>
  <vxe-column type="seq" width="60" title="序号" align="center" show-overflow />
  <vxe-column field="cbAcNumber" width="200px" title="账户号码" show-overflow />
  <vxe-column field="cbAcName" width="160px" title="账户名称" show-overflow />
  <vxe-column field="cbBaName" width="160px" title="银行名称" show-overflow />
  <vxe-column field="cbBaSubbranch" width="160px" title="支行名称" show-overflow />
  <vxe-column field="cbBaProvince" width="160px" title="开户行省" show-overflow />
  <vxe-column field="cbBaCity" width="160px" title="开户行所在市" show-overflow />
  <vxe-column field="cbAcCurrency" width="160px" title="币种" :formatter="formatterCbAcCurrency" />
  <vxe-column field="sealupState" width="120px" align="center" title="封存状态" :formatter="formatterSealupState" />
  <vxe-column title="操作" min-width="100" show-overflow align="center">
    <template #default="{ row }">
      <vxe-button type="text" icon="vxe-icon-edit" @click="openEditPopup(row)" />
      <vxe-button type="text" icon="vxe-icon-delete" @click="removeDetail(row)" />
    </template>
  </vxe-column>
</vxe-table>
2023年03月09日 更新:
1、Element 和 Vant 表单 暂存功能 数据兼容问题:
暂存功能前提情要:
https://www.cnblogs.com/mindzone/p/16802692.html
Element负责PC端页面,Vant负责钉钉H5页面
两个前端项目,同一个业务功能
普通输入的表单项是一致的,但是Select是不一样的
el-select只需要提供数值本身即可,但是van-picker这边是和van-field组合使用
回显需要提供label值给van-field,暂存的数据通用,这会出现一个问题:
在PC端暂存的数据,在手机端回显暂存的时候,label值缺失:
解决思路是在PC端暂存的时候,把手机端需要的label值放进去
先来看最基础的单选Select标签:
element官方文档上@change函数返回的只提供value值
<el-form-item label="所属公司" prop="sysArCoId" :style="commonStyle">
  <el-select ref="sysArCoIdSelect" v-model="form.sysArCoId" :style="inputStyle" size="mini" clearable placeholder="请选择" @change="selectCompanyChange">
    <el-option v-for="(item, idx) in companyList" :key="`sysArCoId${idx}`" :label="`${item.coName} | ${item.coCode}`" :value="item.id" />
  </el-select>
</el-form-item>
给vant-field装填label值需要从element这边获取
有两种获取方式:
第一种使用@click.native
参考CSDN博客:
https://blog.csdn.net/m0_38038870/article/details/123418588
点击时触发事件,直接获取选中的option,然后把值放到表单对象里面
<el-option v-for="(item, idx) in projectList" :key="`project${idx}`" :label="`[${item.inCode} / ${item.inName}]`" :value="item.id" @click.native="sc.row.inName = item.inName" />
第二种使用组件内置的属性获取:
参考简述文章:
http://events.jianshu.io/p/a4b1920ddd1d
通过select组件内置的属性进行获取
/* 存储下拉label值(给钉钉回显) */
this.form.coName = this.$refs['sysArCoIdSelect'].selectedLabel

/* 这里label值不是一致的,需要文本处理 */
this.form.coName = this.form.coName.substring(0, this.form.coName.lastIndexOf('|') - 1)
save
多选Select标签回显:
多选显示的是一组label值,上面那种@click.native的办法就不适用了
还是通过内置属性获取,使用map方法提取label值转字符即可
/* 多选下拉,转换label值 */
this.form.orWaCateName = this.$refs['orWaCateSelect'].selected.map(comp => comp.currentLabel).toString()
多选Select的类型不一致:
el-select多选,是存储一个数组类型,而vant-picker这里是存储一个字符串
暂存接口并没有像业务接口一样提交之前转换成字符串存入
vant手机端和业务字段不需要任何转换处理,主要是el-select这边的处理
从el-select暂存的是:["BA1001", "BA1002", ...]
从van-picker暂存的是:"BA1001, BA1002, ..."
给element这边就判断类型是不是h5暂存的,如果是才转换
这里发现多选为空的情况下暂存,空字符使用分割数组方法会填充一个空串元素
为了去除这个无效元素,我后面加了filter过滤处理
/* 从钉钉端和PC端暂存的类型不一致区分处理 */
const isFromH5 = typeof dataParam.orWaCate === 'string'
if (isFromH5) {
  dataParam.orWaCate = dataParam.orWaCate.split(',').filter(x => x !== '')
}
给vant这边就反过来:
/* 从钉钉端和PC端暂存的类型不一致区分处理 */
const isFromH5 = typeof this.form.afSealType === 'string'
if (!isFromH5) {
  this.form.afSealType = this.form.afSealType.toString()
}
2023年04月19日更新:
解决钉钉H5路由跳转的问题
钉钉微应用H5 分为【安卓,苹果,PC】PC的先不考虑,主要是在安卓和苹果上的跳转处理
先看文档说明:
https://open.dingtalk.com/document/orgapp/return-to-previous-page
问题主要出现在安卓的跳转,发现按照官方文档的说明使用后并不能后退,而是直接退到钉钉页面了
再查看window.history对象之后发现,h5页面的history对象内容为空,这就说明钉钉是不会记录H5的跳转
但是在苹果IOS的钉钉上面并没有发现这个问题,正常使用,所以对IOS的处理是不需要干预的
如何判断移动端是IOS还是安卓?
方式一、通过读取浏览器信息,判断字符内容
const u = navigator.userAgent
const isiOS = !!u.match(/\(i[^;]+;( U;)? CPU.+Mac OS X/)
方式二、使用dingding的JSAPI变量
import ding from 'dingtalk-jsapi'

if (ding.ios) {
  // 是ios  ...
}
解决安卓回退的问题:
一、在跳转之前,先回退需要准备的参数准备好:
因为要回退到本页面,那下一个页面就需要知道本页面的path,和重新跳转到本页面需要的相关参数
    openSellHistoryPopup() {
      this.$router.push({ path: '/salApSellHistory', query: { ... this.$route.query, path: this.$route.path }})
    },
二、在跳转的页面挂载dom之后,对钉钉的后退按钮绑定事件方法
因为是取dom操作,所以要等挂载完成后再绑定,先把当前页面刷新一遍后,再跳回去
  mounted() {
    const u = navigator.userAgent
    const that = this
    const isiOS = !!u.match(/\(i[^;]+;( U;)? CPU.+Mac OS X/)
    if (!isiOS) {
      document.addEventListener('backbutton', function() {
        const { path } = that.$route.query
        window.location.reload()
        that.$router.push({ path, query: { ... that.$route.query }, replace: true })
      })
    }
  }
可以先阻止钉钉自己的后退事件
document.addEventListener('backbutton', function(e) {
  e.preventDefault()
  const { path } = that.$route.query
  window.location.reload()
  that.$router.push({ path, query: { ... that.$route.query }, replace: true })
})
解决苹果IOS页面可拖动的BUG:
需要安装一个inobounce的依赖:
"inobounce": "^0.2.1"
导入inobounce,在挂载时调用开启方法,在页面实例销毁前调用关闭方法
import inobounce from 'inobounce'
因为只针对苹果,所以先判断下是不是IOS
  mounted() {
    if (ding.ios) inobounce.enable()
  },
  beforeDestroy() {
    if (ding.ios) inobounce.disable()
  },
然后页面根元素必须使用自动滚动样式:
overflow-y: auto;
如:
<template>
  <div style="background:#f5f5f5; width: 100vw; height: 100vh;!important; overflow-y: auto;">
   <!-- 页面内容 -->
  </div>
</template>


 浙公网安备 33010602011771号