
【WSDL】04 SpringBoot整合CXF
ApacheCXF框架对WSDL的信息几乎完全屏蔽了
能够更快速更方便的构建WebService
这里参考的视频地址是:
https://www.bilibili.com/video/BV1Kz4y1f78f
首先创建一个POM工程:
<?xml version="1.0" encoding="UTF-8"?>
<project xmlns="http://maven.apache.org/POM/4.0.0"
         xmlns:xsi="http://www.w3.org/2001/XMLSchema-instance"
         xsi:schemaLocation="http://maven.apache.org/POM/4.0.0 http://maven.apache.org/xsd/maven-4.0.0.xsd">
    <modelVersion>4.0.0</modelVersion>
    <modules>
        <module>JAX-WS</module>
        <module>JAX-RS</module>
    </modules>

    <parent>
        <groupId>org.springframework.boot</groupId>
        <artifactId>spring-boot-starter-parent</artifactId>
        <version>1.5.4.RELEASE</version>
    </parent>

    <groupId>cn.cloud9</groupId>
    <artifactId>Springboot-CXF</artifactId>
    <version>1.0-SNAPSHOT</version>
    <packaging>pom</packaging>

</project>
一、JAX-WS案例
创建子工程JAX-WS
依赖坐标:
<?xml version="1.0" encoding="UTF-8"?>
<project xmlns="http://maven.apache.org/POM/4.0.0"
         xmlns:xsi="http://www.w3.org/2001/XMLSchema-instance"
         xsi:schemaLocation="http://maven.apache.org/POM/4.0.0 http://maven.apache.org/xsd/maven-4.0.0.xsd">
    <parent>
        <artifactId>Springboot-CXF</artifactId>
        <groupId>cn.cloud9</groupId>
        <version>1.0-SNAPSHOT</version>
    </parent>
    <modelVersion>4.0.0</modelVersion>

    <artifactId>JAX-WS</artifactId>

    <dependencies>
        <dependency>
            <groupId>org.springframework.boot</groupId>
            <artifactId>spring-boot-starter-web</artifactId>
        </dependency>

        <dependency>
            <groupId>org.apache.cxf</groupId>
            <artifactId>cxf-spring-boot-starter-jaxws</artifactId>
            <version>3.1.11</version>
        </dependency>

        <dependency>
            <groupId>org.projectlombok</groupId>
            <artifactId>lombok</artifactId>
            <version>1.18.24</version>
            <scope>provided</scope>
        </dependency>
    </dependencies>

    <properties>
        <maven.compiler.source>8</maven.compiler.source>
        <maven.compiler.target>8</maven.compiler.target>
    </properties>

</project>
创建普通的业务层资源:
package cn.cloud9.po;

import lombok.Data;

/**
 * @author OnCloud9
 * @description
 * @project Springboot-CXF
 * @date 2022年04月23日 16:50
 */
@Data
public class User {
    private Integer code;
    private String name;
    private String password;
}
接口,标记为Web服务接口
package cn.cloud9.intf;

import cn.cloud9.po.User;

import javax.jws.WebService;
import java.util.List;

@WebService
public interface UserService {
    boolean saveUser(User user);
    boolean deleteUser(User user);
    boolean updateUser(User user);
    List<User> listUsers();
    User findUserById(Integer code);
}
实现类
package cn.cloud9.intf;

import cn.cloud9.po.User;
import org.springframework.stereotype.Service;

import java.util.ArrayList;
import java.util.List;

/**
 * @author OnCloud9
 * @description
 * @project Springboot-CXF
 * @date 2022年04月23日 16:53
 */
@Service("userService")
public class UserServiceImpl implements UserService{
    static List<User> userList;

    static {
        userList = new ArrayList<>();
        for (int i = 1; i < 11; i++) {
            User user = new User();
            user.setCode(1000 + i);
            user.setName("user - " + user.getCode());
            user.setPassword("123456");
            userList.add(user);
        }
    }

    public UserServiceImpl() {
    }
    @Override
    public boolean saveUser(User user) {
        return null != user;
    }

    @Override
    public boolean deleteUser(User user) {
        return null != user;
    }

    @Override
    public boolean updateUser(User user) {
        return null != user;
    }

    @Override
    public List<User> listUsers() {
        return userList;
    }

    @Override
    public User findUserById(Integer code) {
        return userList.stream().filter(user -> user.getCode().equals(code)).findFirst().get();
    }
}
JaxWsConfig配置类
这里有一个服务总线Bean,类似Controller的概念,
但是所有服务都需要进过这个总Controller发布服务
package cn.cloud9.config;

import cn.cloud9.intf.UserService;
import org.apache.cxf.Bus;
import org.apache.cxf.jaxws.EndpointImpl;
import org.springframework.beans.factory.annotation.Autowired;
import org.springframework.context.annotation.Bean;
import org.springframework.context.annotation.Configuration;

import javax.xml.ws.Endpoint;

/**
 * @author OnCloud9
 * @description
 * @project Springboot-CXF
 * @date 2022年04月23日 16:58
 */
@Configuration
public class JaxWsConfig {
    /**
     * 业务总线
     */
    @Autowired
    private Bus bus;

    @Autowired
    private UserService userService;

    @Bean
    public Endpoint createEndpoint() {
        final EndpointImpl endpoint = new EndpointImpl(bus, userService);
        endpoint.publish("/userService");
        return endpoint;
    }
}
启动类:
这个服务没有任何的配置文件
package cn.cloud9;

import org.springframework.boot.SpringApplication;
import org.springframework.boot.autoconfigure.SpringBootApplication;

/**
 * @author OnCloud9
 * @description
 * @project Springboot-CXF
 * @date 2022年04月23日 16:50
 */
@SpringBootApplication
public class JaxWsApplication {
    public static void main(String[] args) {
        SpringApplication.run(JaxWsApplication.class, args);
    }
}
启动成功后,可以访问此地址查看WSDL的资源描述
http://localhost:8080/services/userService?wsdl
JaxWs客户端调用:
客户端需要对应的PO和接口一致,这里CXF会对WS进行封装
屏蔽之前许多内容,只需要提供WS的借口地址即可
另外注意一点,Bus会默认追加一个路径前缀,/services
import cn.cloud9.intf.UserService;
import cn.cloud9.po.User;
import org.apache.cxf.jaxws.JaxWsProxyFactoryBean;

/**
 * @author OnCloud9
 * @description
 * @project Springboot-CXF
 * @date 2022年04月23日 17:04
 */
public class JaxWsTest {
    public static void main(String[] args) {
        final JaxWsProxyFactoryBean factoryBean = new JaxWsProxyFactoryBean();
        factoryBean.setAddress("http://localhost:8080/services/userService");
        factoryBean.setServiceClass(UserService.class);
        final Object o = factoryBean.create();
        UserService userService = (UserService) o;

        System.out.println(userService.saveUser(new User()));
        System.out.println(userService.listUsers());
        final User userById = userService.findUserById(1005);
        System.out.println(userById);
    }
}
得到WS接口代理的实例,就可以调用服务端了
二、JAX-RS案例
新建子工程JAX-RS:
由于是通过Rest风格调用,服务的调用完全可以按照Http的方式使用
这里多出的组件是为了响应JSON化,否则默认响应SOAP数据
<?xml version="1.0" encoding="UTF-8"?>
<project xmlns="http://maven.apache.org/POM/4.0.0"
         xmlns:xsi="http://www.w3.org/2001/XMLSchema-instance"
         xsi:schemaLocation="http://maven.apache.org/POM/4.0.0 http://maven.apache.org/xsd/maven-4.0.0.xsd">
    <parent>
        <artifactId>Springboot-CXF</artifactId>
        <groupId>cn.cloud9</groupId>
        <version>1.0-SNAPSHOT</version>
    </parent>
    <modelVersion>4.0.0</modelVersion>

    <artifactId>JAX-RS</artifactId>

    <dependencies>
        <dependency>
            <groupId>org.springframework.boot</groupId>
            <artifactId>spring-boot-starter-web</artifactId>
        </dependency>

        <dependency>
            <groupId>org.apache.cxf</groupId>
            <artifactId>cxf-spring-boot-starter-jaxrs</artifactId>
            <version>3.1.11</version>
        </dependency>

        <dependency>
            <groupId>org.apache.cxf</groupId>
            <artifactId>cxf-rt-rs-extension-providers</artifactId>
            <version>3.1.11</version>
        </dependency>

        <dependency>
            <groupId>org.codehaus.jettison</groupId>
            <artifactId>jettison</artifactId>
            <version>1.3.7</version>
        </dependency>

        <dependency>
            <groupId>org.projectlombok</groupId>
            <artifactId>lombok</artifactId>
            <version>1.18.24</version>
            <scope>provided</scope>
        </dependency>
    </dependencies>

    <properties>
        <maven.compiler.source>8</maven.compiler.source>
        <maven.compiler.target>8</maven.compiler.target>
    </properties>

</project>
PO,和实现类不需要变更,CXF对REST的支持是提供了这些HTTP的注解
定义在接口上面:
简单数据类型是直接返回的,像PO这样的数据类型,需要通过
@Produces({MediaType.APPLICATION_JSON}) 注解处理返回数据
package cn.cloud9.intf;
import cn.cloud9.po.User;
import javax.jws.WebService;
import javax.ws.rs.*;
import javax.ws.rs.core.MediaType;
import java.util.List;
@WebService
public interface UserService {
@POST
@Path("/save")
boolean saveUser(User user);
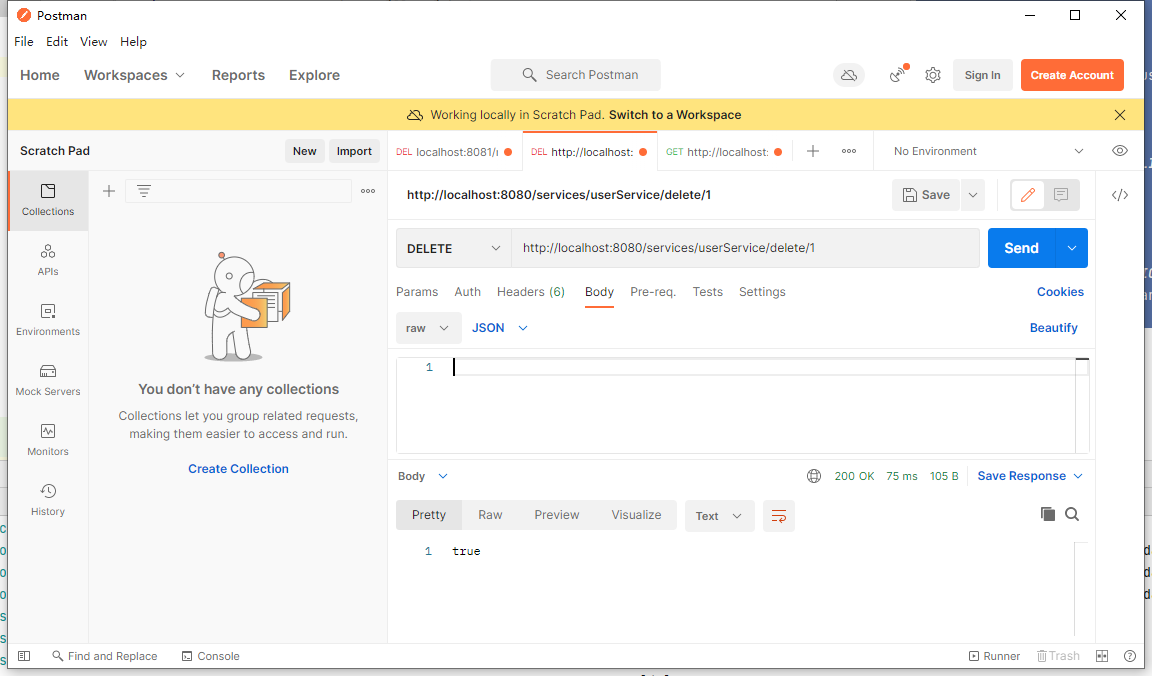
@DELETE
@Path("delete/{id}")
boolean deleteUser(@PathParam("id") Integer code);
@PUT()
@Path("/update")
boolean updateUser(User user);
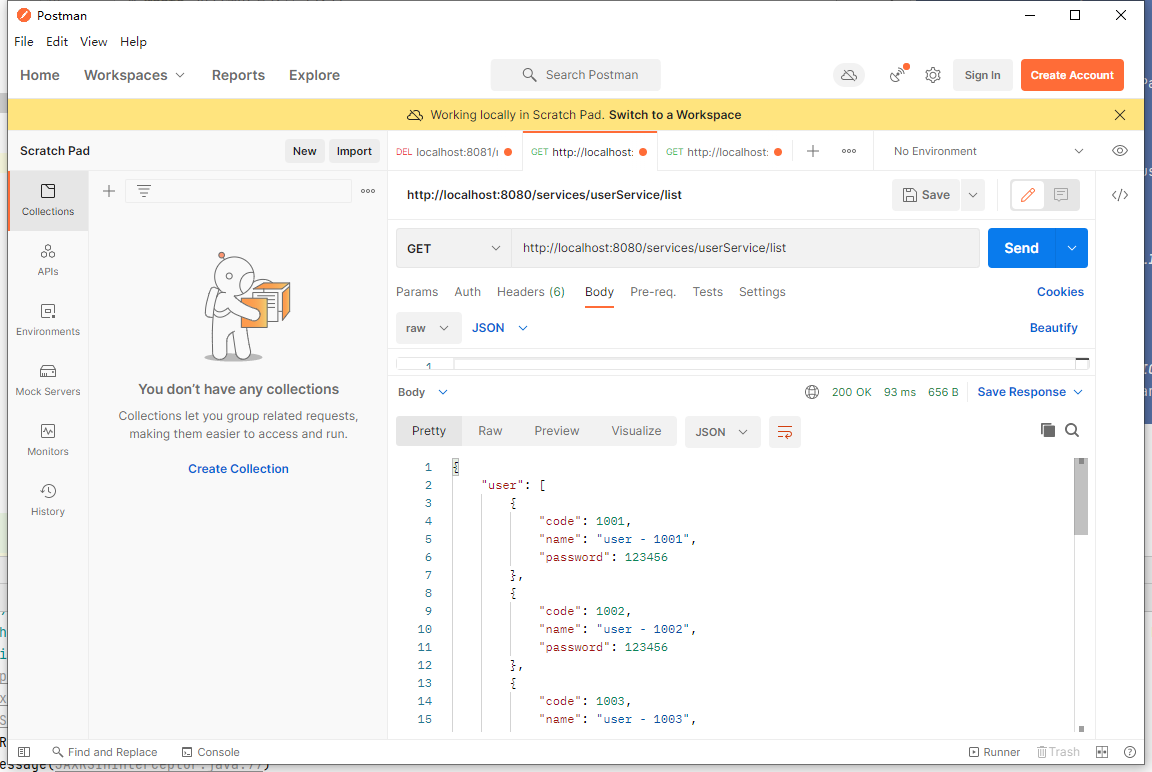
@GET
@Path("/list")
@Produces({MediaType.APPLICATION_JSON})
List<User> listUsers();
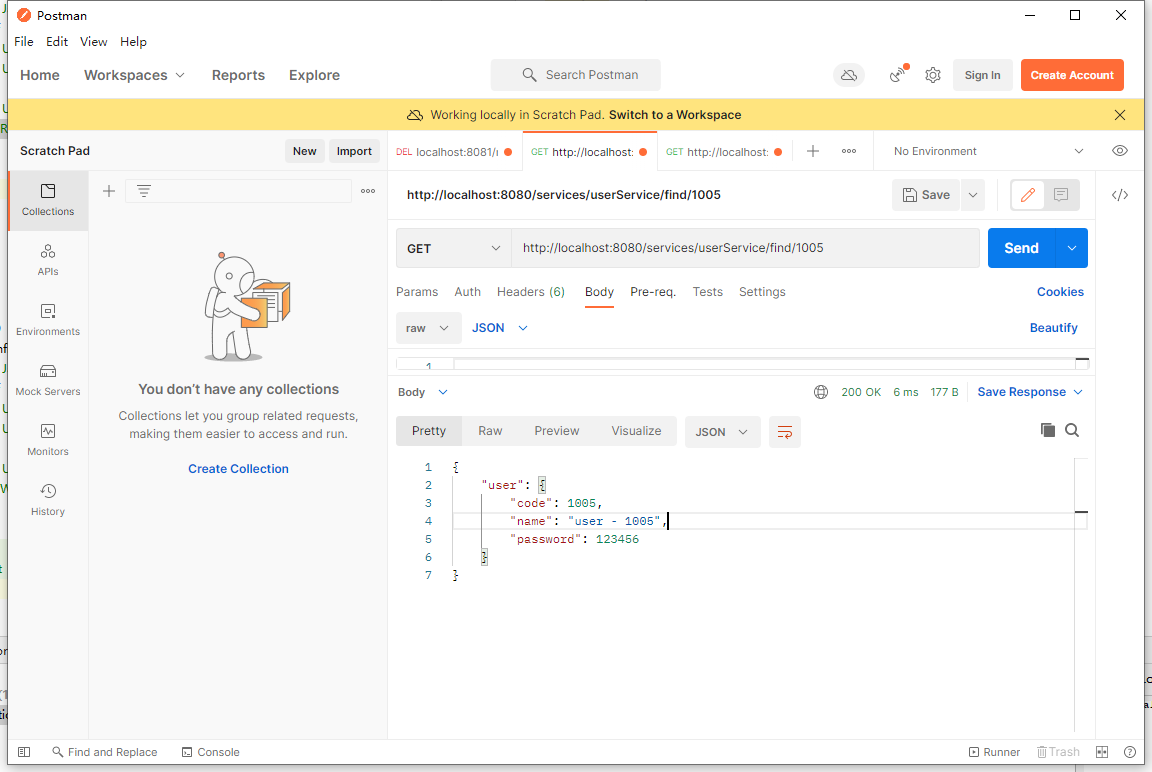
@GET
@Path("/find/{id}")
@Produces(MediaType.APPLICATION_JSON)
User findUserById(@PathParam("id") Integer code);
}
补充一下,PO需要打上@XmlRootElement注解
package cn.cloud9.po;

import lombok.Data;

import javax.xml.bind.annotation.XmlRootElement;

/**
 * @author OnCloud9
 * @description
 * @project Springboot-CXF
 * @date 2022年04月23日 16:50
 */
@Data
@XmlRootElement
public class User {
    private Integer code;
    private String name;
    private String password;
}
JaxRsConfig并没有太大差别
package cn.cloud9.config;

import cn.cloud9.intf.UserService;
import org.apache.cxf.Bus;
import org.apache.cxf.endpoint.Server;
import org.apache.cxf.jaxrs.JAXRSServerFactoryBean;
import org.springframework.beans.factory.annotation.Autowired;
import org.springframework.context.annotation.Bean;
import org.springframework.context.annotation.Configuration;

/**
 * @author OnCloud9
 * @description
 * @project Springboot-CXF
 * @date 2022年04月23日 17:30
 */
@Configuration
public class JaxRsConfig {
    @Autowired
    Bus bus;

    @Autowired
    private UserService userService;

    @Bean
    public Server createServer() {
        final JAXRSServerFactoryBean factoryBean = new JAXRSServerFactoryBean();
        factoryBean.setAddress("/userService");
        factoryBean.setBus(bus);
        factoryBean.setServiceBean(userService);
        return factoryBean.create();
    }
}
JaxRS客户端调用:
因为是Rest接口,所以可以直接使用Postman来发送请求调用了

 浙公网安备 33010602011771号