SpringBoot_初识
SpringBoot
1. 配置
SpringBoot所有自动配置都在启动时扫描并加载(spring. factories所有自动配置类都在这里),但不一定生效,判断条件是否成立,只要导入了对应的start,就有对应的启动器,有了启动器,自动装配就会生效,然后就配置成功
关于SpringBoot,谈谈你的理解:
-
自动装配
-
run()
-
SpringApplication
-
推断应用的类型是普通的项目还是Web项目
-
-
查找并加载所有可用初始化器,设置到initializers属性中
-
-
找出所有的应用程序监听器,设置到listeners属性中
-
-
推断并设置main方法的定义类,找到运行的主类
-
-
这就是自动装配的原理(精髓) :
-
SpringBoot启动会加载大量的自动配置类
-
我们看我们需要的功能有没有在SpringBoot默认写好的自动配置类当中;
-
我们再来看这个自动配置类中到底配置了哪些组件,(只要我们要用的组件存在在其中,我们 就不需要再手动配置了)
-
给容器中自动配置类添加组件的时候,会从properties类中获取某些属性。我们只需要在配置 文件中指定这些属性的值即可
-
xxxxAutoConfigurartion : 自动配置类,给容器中添加组件
-
xxxProperties : 封装配置文件中相关属性
debug
Yaml

server:
port: 8081
#基本语法 key: v(必须含有空格)
#普通k-v
name: miku_moe
#对象
student1:
name: name
age: 18
#行内写法
student2: {name: name,age: 18}
#数组
pets1:
- cat
- dog
#行内写法
pets2:[cat,dog]
#yaml可以直接给实体类赋值 实体类注解:@ConfigurationProperties(prefix = "person" )
person:
name: name${random.uuid}
age: 18
dog: ${person.age:10}_dogname #占位符,如果person.age不存在则默认为10,且自动拼接
#...一一对应
##优点
#松散绑定 "first-name: name"可以与实体类firstName相匹配
#复杂类型装配
#JSR303数据校验 @Validated数据校验 @Email
#批量注入属性
常用JSR303校验:


@Validated @NotNull(message="名字不能为空") private String userName; @Max(value=120,message="年龄最大不能查过120") private int age; @Email(message="邮箱格式错误") private String email; 空检查 @Null //验证对象是否为null @NotNull //验证对象是否不为nu1l,无法查检长度为0的字符串 @NotBlank //检查约束字符串是不是Null还有被Trim的长度是否大于0,只对字符串,且会去掉前后空格 @NotEmpty //检查约束元素是否为NULL或者是EMPTY Booelan检查 @AssertTrue //验证Boolean对象是否为true @AssertFalse //验证Boolean 对象是否为false 长度检查 @Size(min= ,max= ) //验证对象(Array,Collection,Map,String) 长度是否在给定的范围之内 @Length(min= ,max= ) //Validates that the annotated string is between min and max included. 日期检查 @Past //验证Date和Calendar 对象是否在当前时间之前 @Future //验证Date和calendar 对象是否在当前时间之后 /*** @Pattern 验证String对象是否符合正则表达式的规则 ***/
多环境
 server:
     port: 8081
 spring:
     profiles:
         active: dev
 ---
 server :
     port: 8082
 spring:
     profiles: dev
 ---
 server:
     port: 8083
 spring:
     profiles: test
2. Web开发(模拟数据)
xxxx AutoConfiguraion : 向容器中自动配置组件
xxxx Properties : 自动配置类,装配配置文件中自定义的一些内容
xxxx Configuration : 帮助我们进行扩展配置,只要看见了这个东西,我们就要注意
-
导入静态资源
-
首页
-
JSP,模板引擎
-
装配扩展SpringMVC
-
增删改查
-
拦截器
-
国际化

#缓存 spring.thymeleaf.cache=false #项目总路径 #server.servlet.context-path=/study #国际化配置 spring.messages.basename=i18n/login #时间日期格式化 默认使用"/"分割 spring.mvc.format.date=yyyy-MM-dd
静态资源
-
webjars loccalhost:8080/webjars/
-
resources目录下新建目录 : public , static , resources , /** localhost:8080/
-
优先级 : resources > static(默认) > public
-
自定义 : spring.mvc.static-path-pattren=/hello/,classpath:study/ -- 以上默认位置将失效
首页定制
Thymeleaf
注意点,所有页面的静态资源都需要使用thymeleaf接管 @{ } 新版貌似不需要配置也可
 #Thymeleaf规则
 Variable Expressions: ${...}
 Selection Variable Expressions: *{...}
 Message Expressions: #{...}
 Link URL Expressions: @{...}
 Fragment Expressions: ~{...}
依赖
 <!--Thymeleaf依赖-->
 <dependency>
     <groupId>org.thymeleaf</ groupId>
     <artifactId>thymeleaf-spring5</artifactId>
 </dependency>
 <dependency>
     <groupId>org. thymeleaf.extras</ groupId>
     <artifactId>thymeleaf-extras-java8time</artifactId>
 </dependency>
 <!--=============-->
 <dependency>
     <groupId>org.springframework.boot</groupId>
     <artifactId>spring-boot-starter-thymeleaf</artifactId>
 </dependency>
只要需要使用thymeleaf,只需要导入对应的依赖就可以了。我们将html放在我们的templates目录下即可
页面国际化
-
我们需要配置i18n文件
-
我们如果需要在项目中进行按钮自动切换,我们需要自定义一个组件LocaleResolver
-
将自己写的组件配置到spring容器@Bean
 #国际化配置  -- login  +  login_ch_CN
 login.bth=登录
 login.password=密码
 login.remember=记住我
 login.tip=请登录
 login.username=用户名
 #====================
 #login_en_US
 login.bth=Sign in
 login.password=Password
 login.remember=Remember me
 login.tip=Please sign in
 login.username=UserName
/*国际化解析器*/ public class MyLocalResolver implements LocaleResolver { @Override public Locale resolveLocale(HttpServletRequest request) { String language = request.getParameter("l"); Locale locale = Locale.getDefault();//如果没有使用默认的 //如果请求连接携带国际化参数 if (!StringUtils.isEmpty(language)){ //zh_CN String[] split = language.split("_"); //国家地区 locale = new Locale(split[0],split[1]); } return locale; } @Override public void setLocale(HttpServletRequest request, HttpServletResponse response, Locale locale) { } }
 /*配置*/
 @Configuration
 public class MyMvcConfig implements WebMvcConfigurer {
     //(视图解析器 - 页面映射) 路由 : 比重定向快
     @Override
     public void addViewControllers(ViewControllerRegistry registry) {
         registry.addViewController("/").setViewName("index");
         registry.addViewController("/index.html").setViewName("index");
         registry.addViewController("/main.html").setViewName("dashboard");
     }
     //自定义国际化组件
     @Bean
     public LocaleResolver localeResolver(){
         return new MyLocalResolver();
     }
     //拦截器 (addPathPatterns拦截那些请求   excludePathPatterns排除请求)
     @Override
     public void addInterceptors(InterceptorRegistry registry) {
         registry.addInterceptor(new LoginHandlerInterceptor())
                 .addPathPatterns("/**")
                 .excludePathPatterns("/index.html","/","/user/login","/css/*","js/**","/img/*");
     }
 }
登录注销 + 拦截器
/*控制层*/ @Controller public class LoginController { @RequestMapping("/user/login") public String login(@RequestParam("username") String username, @RequestParam("password") String password, HttpSession session, Model model){ if (!StringUtils.isEmpty(username) && "123456".equals(password)){ session.setAttribute("loginUser", username); return "redirect:/main.html"; }else { model.addAttribute("msg","用户名或密码错误!"); } return "index"; } //注销 @RequestMapping("/user/logout") public String logout(HttpSession session){ session.invalidate(); return "redirect:/index.html"; } }
拦截器
/*登录拦截器*/ public class LoginHandlerInterceptor implements HandlerInterceptor { @Override public boolean preHandle(HttpServletRequest request, HttpServletResponse response, Object handler) throws Exception { Object loginUser = request.getSession().getAttribute("loginUser"); if (loginUser == null) { //未登录 request.setAttribute("msg","没有权限,请先登录!"); request.getRequestDispatcher("/index.html").forward(request, response); return false; }else { return true; } } }
员工列表展示
-
提取公共页面 -- 将静态资源中的相应重复模块提出 单独放置在commons.html
 静态页面提取公共
<!-- th:fragment="sidebar" : 抽出化作组件实现复用 th:insert="~{dashboard::sidebar(active='main.html')}" : 插入 - 嵌套div th:replace : 替换 可以使用()传参,接收判断 th:class="${active=='main.html'?'nav-link active':'nav-link'}" --> <!--顶部导航栏--> <nav class="navbar navbar-dark sticky-top bg-dark flex-md-nowrap p-0" th:fragment="topbar"> <a class="navbar-brand col-sm-3 col-md-2 mr-0" href="http://getbootstrap.com/docs/4.0/examples/dashboard/#">[[${session.loginUser}]]</a> <input class="form-control form-control-dark w-100" type="text" placeholder="Search" aria-label="Search"> <ul class="navbar-nav px-3"> <li class="nav-item text-nowrap"> <a class="nav-link" th:href="@{/user/logout}">注销 </a> </li> </ul> </nav> <!--侧边栏--> <nav class="col-md-2 d-none d-md-block bg-light sidebar" th:fragment="sidebar"> <div class="sidebar-sticky"> <ul class="nav flex-column"> <li class="nav-item"> <a th:class="${active=='main.html'?'nav-link active':'nav-link'}" th:href="@{/index.html}"> <svg xmlns="http://www.w3.org/2000/svg" width="24" height="24" viewBox="0 0 24 24" fill="none" stroke="currentColor" stroke-width="2" stroke-linecap="round" stroke-linejoin="round" class="feather feather-home"> <path d="M3 9l9-7 9 7v11a2 2 0 0 1-2 2H5a2 2 0 0 1-2-2z"></path> <polyline points="9 22 9 12 15 12 15 22"></polyline> </svg> 首页 <span class="sr-only">(current)</span> </a> </li> <li class="nav-item"> <a class="nav-link" href="#"> <svg xmlns="http://www.w3.org/2000/svg" width="24" height="24" viewBox="0 0 24 24" fill="none" stroke="currentColor" stroke-width="2" stroke-linecap="round" stroke-linejoin="round" class="feather feather-file"> <path d="M13 2H6a2 2 0 0 0-2 2v16a2 2 0 0 0 2 2h12a2 2 0 0 0 2-2V9z"></path> <polyline points="13 2 13 9 20 9"></polyline> </svg> Orders </a> </li> <li class="nav-item"> <a class="nav-link" href="#"> <svg xmlns="http://www.w3.org/2000/svg" width="24" height="24" viewBox="0 0 24 24" fill="none" stroke="currentColor" stroke-width="2" stroke-linecap="round" stroke-linejoin="round" class="feather feather-shopping-cart"> <circle cx="9" cy="21" r="1"></circle> <circle cx="20" cy="21" r="1"></circle> <path d="M1 1h4l2.68 13.39a2 2 0 0 0 2 1.61h9.72a2 2 0 0 0 2-1.61L23 6H6"></path> </svg> Products </a> </li> <li class="nav-item"> <a th:class="${active=='list.html'?'nav-link active':'nav-link'}" th:href="@{/emps}"> <svg xmlns="http://www.w3.org/2000/svg" width="24" height="24" viewBox="0 0 24 24" fill="none" stroke="currentColor" stroke-width="2" stroke-linecap="round" stroke-linejoin="round" class="feather feather-users"> <path d="M17 21v-2a4 4 0 0 0-4-4H5a4 4 0 0 0-4 4v2"></path> <circle cx="9" cy="7" r="4"></circle> <path d="M23 21v-2a4 4 0 0 0-3-3.87"></path> <path d="M16 3.13a4 4 0 0 1 0 7.75"></path> </svg> 员工管理 </a> </li> <li class="nav-item"> <a class="nav-link" href="#"> <svg xmlns="http://www.w3.org/2000/svg" width="24" height="24" viewBox="0 0 24 24" fill="none" stroke="currentColor" stroke-width="2" stroke-linecap="round" stroke-linejoin="round" class="feather feather-bar-chart-2"> <line x1="18" y1="20" x2="18" y2="10"></line> <line x1="12" y1="20" x2="12" y2="4"></line> <line x1="6" y1="20" x2="6" y2="14"></line> </svg> Reports </a> </li> <li class="nav-item"> <a class="nav-link" href="#"> <svg xmlns="http://www.w3.org/2000/svg" width="24" height="24" viewBox="0 0 24 24" fill="none" stroke="currentColor" stroke-width="2" stroke-linecap="round" stroke-linejoin="round" class="feather feather-layers"> <polygon points="12 2 2 7 12 12 22 7 12 2"></polygon> <polyline points="2 17 12 22 22 17"></polyline> <polyline points="2 12 12 17 22 12"></polyline> </svg> Integrations </a> </li> </ul> <h6 class="sidebar-heading d-flex justify-content-between align-items-center px-3 mt-4 mb-1 text-muted"> <span>Saved reports</span> <a class="d-flex align-items-center text-muted" href="#"> <svg xmlns="http://www.w3.org/2000/svg" width="24" height="24" viewBox="0 0 24 24" fill="none" stroke="currentColor" stroke-width="2" stroke-linecap="round" stroke-linejoin="round" class="feather feather-plus-circle"><circle cx="12" cy="12" r="10"></circle><line x1="12" y1="8" x2="12" y2="16"></line><line x1="8" y1="12" x2="16" y2="12"></line></svg> </a> </h6> <ul class="nav flex-column mb-2"> <li class="nav-item"> <a class="nav-link" href="#"> <svg xmlns="http://www.w3.org/2000/svg" width="24" height="24" viewBox="0 0 24 24" fill="none" stroke="currentColor" stroke-width="2" stroke-linecap="round" stroke-linejoin="round" class="feather feather-file-text"> <path d="M14 2H6a2 2 0 0 0-2 2v16a2 2 0 0 0 2 2h12a2 2 0 0 0 2-2V8z"></path> <polyline points="14 2 14 8 20 8"></polyline> <line x1="16" y1="13" x2="8" y2="13"></line> <line x1="16" y1="17" x2="8" y2="17"></line> <polyline points="10 9 9 9 8 9"></polyline> </svg> Current month </a> </li> <li class="nav-item"> <a class="nav-link" href="#"> <svg xmlns="http://www.w3.org/2000/svg" width="24" height="24" viewBox="0 0 24 24" fill="none" stroke="currentColor" stroke-width="2" stroke-linecap="round" stroke-linejoin="round" class="feather feather-file-text"> <path d="M14 2H6a2 2 0 0 0-2 2v16a2 2 0 0 0 2 2h12a2 2 0 0 0 2-2V8z"></path> <polyline points="14 2 14 8 20 8"></polyline> <line x1="16" y1="13" x2="8" y2="13"></line> <line x1="16" y1="17" x2="8" y2="17"></line> <polyline points="10 9 9 9 8 9"></polyline> </svg> Last quarter </a> </li> <li class="nav-item"> <a class="nav-link" href="#"> <svg xmlns="http://www.w3.org/2000/svg" width="24" height="24" viewBox="0 0 24 24" fill="none" stroke="currentColor" stroke-width="2" stroke-linecap="round" stroke-linejoin="round" class="feather feather-file-text"> <path d="M14 2H6a2 2 0 0 0-2 2v16a2 2 0 0 0 2 2h12a2 2 0 0 0 2-2V8z"></path> <polyline points="14 2 14 8 20 8"></polyline> <line x1="16" y1="13" x2="8" y2="13"></line> <line x1="16" y1="17" x2="8" y2="17"></line> <polyline points="10 9 9 9 8 9"></polyline> </svg> Social engagement </a> </li> <li class="nav-item"> <a class="nav-link" href="#"> <svg xmlns="http://www.w3.org/2000/svg" width="24" height="24" viewBox="0 0 24 24" fill="none" stroke="currentColor" stroke-width="2" stroke-linecap="round" stroke-linejoin="round" class="feather feather-file-text"> <path d="M14 2H6a2 2 0 0 0-2 2v16a2 2 0 0 0 2 2h12a2 2 0 0 0 2-2V8z"></path> <polyline points="14 2 14 8 20 8"></polyline> <line x1="16" y1="13" x2="8" y2="13"></line> <line x1="16" y1="17" x2="8" y2="17"></line> <polyline points="10 9 9 9 8 9"></polyline> </svg> Year-end sale </a> </li> </ul> </div> </nav> </html>
-
列表展示
<!--仅截取正文--> <div th:replace="~{commons/commons::topbar}"></div> <div class="container-fluid"> <div class="row"> <div th:replace="~{commons/commons::sidebar(active='list.html')}"></div> <main role="main" class="col-md-9 ml-sm-auto col-lg-10 pt-3 px-4"> <h2>Section title</h2> <h2><a class="btn btn-sm btn-success" th:href="@{/emp}">添加员工</a></h2> <div class="table-responsive"> <table class="table table-striped table-sm"> <thead> <tr> <th>id</th> <th>lastName</th> <th>email</th> <th>gender</th> <th>department</th> <th>birth</th> <th>operate</th> </tr> </thead> <tbody> <tr th:each="emp:${emps}"> <td th:text="${emp.getId()}"></td> <td th:text="${emp.getLastName()}"></td> <td th:text="${emp.getEmail()}"></td> <td th:text="${emp.getGender()==0?'女':'男'}"></td> <td th:text="${emp.getDepartment.getDepartmentName()}"></td> <td th:text="${#dates.format(emp.getBirth(),'yyyy-MM-dd HH:mm:ss')}"></td> <td> <a class="btn btn-sm btn-primary" th:href="@{'/emp/'+${emp.getId()}}">编辑</a> <a class="btn btn-sm btn-danger" th:href="@{'/delete/'+${emp.getId()}}">删除</a> </td> </tr> </tbody> </table> </div> </main> </div> </div>
数据
 @Repository
 public class DepartmentDao {
     //模拟数据库的数据
     private static Map<Integer, Department> departments = null;
     static {
         departments = new HashMap<Integer,Department>();
         departments.put(101,new Department(101,"aaa"));
         departments.put(102,new Department(102,"bbb"));
         departments.put(103,new Department(103,"ccc"));
         departments.put(104,new Department(104,"ddd"));
         departments.put(105,new Department(105,"eee"));
     }
     //得到所有部门信息
     public Collection<Department> getDepartment(){
         return departments.values();
     }
     //通过ID得到部门
     public Department getDepartmentById(Integer id){
         return departments.get(id);
     }
 }
 //===================================
 @Repository
 public class EmployeeDao {
     //模拟数据库的信息
     private static Map<Integer, Employee> employees = null;
     //员工所属部门
     @Autowired
     private DepartmentDao departmentDao;
     static {
         employees = new HashMap<Integer,Employee>();
         employees.put(1001,new Employee(1001,"AA","A123456@qq.com",0,new Department(101,"aaa"))) ;
         employees.put(1002,new Employee(1002,"BB","B123456@qq.com",0,new Department(102,"bbb"))) ;
         employees.put(1003,new Employee(1003,"CC","C123456@qq.com",1,new Department(103,"ccc"))) ;
         employees.put(1004,new Employee(1004,"DD","D123456@qq.com",0,new Department(104,"ddd"))) ;
         employees.put(1005,new Employee(1005,"EE","E123456@qq.com",1,new Department(105,"eee"))) ;
     }
     //主键自增
     public static Integer initId = 1006;
     //增加员工
     public void save(Employee employee){
         if (employee.getId()==null){
             employee.setId(initId++);
         }
         employee.setDepartment(departmentDao.getDepartmentById(employee.getDepartment().getId()));
         employees.put(employee.getId(), employee);
     }
     //查询全部员工
     public Collection<Employee> getAll(){
         return employees.values();
     }
     //通过ID查询
     public Employee getEmployeeById(Integer id){
         return employees.get(id);
     }
     //通过ID删除
     public void delete(Integer id){
         employees.remove(id);
     }
 }
CRUD
-
添加员工
-
按钮提交
-
跳转页面
-
添加员工
-
成功返回
控制层@Controller public class EmployeeController { @Autowired EmployeeDao employeeDao; @Autowired DepartmentDao departmentDao; @RequestMapping("/emps") public String list(Model model){ Collection<Employee> employees = employeeDao.getAll(); model.addAttribute("emps",employees); return "emp/list"; } @GetMapping("/emp") public String toAdd(Model model){ //查出部门的信息 Collection<Department> departments = departmentDao.getDepartment(); model.addAttribute("departments",departments); return "emp/add"; } @PostMapping("/emp") public String addEmp(Employee employee){ employeeDao.save(employee); //添加操作 return "redirect:/emps"; } @GetMapping("/emp/{id}") public String toUpdate(@PathVariable("id")Integer id,Model model){ Employee employee = employeeDao.getEmployeeById(id); model.addAttribute("emp",employee); //查出部门的信息 Collection<Department> departments = departmentDao.getDepartment(); model.addAttribute("departments",departments); return "/emp/update"; } @PostMapping("/update") public String update(Employee employee){ employeeDao.save(employee); //修改 return "redirect:/emps"; } @GetMapping("/delete/{id}") public String delete(@PathVariable("id")Integer id){ employeeDao.delete(id); return "redirect:/emps"; } }
-
404
 <!--
 SpringBoot
 在templates下新建error文件夹,创建404.html - 错误页面 - **自动配置**
 -->
#前端学习流程
-
模板
-
框架 (组件) Layui Bootstrap semantic-ui element-ui
-
栅格系统
-
导航栏
-
侧边栏
-
表单
-
-
前端搞定: 页面长什么样子: 数据
-
设计数据库 (数据库设计难点!)
-
前端让他能够自动运行,独立化工程
-
数据接口如何对接: json, 对象all in one !
-
前后端联调测试!
-
有一套自己熟悉的后台模板:工作必要! x-admin
-
前端界面:至少自己能够通过前端框架,组合出来一个网站页面
-
让这个网站能够独立运行!
3. Web开发(安全控制)
-
JDBC
-
Mybatis **
-
Druid **
-
Shiro:安全 **
-
Spring Security:安全 **
-
异步任务 邮件发送 定时任务
-
Swagger
-
Dubbo + Zookeeper
JDBC
Data
对于数据访问层,无论是SQL(关系型数据库)还是NOSQL(非关系型数据库),Spring Boot底层都是采用Spring Data的方式进行统一处理。
Spring Boot底层都是采用Spring Data的方式进行统一处理各种数据库, Spring Data也是Spring中与Spring Boot、Spring Cloud等齐名的知名项目。
@RestController public class JDBC { @Autowired JdbcTemplate jdbcTemplate; //自动执行事务 //无实体类,获取数据库的信息 Map @GetMapping("/userlist") public List<Map<String,Object>> userList(){ String sql = "select * from user"; List<Map<String, Object>> maps = jdbcTemplate.queryForList(sql); return maps; } @GetMapping("/addUser") public String addUser(){ String sql = "insert into mybatis.user(id,name,pwd) values (10,'xiao','123456')"; jdbcTemplate.update(sql); return "update-ok"; } @GetMapping("/update/{id}") public String update(@PathVariable("id")int id){ String sql = "update mybatis.user set name=?,pwd=? where id="+id; //封装 Object[] objects = new Object[2]; objects[0] = "xiao2"; objects[1] = "zzzzzz"; jdbcTemplate.update(sql,objects); return "update-ok"; } @GetMapping("/delete/{id}") public String delete(@PathVariable("id")int id){ String sql = "delete from mybatis.user where id=?"; jdbcTemplate.update(sql,id); return "delete-ok"; } }
Druid
 <dependency>
     <groupId>com.alibaba</groupId>
     <artifactId>druid</artifactId>
     <version>1.2.6</version>
 </dependency>
配置
spring: datasource: username: root password: root url: "jdbc:mysql://localhost:3306/mybatis?useUnicode=true&characterEncoding=utf-8" # 时区 serverTimezone=UTC driver-class-name: com.mysql.cj.jdbc.Driver #type: 指定数据源 type: com.alibaba.druid.pool.DruidDataSource #=======Spring Boot默认是不注入这些属性值的,需要自己绑定 #=======druid 数据源专有配冒 #initialsize: 5 #minIdle: 5 #maxActive: 20 #maxWait: 60000 #timeBetweenEvictionRunsMillis: 60000 #minEvictableIdleTimeMillis: 300000 #validationQuery: SELECT 1 FROM DUAL #testWhileIdle: true #testOnBorrow: false #testOnReturn: false #poolPreparedstatements: true #=======配置监控统计拦截的filters,stat:监控统计、Log4j:日志记录、wall:防御sql注入 #=======如果允许时报错java.lang.ClassNotFoundException:org.apache.log4j.Priority #=======则导入Log4j依赖即可 #filters: stat,wall,log4j #maxPoolPreparedstatementPerConnectionSize: 20 #useGlobalDataSourceStat: true #connectionProperties: druid.stat.mergeSql=true;druid.stat.slowSqlMillis=500
config
@Configuration public class Druid { @ConfigurationProperties(prefix="spring.datasource") @Bean public DataSource druidDataSource(){ return new DruidDataSource(); } //后台监控:web.xml ServletRegistrationBean - 因为SpringBoot内置了servlet容器,所以没有web.xml,替代方法ServletRegistrationBean @Bean public ServletRegistrationBean StatViewServlet(){ ServletRegistrationBean<StatViewServlet> bean = new ServletRegistrationBean<>(new StatViewServlet(), "/druid/*"); //后台需有人登录,账号密码配置 HashMap<String, String> map = new HashMap<>(); //增加配置 固定参数 map.put( "loginUsername", "admin"); map.put( "loginPassword", "123456"); //允许谁可以访问 map.put("allow", ""); //禁止谁可以访问 map.put("xxx", "192.168.11.123"); bean.setInitParameters(map);//初始化参数 return bean; } //filter - 过滤器 @Bean public FilterRegistrationBean webStatFliter(){ FilterRegistrationBean bean = new FilterRegistrationBean(); bean.setFilter(new WebStatFilter()); //可以过滤那些请求 HashMap<String, String> init = new HashMap<>(); //那些东西不进行统计 init.put("exclusions", "*.js,*.css,/druid/*"); bean.setInitParameters(init); return bean; } }
Spring Security(安全)
shiro , SpringSecurity : 很像,除了类不一样,名字不一样
@Controller public class Router { @RequestMapping({"/","/index"}) public String index(){ return "index"; } @RequestMapping("/toLogin") public String toLogin(){ return "views/login"; } @RequestMapping("/level1/{id}") public String level1(@PathVariable("id") int id){ return "views/level1/"+id; } @RequestMapping("/level2/{id}") public String level2(@PathVariable("id") int id){ return "views/level2/"+id; } @RequestMapping("/level3/{id}") public String level3(@PathVariable("id") int id){ return "views/level3/"+id; } } /*AOP - 拦截器*/ @EnableWebSecurity //@Enable xxxx 开启某项功能 public class SecurityC extends WebSecurityConfigurerAdapter { /*授权 -- 链式编程*/ @Override protected void configure(HttpSecurity http) throws Exception { //首页所有人可以访问,功能页对应权限访问 //请求授权的规则 http.authorizeRequests() .antMatchers("/").permitAll() .antMatchers("/level1/**").hasRole("vip1") .antMatchers("/level2/**").hasRole("vip2") .antMatchers("/level3/**").hasRole("vip3"); //无权限默认登录页,开启登录页面 - 登录页面请求"/toLogin"(重定向) - 登录认证请求"/login"(表单) http.formLogin().loginPage("/toLogin").usernameParameter("username").passwordParameter("password").loginProcessingUrl("/login"); //防止网站攻击 get -- CSRF //http.csrf().disable(); //开启注销功能 - 成功登出回首页 http.logout().logoutSuccessUrl("/"); //开启记住我 - 默认保存14天 http.rememberMe().rememberMeParameter("remember"); } /*认证 SpringBoot2.1.x直接使用 密码编码:PasswordEncoder 在Spring Security 5.0+ 新增加密方法 */ @Override protected void configure(AuthenticationManagerBuilder auth) throws Exception { /* 数据库 auth.jdbcAuthentication().dataSource(dataSource).withDefaultSchema() .withUser(users.username("user").password("password").roles("USER")); */ auth.inMemoryAuthentication().passwordEncoder(new BCryptPasswordEncoder()) .withUser("admin").password(new BCryptPasswordEncoder().encode("123456")).roles("vip2","vip3") .and() .withUser("root").password(new BCryptPasswordEncoder().encode("123456")).roles("vip1","vip2","vip3") .and() .withUser("123").password(new BCryptPasswordEncoder().encode("123456")).roles("vip1"); } }
-
认证
-
授权
-
功能权限
-
访问权限
-
菜单权限
-
拦截器,过滤器
-
用户授权认证
-
注册及权限控制
-
记住我及首页
<!--依赖:thymeleaf web-->
简介
Spring Security是针对Spring项目的安全框架,也是Spring Boot底层安全模块默认的技术选型,他可以实现强大的Web安全控制,对于安全控制,我们仅需要引入spring- boot-starter-security模块,进行少量的配置,即可实现强大的安全管理!
记住几个类:
-
WebSecurityConfigurerAdapter:自定义Security策略
-
AuthenticationManagerBuilder: 自定义认证策略
-
@EnableWebSecurity: 开启WebSecurity模式
Spring Security的两个主要目标是“认证”和"授权”(访问控制)。
-
“认证”(Authentication)
-
"授权”(Authorization)
这个概念是通用的,而不是只在Spring Security中存在。
Shiro
Spring Security中均有方法 :
 Subject currentUser = SecurityUti1s.getSubject();
 Session session = currentUser.getSession();
 currentUser.isAuthenticated()
 currentUser.getPrincipal()
 currentUser.hasRole("schwartz")
 currentUser.isPermitted ("lightsaber:wield")
 currentUser.logout();
@Controller public class MyC { @RequestMapping({"/","/index"}) public String toIndex(Model model){ model.addAttribute("msg", "hello"); return "index"; } @RequestMapping("/toLogin") public String toLogin(){ return "login"; } @RequestMapping("/user/add") public String add(){ return "user/add"; } @RequestMapping("/user/update") public String update(){ return "user/update"; } @RequestMapping("/login") public String login(String username,String password,Model model){ //获取当前用户 Subject subject = SecurityUtils.getSubject(); //封装用户登录信息 -- token:令牌 UsernamePasswordToken token = new UsernamePasswordToken(username, password); //执行登录方法 try { subject.login(token); return "index"; } catch (UnknownAccountException e) { // 用户名不存在 model.addAttribute("msg","用户名错误!"); return "login"; } catch (IncorrectCredentialsException e) { // 密码不存在 model.addAttribute("msg","密码错误!"); return "login"; } } @RequestMapping("/noauth") @ResponseBody public String unAuthorized(){ return "未经授权无法访问此页面!"; } } @Configuration public class ShiroConfig { /*由下向上创建*/ //ShiroFilterFactoryBean @Bean public ShiroFilterFactoryBean getShiroFilterFactoryBean(@Qualifier("securityManager") DefaultWebSecurityManager defaultWebSecurityManager){ ShiroFilterFactoryBean bean = new ShiroFilterFactoryBean(); //设置安全管理器 bean.setSecurityManager(defaultWebSecurityManager); //================>添加Shiro内置过滤器 /* anon : 无序认证即可访问 authc: 必须认证才可访问 user : 必须拥有记住我功能才能使用 perms: 拥有对某资源的权限才能使用 role : 拥有某个角色权限才能访问 */ //登录拦截 Map<String, String> filterMap = new LinkedHashMap<>(); //授权 401未授权 正常情况下,未授权跳转到未授权页面 filterMap.put("/user/add", "perms[user:add]"); filterMap.put("/user/update", "perms[user:update]"); filterMap.put("/user/*", "authc"); bean.setFilterChainDefinitionMap(filterMap); //设置未授权请求 bean.setUnauthorizedUrl("/noauth"); //设置登录请求 bean.setLoginUrl("/toLogin"); //================ return bean; } //DefaultWebSecurityManager @Bean(name = "securityManager") public DefaultWebSecurityManager defaultWebSecurityManager(@Qualifier("userRealm") UserRealm userRealm){ DefaultWebSecurityManager securityManager = new DefaultWebSecurityManager(); //关联userRealm securityManager.setRealm(userRealm); return securityManager; } //创建Realm对象,需自定义类 @Bean(name = "userRealm") public UserRealm userRealm(){ return new UserRealm(); } //ShiroDialect : 整合shiro,thymeleaf @Bean public ShiroDialect getShiroDialect(){ return new ShiroDialect(); } } public class UserRealm extends AuthorizingRealm { @Autowired UserService userService; //授权 -- 进入拦截页面需要授权 @Override protected AuthorizationInfo doGetAuthorizationInfo(PrincipalCollection principalCollection) { System.out.println("执行了==>授权doGetAuthorizationInfo"); SimpleAuthorizationInfo info = new SimpleAuthorizationInfo(); /*数据库中新增权限perms字段*/ //拿到登录用户的信息 Subject subject = SecurityUtils.getSubject(); //拿到认证传递的user对象 User currentUser = (User) subject.getPrincipal(); //设置用户权限 info.addStringPermission(currentUser.getPerms()); //info.addStringPermission("user:add"); return info; } //认证 -- 登录需要认证 @Override protected AuthenticationInfo doGetAuthenticationInfo(AuthenticationToken authenticationToken) throws AuthenticationException { System.out.println("执行了==>认证doGetAuthenticationInfo"); //用户名密码 -- 数据库 /*String name = "root"; String password = "123456";*/ UsernamePasswordToken userToken = (UsernamePasswordToken) authenticationToken; User user = userService.queryUserByName(userToken.getUsername()); if (user==null){ return null; //UnknownAccountException } /*if (!userToken.getUsername().equals(name)){ return null; //抛出异常,UnknownAccountException }*/ //密码认证,Shiro操作 - 密码加密:MD5,MD5盐值 ---- user传递给授权用于验证 return new SimpleAuthenticationInfo(user,user.getPwd(),""); } }
-
登录拦截
-
用户认证*
-
整合 Mybatis
-
授权
-
整合Thymeleaf
4. Swagger
Vue + SpringBoot
简介
后端时代 : 前端只用管理静态页面, html=>后端 模板引擎JSP=>后端主力
前后端分离式时代:
-
后端 : 后端控制层,服务层,数据访问层【后端团队】
-
前端 : 前端控制层,视图层【前端团队】
-
伪造后端数据,Json
-
-
前端后如何交互? =>API
-
前后端相对独立 , 松耦合
-
前后端甚至可以部署在不同的服务器上
问题 : 前后端集成联调 , 前端人员和后端人员无法做到"及时协商 , 尽早解决" , 最终导致问题集中爆发
解决方案 :
-
制定schema[计划提纲] , 实时更新最新API , 降低集成风险
-
早些年 : 指定word计划文档
-
前后端分离 : 前端测试后端接口 : postman | 后端提供接口 , 需实时更新最新的消息及改动
-
Swagger
-
号称世界上最流行的Api框架
-
RestFul Api文档在线自动生成工具 => Api文档与API定义同步更新
-
直接运行 , 可以在线测试API接口
-
支持多种语言 : (Java , Php) ...
使用
导入依赖 : springfox
 <dependency>
     <groupId>io.springfox</groupId>
     <artifactId>springfox-swagger2</artifactId>
     <version>3.0.0</version>
 </dependency>
 <dependency>
     <groupId>io.springfox</groupId>
     <artifactId>springfox-swagger-ui</artifactId>
     <version>3.0.0</version>
 </dependency>
编写一个hello
配置
Swagger=>Config
 @Configuration
 @EnableSwagger2  //开启
 public class SwaggerConfig {
 }
测试访问 : http://localhost:8080/swagger-ui.html
如果访问错误(springfox依赖3.0) : 需要新增依赖启动器
 <dependency>
     <groupId>io.springfox</groupId>
     <artifactId>springfox-boot-starter</artifactId>
     <version>3.0.0</version>
 </dependency>
且访问地址为 : http://localhost:8080/swagger-ui/index.html
如果还有问题 , 可以尝试修改注解 , 或在启动类增加注解 @EnableOpenApi
 @RestController
 public class HelloC {
     @RequestMapping("/hello")
     public String hello(){
         return "hello";
     }
 }
SwaggerConfig
 @Configuration
 @EnableSwagger2  //开启
 public class SwaggerConfig {
     //配置Swagger的Docket的Bean实例
     @Bean
     public Docket docket(){
         return new Docket(DocumentationType.SWAGGER_2).apiInfo(apiInfo())
             //enable是否启动Swagger,如果为false,这Swagger不能在浏览器访问
             .enable(false)
             .select()
             /*链式 -- 配置扫描接口
             RequestHandlerSelectors配置要扫描接口的方式
             basePackage指定扫描的包
             any()扫描全部  none()不扫描
             withClassAnnotation扫描类上的注解,参数是一个注解的反射对象 (如:RestController.class)
             withMethodAnnotation扫描方法上的注解
             */
         .apis(RequestHandlerSelectors.basePackage("com.example.swagger.controller"))
                 //paths() 过滤扫描路径
                 //.paths(PathSelectors.ant("/example/swagger/**"))
                 .build();
     }
     //配置Swagger信息 - apiinfo
     private ApiInfo apiInfo(){
         //作者信息
         Contact contact = new Contact("", "", "");
         return new ApiInfo(
                 "文档标题",
                 "文档 描述",
                 "1.0",
                 "url",
                 contact,
                 "Apache 2.0",
                 "http://www.apache.org/licenses/LICENSE-2.0",
                 new ArrayList()
         );
     }

 }
我只希望我的Swagger在生产环境中使用,在发布的时候不使用?
-
判断是否生产环境
/*方法带参数"(Environment environment)"*/ //设置要显示的环境 @Profile("dev") ??? -- 需要配置多套配置文件application.properties //Profiles dev = Profiles.of("dev","test"); //获得项目环境 //boolean flag = environment.acceptsProfiles(profiles); .enable(flag)
配置API文档分组
 //配置API分组  --  多个分组即创建多个Docket即声明多个Docket实例
 //@Bean public Docket docket1_2_3_4(){
 //return new Docket(DocumentationType.SWAGGER_2).groupName("A_B_C_D");}
 .groupName("study")
实体类配置
@RestController public class HelloC { @GetMapping("/hello") public String hello(){ return "hello"; } //只要接口中返回值存在实体类,则会被扫描 @GetMapping("/user") public User user(){ return new User(); } @ApiOperation("给方法加注释") @GetMapping("/test") public String test(@ApiParam("参数加注释")String username){ return "test"+username; } }
注解
 //@Api(tags="注释")  ???
 @ApiModel("用户实体类")
 public class User {
     @ApiModelProperty("用户名")
     private String username;
     @ApiModelProperty("密码")
     private String password;
 }
-
我们可以通过Swagger给一些比较难理解的属性或者接口,增加注释信息
-
接口文档实时更新
-
可以在线测试
【注意点】在正式发布的时候 , 关闭Swagger ! 出于安全考虑 , 而且节省运行的内存
5. 任务
异步任务
controller
 @RestController
 public class AsyncC {
     @Autowired
     AsyncService service;
     @RequestMapping("/hello")
     public String hello(){
         service.hello(); //等待三秒
         return "OK";
     }
 }
service
 @Service
 public class AsyncService {
     //告诉Spring这是一个异步方法
     @Async
     public void hello(){
         try {
             Thread.sleep(3000);
         } catch (InterruptedException e) {
             e.printStackTrace();
         }
         System.out.println("数据正在处理...");
     }
 }
还需要再main函数加上注解
 @EnableAsync  //开启异步注解
 @SpringBootApplication
 public class TaskApplication {
     public static void main(String[] args) {
         SpringApplication.run(TaskApplication.class, args);
     }
 }
邮件发送
配置 application.properties
 spring.mail.username=邮箱地址
 spring.mail.password=授权码
 spring.mail.host=smtp.qq.com
 #开启加密验证
 spring.mail.properties.mail.smtp.ssl.enable=true
使用测试
@SpringBootTest class TaskApplicationTests { @Autowired JavaMailSenderImpl mailSender; @Test void contextLoads() { SimpleMailMessage mailMessage = new SimpleMailMessage(); mailMessage.setSubject("主题"); mailMessage.setText("正文"); mailMessage.setTo("1359403221@qq.com"); mailMessage.setFrom("1359403221@qq.com"); mailSender.send(mailMessage); } //复杂邮件 @Test void contextLoads2() throws MessagingException { MimeMessage mimeMessage = mailSender.createMimeMessage(); //组装 MimeMessageHelper helper = new MimeMessageHelper(mimeMessage, true); helper.setSubject("主题"); helper.setText("<p style='color:red'>正文</p>",true); //附件 helper.addAttachment("1.jpg" , new File("路径")); helper.setTo("1359403221@qq.com"); helper.setFrom("1359403221@qq.com"); mailSender.send(mimeMessage); } //封装方法 /** * @param html:是否支持多文本上传 * @param subject * @param text * @throws MessagingException */ public void sendMail(Boolean html,String subject,String text) throws MessagingException { MimeMessage mimeMessage = mailSender.createMimeMessage(); //组装 -- true:是(是否支持多文本上传) MimeMessageHelper helper = new MimeMessageHelper(mimeMessage, html); helper.setSubject(subject); helper.setText(text,true); //附件 helper.addAttachment("1.jpg" , new File("路径")); helper.setTo("1359403221@qq.com"); helper.setFrom("1359403221@qq.com"); mailSender.send(mimeMessage); } }
定时任务
/*定时任务 TaskScheduler 任务调度者 TaskExecutor 任务执行者 @EnableScheduling 开启定时功能的注解 @Scheduled 什么时候执行 Cron表达式 */ @Service public class ScheduledService { //特定时间执行 Timer //秒 分 时 日 月 周几~ //0 0/5 10,11 * * ? 每个月10,11号的10点,每5分钟执行一次 @Scheduled(cron = "0 30 10 ? * 1-6") public void hello(){ System.out.println("执行Scheduled!"); } } //======================== //主函数需要开启定时的注解 @EnableScheduling
6. Redis
SpringBoot操作数据 : spring-data jpa jdbc mongodb redis
SpringData 也是和SpringBoot齐名的项目
说明︰在SpringBoot2.x之后 , 原来使用的 jedis 被替换为了 lettuce ?
-
jedis : 采用的直连,多个线程操作的话,是不安全的,如果想要避免不安全的,使用jedis pool连接池 BIO
-
lettuce : 采用netty,实例可以再多个线程中进行共享,不存在线程不安全的情况,可以减少线程数据,更像NIO模式
依赖
 <dependency>
     <groupId>org.springframework.boot</groupId>
     <artifactId>spring-boot-starter-data-redis</artifactId>
 </dependency>
配置
 spring.redis.host=127.0.0.1
 spring.redis.port=6379
测试
@SpringBootTest class RedisApplicationTests { @Autowired private RedisTemplate redisTemplate; @Test void contextLoads() { //redisTemplate : 操作不同的数据类型,api与指令一致 // opsForValue 操作字符串 类似String // opsForList 操作List 类似List // opsForSet opsForHash opsForZSet opsForGen opsForHyperLogLog //除了基本操作,常用的方法都可以直接通过redisTemplate操作,比如事务,和基本的CRUD //获取连接 //RedisConnection connection = redisTemplate.getConnectionFactory().getConnection(); //connection.flushDb(); //connection.flushAll(); redisTemplate.opsForValue().set("mykey", "hello"); System.out.println(redisTemplate.opsForValue().get("mykey")); } }
序列化 . . .
pojo
@Component @AllArgsConstructor @NoArgsConstructor @Data //允许你将实现了Serializable接口的对象转换为字节序列 public class User implements Serializable { private String name; private int age; }
测试
 @Test
 void test() throws JsonProcessingException {
     //开发一般使用json传递对象
     User user = new User("name", 18);
     //序列化  --  对象 如果没有序列化报错
     //String jsonUser = new ObjectMapper().writeValueAsString(user);
     redisTemplate.opsForValue().set("user", user);  //jsonUser
     System.out.println(redisTemplate.opsForValue().get("user"));
 }
自定义序列化
@Configuration public class Redis { //编写自己的redisTemplate -- 默认jdk的序列化方式 //固定模板 @Bean public RedisTemplate<String,Object> redisTemplate(RedisConnectionFactory redisConnectionFactory){ RedisTemplate<String, Object> template = new RedisTemplate<String, Object>(); template.setConnectionFactory(redisConnectionFactory); //Json的序列化配置 Jackson2JsonRedisSerializer jackson2JsonRedisSerializer = new Jackson2JsonRedisSerializer(Object.class); ObjectMapper om = new ObjectMapper(); om.setVisibility(PropertyAccessor.ALL, JsonAutoDetect.Visibility.ANY); om.enableDefaultTyping(ObjectMapper.DefaultTyping.NON_FINAL); jackson2JsonRedisSerializer.setObjectMapper(om); //String的序列化 StringRedisSerializer stringRedisSerializer = new StringRedisSerializer(); //key采用String序列化方式 template.setKeySerializer(stringRedisSerializer); //hash也采用String序列化方式 template.setHashKeySerializer(stringRedisSerializer); //value序列化方式采用Json template.setValueSerializer(jackson2JsonRedisSerializer); //hash的value序列化方式也采用Json template.setHashValueSerializer(jackson2JsonRedisSerializer); template.afterPropertiesSet(); return template; } }
7. 分布式Dubbo+Zookeeper+SpringBoot
分布式系统是由一组通过网络进行通信、为了完成共同的任务而协调工作的计算机节点组成的系统。
分布式系统的出现是为了用廉价的、普通的机器完成单个计算机无法完成的计算、存储任务。
其目的是利用更多的机器,处理更多的数据。
分布式系统(distributed system)是建立在网络之上的软件系统。
分布式
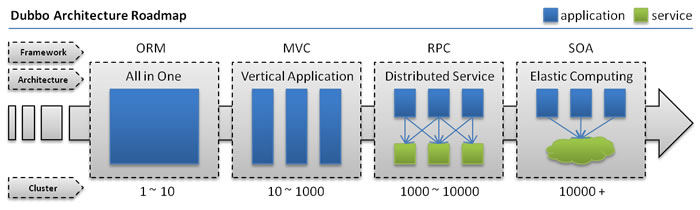
单一应用架构 ORM
当网站流量很小时,只需一个应用,将所有功能都部署在一起,以减少部署节点和成本。此时,用于简化增删改查工作量的数据访问框架(ORM)是关键。
适用于小型网站,小型管理系统,将所有功能都部署到一个功能里,简单易用。缺点 : 1、性能扩展比较难2、协同开发问题3、不利于升级维护
垂直应用架构 MVC
当访问量逐渐增大,单一应用增加机器带来的加速度越来越小,将应用拆成互不相千的几个应用,以提升效率。此时,用于加速前端页面开发的Web框架(MVC)是关键。通过切分业务来实现各个模块独立部署,降低了维护和部署的难度,团队各司其职更易管理,性能扩展也更方便,更有针对性。
分布式服务架构 RPC
当垂直应用越来越多,应用之间交互不可避免,将核心业务抽取出来,作为独立的服务,逐渐形成稳定的服务中心,使前端应用能更快速的响应多变的市场需求。此时,用于提高业务复用及整合的分布式服务框架(RPC)是关键。
流动计算架构 SOA
当服务越来越多,容量的评估,小服务资源的浪费等问题逐渐显现,此时需增加一个调度中心基于访问压力实时管理集群容量,提高集群利用率。此时,用于提高机器利用率的资源调度和治理中心 (SOA) [Service Oriented Architecture]是关键。
RPC
什么是RPC?
-
RPC【Remote Procedure Call】是指远程过程调用,是一种进程间通信方式,他是一种技术的思想而不是规范。它允许程序调用另一个地址空间 (通常是共享网络的另一台机器上) 的过程或函数,而不用程序员显式编码这个远程调用的细节。即程序员无论是调用本地的还是远程的函数,本质上编写的调用代码基本相同。
-
也就是说两台服务器A,B,一个应用部署在A服务器上,想要调用B服务器上应用提供的函数/方法,由于不在一个内存空间,不能直接调用,需要通过网络来表达调用的语义和传达调用的数据。
为什么要用RPC呢?
-
就是无法在一个进程内,甚至一个计算机内通过本地调用的方式完成的需求,比如不同的系统间的通讯,甚至不同的组织间的通讯,由于计算能力需要横向扩展,需要在多台机器组成的集群上部署应用。RPC就是要像调用本地的函数一样去调远程函数

RPC两个核心模块 : 通讯,序列化( [方便数据传输] 数据传输需要转化)
Dubbo
实现RPC的一套框架
什么是dubbo?
Apache Dubbo |dbau|是一款高性能、轻量级的开源 Java RPC框架,它提供了三大核心能力 : 面向接口的远程方法调用,智能容错和负载均衡,以及服务自动注册和发现。
init : 初始化 async : 异步 sync : 同步
服务提供者(Provider) : 暴露服务的服务提供方,服务提供者在启动时,向注册中心注册自己提供的服务。
服务消费者(Consumer) : 调用远程服务的服务消费方,服务消费者在启动时,向注册中心订阅自己所需的服务,服务消费者,从提供者地址列表中,基于软负载均衡算法,选一台提供者进行调用,如果调用失败,再选另一台调用。
注册中心(Registry) : 注册中心返回服务提供者地址列表给消费者,如果有变更,注册中心将基于长连接推送变更数据给消费者
监控中心(Monitor) : 服务消费者和提供者,在内存中累计调用次数和调用时间,定时每分钟发送一次统计数据到监控中心

环境搭建
ZooKeeper
ZooKeeper是一个分布式的,开放源码的分布式应用程序协调服务,是Google的Chubby一个开源的实现,是Hadoop和Hbase的重要组件。它是一个为分布式应用提供一致性服务的软件,提供的功能包括 : 配置维护、域名服务、分布式同步、组服务等。
ZooKeeper的目标就是封装好复杂易出错的关键服务,将简单易用的接口和性能高效、功能稳定的系统提供给用户。
下载 : http://ftp.wayne.edu/apache/zookeeper/ (3.5.5以上下载bin)
启动 : 管理员开启cmd,在文件bin目录下执行 " zkCleanup.cmd " , 如果报错的话,打开conf目录复制一份zoo_sample.cfg且改名为zoo.cfg即可
ZooKeeper : 注册中心
dubbo-admin : 是一个监控管理后台,查看我们注册了哪些服务,哪些服务被消费了~
Dubbo : jar包~
配置Dubbo
下载解压 https://github.com/apache/dubbo-admin/tree/master-0.2.0
-
管理员打开cmd 在项目目录下打包dubbo-admin | 或者在idea中打开打包
mvn clean package -D maven,test,skip=true
用IDEA测试
导包 : Dubbo ZooKeeper 启动器
 <!--导入依赖: Dubbo + zookeeper -->
 <dependency>
     <groupId>org.apache.dubbo</groupId>
     <artifactId>dubbo-spring-boot-starter</artifactId>
     <version>2.7.3</version>
 </dependency>
 <!--zkclient-->
 <dependency>
     <groupId>com.github.sgroschupf</groupId>
     <artifactId>zkclient</artifactId>
     <version>0.1</version>
 </dependency>
 <!--解决日志冲突   引入zookeeper-->
 <dependency>
     <groupId>org.apache.curator</groupId>
     <artifactId>curator-framework</artifactId>
     <version>2.12.0</version>
 </dependency>
 <dependency>
     <groupId>org.apache.curator</groupId>
     <artifactId>curator-recipes</artifactId>
     <version>2.12.0</version>
 </dependency>
 <dependency>
     <groupid>org.apache.zookeeper</groupId>
     <artifactId>zookeeper</artifactId>
     <version>3.4.14</version>
     <!--排除这个slf4j-log4j12-->
     <exclusions>
         <exclusion>
             <groupId>org.slf4j</groupId>
             <artifactId>slf4j-log4j12</artifactId>
         </exclusion>
     </exclusions>
 </dependency>
model : provider | service
 //=======接口类=======
 public interface TicketService {
     public String getTicket();
 }
 //=======实现类=======
 //zookeeper服务注册与发现
 @Component   //注解就可以被扫描到,项目启动自动注册到注册中心(使用Dubbo尽量不要使用service注解)
 public class TicketServiceImpl implements TicketService {
     @Override
     public String getTicket() {
         return "name";
     }
 }
配置
 server.port=8001
 #服务器应用名
 dubbo.application.name=provider-service
 #注册中心地址
 dubbo.registry.address=zookeeper://127.0.0.1:2181
 #那些服务注册
 dubbo.scan.base-packages=com.study.service
model : consumer
 @Service
 public class UserService {
     //想拿到provider-service提供的对象
     @Reference   //引用  Pom坐标,可以定义路径相同的接口名  --  将provider-service接口导入此项目相同路径的包下
     TicketService ticketService;
     public String bugTicket(){
         String ticket = ticketService.getTicket();
         System.out.println(ticket);
     }
 }
配置
 server.port=8002
 #消费者取哪里的服务  需要暴露自己的名字
 dubbo.application.name=consumer-service
 #注册中心地址
 dubbo.registry.address=zookeeper://127.0.0.1:2181
测试类测试
 @SpringBootTest
 class Tests {
     @Autowired
     Userservice userService;
     @Test
     void contextLoads() {
         userService.buyTicket();
     }
 }
步骤
前提 : zookeeper以开启
提供者提供服务
-
导入依赖
-
配置注册中心的地址,以及服务发现名,和要扫描的包
-
在想要被注册的服务上面~增加一个注解@Service2
消费者如何消费
-
导入依赖
-
配置注册中心的地址,配置自己的服务名
-
从远程注入服务~
#回顾
三层架构 MVC ==> 解耦
核心框架
-
Spring
-
IOC : 控制反转
-
原来我们都是自己一步步操作,现在交给容器了 , 我们需要什么就去拿就可以了
-
-
AOP : 切面(本质:动态代理)
-
不影响业务本来的情况下,实现动态增加功能,大量应用在日志,事务...等
-
-
spring是一个轻量级的Java开源框架 (也十分复杂,配置文件)
-
容器目的︰解决企业开发的复杂性问题
-
-
SpringBoot
-
springBoot并不是新东西,就是spring的升级版
-
新一代JavaEE的开发标准,开箱即用 ==> 拿过来就可以用
-
它自动帮我们配置了非常多的东西,我们拿来即用
-
特性 : 约定大于配置
-
微服务架构
-
模块化 , 功能化
-
负债均衡
-
微服务架构问题?
-
分布式架构会遇到的四个核心问题?
-
1.这么多服务,客户端该如何去访问?
-
2.这么多服务,服务之间如何进行通信?
-
3.这么多服务,如何治理呢?
-
4.服务挂了,怎么办?
-
-
-
解决方案:
-
SpringCloud,是一套生态,就是来解决以上分布式架构的4个问题
-
想使用springcloud,必须要掌握springBoot,因为springc1oud是基于springBoot
-
1 . Spring cloud NetFlix ,出来了一套解决方案,一站式解决方案
-
Api网关,zuul组件
-
Feign --> Httpclient ---> HTTP的通信方式,同步并阻塞
-
服务注册与发现,Eureka
-
熔断机制,Hystrix
-
2018年底,无限期停止维护
-
-
2 . Apache Dubbo zookeper,第二套解决系统
-
API︰没有!要么找第三方组件,要么自己实现
-
Dubbo是一个高性能的基于Java实现的RPC通信框架
-
服务注册与发现,zookeeper:动物园管理者(Hadoop,Hive)
-
没有(熔断):借助了Hystrix
-
-
3 . SpringCloud Alibaba 一站式解决
-
-
目前,又提出一种方案:
-
服务网格:下一代微服务标准 Server Mesh
-
代表解决方案 : istio
-
-
万变不离其宗,一通百通!
-
API网关,服务路由
-
HTTP,RPC框架,异步调用
-
服务注册与发现,高可用
-
熔断机制,服务降级
-
-
为什么要解决这个问题? 本质 : 网络是不可靠的


【推荐】国内首个AI IDE,深度理解中文开发场景,立即下载体验Trae
【推荐】编程新体验,更懂你的AI,立即体验豆包MarsCode编程助手
【推荐】抖音旗下AI助手豆包,你的智能百科全书,全免费不限次数
【推荐】轻量又高性能的 SSH 工具 IShell:AI 加持,快人一步
· AI与.NET技术实操系列:向量存储与相似性搜索在 .NET 中的实现
· 基于Microsoft.Extensions.AI核心库实现RAG应用
· Linux系列:如何用heaptrack跟踪.NET程序的非托管内存泄露
· 开发者必知的日志记录最佳实践
· SQL Server 2025 AI相关能力初探
· winform 绘制太阳,地球,月球 运作规律
· AI与.NET技术实操系列(五):向量存储与相似性搜索在 .NET 中的实现
· 超详细:普通电脑也行Windows部署deepseek R1训练数据并当服务器共享给他人
· 【硬核科普】Trae如何「偷看」你的代码?零基础破解AI编程运行原理
· 上周热点回顾(3.3-3.9)