CRM 客户关系管理系统
CRM(Customer Relationship Manager)客户关系管理系统
企业为提高核心竞争力,利用相应的信息技术以及互联网技术协调企业与顾客间在销售、营销和服务上的交互,从而提升其管理方式,向客户提供创新式的个性化的客户交互和服务的过程。其最终目标是吸引新客户、保留老客户以及将已有客户转为忠实客户,增加市场。
1. 需求分析
- 存储所有客户咨询信息
- 避免重复录入数据
- 客户多次跟踪记录(销售)
- 客户来源、成单率分析
- 每个销售只能修改自己的客户信息
- 报名流程开发等
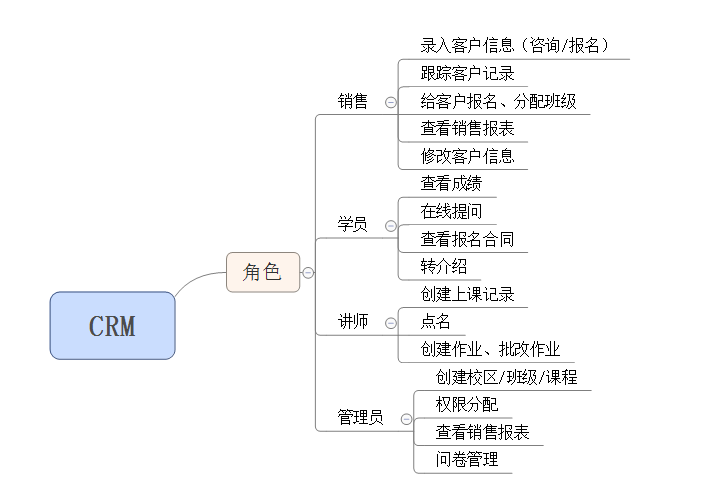
2. 业务场景分析
业务场景分析意在各个用户使用 CRM 用来做什么,能够更好地别写项目。在这里我们编写一个基于培训机构的 CRM。
成员及使用场景
| 成员 | 说明 | 成员 | 说明 |
|---|---|---|---|
| 机构销售 | 寻找学员报名、给学员报名,分配班级等 | 学员 | 咨询课程,缴纳学费 |
| 讲师 | 查看班级列表、创建课程记录、布置作业,批改作业等 | 管理员 | 创建课程、校区、班级,分配权限等 |
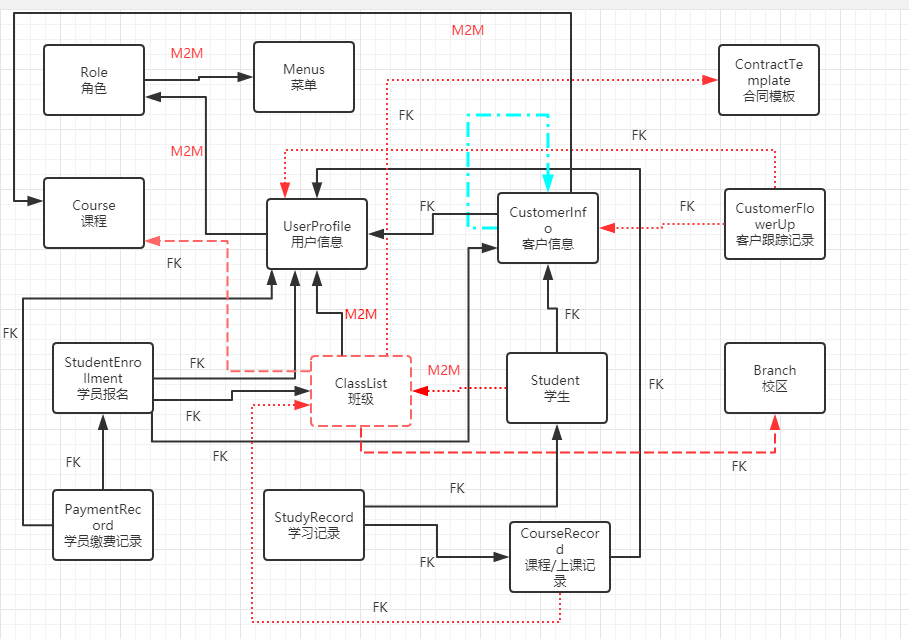
3. 模型设计
4. 菜单
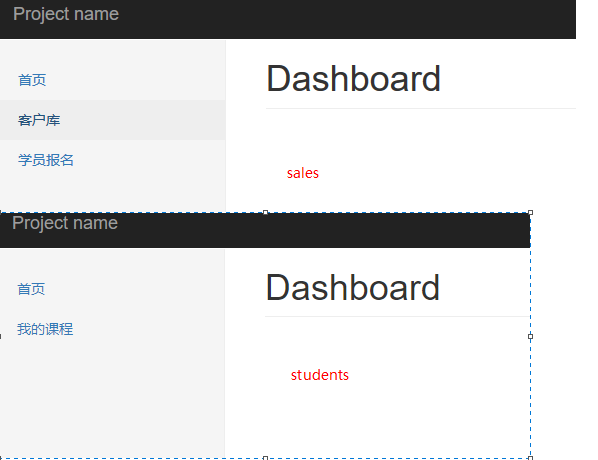
不同的用户有访问 crm,看到的菜单也是不一样的,这也是最基本的一种权限体现,比如:
- 销售:可以查看首页、客户库、学员报名
- 学生:可以查看首页、我的课程等
- 管理员:上述都可以查看
通过用户、菜单,以及角色模型即可实现:
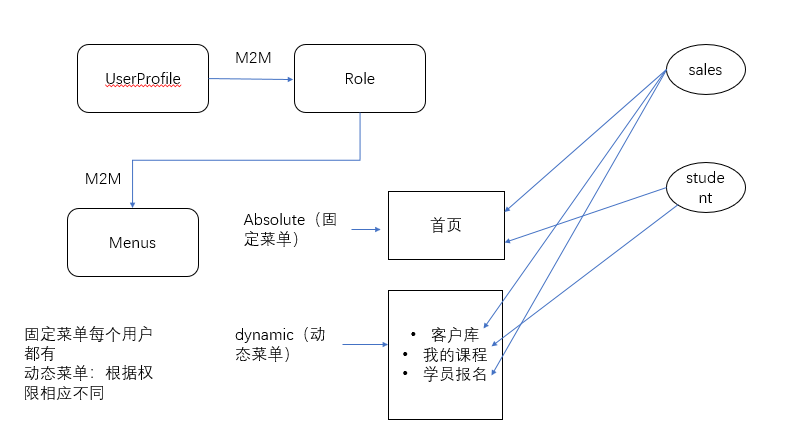
菜单分为固定(absolute)和动态菜单(dynamic)两种,动态菜单人人都可以看到(如:首页),而固定菜单不同的角色看到的都不一样:
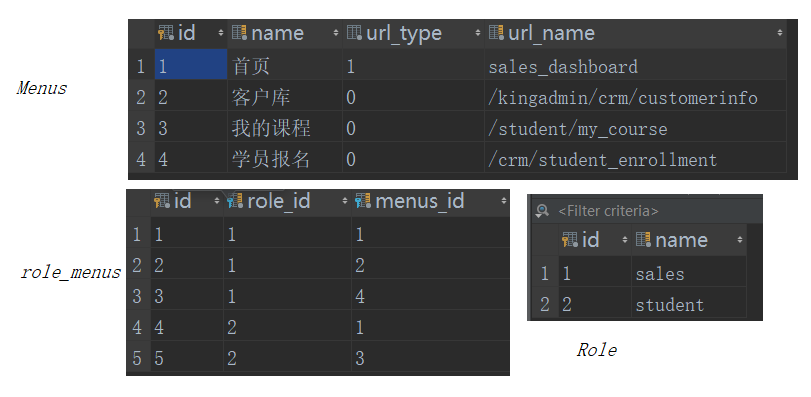
另外动态菜单的 url_anem 要与路由中 name 一致:
crm/views.py
from django.urls import path, re_path
from crm import views

urlpatterns = [
    path('dashboard/', views.dashboard, name='sales_dashboard'),	# 首页 url_name 与这个 name 一致
    path('student_enrollment/', views.student_enrollment, name='student_enrollment'),
	...
]
5. 页面布局
整个 CRM 总体布局,我们以 bootstrap 中的模板为基础,在此之上进行修改拓展,采用的样式为:

模板地址:Dashboard
为了减少代码重复,在这里采用模板继承:
1、base.html
base.html 只是构建了一个整体框架:
{% load  static %}
<!DOCTYPE html>
<html lang="en">
<head>
    <meta charset="utf-8">
    <meta http-equiv="X-UA-Compatible" content="IE=edge">
    <meta name="viewport" content="width=device-width, initial-scale=1">
    <!-- The above 3 meta tags *must* come first in the head; any other head content must come *after* these tags -->
    <meta name="description" content="">
    <meta name="author" content="">

    <title>CRM</title>

    <!-- Bootstrap core CSS -->
    <link href="{% static 'css/bootstrap.css' %}" rel="stylesheet">

    <!-- dashboard 这个模板的 css 样式 -->
    <link href="{% static 'css/dashboard.css' %}" rel="stylesheet">

    {% block extra-css %}

    {% endblock %}

</head>

<body>
    <!--主要内容区-->
    {% block body %}

    {% endblock %}

<!-- JS 文件
================================================== -->
<!-- 放置在文档的末尾,以便页面加载更快 -->
<script src="{% static 'js/jquery-3.3.1.js' %}"></script>
<script src="{% static 'js/bootstrap.js' %}"></script>
</body>
</html>
2、index.html
index.html 继承 base.html,这里主要有 "顶部导航栏、左侧菜单以及右侧主要内容区"
{% extends 'include/base.html' %}

{% block body %}
	<!--顶部导航栏-->
    <nav class="navbar navbar-inverse navbar-fixed-top">
        <div class="container-fluid">
            <div class="navbar-header">
                <button type="button" class="navbar-toggle collapsed" data-toggle="collapse" data-target="#navbar"
                        aria-expanded="false" aria-controls="navbar">
                    <span class="sr-only">Toggle navigation</span>
                    <span class="icon-bar"></span>
                    <span class="icon-bar"></span>
                    <span class="icon-bar"></span>
                </button>
                <a class="navbar-brand" href="#">{% block title %}Project name{% endblock %}</a>
            </div>
            <div id="navbar" class="navbar-collapse collapse">
                <ul class="nav navbar-nav navbar-right">
                    <li class="dropdown ">
                        <a href="#" class="dropdown-toggle" data-toggle="dropdown"
                           role="button">{{ request.user.name }}
                            <span class="caret"></span></a>
                        <ul class="dropdown-menu">
                            <li><a href="#">个人信息</a></li>
                            <li><a href="{% url 'logout' %}">登出</a></li>

                        </ul>
                    </li>

                </ul>
            </div>
        </div>
    </nav>

	<!--左侧菜单和右侧内容区-->
    <div class="container-fluid">
        <div class="row">
            <div class="col-sm-3 col-md-2 sidebar">
                <ul class="nav nav-sidebar">
                    {% for role in request.user.role.all %}
                        {% for menu in role.menus.all %}
                            {% if request.path == menu.url_name %}
                                <li class="active"><a
                                        href="{% if menu.url_type == 0 %} {{ menu.url_name }}{% else %}{% url menu.url_name %}{% endif %}">{{ menu.name }}</a>
                                </li>
                            {% else %}
                                <li>
                                    <a href="{% if menu.url_type == 0 %} {{ menu.url_name }}{% else %}{% url menu.url_name %}{% endif %}">{{ menu.name }}</a>
                                </li>
                            {% endif %}
                        {% endfor %}

                    {% endfor %}

                </ul>
            </div>

            <!--右侧内容区-->
            <div class="col-sm-9 col-sm-offset-3 col-md-10 col-md-offset-2 main">
                {% block right-content-container %}
                    <h1 class="page-header">Dashboard</h1>
                {% endblock %}

            </div>
        </div>
    </div>

{% endblock %}
3、CRM 页面
CRM 页面只用继承 index.html 即可,dashboard.html:
{% extends 'include/index.html' %}

{% block right-content-container %}
    <h1 class="page-header">首页</h1>
{% endblock %}
6. 报名流程
整个 CRM 的报名流程大致分为以下几步:
- 销售:向后台发起报名,后台生成报名链接,销售将链接发给学员填写
- 学员:填写报名表、包括个人信息、学费,上传个人证件等
- 销售:审核报名表,创建缴费记录,并为学员分配班级
crm/urls.py
from django.urls import path, re_path
from crm import views

urlpatterns = [
    path('dashboard/', views.dashboard, name='sales_dashboard'),
    path('student_enrollment/', views.student_enrollment, name='student_enrollment'),	# 发起报名
    re_path(r'^enrollment/(\d+)/$', views.enrollment, name='enrollment'),			# 报名链接
    re_path(r'^enrollment/(\d+)/fielupload/$', views.enrollment_fileupload, 		# 证件上传name='enrollment_fileupload'),

    re_path(r'^student_enrollment/(\d+)/contract_audit/$', views.contract_audit, 	# 合同审核name='contract_audit'),

]
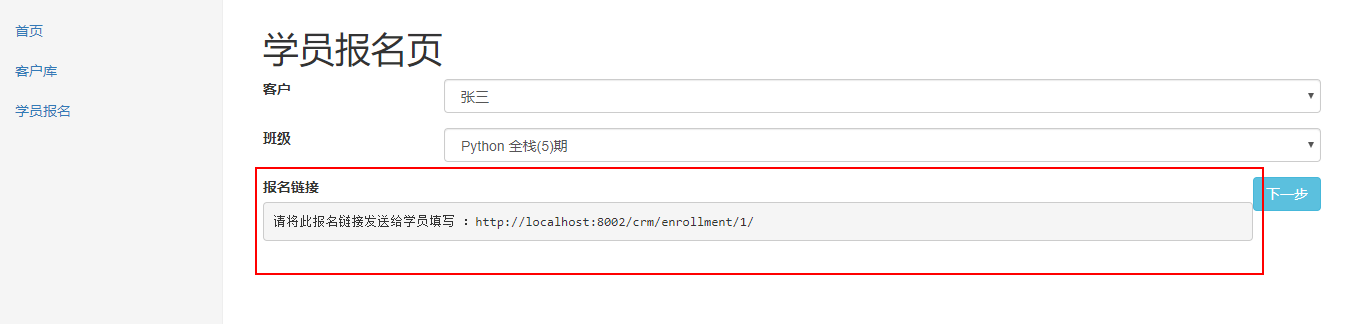
创建报名链接
销售访问:<http://127.0.0.1:8002/crm/student_enrollment/> 发起报名,会在后台创建一条报名记录,并返回报名链接,销售将链接发给学员填写:
@login_required
def student_enrollment(request):
    """销售分配学员班级,并生成报名链接"""
    customer_data = models.CustomerInfo.objects.all()
    class_list_data = models.ClassList.objects.all()
    if request.method == "POST":
        customer_id = request.POST.get('customer_id')  # 客户
        class_grade_id = request.POST.get('class_grade_id')  # 班级
        consultant_id = request.user.id  # 课程顾问

        try:
            # 创建报名记录
            enrollment_obj = models.StudentEnrollment.objects.create(
                customer_id=customer_id,
                class_grade_id=class_grade_id,
                consultant_id=consultant_id
            )
        except IntegrityError as e:
            enrollment_obj = models.StudentEnrollment.objects.get(customer_id=customer_id,
                                                                  class_grade_id=class_grade_id)

            # 学员是否同意协议,是则跳转到合同审核页面,否则
            # 这里意思是,如果学员填写了报名表,那么 StudentEnrollment 中 contract_agreed 是有记录的,因此当学员填写了报名表,销售再次点击报名页面中下一步时,会跳转到合同审核页面
            if enrollment_obj.contract_agreed:
                return redirect('/crm/student_enrollment/%s/contract_audit/' % enrollment_obj.id)

        # 生成报名链接,传递给前端,销售复制发送给学员填写报名信息
        enrollment_links = 'http://localhost:8002/crm/enrollment/%s/' % enrollment_obj.id

    return render(request, 'crm/student_enrollment.html', locals())
报名表
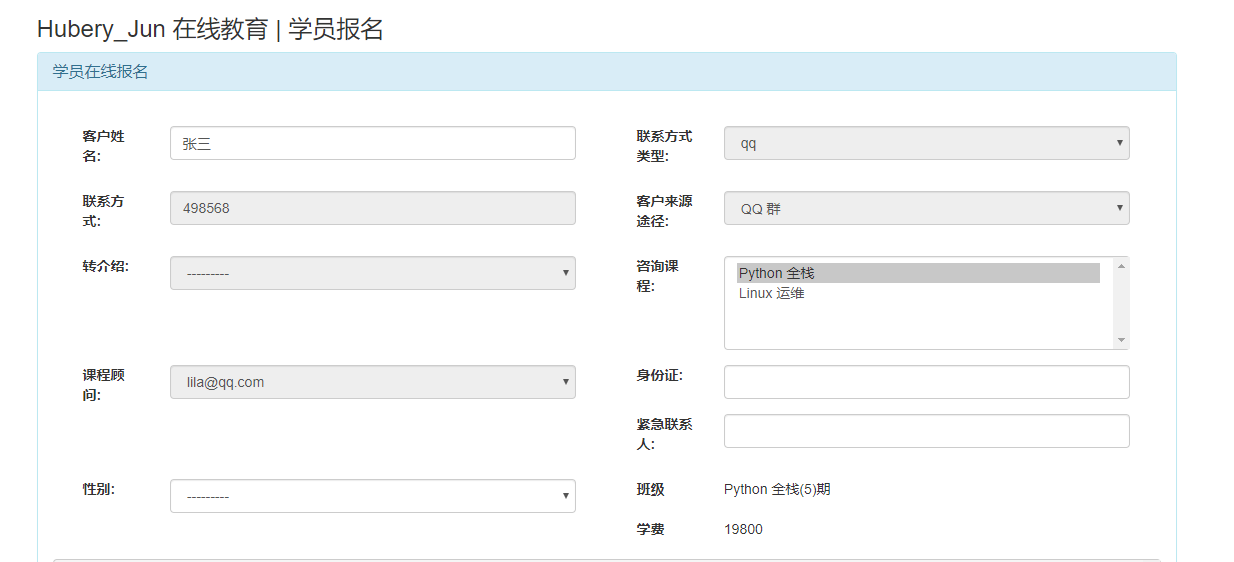
检查用户是否勾选合同协议及是否上传证件(通过 onsubmit 事件,form 表单提交前执行哪个函数):
<form method="post" onsubmit="return BeforeRemoveDisabled()" novalidate>
    <!-- 合同协议 -->
    <pre style="height: 400px">{{ enrollment_obj.class_grade.contract_template.content }}</pre>
    <input type="checkbox" name="contract_agreed"> 我已认真阅读完毕,无条件同意!

    <input type="submit" value="提交" class="btn btn-info pull-right">
</form>
<script>
    // 表单提交前,移除所有的 disabled,form 表单不能提交 disabled
    function BeforeRemoveDisabled() {
    $(':disabled').removeAttr('disabled');

    // 如果没有上传证件信息,提示上传
    if ($('#uploaded_files').children().length == 0){
        alert('请上传证件信息!');
        return false
    }

    // 如果没有勾选协议,表单不能提交
    if (!$("input[name='contract_agreed']").prop('checked')) {
        alert('请勾选合同协议!');
        return false
    }
}
</script>
使用 drop-zone 插件实现证件上传
 <!-- 证件上传 -->
<div class="file-upload">
    <h3>身份证上传</h3>

    <ul id="uploaded_files">

    </ul>

    <form id="myAwesomeDropzone" action="{% url 'enrollment_fileupload' enrollment_obj.id %}"
          class="dropzone">
        <div class="fallback">
            <input name="file" type="file" multiple/>
        </div>
    </form>

</div>
<script src="{% static 'plugins/dropzone/dropzone.js' %}"></script>
<script>
    // "myAwesomeDropzone" is the camelized version of the HTML element's ID
    Dropzone.options.myAwesomeDropzone = {
    paramName: "file",			 // 用于传输文件的名称
    maxFilesize: 2, 			// MB      最大不能上传超过 2 M
    maxFiles: 2,    			// 最多上传 2 个文件
    parallelUploads: 1,     	// 单次上传 1 个
    accept: function (file, done) {
        if (file.name == "justinbieber.jpg") {
            done("Naha, you don't.");
        }
        else {
            done();
        }
    }
};

// 避免重复创建 Dropzone
Dropzone.options.myAwesomeDropzone = false;

// 上传成功回调,返回值存在 response 中
$(function () {
    // Now that the DOM is fully loaded, create the dropzone, and setup the
    // event listeners
    // Prevent Dropzone from auto discovering this element:
    {#            Dropzone.options.myAwesomeDropzone = false;#}
    var myDropzone = new Dropzone("#myAwesomeDropzone");
     myDropzone.on("success", function (file, response) {
         /* Maybe display some more file information on your page */
         console.log("success", file, file.name, response);
         var response = JSON.parse(response);
         if (!response.status) {
             alert(response.error);
         } else {
             var ele = "<li class='file_title'>" + file.name + ' ' + "<span class='glyphicon glyphicon-remove'></span>" + "</li>" ;
             $("#uploaded_files").append(ele);
             alert(response.message)

         }

     });
    });

    // $('.file_title').children('span')
    /*
     $('#uploaded_files').on('click', 'span', function () {
        alert(123);
    })
     */

    $('#uploaded_files').on('click', 'span', function () {
        $(this).parent().remove();
    })
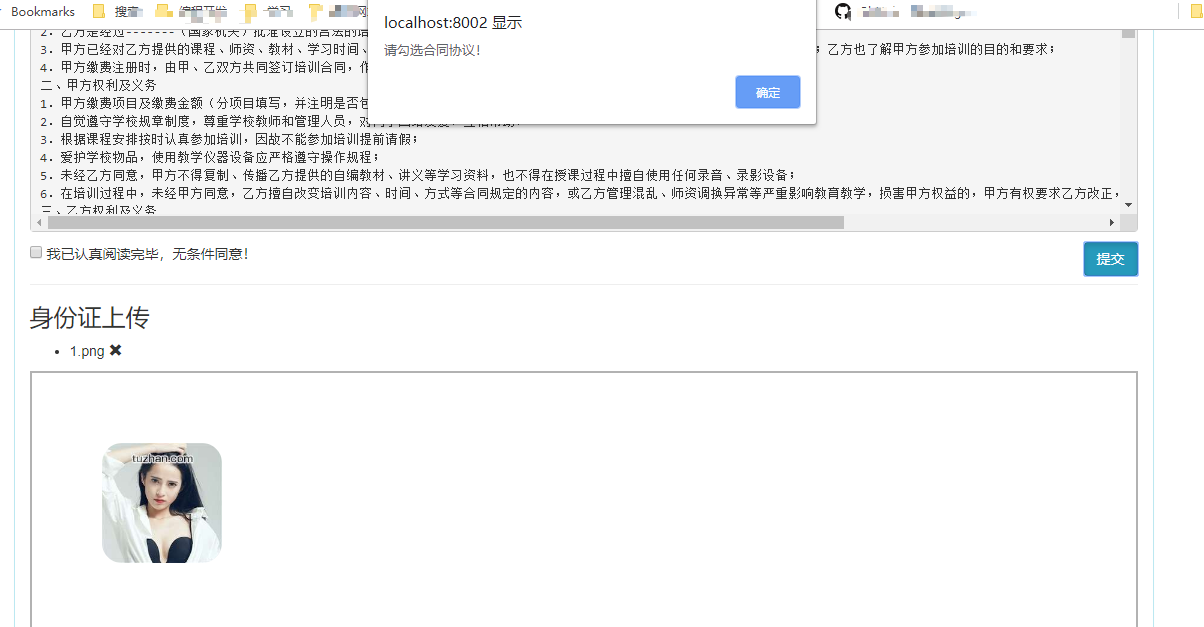
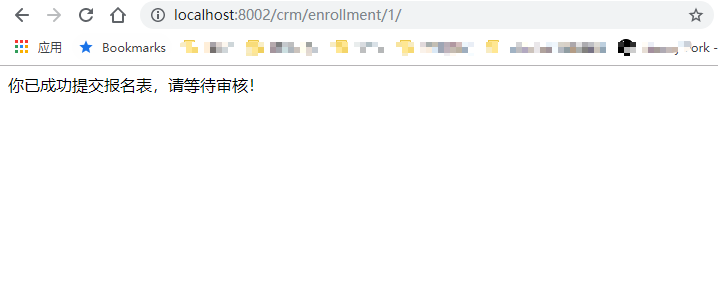
提交报名表后:
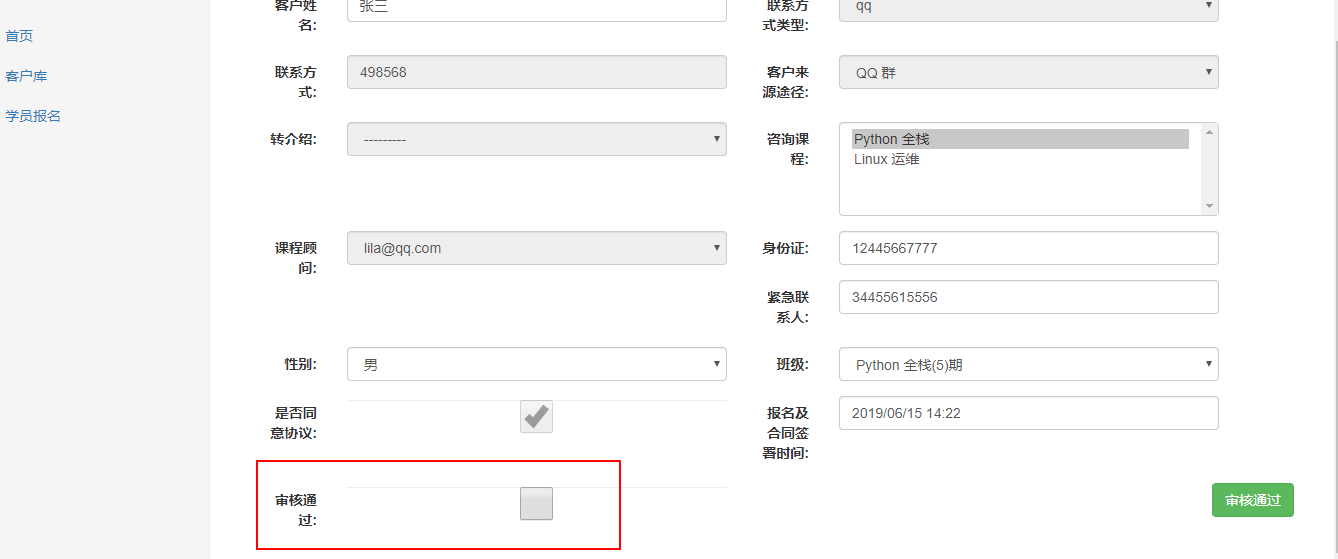
合同审核
销售审核合同后,将跳转到数据修改页面:
以上就是 CRM 的大致开发流程,具体源码可参考:<https://github.com/hj1933/PerfectCRM>

 浙公网安备 33010602011771号