从零搭建springcloud微服务(三)----微服务消费方cloud-consumer
一、微服务服务方的搭建
1.File—>New—>Module
2.选择Spring Initializr,选择对应的JDK,
Choose Initializr Server URL 选择 default。
Next。
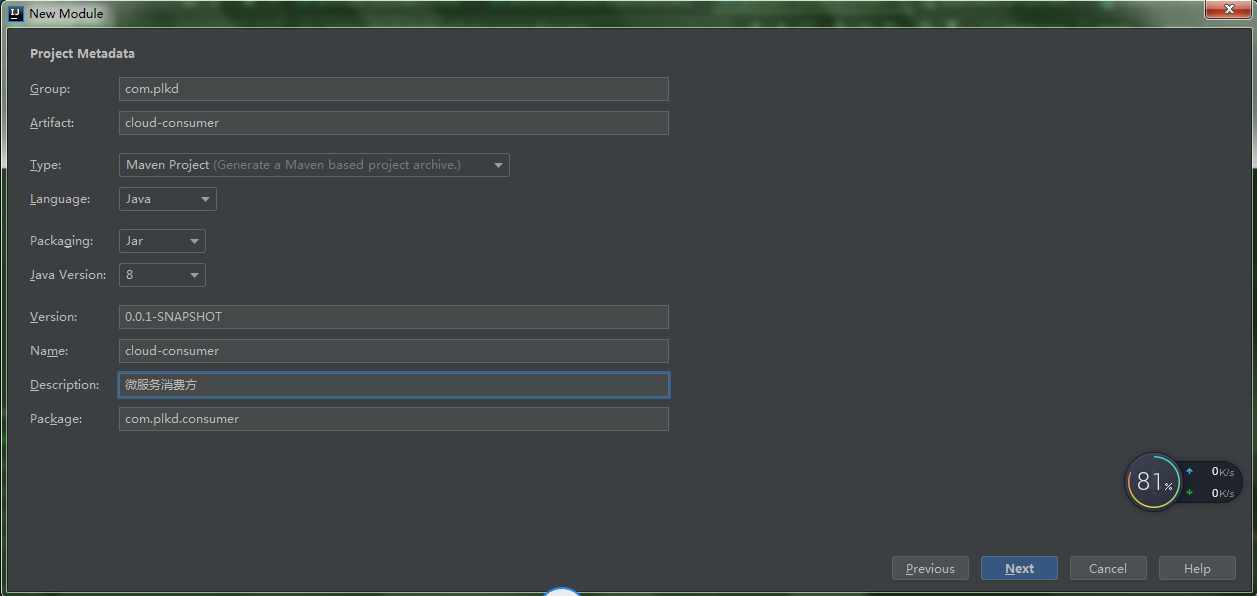
3.输入项目组Group:com.plkd。
组件名称Artifact:cloud-consumer。
Type:选择Maven Project。
version:0.0.1-SNAPSHOT。
修改自动生成的Package:com.plkd.consumer
修改自动生成的description:微服务消费方。
Next。

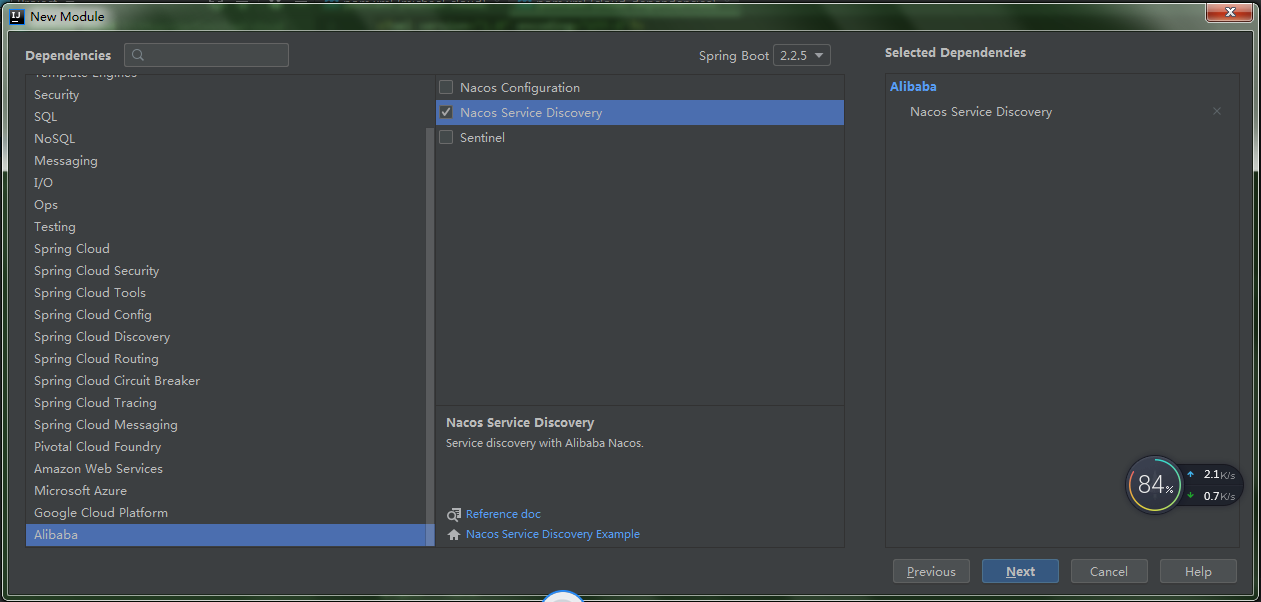
4.dependencies选择Alibaba—>Nacos Service Discovery。
Spring Boot选择你需要的版本,我这选择2.2.5。
Next。

5.Project Name一般不做修改,和组件名称Artifact一样。
Content root、Module file location 均按自动生成,不做修改。
Finish。

6.修改pom文件。调整成如下
<?xml version="1.0" encoding="UTF-8"?>
<project xmlns="http://maven.apache.org/POM/4.0.0" xmlns:xsi="http://www.w3.org/2001/XMLSchema-instance"
         xsi:schemaLocation="http://maven.apache.org/POM/4.0.0 https://maven.apache.org/xsd/maven-4.0.0.xsd">
    <modelVersion>4.0.0</modelVersion>
    <parent>
        <groupId>com.plkd</groupId>
        <artifactId>cloud-dependencies</artifactId>
        <version>0.0.1-SNAPSHOT</version>
        <relativePath>../cloud-dependencies</relativePath><!-- lookup parent from repository -->
    </parent>
    <groupId>com.plkd</groupId>
    <artifactId>cloud-consumer</artifactId>
    <version>0.0.1-SNAPSHOT</version>
    <name>cloud-consumer</name>
    <description>微服务消费方</description>

    <dependencies>
        <dependency>
            <groupId>com.alibaba.cloud</groupId>
            <artifactId>spring-cloud-starter-alibaba-nacos-discovery</artifactId>
        </dependency>

        <dependency>
            <groupId>org.springframework.boot</groupId>
            <artifactId>spring-boot-starter-test</artifactId>
            <scope>test</scope>
            <exclusions>
                <exclusion>
                    <groupId>org.junit.vintage</groupId>
                    <artifactId>junit-vintage-engine</artifactId>
                </exclusion>
            </exclusions>
        </dependency>
    </dependencies>

    <build>
        <plugins>
            <plugin>
                <groupId>org.springframework.boot</groupId>
                <artifactId>spring-boot-maven-plugin</artifactId>
            </plugin>
        </plugins>
    </build>

</project>
7.在application.properties中配置 Nacos server的地址:
server.port=8080
spring.application.name=cloud-consumer
spring.cloud.nacos.discovery.server-addr=121.36.217.132:8848
spring.cloud.nacos.discovery.username=nacos
spring.cloud.nacos.discovery.password=nacos
8.通过 Spring Cloud 原生注解 @EnableDiscoveryClient 开启服务注册发现功能。给 RestTemplate 实例添加 @LoadBalanced 注解,开启 @LoadBalanced 与 Ribbon 的集成。
package com.plkd.consumer;

import org.springframework.beans.factory.annotation.Autowired;
import org.springframework.boot.SpringApplication;
import org.springframework.boot.autoconfigure.SpringBootApplication;
import org.springframework.cloud.client.discovery.EnableDiscoveryClient;
import org.springframework.cloud.client.loadbalancer.LoadBalanced;
import org.springframework.context.annotation.Bean;
import org.springframework.web.bind.annotation.PathVariable;
import org.springframework.web.bind.annotation.RequestMapping;
import org.springframework.web.bind.annotation.RequestMethod;
import org.springframework.web.bind.annotation.RestController;
import org.springframework.web.client.RestTemplate;

@SpringBootApplication
@EnableDiscoveryClient
public class CloudConsumerApplication {

    @LoadBalanced
    @Bean
    public RestTemplate restTemplate() {
        return new RestTemplate();
    }

    public static void main(String[] args) {
        SpringApplication.run(CloudConsumerApplication.class, args);
    }
    @RestController
    public class TestController {

        private final RestTemplate restTemplate;

        @Autowired
        public TestController(RestTemplate restTemplate) {this.restTemplate = restTemplate;}

        @RequestMapping(value = "/echo/{str}", method = RequestMethod.GET)
        public String echo(@PathVariable String str) {
            return restTemplate.getForObject("http://cloud-provider/echo/" + str, String.class);
        }
    }
}
需要在cloud-consumer模块的pom文件中额外添加
<dependency>
<groupId>org.springframework.boot</groupId>
<artifactId>spring-boot-starter-web</artifactId>
</dependency>
9.启动服务

登录nacos server
10.浏览器访问调用 http://localhost:8080/echo/2018,返回内容为 Hello Nacos Discovery 2018。

参考文档:
https://blog.csdn.net/csuzxm2000/article/details/86511847
https://nacos.io/zh-cn/docs/quick-start-spring-cloud.html

