网络爬虫-获取infoq里的测试新闻保存至html
用java+webdriver+testng实现获取infoq里的测试新闻,获取文章标题和内容,保存至html文件
前提条件:
已安装好java环境,工程导入了webdriver的jar包和testng的jar包
代码如下:
第一:新建PublicModel类,该类中实现了写入html的文件功能和初始化方法
 1 package com.ustc.publics;
 2
 3 import java.io.BufferedWriter;
 4 import java.io.File;
 5 import java.io.FileOutputStream;
 6 import java.io.IOException;
 7 import java.io.OutputStreamWriter;
 8 import java.text.SimpleDateFormat;
 9 import java.util.ArrayList;
10 import java.util.Date;
11 import java.util.HashMap;
12
13 import org.openqa.selenium.WebDriver;
14 import org.openqa.selenium.ie.InternetExplorerDriver;
15
16 public class PublicModel {
17     public static WebDriver driver;
18
19     /**
20      * 初始化方法
21      */
22     public static void initModel() {
23         driver = new InternetExplorerDriver();
24          /*driver.manage().timeouts().implicitlyWait(3, TimeUnit.SECONDS);*/
25         driver.manage().window().maximize();
26     }
27
28     /**
29      * 写入html文件方法数组
30      *
31      * @param hotTopics
32      *            hashmap的数组内容
33      * @param file
34      *            文件名称
35      * @throws IOException
36      */
37     public static void writeHtmlContent(ArrayList<HashMap<String, String>> hotTopics, String file, String title1,
38             String title2) {
39         FileOutputStream fis = null;
40         BufferedWriter bfr = null;
41         String css = "table.gridtable {" + "font-family: verdana,arial,sans-serif;" + "font-size:11px;"
42                 + "color:#333333;" + "border-width: 1px;" + "border-color: #666666;" + "border-collapse: collapse;"
43                 + "}" + "table.gridtable th {" + "border-width: 1px;" + "padding: 8px;" + "border-style: solid;"
44                 + "border-color: #666666;" + "background-color: #dedede;" + "}" + "table.gridtable td {"
45                 + "border-width: 1px;" + "padding: 8px;" + "border-style: solid;" + "border-color: #666666;"
46                 + "background-color: #ffffff;" + "}";
47         try {
48             /* 文件名:当前工程路径+result+20160607_file.html */
49             Date currentTime = new Date();
50             SimpleDateFormat formatter = new SimpleDateFormat("yyyyMMdd");
51             String dateString = formatter.format(currentTime);
52             String filename = System.getProperty("user.dir") + File.separator + "result" + File.separator + dateString
53                     + "_" + file + ".html";
54             fis = new FileOutputStream(filename);
55             bfr = new BufferedWriter(new OutputStreamWriter(fis));
56             /* 遍历arrayList的hashMap内容,按行写入html文件 */
57             bfr.append("<html>");
58             bfr.append("<head>");
59             bfr.append("<title>数据写入html展示</title>");
60             bfr.append("<meta http-equiv=\"Content-Type\" content=\"text/html; charset=utf-8\" />");
61             bfr.append("</head>");
62             bfr.append("<style type=\"text/css\">");
63             bfr.append(css);
64             bfr.append("</style>");
65             bfr.append("<body>");
66             bfr.append("<table class=\"gridtable\" >");
67             bfr.append("<tr><th>序号</th><th>" + title1 + "</th><th>" + title2 + "</th>");
68             bfr.append("<tbody>");
69             for (int i = 0; i < hotTopics.size(); i++) {
70                 bfr.append("<tr>");
71                 String que = hotTopics.get(i).get("que").toString();
72                 String ans = hotTopics.get(i).get("ans").toString();
73                 bfr.append("<td>" + i + "</td>");
74                 bfr.append("<td>" + que + "</td>");
75                 bfr.append("<td>" + ans + "</td>");
76                 bfr.append("</tr>");
77             }
78             bfr.append("</tbody>");
79             bfr.append("</table>");
80             bfr.append("</body>");
81             bfr.append("</html>");
82
83         } catch (Exception e) {
84             e.printStackTrace();
85         } finally {
86             try {
87                 bfr.close();
88             } catch (Exception e) {
89                 e.printStackTrace();
90             }
91             try {
92                 fis.close();
93             } catch (Exception e) {
94                 e.printStackTrace();
95             }
96         }
97     }
98 }
第二:新建InfoqArticle类,该类继承了PublicModel类,获取infoq里的测试新闻,获取文章标题和内容,保存至html文件
 1 package com.ustc.base;
 2
 3 import java.util.ArrayList;
 4 import java.util.HashMap;
 5 import java.util.List;
 6
 7 import org.openqa.selenium.By;
 8 import org.openqa.selenium.WebElement;
 9 import org.testng.annotations.AfterClass;
10 import org.testng.annotations.BeforeClass;
11 import org.testng.annotations.Test;
12
13 import com.ustc.publics.PublicModel;
14
15 public class InfoqArticle extends PublicModel{
16     @BeforeClass
17     public void setUp() {
18         initModel();
19     }
20
21     /**
22      * 获取infoq里的测试新闻,获取文章标题和内容,保存至html文件
23      * @throws Exception
24      */
25     @Test
26     public void getInfoqMsg() throws Exception{
27         String url = "http://www.infoq.com/cn/testing/?utm_source=infoq&utm_medium=header_graybar&utm_campaign=topic_clk";
28         driver.get(url);
29         /* 获取infoq测试文章根节点 */
30         WebElement rootNode = driver.findElement(By.cssSelector("div[class~='articles']"));
31         List<WebElement> nodes = rootNode.findElements(By.tagName("p"));
32         ArrayList<HashMap<String, String>> infoqMsgs = new ArrayList<HashMap<String, String>>();
33         ArrayList<String> titles = new ArrayList<String>();
34         /*获取所有测试文章的链接*/
35         for (WebElement node : nodes) {
36             titles.add(node.findElement(By.cssSelector("a.art_title")).getAttribute("href"));
37         }
38         /* 遍历添加infoq文章标题、内容到数组中 */
39         for(String title : titles){
40             HashMap<String, String> topic = new HashMap<String, String>();
41             driver.get(title);
42             /*文章标题*/
43             topic.put("que", driver.findElement(By.cssSelector("div.title_canvas > h1")).getText());
44             /*文章链接*/
45             topic.put("ans",title);
46             /*文章内容,文章内容已经获取到,因为内容太多所以没有往html中写入,只写入了该文章的链接*/
47             infoqMsgs.add(topic);
48         }
49
50         /*数组数据写入html*/
51         writeHtmlContent(infoqMsgs,"infoq_article","文章标题","文章内容");
52     }
53
54     @AfterClass
55     public void quit() {
56         driver.quit();
57     }
58 }
第三:配置testng.xml文件
1 <?xml version="1.0" encoding="UTF-8"?>
2 <!DOCTYPE suite SYSTEM "http://testng.org/testng-1.0.dtd">
3 <suite name="Suite" parallel="false">
4   <test name="Test">
5     <classes>
6       <class name="com.ustc.base.InfoqArticle09"/> <!--9:抓取infoq的测试新闻  -->
7     </classes>
8   </test> <!-- Test -->
9 </suite> <!-- Suite -->
运行testng.xml结果为:
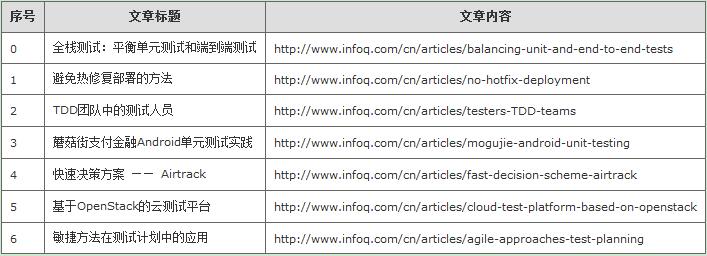
项目路径result目录下生成了一个文件:20160615_infoq_article09.html,内容如下

分类:
03-接口自动化测试


【推荐】国内首个AI IDE,深度理解中文开发场景,立即下载体验Trae
【推荐】编程新体验,更懂你的AI,立即体验豆包MarsCode编程助手
【推荐】抖音旗下AI助手豆包,你的智能百科全书,全免费不限次数
【推荐】轻量又高性能的 SSH 工具 IShell:AI 加持,快人一步
· Linux系列:如何用heaptrack跟踪.NET程序的非托管内存泄露
· 开发者必知的日志记录最佳实践
· SQL Server 2025 AI相关能力初探
· Linux系列:如何用 C#调用 C方法造成内存泄露
· AI与.NET技术实操系列(二):开始使用ML.NET
· 被坑几百块钱后,我竟然真的恢复了删除的微信聊天记录!
· 没有Manus邀请码?试试免邀请码的MGX或者开源的OpenManus吧
· 【自荐】一款简洁、开源的在线白板工具 Drawnix
· 园子的第一款AI主题卫衣上架——"HELLO! HOW CAN I ASSIST YOU TODAY
· Docker 太简单,K8s 太复杂?w7panel 让容器管理更轻松!