CentOS7.6 部署asp.net core2.2 应用
1.安装.net Core SDK
在安装.NET之前,您需要注册Microsoft密钥,注册产品存储库并安装所需的依赖项。这只需要每台机器完成一次。
打开终端并运行以下命令:
sudo rpm -Uvh https://packages.microsoft.com/config/rhel/7/packages-microsoft-prod.rpm
安装.NET SDK
更新可用于安装的产品,然后安装.NET SDK。
在终端中,运行以下命令:
sudo yum update
sudo yum install dotnet-sdk-2.2
2.安装配置Nginx进行反向代理
yum install epel-release    //安装CentOS的 EPEL仓库

yum install nginx           //安装Nginx

systemctl enable nginx      //设置系统启动后, 默认启动Nginx

systemctl start nginx       //启动Nginx

systemctl status firewalld //查看防火墙状态

systemctl start firewalld   // 启动防火墙

//允许HTTP和HTTPS通过防火墙
firewall-cmd  --permanent --zone=public --add-service=http  //允许HTTP
firewall-cmd  --permanent --zone=public --add-service=https //允许HTTPS
firewall-cmd  --reload
在浏览器地址栏输入你服务器的IP地址,就可以看到nginx的欢迎页了

如果无法访问, 请查看firewall 是否开放80端口
firewall-cmd --zone= public --add-port= 3306 /tcp --permanent   //开放80端口

systemctl restart firewalld.service                             //重启防火墙
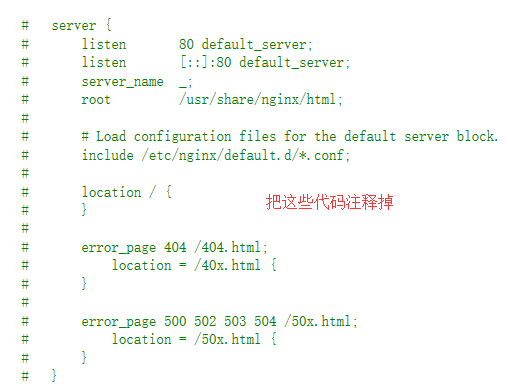
接下来修改配置文件
vim /etc/nginx/nginx.conf //打开文件编辑模式, 输入i 进行编辑 完成后 按ESC键输入:wq 回车 退出编辑模式
找到下面的代码,注释掉

然后在 /etc/nginx/conf.d 文件夹下创建 youbage.conf
server {
    listen 80;
 server_name  www.你的域名.cn;  #绑定域名
    location / {
        proxy_pass http://localhost:5000;
        proxy_http_version 1.1;
        proxy_set_header Upgrade $http_upgrade;
        proxy_set_header Connection keep-alive;
        proxy_set_header Host $host;
        proxy_cache_bypass $http_upgrade;
    }
}
proxy_pass http: 后的url为你在core 启动项配置的路径(默认localhost:5000)
将创建好的自定义配置文件上传到 /etc/nginx/conf.d目录下 ,最后执行命令 重启Nginx
nginx –s reload
将Nginx添加到SELinux白名单
SELinux设置: https://www.bilibili.com/video/av22230664/?p=2 (了解一下)
https://www.linuxidc.com/Linux/2016-11/137723.htm(修改SELinux的状态)
上面的视频有一点坑
我测试的环境是:阿里云ECS服务器,CentOS7.6 系统
首先 先查看SELinux的状态
getenforce //查看现在的状态
默认是不开启的(diaabled)
在关闭状态下的时候 下面两句代码不会起作用
setenforce 0
setenforce 1
需要在配置文件中修改状态
vim /etc/selinux/config

把SELINUX=disabled修改为permissive
上面的视频中说设置成enforcing ,但是我设置后服务器用XShell就连接不上了,不知为何(有时间在研究吧)
然后重启服务器
现在就可以使用 setenforce 0 or 1 切换
具体情况具体看,上面两个链接都有
未完。。。。。。。


 浙公网安备 33010602011771号