IOS开发中的页面传值
IOS开发中的页面传值
导言
本文将基础的介绍一些关于IOS中页面传值的一些方法,语言基于Objective-c
- 属性传值
- 代理传值
- Block传值
- 单利传值
1.属性传值
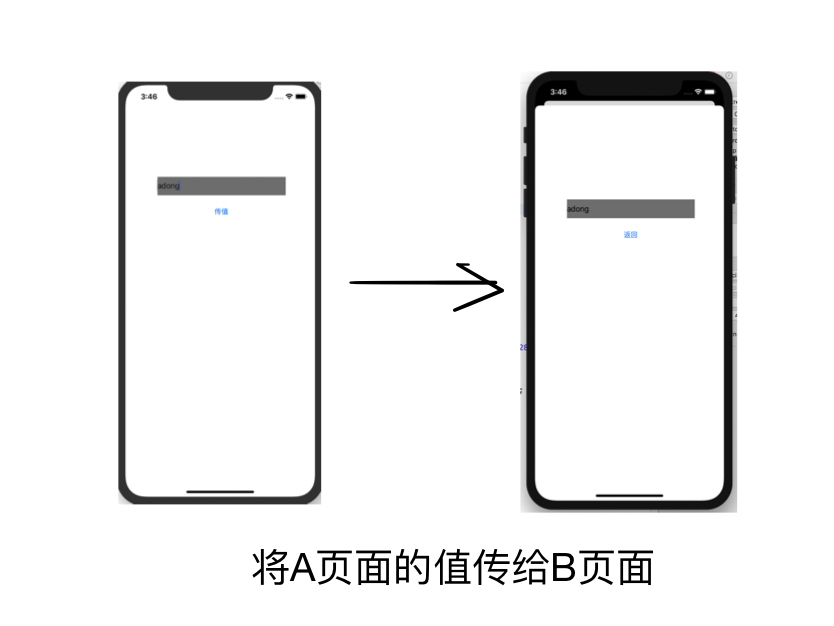
A页面的值跳转到B页面之后把值传给B页面,只需要在.h文件定义属性,A页面再跳转之前赋值给B页面的实例对象属性即可。这种传值方式一般用于正向传值给跳转界面。
A页面 .m文件
#import "ViewController.h"
#import "ViewController2.h"

@interface ViewController ()
{
  	//此处要定义成全局的控件,因为B页面也要用
    UITextField *tf;
}

@end

@implementation ViewController

- (void)viewDidLoad {
    [super viewDidLoad];
    self.view.backgroundColor = [UIColor whiteColor];
    // Do any additional setup after loading the view.
    tf = [[UITextField alloc] initWithFrame:CGRectMake(70, 200, 280, 40)];
    tf.backgroundColor = [UIColor grayColor];
    [self.view addSubview:tf];

    UIButton *btn = [UIButton buttonWithType:UIButtonTypeSystem];
    btn.frame = CGRectMake(160, 260, 100, 30);
    [btn setTitle:@"传值" forState:UIControlStateNormal];
    [btn addTarget:self action:@selector(jump) forControlEvents:UIControlEventTouchUpInside];
    [self.view addSubview:btn];

}

- (void) jump{
    ViewController2 *v2 = [[ViewController2 alloc] init];

    //在跳转前进行传值
    v2.str = tf.text;

    [self presentViewController:v2 animated:YES completion:nil];
}
@end
B页面 .h文件
#import <UIKit/UIKit.h>

NS_ASSUME_NONNULL_BEGIN

@interface ViewController2 : UIViewController
//声明一个属性用来接收要传过来的值,这里定义为传过来一个字符串
@property(nonatomic,strong) NSString *str;
@end

NS_ASSUME_NONNULL_END
B页面 .m文件
#import "ViewController2.h"

@interface ViewController2 ()


@end

@implementation ViewController2

- (void)viewDidLoad {
    [super viewDidLoad];
    self.view.backgroundColor = [UIColor whiteColor];

    UILabel *lab = [[UILabel alloc] initWithFrame:CGRectMake(70, 200, 280, 40)];
    lab.backgroundColor = [UIColor grayColor];

    //lab的值就是传过来的字符串的值
    lab.text = self.str;

    [self.view addSubview:lab];
    UIButton *btn2 = [UIButton buttonWithType:UIButtonTypeSystem];
    btn2.frame = CGRectMake(160, 260, 100, 30);
    [btn2 setTitle:@"返回" forState:UIControlStateNormal];
    [btn2 addTarget:self action:@selector(back) forControlEvents:UIControlEventTouchUpInside];
    [self.view addSubview:btn2];
}

- (void) back {
    [self dismissViewControllerAnimated:YES completion:nil];
}
@end

2.代理传值
属性传值用于正向传值,当我们需要反向传值时,使用代理传值
我们将要传回去的值当做代理方法中的参数传回去。
我们是在第二个页面中写协议,在第一个页面中来用
下面是写协议的操作(以下都是在B页面的 .h 文件完成)
-
1.声明协议
-
2.声明属性(代理人)
-
3.声明代理方法
B页面的 .h文件
#import <UIKit/UIKit.h>

NS_ASSUME_NONNULL_BEGIN

//1.声明协议
@protocol passValueDelegate <NSObject>
//3.实现方法
- (void)passColor:(id) color;
@end

@interface ViewController2 : UIViewController

//2.声明属性(代理人)
//默认用assign 和 id
@property(nonatomic,assign) id <passValueDelegate> delegate;

@end

NS_ASSUME_NONNULL_END
接下来是实现协议的操作(以下操作均是在A页面的 .m文件完成)
- 遵守协议
- 指定代理人
- 写代理方法
A页面的 .m文件
#import "ViewController.h"
#import "ViewController2.h"

//遵守协议
@interface ViewController () <passValueDelegate>

@end

@implementation ViewController

- (void)viewDidLoad {
    [super viewDidLoad];
    self.view.backgroundColor = [UIColor whiteColor];

    UIButton *btn = [UIButton buttonWithType:UIButtonTypeSystem];
    btn.frame = CGRectMake(160, 260, 100, 30);
    [btn setTitle:@"传值" forState:UIControlStateNormal];
    [btn addTarget:self action:@selector(jump) forControlEvents:UIControlEventTouchUpInside];
    [self.view addSubview:btn];

}

- (void) jump{
    ViewController2 *v2 = [[ViewController2 alloc] init];

    //指定代理人
    v2.delegate = self;
    [self presentViewController:v2 animated:YES completion:nil];
}

//写代理方法
- (void) passColor:(id)color {
    self.view.backgroundColor = color;
}

@end
在B页面返回A页面的时候触发代理方法
B页面的 .m文件
#import "ViewController2.h"

@interface ViewController2 ()
@end

@implementation ViewController2

- (void)viewDidLoad {
    [super viewDidLoad];
    // Do any additional setup after loading the view.
    self.view.backgroundColor = [UIColor yellowColor];

    UIButton *btn2 = [UIButton buttonWithType:UIButtonTypeSystem];
    btn2.frame = CGRectMake(160, 260, 100, 30);
    [btn2 setTitle:@"返回" forState:UIControlStateNormal];
    [btn2 addTarget:self action:@selector(back) forControlEvents:UIControlEventTouchUpInside];
    [self.view addSubview:btn2];
}

- (void) back {
    //返回的时候触发代理方法
    [self.delegate passColor:self.view.backgroundColor];
    [self dismissViewControllerAnimated:YES completion:nil];
}

3.Block传值
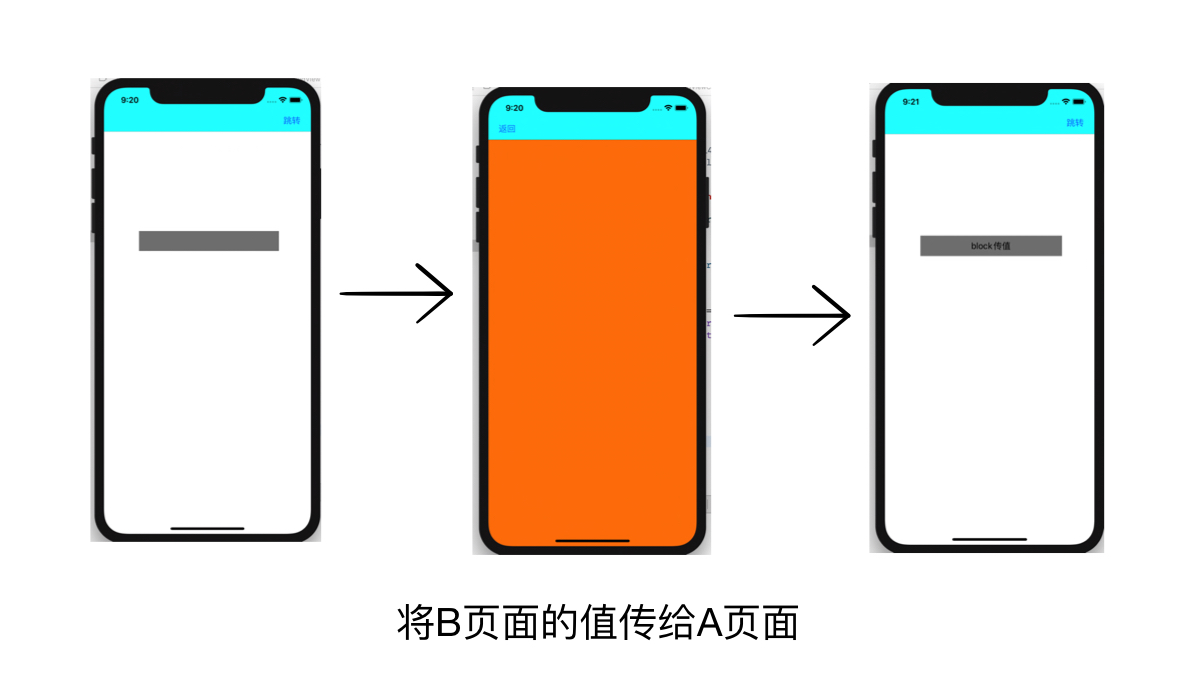
Block回调传值通常用于两个页面之间的反向传值。A页面需要接收来自B页面的值,即反向传值,在这里我们用Block回调实现。
以下是使用block的基本操作
- 声明
在B页面中声明block属性
#import <UIKit/UIKit.h>
NS_ASSUME_NONNULL_BEGIN
@interface SecondViewController : UIViewController
//用copy将block从栈区拷贝到堆区里面去
@property(nonatomic,copy) void(^myBlock)(NSString *str);
@end
NS_ASSUME_NONNULL_END
- 定义
在A页面中,获取B页面对象,并通过此对象来编写block的实现
#import "RootViewController.h"
#import "SecondViewController.h"
@interface RootViewController ()
{
    UILabel *lab;
}

@end

@implementation RootViewController

- (void)viewDidLoad {
    [super viewDidLoad];
    self.view.backgroundColor = [UIColor orangeColor];
    self.view.backgroundColor = [UIColor whiteColor];
    self.navigationItem.rightBarButtonItem = [[UIBarButtonItem alloc] initWithTitle:@"跳转" style:UIBarButtonItemStylePlain target:self action:@selector(Next)];

    lab = [[UILabel alloc] initWithFrame:CGRectMake(70, 200, 280, 40)];
    lab.backgroundColor = [UIColor grayColor];
    lab.textAlignment = NSTextAlignmentCenter;
    [self.view addSubview:lab];
}

- (void)Next {
    SecondViewController *v2 = [[SecondViewController alloc] init];
    //block的实现
    v2.myBlock = ^(NSString * _Nonnull str) {
        self->lab.text = str;
    };
    [self.navigationController pushViewController:v2 animated:YES];
}

@end
注意:此处只是定义该Block方法,当用户点击了”跳转按钮“时,Block内部的代码并不会执行,只有该Block被调用时,才会执行该Block内部的代码。
本例中,当在第二个页面点击”返回“时,才会调用block内的代码
- 调用
在B页面中调用Block进行传值
#import "SecondViewController.h"

@interface SecondViewController ()

@end
@implementation SecondViewController

- (void)viewDidLoad {
    [super viewDidLoad];
    self.view.backgroundColor = [UIColor orangeColor];
    self.navigationItem.leftBarButtonItem = [[UIBarButtonItem alloc] initWithTitle:@"返回" style:UIBarButtonItemStylePlain target:self action:@selector(Back)];
}
- (void) Back{
    //调用
    self.myBlock(@"block传值");
    [self.navigationController popViewControllerAnimated:YES];
}

@end

有关block的一些基本相关知识可以查看我的另一篇博客。
4.通知中心传值
通知中心传值,可以跨越多个页面传值, 一般也是从后面的页面传给前面的页面。(一对多的过程)
举个例子,广播电台开始播放一档节目时,这个电台的频率就是传递的值,当我们用户想要听这个节目时,我们就要打开收音机,然后自己调频到相应的频道来听这个节目。这个过程中,广播站只负责发送,谁来接收他不管。
接收消息的页面就是收音机,注册通知中心就是打开收音机并且调频
发送消息的页面就是广播站,在页面跳转时发送广播
以下是通知中心传值的基本操作
- 在A页面建立一个通知中心,通过通知中心,注册一个监听事件
- 在A页面中,设置接收到通知的事件
- 在A页面移除通知中心
- 在B页面中,建立一个通知中心,通过通知中心,发送通知(就是传值的过程),将要传输的值作为object传值给第一个界面
//监听通知
// 通知中心是一个单例,它会将通知广播出去,内存中的所有对象都可以通过该通知中心来监听其他对象或者是自己所发出的通知
    // 第一个参数:观察者(即谁收到这个通知将会做出响应)
    // 第二个参数:观察者收到通知以后将会调用哪个方法
    // 第三个参数:通知的名称
    // 第四个参数:监听谁发来的通知,nil表示所有对象发送的通知都接收
    [[NSNotificationCenter defaultCenter] addObserver:self selector:@selector(countAdded) name:@"countAdded" object:nil];

// 发送通知
    // 第一个参数:通知名称
    // 第二个参数:通知的发送者
    // 第三个参数:一个字典,随着通知一起传递的信息
    [[NSNotificationCenter defaultCenter] postNotificationName:@"countAdded" object:self userInfo:userInfo];
**在A页面 .m文件注册通知中心,并执行通知的方法,最后移除通知中心
#import "RootViewController.h"
#import "SecondViewController.h"
@interface RootViewController ()
{
    UILabel *lab;
}

@end

@implementation RootViewController

- (void)viewDidLoad {
    [super viewDidLoad];
    self.view.backgroundColor = [UIColor orangeColor];
    self.view.backgroundColor = [UIColor whiteColor];
    self.navigationItem.rightBarButtonItem = [[UIBarButtonItem alloc] initWithTitle:@"跳转" style:UIBarButtonItemStylePlain target:self action:@selector(Next)];

    lab = [[UILabel alloc] initWithFrame:CGRectMake(70, 200, 280, 40)];
    lab.backgroundColor = [UIColor grayColor];
    lab.textAlignment = NSTextAlignmentCenter;
    [self.view addSubview:lab];

    //注册通知
    [[NSNotificationCenter defaultCenter] addObserver:self selector:@selector(receiveMessage:) name:@"90.8" object:nil];
}


//收到通知执行的方法
- (void)receiveMessage:(NSNotification *)mes{
    //从通知里面取出值
  	//传的值需要转换成字符串
    lab.text = [NSString stringWithFormat:@"%@",mes.object];
}

- (void)Next {
    SecondViewController *v2 = [[SecondViewController alloc] init];
    [self.navigationController pushViewController:v2 animated:YES];
}

//移除当前对象监听的事件
- (void)dealloc
{
  	//这是删除所有的通知中心,也可以按照属性来删除
    [[NSNotificationCenter defaultCenter] removeObserver:self];
}

@end
在B页面 .m文件发送通知
#import "SecondViewController.h"

@interface SecondViewController ()

@end

@implementation SecondViewController

- (void)viewDidLoad {
    [super viewDidLoad];
    self.view.backgroundColor = [UIColor orangeColor];
    self.navigationItem.leftBarButtonItem = [[UIBarButtonItem alloc] initWithTitle:@"返回" style:UIBarButtonItemStylePlain target:self action:@selector(Back)];
}
- (void) Back{

    //发送通知
    [[NSNotificationCenter defaultCenter] postNotificationName:@"90.8" object:@"通知传值" userInfo:nil];
    [self.navigationController popViewControllerAnimated:YES];
}

@end
消息通知中心传值使用时会使得代码非常乱,但是他可以跨多个页面传值。
以上就是一些关于页面传值的基本操作


 浙公网安备 33010602011771号