Android学习笔记17:单项选择RadioButton和多项选择CheckBox的使用
在Android中,可以通过RadioButton和RadioGroup的组合来实现单项选择的效果。而多项选择则是通过CheckBox来实现的。
1.单项选择RadioButton
我们知道,一个单项选择是由两部分组成的,分别是前面的选择按钮和后面的“答案”。选择按钮可以通过RadioButton来实现,而“答案”则可以通过RadioGroup来实现。
具体的实现步骤如下:
首先,在布局文件中定义一个TextView控件,用来显示问题。
然后,再在布局文件中定义一个RadioGroup控件,用来显示答案。
最后,再在RadioGroup控件中定义四个(根据需求而定)RadioButton控件,并将“答案”分别赋给每个选项。
如下是实现一个单项选择demo的xml布局文件源代码:
 单项选择xml源代码
 1 <LinearLayout xmlns:android="http://schemas.android.com/apk/res/android"
 2     xmlns:tools="http://schemas.android.com/tools"
 3     android:orientation="vertical"
 4     android:layout_width="match_parent"
 5     android:layout_height="match_parent" >
 6
 7     <!-- 题干 -->
 8     <TextView
 9         android:id="@+id/textView"
10         android:layout_marginTop="10dp"
11         android:layout_width="match_parent"
12         android:layout_height="wrap_content"
13         android:text="Android底层基于以下哪一种操作系统?"    >
14     </TextView>
15
16     <!-- 选项 -->
17     <RadioGroup
18         android:id="@+id/radioGroup"
19         android:layout_width="match_parent"
20         android:layout_height="wrap_content"
21         android:orientation="vertical"    >
22
23         <!-- 选项1 -->
24         <RadioButton
25             android:id="@+id/radioButton1"
26             android:layout_width="match_parent"
27             android:layout_height="wrap_content"
28             android:text="Windows"    >
29         </RadioButton>
30
31         <!-- 选项2 -->
32         <RadioButton
33             android:id="@+id/radioButton2"
34             android:layout_width="match_parent"
35             android:layout_height="wrap_content"
36             android:text="Linux"    >
37         </RadioButton>
38
39         <!-- 选项3 -->
40         <RadioButton
41             android:id="@+id/radioButton3"
42             android:layout_width="match_parent"
43             android:layout_height="wrap_content"
44             android:text="Moc os"    >
45         </RadioButton>
46
47         <!-- 选项4 -->
48         <RadioButton
49             android:id="@+id/radioButton4"
50             android:layout_width="match_parent"
51             android:layout_height="wrap_content"
52             android:text="Java"    >
53         </RadioButton>
54
55     </RadioGroup>
56
57 </LinearLayout>
通过以上三个步骤,我们便可以很轻松的实现单项选择的效果了,上述demo源代码的运行效果如图1所示。

图1 单项选择界面
因为是单项选择,所以各个选项之间存在互斥性,即仅能选中其中的某一个选项。那么如何来确定用户的选择是否正确,并给出相应的提示信息呢?
要确定用户的选择是否正确,需要知道用户选择的是选项中的哪一项,这可以通过为RadioGroup设置事件监听器setOnCheckedChangeListener来实现。通过该事件监听器便可以判断出用户点击的是哪一个RadioButton了。然后,再使用Toast来显示相应的提示信息即可。
用上述方案实现单项选择demo的java源代码如下:
 单项选择java源代码
 1 package com.example.android_radiobutton;
 2
 3 import android.os.Bundle;
 4 import android.view.Gravity;
 5 import android.widget.RadioButton;
 6 import android.widget.RadioGroup;
 7 import android.widget.TextView;
 8 import android.widget.Toast;
 9 import android.app.Activity;
10
11 public class MainActivity extends Activity {
12
13     TextView mTextView;                                //TextView对象,用于显示问题
14     RadioGroup mRadioGroup;                   //RadioGroup对象,用于显示答案
15     RadioButton mRadioButton_1;            //RadioButton对象,用于显示选项1
16     RadioButton mRadioButton_2;            //RadioButton对象,用于显示选项2
17     RadioButton mRadioButton_3;            //RadioButton对象,用于显示选项3
18     RadioButton mRadioButton_4;            //RadioButton对象,用于显示选项4
19
20     @Override
21     public void onCreate(Bundle savedInstanceState) {
22         super.onCreate(savedInstanceState);
23         setContentView(R.layout.activity_main);                //加载布局文件
24
25         //加载控件
26         mTextView = (TextView)this.findViewById(R.id.textView);
27         mRadioGroup = (RadioGroup)this.findViewById(R.id.radioGroup);
28         mRadioButton_1 = (RadioButton)this.findViewById(R.id.radioButton1);
29         mRadioButton_2 = (RadioButton)this.findViewById(R.id.radioButton2);
30         mRadioButton_3 = (RadioButton)this.findViewById(R.id.radioButton3);
31         mRadioButton_4 = (RadioButton)this.findViewById(R.id.radioButton4);
32
33         //设置事件监听
34         mRadioGroup.setOnCheckedChangeListener(new RadioGroup.OnCheckedChangeListener() {
35             public void onCheckedChanged(RadioGroup group, int checkedId) {
36                 if (checkedId == mRadioButton_2.getId()) {
37                     DisplayToast("正确答案:"+mRadioButton_2.getText()+",恭喜你,回答正确");
38                 } else {
39                     DisplayToast("回答错误!");
40                 }
41             }
42         });
43     }
44
45     //显示提示信息
46     public void DisplayToast(String string) {
47         Toast mToast = Toast.makeText(this, string, Toast.LENGTH_LONG);
48         mToast.setGravity(Gravity.TOP, 0, 400);
49         mToast.show();
50     }
51 }
运行后可以看到,当用户选中正确答案后,会给出“正确答案:Linux,恭喜你,回答正确!”的提示信息,如图2所示。当用户选中错误答案后,则会给出“回答错误”的提示信息。如图3所示。

图2 回答正确

图3 回答错误
2.多项选择CheckBox
多项选择与单项选择最重要的区别就是多项选择可以让用户选择一个以上的选项。
在Android中,多项选择是通过CheckBox来实现的,为了确定用户是否选择了某一项,则需要对每一个选项进行事件监听。
多项选择的实现方法和单项选择的实现方法大致相同。
首先,在布局文件中定义一个TextView控件,用来显示问题。
然后,再在布局文件中定义四个(根据需求而定)CheckBox控件,分别用来显示每一个选项。
最后,在布局文件中定义一个Button控件,用于提交用户所选的选项(这个可以没有)。
如下是实现一个多项选择demo的xml布局文件源代码:
 多项选择xml源代码
 1 <LinearLayout xmlns:android="http://schemas.android.com/apk/res/android"
 2     xmlns:tools="http://schemas.android.com/tools"
 3     android:orientation="vertical"
 4     android:layout_width="match_parent"
 5     android:layout_height="match_parent" >
 6
 7     <!-- 题干 -->
 8     <TextView
 9         android:id="@+id/textview"
10         android:layout_marginTop="10dp"
11         android:layout_width="match_parent"
12         android:layout_height="wrap_content"
13         android:text="调查:你喜欢Android的原因是?"    >
14     </TextView>
15
16     <!-- 选项 -->
17     <CheckBox
18         android:id="@+id/checkbox1"
19         android:layout_width="match_parent"
20         android:layout_height="wrap_content"
21         android:text="无界限的应用程序"    >
22     </CheckBox>
23
24     <CheckBox
25         android:id="@+id/checkbox2"
26         android:layout_width="match_parent"
27         android:layout_height="wrap_content"
28         android:text="应用程序是在平等的条件下创建的"    >
29     </CheckBox>
30
31     <CheckBox
32         android:id="@+id/checkbox3"
33         android:layout_width="match_parent"
34         android:layout_height="wrap_content"
35         android:text="应用程序可以轻松地嵌入网络"    >
36     </CheckBox>
37
38     <CheckBox
39         android:id="@+id/checkbox4"
40         android:layout_width="match_parent"
41         android:layout_height="wrap_content"
42         android:text="应用程序可以并行运行"    >
43     </CheckBox>
44
45     <!-- 提交 -->
46     <Button
47         android:id="@+id/button"
48         android:layout_width="100dp"
49         android:layout_height="wrap_content"
50         android:layout_marginLeft="110dp"
51         android:text="提交"    >
52     </Button>
53
54 </LinearLayout>
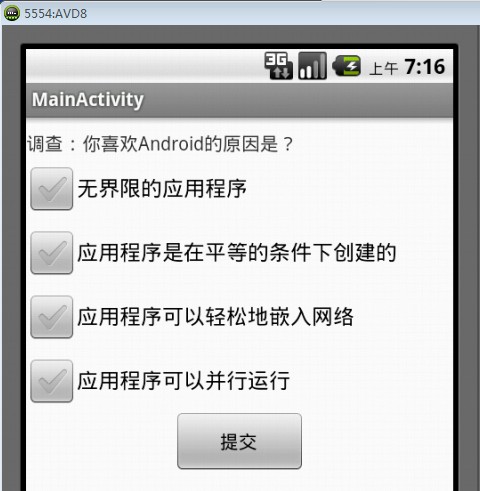
运行后的效果如图4所示。

图4 多项选择界面
当然了,我们还需要在java代码中实现对用户的操作进行事件监听,并做出相应的响应。为此,我们需要为每一个CheckBox多项选择选项都设置一个事件监听器setOnCheckedChangeListener,并通过mCheckBox.isChecked()方法来判断该选项是否被选中(true表示被选中,false表示未选中)。此外,我们还可以通过一个全局变量checkedcount来统计当前有几个选项被选中,实现方法也很简单,当mCheckBox.isChecked()为true时令checkedcount++;当mCheckBox.isChecked()为false时令checkedcount--就可以了。最后,我们再为“提交”按钮设置一个监听器setOnClickListener,当用户点击“提交”时,显示一条总共选择了几项的提示信息。
用上述方案实现多项选择demo的java源代码如下:
 多项选择java源代码
  1 package com.example.android_checkbox;
  2
  3 import android.os.Bundle;
  4 import android.view.Gravity;
  5 import android.view.View;
  6 import android.view.View.OnClickListener;
  7 import android.widget.Button;
  8 import android.widget.CheckBox;
  9 import android.widget.CompoundButton;
 10 import android.widget.Toast;
 11 import android.widget.CompoundButton.OnCheckedChangeListener;
 12 import android.widget.TextView;
 13 import android.app.Activity;
 14
 15 public class MainActivity extends Activity {
 16
 17     TextView mTextView;                   //TextView对象,用于显示问题
 18     CheckBox mCheckBox1;              //CheckBox对象,用于显示选项1
 19     CheckBox mCheckBox2;              //CheckBox对象,用于显示选项2
 20     CheckBox mCheckBox3;              //CheckBox对象,用于显示选项3
 21     CheckBox mCheckBox4;              //CheckBox对象,用于显示选项4
 22     Button mButton;                              //Button对象,用于显示提交按钮
 23
 24     int checkedcount = 0;                    //计数器,用于统计选中的个数
 25
 26     @Override
 27     public void onCreate(Bundle savedInstanceState) {
 28         super.onCreate(savedInstanceState);
 29         setContentView(R.layout.activity_main);//加载布局文件
 30
 31         //加载控件
 32         mTextView = (TextView)this.findViewById(R.id.textview);
 33         mCheckBox1 = (CheckBox)this.findViewById(R.id.checkbox1);
 34         mCheckBox2 = (CheckBox)this.findViewById(R.id.checkbox2);
 35         mCheckBox3 = (CheckBox)this.findViewById(R.id.checkbox3);
 36         mCheckBox4 = (CheckBox)this.findViewById(R.id.checkbox4);
 37         mButton = (Button)this.findViewById(R.id.button);
 38
 39         //选项1事件监听
 40         mCheckBox1.setOnCheckedChangeListener(new OnCheckedChangeListener() {
 41             public void onCheckedChanged(CompoundButton buttonView, boolean isChecked) {
 42                 if (mCheckBox1.isChecked()) {
 43                     checkedcount++;
 44                     DisplayToast("你选择了:" + mCheckBox1.getText());
 45                 } else {
 46                     checkedcount--;
 47                 }
 48             }
 49         });
 50
 51         //选项2事件监听
 52         mCheckBox2.setOnCheckedChangeListener(new OnCheckedChangeListener() {
 53             public void onCheckedChanged(CompoundButton buttonView, boolean isChecked) {
 54                 if (mCheckBox2.isChecked()) {
 55                     checkedcount++;
 56                     DisplayToast("你选择了:" + mCheckBox2.getText());
 57                 } else {
 58                     checkedcount--;
 59                 }
 60             }
 61         });
 62
 63         //选项3事件监听
 64         mCheckBox3.setOnCheckedChangeListener(new OnCheckedChangeListener() {
 65             public void onCheckedChanged(CompoundButton buttonView, boolean isChecked) {
 66                 if (mCheckBox3.isChecked()) {
 67                     checkedcount++;
 68                     DisplayToast("你选择了:" + mCheckBox3.getText());
 69                 } else {
 70                     checkedcount--;
 71                 }
 72             }
 73         });
 74
 75         //选项4事件监听
 76         mCheckBox4.setOnCheckedChangeListener(new OnCheckedChangeListener() {
 77             public void onCheckedChanged(CompoundButton buttonView, boolean isChecked) {
 78                 if (mCheckBox4.isChecked()) {
 79                     checkedcount++;
 80                     DisplayToast("你选择了:" + mCheckBox4.getText());
 81                 } else {
 82                     checkedcount--;
 83                 }
 84             }
 85         });
 86
 87         //”提交“按钮事件监听
 88         mButton.setOnClickListener(new OnClickListener() {
 89             public void onClick(View v) {
 90                 DisplayToast("谢谢参与,你一共选择了" + checkedcount + "项!");
 91             }
 92         });
 93     }
 94
 95     //显示提示信息
 96     public void DisplayToast(String string) {
 97         Toast mToast = Toast.makeText(this, string, Toast.LENGTH_LONG);
 98         mToast.setGravity(Gravity.TOP, 0, 450);
 99         mToast.show();
100     }
101 }
运行后可以看到,当用户选择了某一个选项后,会给出类似“你选择了:应用程序可以轻松地嵌入网络”的提示信息,如图5所示。当用户点击“提交”按钮后,会给出类似“谢谢参与,你总共选择了2项”的提示信息,如图6所示。

图5 选择选项效果

图6 提交选项效果
3.定制自己的单项选择RadioButton式样
Android提供的单项选择RadioButton式样比较单一,如何来定制自己想要的单项选择RadioButton式样呢?下面给出一个简单的实现案例。
我们知道,Android提供的单项选择RadioButton式样,有三点最基本的特性:
第一,RadioButton有两种状态,一种是未选中下的置灰状态,另一种是选中下的高亮状态,且两种状态互斥。
第二,RadioButton间存在互斥性,即仅能选中其中的某一个选项。
第三,能够判断出当前用户选择的是哪一个RadioButton选项。
所以,我们自己定制的单项选择RadioButton式样至少也应该具备以上的三点特性。
3.1特性一的实现
特性一的实现并不复杂,我们可以使用两张不同的图片来分别表示RadioButton的两种状态(选中和未选中),而选中和未选中的状态则可以通过android:state_checked属性来设置。具体可以通过在工程的res/drawable目录下新建一个radiostyle.xml文件来实现,radiostyle.xml文件的源代码如下,其中button_ok是选中状态下要显示的图片,button_ng是未选中状态下要显示的图片。
 radiostyle.xml源代码
 1 <?xml version="1.0" encoding="utf-8"?>
 2 <selector xmlns:android="http://schemas.android.com/apk/res/android">
 3
 4     <!-- 未选中状态 -->
 5     <item
 6         android:state_checked="false"
 7         android:drawable="@drawable/button_ng"    >
 8     </item>
 9
10     <!-- 选中状态 -->
11     <item
12         android:state_checked="true"
13         android:drawable="@drawable/button_ok"    >
14     </item>
15
16 </selector>
3.2特性二的实现
要实现RadioButton选项间的互斥性,可以通过mRadioButton.setChecked()方法来实现,当某一选项为true时,将其余选项置为false即可。
3.3特性三的实现
要判断用户选中的是哪一个选项,可以通过为每一个RadioButton按钮设置一个setOnClickListener监听器来实现。
3.4实例效果
在本实例中,定制了一个自己的单项选择RadioButton式样,并且实现RadioButton式样的上述三点最基本的特性,达到了和1.单项选择RadioButton中的所举例子同样的运行效果。运行效果分别如图7、图8、图9所示。

图7 自定义单项选择式样

图8 回答正确

图9 回答错误


【推荐】国内首个AI IDE,深度理解中文开发场景,立即下载体验Trae
【推荐】编程新体验,更懂你的AI,立即体验豆包MarsCode编程助手
【推荐】抖音旗下AI助手豆包,你的智能百科全书,全免费不限次数
【推荐】轻量又高性能的 SSH 工具 IShell:AI 加持,快人一步
· .NET Core 中如何实现缓存的预热?
· 从 HTTP 原因短语缺失研究 HTTP/2 和 HTTP/3 的设计差异
· AI与.NET技术实操系列:向量存储与相似性搜索在 .NET 中的实现
· 基于Microsoft.Extensions.AI核心库实现RAG应用
· Linux系列:如何用heaptrack跟踪.NET程序的非托管内存泄露
· TypeScript + Deepseek 打造卜卦网站:技术与玄学的结合
· 阿里巴巴 QwQ-32B真的超越了 DeepSeek R-1吗?
· 【译】Visual Studio 中新的强大生产力特性
· 10年+ .NET Coder 心语 ── 封装的思维:从隐藏、稳定开始理解其本质意义
· 【设计模式】告别冗长if-else语句:使用策略模式优化代码结构