自定义的Qt控件特效
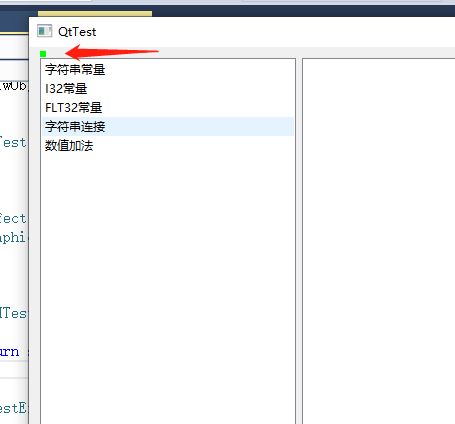
实现自定义特效的方法一般是继承QGraphicsEffect类,重写它的draw(...)函数。如果特效需要扩展目标的外矩形则还要重写boundingRectFor(...)函数。使用时用QWidget::setGraphicsEffect(...)函数把特效加到控件上就行了。在不扩展目标外矩形的情况下按照Qt帮助的写法直接绘制就可以,而在需要扩展外矩形的情况则有坑需要注意。这里给出一个需要扩展目标外矩形的例子。实现目标是在控件外部的左上角显示一个绿色的正方形。效果如下:

本文代码在VS2015和Qt5.9下测试通过。下面是头文件:
class MTestEffect : public QGraphicsEffect
{
    Q_OBJECT

public:
    MTestEffect(QObject* parent = 0);

private:
    QRectF boundingRectFor(const QRectF &sourceRect) const override;

    void draw(QPainter *painter) override;
};
CPP文件:
MTestEffect::MTestEffect(QObject* parent) :
    QGraphicsEffect(parent)
{
}

QRectF MTestEffect::boundingRectFor(const QRectF &sourceRect) const
{
    return sourceRect.adjusted(0, -7, 0, 0);
}

void MTestEffect::draw(QPainter *painter)
{
    QPoint offset;
    QPixmap pixmap = sourcePixmap(Qt::DeviceCoordinates, &offset);
    painter->save();
    painter->setWorldTransform(QTransform());

    painter->fillRect(offset.x(), offset.y(), 6, 6, Qt::green);
    painter->drawPixmap(offset, pixmap);
    painter->restore();
}
这里需要着重看的是draw(...)函数,它取pixmap用的是Qt::DeviceCoordinates而不是Qt::LogicalCoordinates,而且绘制之前要先把worldTransform清空。经过有限的测试在需要扩展目标外矩形的情况下必须这样写,否则绘制效果会出问题。
另外,外扩外矩形只针对子控件,对于顶层窗口是无效的。因为特效不能显示在顶层窗口的外面。


