图像处理库opencv-python pillow skimage
pytorch学习(五)—图像的加载/读取方式 - 简书 (jianshu.com) 写的好详细 全面 搬一下 别没了
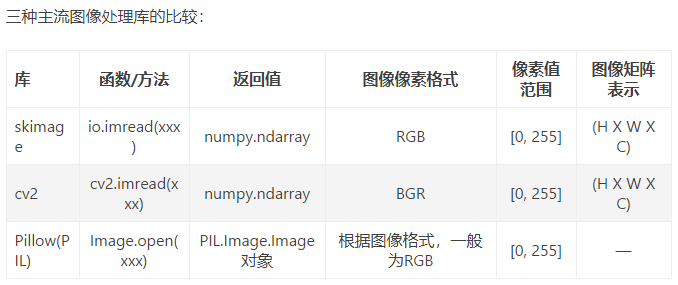
import matplotlib.pyplot as plt
import skimage.io as io
import cv2
from PIL import Image
import numpy as np
import torch

# dog.jpg    width = 1599, height=1066, channel=3

# 使用skimage读取图像
img_skimage = io.imread('dog.jpg')        # skimage.io imread()-----np.ndarray,  (H x W x C), [0, 255],RGB
print(img_skimage.shape)

# 使用opencv读取图像
img_cv = cv2.imread('dog.jpg')            # cv2.imread()------np.array, (H x W xC), [0, 255], BGR
print(img_cv.shape)

# 使用PIL读取
img_pil = Image.open('dog.jpg')         # PIL.Image.Image对象
img_pil_1 = np.array(img_pil)           # (H x W x C), [0, 255], RGB
print(img_pil_1.shape)

plt.figure()
for i, im in enumerate([img_skimage, img_cv, img_pil_1]):
    ax = plt.subplot(1, 3, i + 1)
    ax.imshow(im)
    plt.pause(0.01)
# ------------np.ndarray转为torch.Tensor------------------------------------
# numpy image: H x W x C
# torch image: C x H x W
# np.transpose( xxx,  (2, 0, 1))   # 将 H x W x C 转化为 C x H x W
tensor_skimage = torch.from_numpy(np.transpose(img_skimage, (2, 0, 1)))
tensor_cv = torch.from_numpy(np.transpose(img_cv, (2, 0, 1)))
tensor_pil = torch.from_numpy(np.transpose(img_pil_1, (2, 0, 1)))
torch.Tensor 高维矩阵的表示: (nSample)x C x H x W
numpy.ndarray 高维矩阵的表示: H x W x C
# np.transpose( xxx,  (2, 0, 1))   # 将 C x H x W 转化为 H x W x C
img_skimage_2 = np.transpose(tensor_skimage.numpy(), (1, 2, 0))
img_cv_2 = np.transpose(tensor_cv.numpy(), (1, 2, 0))
img_pil_2 = np.transpose(tensor_pil.numpy(), (1, 2, 0))

plt.figure()
for i, im in enumerate([img_skimage_2, img_cv_2, img_pil_2]):
    ax = plt.subplot(1, 3, i + 1)
    ax.imshow(im)
    plt.pause(0.01)
# opencv 读取的图像为BGR
# 首先需要转为RGB
img_cv = cv2.cvtColor(img_cv, cv2.COLOR_BGR2RGB)
# 转torch.Tensor
tensor_cv = torch.from_numpy(img_cv)
# tensor转numpy
img_cv_2 = tensor_cv.numpy()
plt.figure()
plt.title('cv')
plt.imshow(img_cv_2)
plt.show()
