k8s安装详解
k8s安装
一、简介
 Kubernetes有两种方式,第一种是二进制的方式,可定制但是部署复杂容易出错;第二种是kubeadm工具安装,部署简单,不可定制化。本次我们部署kubeadm版.
 服务器配置至少是2G2核的。如果不是则可以在集群初始化后面增加 --ignore-preflight-errors=NumCPU
二、部署规划
1、部署系统版本
| 软件 | 版本 |
|---|---|
| CentOS | CentOS Linux release 7.7.1908 (Core) |
| Docker | 19.03.12 |
| Kubernetes | V1.19.1 |
| Flannel | V0.13.0 |
| Kernel-lm | kernel-lt-4.4.245-1.el7.elrepo.x86_64.rpm |
| Kernel-lm-devel | kernel-lt-devel-4.4.245-1.el7.elrepo.x86_64.rpm |
2、节点规划
| Hostname | Ip | 内核版本 |
|---|---|---|
| k8s-master-01 | 192.168.15.101 | 4.4.245-1.el7.elrepo.x86_64 |
| K8s-node-01 | 192.168.15.102 | 4.4.245-1.el7.elrepo.x86_64 |
| K8s-node-02 | 192.168.15.103 | 4.4.245-1.el7.elrepo.x86_64 |
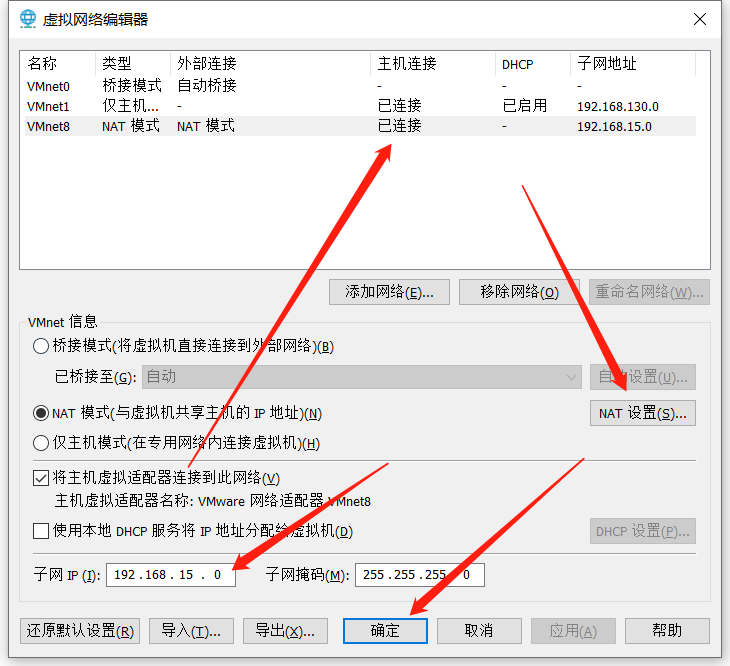
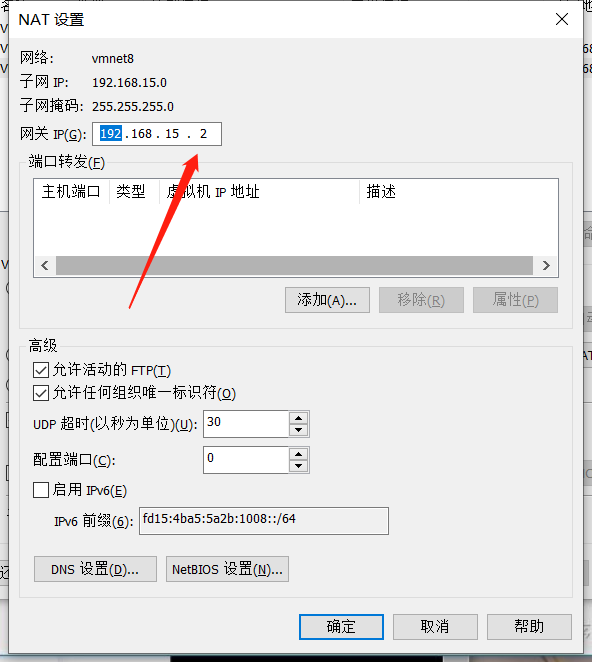
三、修改网络及三台主机
1、修改虚拟网络编辑器
2、克隆主机
192.168.15.101   k8s-m-01 m1
192.168.15.102   k8s-n-01 n1
192.168.15.103   k8s-n-02 n2
3、修改三台实例IP网关
vim /etc/sysconfig/network-scripts/ifcfg-eth0
内网eth1也要不同IP否则三台机器IP冲突。修改完成后重启网卡,ping http://baidu.com 查看网络是否畅通
4、重启网卡
systemctl restart network
四、修改主机名及解析(三台节点)
1、修改主机名
hostnamectl set-hostname k8s-master-01
2、添加host解析
[root@localhost ~]# vi /etc/hosts
192.168.11.101 k8s-master-01
192.168.11.102 k8s-node-01
五、系统优化
1、关闭selinux
# 永久关闭
sed -i 's#enforcing#disabled#g' /etc/selinux/config

#临时关闭
setenforce 0
2、关闭防火墙
systemctl disable --now firewalld
3、关闭swap分区
一旦触发swap,会导致系统性能急剧下降,所以一般情况下,K8S要求关闭swap分区。
swapoff -a
sed -i.bak 's/^.*centos-swap/#&/g' /etc/fstab
echo 'KUBELET_EXTRA_ARGS="--fail-swap-on=false"' > /etc/sysconfig/kubelet
4、配置国内yum源
默认情况下,CentOS使用的是官方yum源,所以一般情况下在国内使用是非常慢,所以我们可以替换成国内的一些比较成熟的yum源,例如:清华大学镜像源,网易云镜像源等等。
mv /etc/yum.repos.d/CentOS-Base.repo /etc/yum.repos.d/CentOS-Base.repo.backup
curl -o /etc/yum.repos.d/CentOS-Base.repo https://mirrors.aliyun.com/repo/Centos-7.repo
curl -o /etc/yum.repos.d/epel.repo http://mirrors.aliyun.com/repo/epel-7.repo

# 刷新缓存
yum makecache

# 更新系统
yum update -y --exclud=kernel*
5、升级系统内核
由于Docker运行需要较新的系统内核功能,例如ipvs等等,所以一般情况下,我们需要使用4.0+以上版本的系统内核。
yum localinstall -y kernel-lt*
grub2-set-default  0 && grub2-mkconfig -o /etc/grub2.cfg
grubby --default-kernel
# 重启
reboot
6、安装ipvs
ipvs是系统内核中的一个模块,其网络转发性能很高。一般情况下,我们首选ipvs。
# 安装IPVS
yum install -y conntrack-tools ipvsadm ipset conntrack libseccomp
# 加载IPVS模块
cat > /etc/sysconfig/modules/ipvs.modules <<EOF
#!/bin/bash
ipvs_modules="ip_vs ip_vs_lc ip_vs_wlc ip_vs_rr ip_vs_wrr ip_vs_lblc ip_vs_lblcr ip_vs_dh ip_vs_sh ip_vs_fo ip_vs_nq ip_vs_sed ip_vs_ftp nf_conntrack"
for kernel_module in \${ipvs_modules}; do
  /sbin/modinfo -F filename \${kernel_module} > /dev/null 2>&1
  if [ $? -eq 0 ]; then
    /sbin/modprobe \${kernel_module}
  fi
done
EOF

chmod 755 /etc/sysconfig/modules/ipvs.modules && bash /etc/sysconfig/modules/ipvs.modules && lsmod | grep ip_vs
7、内核参数优化
内核参数优化的主要目的是使其更适合kubernetes的正常运行。
cat > /etc/sysctl.d/k8s.conf << EOF
net.ipv4.ip_forward = 1
net.bridge.bridge-nf-call-iptables = 1
net.bridge.bridge-nf-call-ip6tables = 1
fs.may_detach_mounts = 1
vm.overcommit_memory=1
vm.panic_on_oom=0
fs.inotify.max_user_watches=89100
fs.file-max=52706963
fs.nr_open=52706963
net.ipv4.tcp_keepalive_time = 600
net.ipv4.tcp.keepaliv.probes = 3
net.ipv4.tcp_keepalive_intvl = 15
net.ipv4.tcp.max_tw_buckets = 36000
net.ipv4.tcp_tw_reuse = 1
net.ipv4.tcp.max_orphans = 327680
net.ipv4.tcp_orphan_retries = 3
net.ipv4.tcp_syncookies = 1
net.ipv4.tcp_max_syn_backlog = 16384
net.ipv4.ip_conntrack_max = 65536
net.ipv4.tcp_max_syn_backlog = 16384
net.ipv4.top_timestamps = 0
net.core.somaxconn = 16384
EOF

# 立即生效
sysctl --system
8、安装基础软件
安装一些基础软件,是为了方便我们的日常使用。
yum install wget expect vim net-tools ntp bash-completion ipvsadm ipset jq iptables conntrack sysstat libseccomp -y
9、安装docker
yum install -y yum-utils device-mapper-persistent-data lvm2
yum-config-manager --add-repo https://mirrors.aliyun.com/docker-ce/linux/centos/docker-ce.repo

yum install docker-ce-19.03.9 -y
sudo mkdir -p /etc/docker
sudo tee /etc/docker/daemon.json <<-'EOF'
{
  "registry-mirrors": ["https://8mh75mhz.mirror.aliyuncs.com"]
}
EOF
sudo systemctl daemon-reload ; systemctl restart docker;systemctl enable --now docker.service
10、同步集群时间
echo '#Timing synchronization time' >>/var/spool/cron/root #给定时任务加上注释
echo '0 */1 * * * /usr/sbin/ntpdate ntp1.aliyun.com &>/dev/null' >>/var/spool/cron/root  #设置定时任务
crontab -l #检查结果
六、安装k8s
1、安装kebenetes yum 源(所有节点都要装)
cat <<EOF > /etc/yum.repos.d/kubernetes.repo
[kubernetes]
name=Kubernetes
baseurl=https://mirrors.aliyun.com/kubernetes/yum/repos/kubernetes-el7-x86_64/
enabled=1
gpgcheck=1
repo_gpgcheck=1
gpgkey=https://mirrors.aliyun.com/kubernetes/yum/doc/yum-key.gpg https://mirrors.aliyun.com/kubernetes/yum/doc/rpm-package-key.gpg
EOF

setenforce 0

yum install -y kubelet kubeadm kubectl

systemctl enable kubelet && systemctl start kubelet
2、节点初始化
1)初始化master节点(仅在master节点上执行)
kubeadm init \
--image-repository=registry.cn-hangzhou.aliyuncs.com/k8sos \
--kubernetes-version=v1.18.8 \
--service-cidr=10.96.0.0/12 \
--pod-network-cidr=10.244.0.0/16
2)建立用户集群权限
mkdir -p $HOME/.kube
sudo cp -i /etc/kubernetes/admin.conf $HOME/.kube/config
sudo chown $(id -u):$(id -g) $HOME/.kube/config

#如果是root用户,则可以使用:
echo "export KUBECONFIG=/etc/kubernetes/admin.conf" >> ~/.bash_profile
source ~/.bash_profile
3)安装集群网络插件(flannel.yaml见附件)
[root@k8s-master-01 ~]# vim kube-flannel.yaml

---
apiVersion: policy/v1beta1
kind: PodSecurityPolicy
metadata:
  name: psp.flannel.unprivileged
  annotations:
    seccomp.security.alpha.kubernetes.io/allowedProfileNames: docker/default
    seccomp.security.alpha.kubernetes.io/defaultProfileName: docker/default
    apparmor.security.beta.kubernetes.io/allowedProfileNames: runtime/default
    apparmor.security.beta.kubernetes.io/defaultProfileName: runtime/default
spec:
  privileged: false
  volumes:
  - configMap
  - secret
  - emptyDir
  - hostPath
  allowedHostPaths:
  - pathPrefix: "/etc/cni/net.d"
  - pathPrefix: "/etc/kube-flannel"
  - pathPrefix: "/run/flannel"
  readOnlyRootFilesystem: false
  # Users and groups
  runAsUser:
    rule: RunAsAny
  supplementalGroups:
    rule: RunAsAny
  fsGroup:
    rule: RunAsAny
  # Privilege Escalation
  allowPrivilegeEscalation: false
  defaultAllowPrivilegeEscalation: false
  # Capabilities
  allowedCapabilities: ['NET_ADMIN', 'NET_RAW']
  defaultAddCapabilities: []
  requiredDropCapabilities: []
  # Host namespaces
  hostPID: false
  hostIPC: false
  hostNetwork: true
  hostPorts:
  - min: 0
    max: 65535
  # SELinux
  seLinux:
    # SELinux is unused in CaaSP
    rule: 'RunAsAny'
---
kind: ClusterRole
apiVersion: rbac.authorization.k8s.io/v1
metadata:
  name: flannel
rules:
- apiGroups: ['extensions']
  resources: ['podsecuritypolicies']
  verbs: ['use']
  resourceNames: ['psp.flannel.unprivileged']
- apiGroups:
  - ""
  resources:
  - pods
  verbs:
  - get
- apiGroups:
  - ""
  resources:
  - nodes
  verbs:
  - list
  - watch
- apiGroups:
  - ""
  resources:
  - nodes/status
  verbs:
  - patch
---
kind: ClusterRoleBinding
apiVersion: rbac.authorization.k8s.io/v1
metadata:
  name: flannel
roleRef:
  apiGroup: rbac.authorization.k8s.io
  kind: ClusterRole
  name: flannel
subjects:
- kind: ServiceAccount
  name: flannel
  namespace: kube-system
---
apiVersion: v1
kind: ServiceAccount
metadata:
  name: flannel
  namespace: kube-system
---
kind: ConfigMap
apiVersion: v1
metadata:
  name: kube-flannel-cfg
  namespace: kube-system
  labels:
    tier: node
    app: flannel
data:
  cni-conf.json: |
    {
      "name": "cbr0",
      "cniVersion": "0.3.1",
      "plugins": [
        {
          "type": "flannel",
          "delegate": {
            "hairpinMode": true,
            "isDefaultGateway": true
          }
        },
        {
          "type": "portmap",
          "capabilities": {
            "portMappings": true
          }
        }
      ]
    }
  net-conf.json: |
    {
      "Network": "10.244.0.0/16",
      "Backend": {
        "Type": "vxlan"
      }
    }
---
apiVersion: apps/v1
kind: DaemonSet
metadata:
  name: kube-flannel-ds
  namespace: kube-system
  labels:
    tier: node
    app: flannel
spec:
  selector:
    matchLabels:
      app: flannel
  template:
    metadata:
      labels:
        tier: node
        app: flannel
    spec:
      affinity:
        nodeAffinity:
          requiredDuringSchedulingIgnoredDuringExecution:
            nodeSelectorTerms:
            - matchExpressions:
              - key: kubernetes.io/os
                operator: In
                values:
                - linux
      hostNetwork: true
      priorityClassName: system-node-critical
      tolerations:
      - operator: Exists
        effect: NoSchedule
      serviceAccountName: flannel
      initContainers:
      - name: install-cni-plugin
        image: rancher/mirrored-flannelcni-flannel-cni-plugin:v1.0.0
        command:
        - cp
        args:
        - -f
        - /flannel
        - /opt/cni/bin/flannel
        volumeMounts:
        - name: cni-plugin
          mountPath: /opt/cni/bin
      - name: install-cni
        image: quay.io/coreos/flannel:v0.15.1
        command:
        - cp
        args:
        - -f
        - /etc/kube-flannel/cni-conf.json
        - /etc/cni/net.d/10-flannel.conflist
        volumeMounts:
        - name: cni
          mountPath: /etc/cni/net.d
        - name: flannel-cfg
          mountPath: /etc/kube-flannel/
      containers:
      - name: kube-flannel
        image: quay.io/coreos/flannel:v0.15.1
        command:
        - /opt/bin/flanneld
        args:
        - --ip-masq
        - --kube-subnet-mgr
        resources:
          requests:
            cpu: "100m"
            memory: "50Mi"
          limits:
            cpu: "100m"
            memory: "50Mi"
        securityContext:
          privileged: false
          capabilities:
            add: ["NET_ADMIN", "NET_RAW"]
        env:
        - name: POD_NAME
          valueFrom:
            fieldRef:
              fieldPath: metadata.name
        - name: POD_NAMESPACE
          valueFrom:
            fieldRef:
              fieldPath: metadata.namespace
        volumeMounts:
        - name: run
          mountPath: /run/flannel
        - name: flannel-cfg
          mountPath: /etc/kube-flannel/
      volumes:
      - name: run
        hostPath:
          path: /run/flannel
      - name: cni-plugin
        hostPath:
          path: /opt/cni/bin
      - name: cni
        hostPath:
          path: /etc/cni/net.d
      - name: flannel-cfg
        configMap:
          name: kube-flannel-cfg

[root@localhost ~]# kubectl apply -f kube-flannel.yaml
4)将工作节点加入集群(node节点)
kubeadm join 192.168.15.101:6443 --token 8so9xj.2p4jxtrjhxy18c8k \
	--discovery-token-ca-cert-hash sha256:8ec01e52a9540268568bd9808abd0d57dc920066e185a581dbc15460e86c189c
5)检查集群状态
## 第一种方式
[root@k8s-master-01 ~]# kubectl get nodes
NAME            STATUS   ROLES                  AGE     VERSION
k8s-master-01   Ready    control-plane,master   11m     v1.20.5
k8s-node-01     Ready    <none>                 3m13s   v1.20.5
k8s-node-02     Ready    <none>                 3m9s    v1.20.5


# 第二种方式
[root@k8s-master-01 ~]# kubectl get pods -n kube-system
NAME                                    READY   STATUS    RESTARTS   AGE
coredns-f68b4c98f-mmxkc                 1/1     Running   0          11m
coredns-f68b4c98f-nvp6b                 1/1     Running   0          11m
etcd-k8s-master-01                      1/1     Running   0          11m
kube-apiserver-k8s-master-01            1/1     Running   0          11m
kube-controller-manager-k8s-master-01   1/1     Running   0          11m
kube-flannel-ds-25kk5                   1/1     Running   0          4m49s
kube-flannel-ds-9zkkl                   1/1     Running   0          3m22s
kube-flannel-ds-sx57n                   1/1     Running   0          3m26s
kube-proxy-2gsrl                        1/1     Running   0          11m
kube-proxy-jkdbs                        1/1     Running   0          3m22s
kube-proxy-wqrc2                        1/1     Running   0          3m26s
kube-scheduler-k8s-master-01            1/1     Running   0          11m


# 第三种方式:直接验证集群DNS
[root@k8s-master-01 ~]# kubectl run test -it --rm --image=busybox:1.28.3
If you don't see a command prompt, try pressing enter.
/ # nslookup kubernetes
Server:    10.96.0.10
Address 1: 10.96.0.10 kube-dns.kube-system.svc.cluster.local

Name:      kubernetes
Address 1: 10.96.0.1 kubernetes.default.svc.cluster.local


【推荐】国内首个AI IDE,深度理解中文开发场景,立即下载体验Trae
【推荐】编程新体验,更懂你的AI,立即体验豆包MarsCode编程助手
【推荐】抖音旗下AI助手豆包,你的智能百科全书,全免费不限次数
【推荐】轻量又高性能的 SSH 工具 IShell:AI 加持,快人一步
· 无需6万激活码!GitHub神秘组织3小时极速复刻Manus,手把手教你使用OpenManus搭建本
· C#/.NET/.NET Core优秀项目和框架2025年2月简报
· 什么是nginx的强缓存和协商缓存
· 一文读懂知识蒸馏
· Manus爆火,是硬核还是营销?