
WPF—路由事件
路由:起点与终点间有若干个中转站,从起点出发经过每个中转站时要做出选择,最终以正确(如:最短或最快)的路径到达终点。
Windows操作系统:一种消息驱动的操作系统,程序是由消息驱动,程序运行也需要把自己的消息系统与操作系统的消息系统“连通”才能被执行和响应。事件的前身就是消息(Message)
WPF中两种“树”:一种逻辑树(Logical Tree);一种可视元素树(Visual Tree)。把Logical Tree延伸至Template组件级别,得到的是Visual Tree。两种“树”的区别在于:LogicalTree的叶子节点是构成用户界面的空间,而VisualTree要连控件中的细微结构也算上。
Logical Tree可以借助LogicalTreeHelper类中static方法导航或查找元素:
BringIntoView:把选定元素带进用户可视区域(经常用于可滚动视图)
FindLogicalNode:按给的名称查找元素
GetChildren:获取所有直接子集元素
GetParent:获取直接父级元素。
Visual Tree借助VisualTreeHelper类的static方法实现。
微软把消息机制封装成事件模型。事件模型隐藏了消息机制的很多细节,消息驱动机制在事件模型中被简化为3个关键点:
1.事件拥有者:消息的发送者。事件的宿主可以在某些条件下激发它拥有的事件,即事件的被触发。事件被触发则消息被发送
2.事件的响应者:消息的接收者、处理者。事件接收者使用其事件处理器(Event Handler)对事件做出响应。
3.事件的订阅关系:事件的拥有者可以随时激发事件,但是事件发生后会不会得到响应要看有没有事件的响应者,或者事件有没有被关注。如果对象A关注对象B的某个事件是否发生,则称A订阅了B的事件。事件实际是一个使用event关键字修饰的委托(Delegate)类型成员变量,事件处理器则是一个函数,即A订阅了B的事件,本质上是让B.Event与A.EventHandler关联起来。所谓事件激发就是B.Event被调用,这时,与其关联的A.EventHandler会被调用。
路由事件和直接事件的区别:直接事件激发时,发送者直接将消息通过事件订阅交送给事件响应者,事件响应者使用其事件处理器方法对事件的发生做出响应。驱动程序逻辑按客户需求运行;路由事件的事件拥有者和事件响应者之间没有直接显式的订阅关系,事件的拥有者只负责激发事件,事件将由谁响应它并不知道,事件的响应者则安装有事件监听器,针对某类事件监听,当有此类事件传送至,此时事件响应者就使用事件处理器来响应事件并决定事件是否可以继续传递。
以Button的Click事件说明路由事件的使用:
XAML代码:
<Window x:Class="SimpleRoutedTest.MainWindow"
xmlns="http://schemas.microsoft.com/winfx/2006/xaml/presentation"
xmlns:x="http://schemas.microsoft.com/winfx/2006/xaml"
xmlns:d="http://schemas.microsoft.com/expression/blend/2008"
xmlns:mc="http://schemas.openxmlformats.org/markup-compatibility/2006"
xmlns:local="clr-namespace:SimpleRoutedTest"
mc:Ignorable="d"
Title="SimpleRouted" Height="350" Width="525">
<Grid x:Name="gridRoot" Background="AliceBlue" >
<Grid x:Name="gridA" Margin="10" Background="Blue">
<Grid.ColumnDefinitions>
<ColumnDefinition/>
<ColumnDefinition/>
</Grid.ColumnDefinitions>
<Canvas x:Name="canvasLeft" Grid.Column="0" Background="Red" Margin="10">
<Button x:Name="buttonLeft" Content="Left" Click="buttonLeft_Click" Width="40" Height="100" Margin="10"/>
</Canvas>
<Canvas x:Name="canvasRight" Grid.Column="1" Background="Yellow" Margin="10">
<Button x:Name="buttonRight" Content="Right" Width="40" Height="100" Margin="10"/>
</Canvas>
</Grid>
</Grid>
</Window>
运行结果: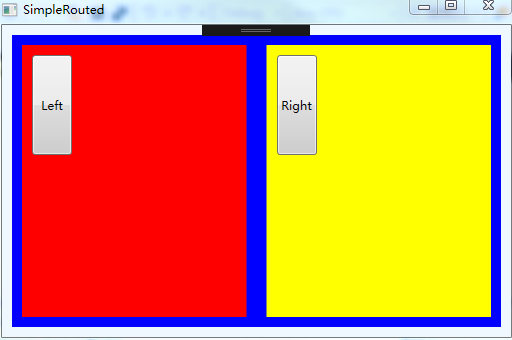
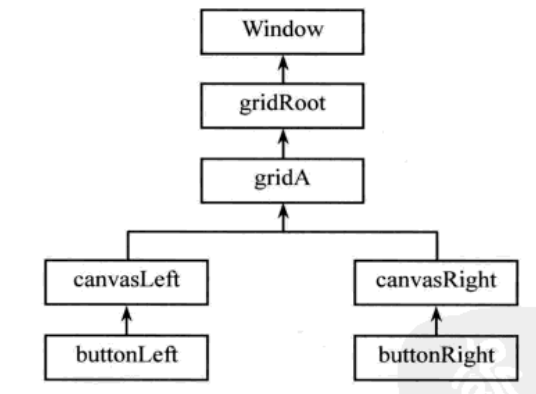
单击buttonleft时,Button.Click事件会沿着buttonLeft->canvasLeft->gridA->gridRoot->Window路线向上传送;单击buttonRight时,Button.Click事件沿着buttonRight->canvasRight->gridA->gridRoot->Window路线向上传送。因为没有设置具体空间监听Button.Click事件,所有单击按钮后事件传递,但是没有响应。为girdRoot安装针对Button.Click事件的监听器
后台代码:
public MainWindow()
{
InitializeComponent();
this.gridRoot.AddHandler(Button.ClickEvent, new RoutedEventHandler(this.buttonLeft_Click));//第二个参数为一个RoutedEventHandler类型的Delegate的实例
}
private void buttonLeft_Click(object sender, RoutedEventArgs e)
{
MessageBox.Show((e.OriginalSource as FrameworkElement).Name);
}
AddHandler方法源自UIElement类,即所有UI空间都具有这个方法。
WPF事件系统使用与属性系统类似的“静态字段->包装器”的策略。路由事件本身是一个RoutedEvent类型的静态成员变量(Button.ClickEvent),Button还有一个与之对应的Click事件(CLR包装)专门用于对外界暴露这个事件。
自定义路由事件:
三个步骤:
(1)声明并注册路由事件
(2)为路由事件添加CLR事件包装
(3)创建可以激发路由事件的方法
定义路由事件与定义依赖属性的手法相似——声明一个public static readonly修饰的RoutedEvent类型字段,然后使用EventManager类的RegisterRoutedEvnet方法进行注册。
为路由事件添加CLR事件包装是为了把路由事件暴露像一个传统的直接事件(如果不关注底层实现,不会感觉到与传统直接事件的区别,仍然可以用操作费“+=”为事件添加处理器和使用操作符“-=”移除不再使用的事件处理器)。为路由事件添加CLR事件包装的代码与使用CLR属性包装依赖属性的代码格式相似,只是get和set被替换为add和remove。
激发路由事件,首先创建需要让事件携带的消息(RoutedEventArgs类的实例)并把它与路由事件关联,然后调用元素的RaiseEvent方法(继承自UIElement类)把事件发送出去。
完整的注册代码如下:
public static readonly RoutedEvent ClickEvent = EventManager.RegisterRoutedEvent
("Click", RoutingStrategy.Bubble, typeof(RoutedEventHandler), typeof(ButtonBase));
第一个参数为事件名称,string类型
第二个参数为路由事件策略,WPF有3种路由策略
1.Bubble,冒泡式:路由事件由事件的激发着出发向它的上级容器一层一层路由,直至最外层容器(Window或Page)
2.Tunnel,隧道式:与Bubble相反,由UI树的树根向事件激发空间移动
3.Direct,直达式:模仿CLR直接事件,直接将消息传送到事件处理器
第三个参数用于指定事件处理器的类型。事件处理器的返回值类型和参数列表必须与此参数指定的委托保持一致,
第四个参数用于指定路由事件的宿主类型
实例:
首先创建一个RoutedEventArgs类的派生类,并添加ClickTime属性:
public class ReportTimeEventArgs:RoutedEventArgs
{
public ReportTimeEventArgs(RoutedEvent routedEvent,object source) : base(routedEvent, source) { }
public DateTime ClickTime { get; set; }
}
创建button派生类,添加路由事件:
public class TimeButton : Button
{
public static readonly RoutedEvent ReportTimeEvent = EventManager.RegisterRoutedEvent
("ReportTime", RoutingStrategy.Bubble, typeof(EventHandler<ReportTimeEventArgs>), typeof(TimeButton));
public event RoutedEventHandler ReportTime
{
add { this.AddHandler(ReportTimeEvent, value); }
remove { this.RemoveHandler(ReportTimeEvent, value);}
}
protected override void OnClick()
{
base.OnClick();
ReportTimeEventArgs args = new ReportTimeEventArgs(ReportTimeEvent, this);
args.ClickTime = DateTime.Now;
this.RaiseEvent(args);
}
}
xaml代码如下:
<Window x:Class="SimpleRoutedEventTest.MainWindow"
xmlns="http://schemas.microsoft.com/winfx/2006/xaml/presentation"
xmlns:x="http://schemas.microsoft.com/winfx/2006/xaml"
xmlns:d="http://schemas.microsoft.com/expression/blend/2008"
xmlns:mc="http://schemas.openxmlformats.org/markup-compatibility/2006"
xmlns:local="clr-namespace:SimpleRoutedEventTest"
mc:Ignorable="d"
x:Name="window_1"
Title="RoutedEventTest" Height="350" Width="525"
local:TimeButton.ReportTime="ReportTimeHandler">
<Grid x:Name="grid_1" local:TimeButton.ReportTime="ReportTimeHandler">
<Grid x:Name="grid_2" local:TimeButton.ReportTime="ReportTimeHandler">
<Grid x:Name="grid_3" local:TimeButton.ReportTime="ReportTimeHandler">
<StackPanel x:Name="stackPanel_1" local:TimeButton.ReportTime="ReportTimeHandler">
<ListBox FontSize="20" Height="100" x:Name="listBox"/>
<local:TimeButton x:Name="timeBtton" Width="80" Height="80" Content="报时" local:TimeButton.ReportTime="ReportTimeHandler"/>
</StackPanel>
</Grid>
</Grid>
</Grid>
</Window>
在窗口类中添加ReportTimeHandler方法:
private void ReportTimeHandler(object sender, ReportTimeEventArgs e)
{
FrameworkElement element = sender as FrameworkElement;
string timeStr = e.ClickTime.ToLongTimeString();
string content = string.Format("{0}到达{1}", timeStr, element.Name);
this.listBox.Items.Add(content);
if(element==this.grid_2)
{
e.Handled = true;
}
}
可以把TimeReportEvent的策略改为Tunnel。
如何让一个路由事件在某个节点出不再传递:路由事件携带的事件参数必须是RoutedEventArgs类或其派生类的实例,RoutedEventArgs类具有一个bool类型的属性Handled,如果设为true,表示路由事件“已经被处理”,就不会继续传递。
路由事件小结:
1.很多类的事件都是路由事件,如TexBox的TextChanged事件,Binding类的SourceUpdated事件等,所有在用到这些类型的时候不要墨守成规.NET编程的习惯,要发货自己的想象力,让程序结构更加合理,代码更加简洁。
2.路由事件虽好,但也不要乱用(如果让所有Button的Click事件都传递到最外层床头,让窗体捕捉处理,那程序结构变得毫无意义。正确方法是,事件该由谁来捕捉处理,传到这个地方时就该处理掉)
RoutedEventArgs的Source与OriginalSource
RoutedEventArgs有两个属性Source和OriginalSource,表示路由事件传递的起点,Source表示LogicalTree上的消息源头,OriginalSource表示VisualTree上的源头。
实例:首先新建一个工程,右键工程添加用户控件(UserControl),XAML代码如下:
<UserControl x:Class="SourceAndOriginalSource.MyUserControl"
             xmlns="http://schemas.microsoft.com/winfx/2006/xaml/presentation"
             xmlns:x="http://schemas.microsoft.com/winfx/2006/xaml"
             xmlns:mc="http://schemas.openxmlformats.org/markup-compatibility/2006"
             xmlns:d="http://schemas.microsoft.com/expression/blend/2008"
             xmlns:local="clr-namespace:SourceAndOriginalSource"
             mc:Ignorable="d"
             d:DesignHeight="300" d:DesignWidth="300">
    <Border BorderBrush="Orange" BorderThickness="3" CornerRadius="10">
        <Button x:Name="innerButton" Width="80" Height="80" Content="OK"/>
    </Border>
</UserControl>
然后把UserControl添加到主窗口中:
<Window x:Class="SourceAndOriginalSource.MainWindow"
        xmlns="http://schemas.microsoft.com/winfx/2006/xaml/presentation"
        xmlns:x="http://schemas.microsoft.com/winfx/2006/xaml"
        xmlns:d="http://schemas.microsoft.com/expression/blend/2008"
        xmlns:mc="http://schemas.openxmlformats.org/markup-compatibility/2006"
        xmlns:local="clr-namespace:SourceAndOriginalSource"
        mc:Ignorable="d"
        Title="MainWindow" Height="350" Width="525">
    <Grid>
        <local:MyUserControl x:Name="myUserControl" Margin="10"/>
    </Grid>
</Window>
后台代码中为主题窗口添加对Button.Click路由事件的监听:
 public partial class MainWindow : Window
    {
        public MainWindow()
        {
            InitializeComponent();
        //为主窗体添加对Button.Click事件的监听
            this.AddHandler(Button.ClickEvent, new RoutedEventHandler(this.Button_Click));//第二个参数为一个RoutedEventHandler类型的Delegate的实例
        }

      //路由事件处理
        private void Button_Click(object sender,RoutedEventArgs e)
        {
            string strOriginalSource = string.Format("VisualTree start point:{0},type is{1}",
                (e.OriginalSource as FrameworkElement).Name, e.OriginalSource.GetType().Name);
            string strSource = string.Format("LogicalTree start point:{0},type is{1}",
                (e.Source as FrameworkElement).Name, e.Source.GetType().Name);
            MessageBox.Show(strOriginalSource + "\r\n" + strSource);
        }
    }
Button.Click路由事件是从MyUserControl的innerButton发出来的,在主窗口中,myUserContro是LogicalTree的末端节点,所有e.Source就是myUserControl;而窗体的VisualTree则包含了myUserControl的内部结构,所有使用e.OriginalSource可以获得innerButton。
附加事件:
拥有附加事件的类:
1.Binding类:SourceUpdated事件,TargetUpdated事件
2.Mouse类:MouseEnter事件,MouseLeave事件、MouseDown事件、MouseUp事件等
3.Keyboard类:KeyDown事件、KeyUp事件等
路由事件的宿主都是拥有可视化实体的界面元素,而附加事件则不具备显示在用户界面上的能力。
实例:设计一个Student类,如果Student实例的Name属性值发生了变化就激发一个路由事件,使用界面元素捕捉这个事件
 public class Student
    {
        public static readonly RoutedEvent NameChangedEvent = EventManager.RegisterRoutedEvent
            ("NameChanged", RoutingStrategy.Bubble, typeof(RoutedEventHandler), typeof(Student));

        public int Id { get; set; }
        public string Name { get; set; }

     }
XAML界面:
<Window x:Class="AttachEventTest.MainWindow"
        xmlns="http://schemas.microsoft.com/winfx/2006/xaml/presentation"
        xmlns:x="http://schemas.microsoft.com/winfx/2006/xaml"
        xmlns:d="http://schemas.microsoft.com/expression/blend/2008"
        xmlns:mc="http://schemas.openxmlformats.org/markup-compatibility/2006"
        xmlns:local="clr-namespace:AttachEventTest"
        mc:Ignorable="d"
        Title="MainWindow" Height="350" Width="525">
    <Grid x:Name="gridMain" Margin="5" Background="AliceBlue">
        <Button x:Name="button1" Content="OK" Width="80" Height="100" Click="button1_Click"/>
    </Grid>
</Window>
后台代码:
public partial class MainWindow : Window
    {
        public MainWindow()
        {
            InitializeComponent();

            this.gridMain.AddHandler(Student.NameChangedEvent,new RoutedEventHandler(this.StudentNameChangedHandler));
        }

        private void button1_Click(object sender, RoutedEventArgs e)
        {
            Student stu = new Student() { Id = 101, Name = "Tim" };
            stu.Name = "Tom";
            RoutedEventArgs arg = new RoutedEventArgs(Student.NameChangedEvent, stu);
            this.button1.RaiseEvent(arg);
        }

        private void StudentNameChangedHandler(object sender,RoutedEventArgs e)
        {
            MessageBox.Show((e.OriginalSource as Student).Id.ToString());
        }
    }
Button被单击后触发Button_Click方法。但是Student不是UIElement派生类,不具有RaiseEvent方法。在窗体构造器中为Grid元素添加了对Student.NameChangedEvent的监听,与添加对路由事件的监听没有区别。
微软官方稳定约定需要给附加事件添加一个CLR包装以便XAML编辑器识别并进行智能提示。微软规定
1.为目标UI元素添加附加事件监听器的包装器是一个名为Add*Handler的public static方法,星号代表事件名称(与注册事件时的名称一致)。此方法接收两个参数,第一个为事件的监听者(DependencyObject类型),第二个参数是事件的处理器(RoutedEventHandler委托类型)
2.解除UI元素对附加事件监听的包装器是名为Remove*Handler的public static方法,星号为事件名称,参数与Add*Handler相同
则Student类变为:
 public class Student
    {
        public static readonly RoutedEvent NameChangedEvent = EventManager.RegisterRoutedEvent
            ("NameChanged", RoutingStrategy.Bubble, typeof(RoutedEventHandler), typeof(Student));

        public int Id { get; set; }
        public string Name { get; set; }

        public static void AddNameChangedHandler(DependencyObject d,RoutedEventHandler h)
        {
            UIElement e = d as UIElement;
            if(e!=null)
            {
                e.AddHandler(Student.NameChangedEvent, h);
            }
        }

        public static void RemoveNameChangedHandler(DependencyObject d,RoutedEventHandler h)
        {
            UIElement e = d as UIElement;
            if(e!=null)
            {
                e.RemoveHandler(Student.NameChangedEvent, h);
            }
        }
    }
窗口类的初始化变为:
public MainWindow()
        {
            InitializeComponent();

            //this.gridMain.AddHandler(Student.NameChangedEvent,new RoutedEventHandler(this.StudentNameChangedHandler));
            Student.AddNameChangedHandler(this.gridMain, new RoutedEventHandler(this.StudentNameChangedHandler));//第二个参数为一个RoutedEventHandler类型的Delegate的实例
        }
UIElement类是路由事件宿主与附加事件宿主的分水岭,不单身因为从UIElement类开始才具备了在界面上显示的能力,还因为RaiseEvent、AddHandler和RemoveHandler这些方法也定义在UIElement类中。因此,如果在一个非UIElement派生类中注册路由事件,则这个类的实例既不能自己激发(Raise)此路由事件也无法自己监听此路由事件,只能把这个事件的激发“附着”在某个具有RaiseEvent方法的对象上,借助这个对象的RaiseEvent方法把事件发送出去;事件的监听任务也只能交给别的对象去做。总是,附加事件算是路由事件的一种用法而非一个新概念。
总结
1.像Button.Click这些路由事件,因为事件宿主是界面元素,本身就是UI树上的一个节点,所有路由时的第一站就是事件激发者;附加事件宿主不是UIElement派生类,所有不能出现在UI树上的节点,而且附加事件的激发是借助UI元素实现的,因此,附加事件路由时第一站是激发它的元素
2.附加事件一般定义在像Binding、Mouse、Keyboard这种全局Helper类中。如果程序架构设计的好(使用数据驱动UI),那么业务逻辑一点会使用Binding对象与UI元素关联,一旦与业务逻辑相关对象实现了INotifyPropertyChanged借口并且Binding对象的NotifyOnSourceUpdated属性设置为true,则Binding就会激发SourceUpdated附加事件,此事件会在UI元素树上路由并被监听者捕获
摘抄自《WPF深入浅出》第八章。
