http服务配置和apache
# grep "Section" /etc/httpd/conf/httpd.conf
### Section 1: Global Environment 全局环境
### Section 2: 'Main' server configuration 主服务器的配置(建立一个网站)
### Section 3: Virtual Hosts 虚拟主机的配置
ServerTokens Major|Minor|Min[imal]|Prod[uctOnly]|OS|Full
ServerTokens Prod[uctOnly] :Server: Apache
ServerTokens Major: Server: Apache/2
ServerTokens Minor: Server: Apache/2.0
ServerTokens Min[imal]: Server: Apache/2.0.41
ServerTokens OS: Server: Apache/2.0.41 (Unix)
ServerTokens Full (or not specified): Server: Apache/2.0.41
This setting applies to the entire server and cannot be
enabled or disabled on a virtualhost-by-virtualhost basis.
After version 2.0.44, this directive also controls the
information presented by the ServerSignature directive.
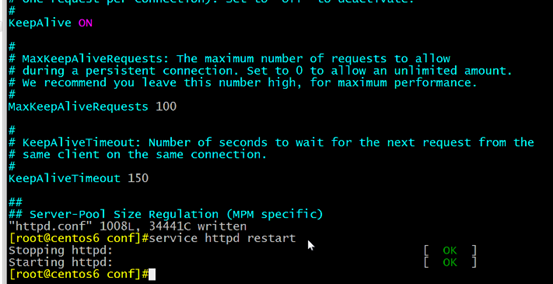
Persistent Connection :连接建立,每个资源获取完成后不会
时间 限制, :以秒为单位, httpd-2.4 支持毫秒级
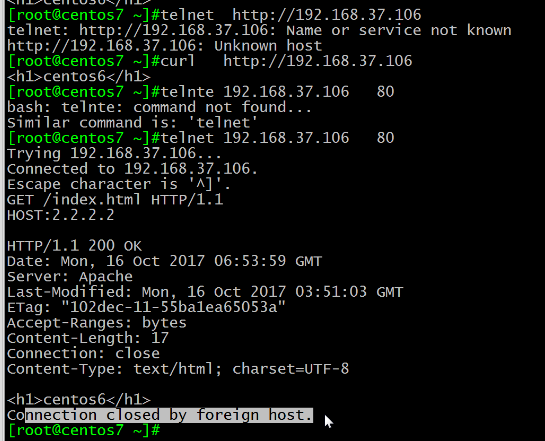
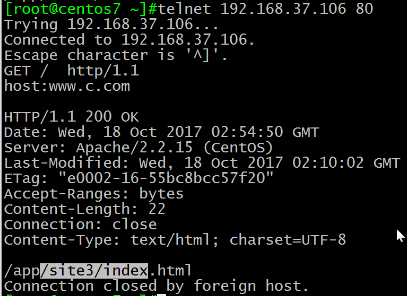
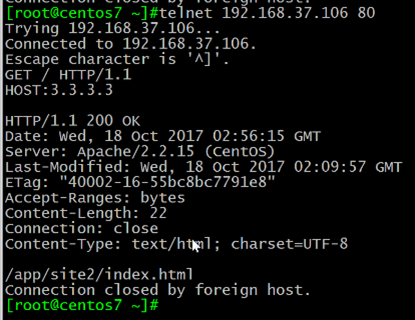
测试: : telnet WEB_SERVER_IP PORT
4 、MPM( ( Multi-Processing Module )多路处理模块
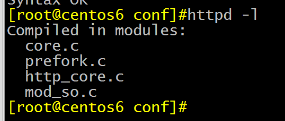
httpd-2.2 不支持同时编译多个模块,所以只能编译时选
定一个;rpm 安装的包提供三个二进制程序文件,分别用于实现
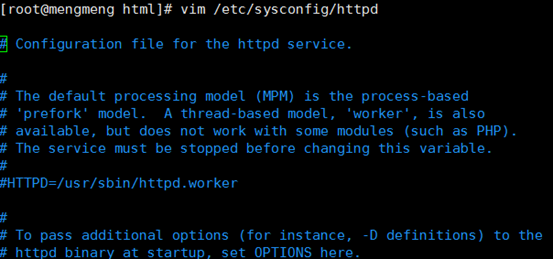
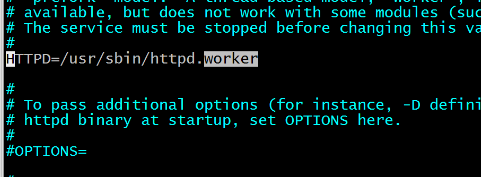
默认为/usr/sbin/httpd, 即prefork 模式
将本来注释掉的HTTPD WORKER模式 将注释去掉,重启服务生效
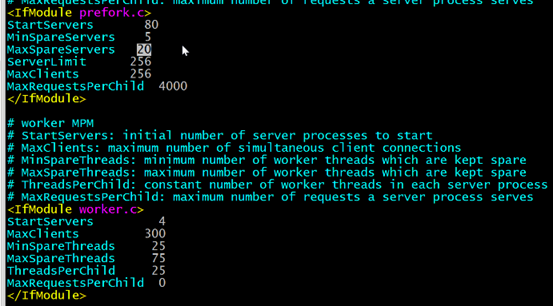
配置文件:/etc/httpd/conf.modules.d/00-mpm.conf
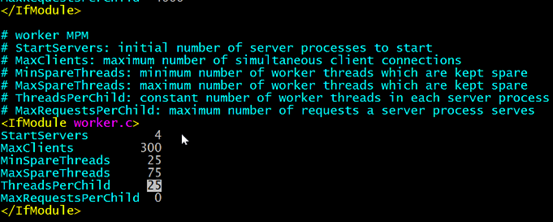
ServerLimit 256 最多进程数, 最大20000
MaxRequestsPerChild 4000 子进程最多能处理的请求
数量。在处理MaxRequestsPerChild 个请求之后, 子进程将
会被父进程终止,这时候子进程占用的内存就会释放( 为0时 时
5 、DSO: : Dynamic Shared Object
LoadModule <mod _name> <mod_path>
相对于ServerRoot (默认/etc/httpd) )
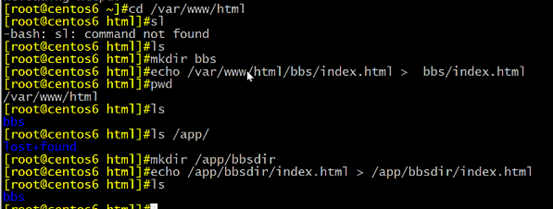
DocumentRoot 指向的路径为URL 路径的起始位置
http://HOST:PORT/test/index.html
DirectoryIndex index.html index.html.var
<FilesMatch "\.(gif|jpe?g|png)$">
<LocationMatch "/(extra|special)/data">
9 、<Directory> 中"基于源地址"实现访问控制
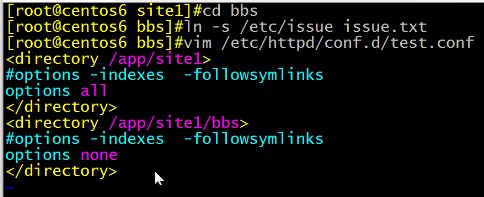
(1) Options :后跟1 个或多个以空白字符分隔的选项列表
Indexes :指明的URL 路径下不存在与定义的主页面资源

FollowSymLinks :允许访问符号链接文件所指向的源文件

Options Indexes FollowSymLinks
Options Indexes FollowSymLinks
.htaccess (由AccessFileName 指定)文件中,覆盖之前的
AllowOverride None :.htaccess 文件无效
AllowOverride AuthConfig Indexes 除了AuthConfig

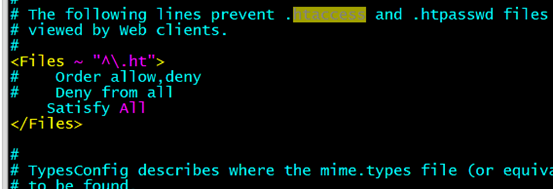
order :定义生效次序;写在后面的表示默认法则(冲突的情况下,后面的优先;不冲突的情况下,都 生效)

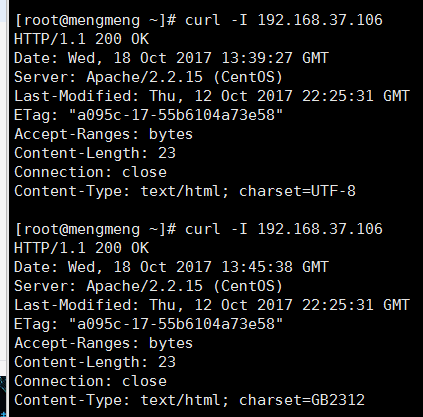
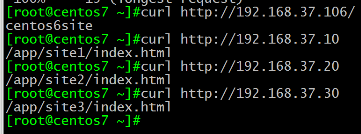
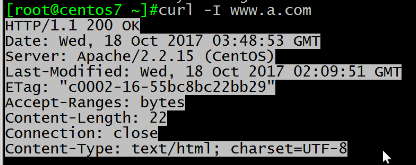
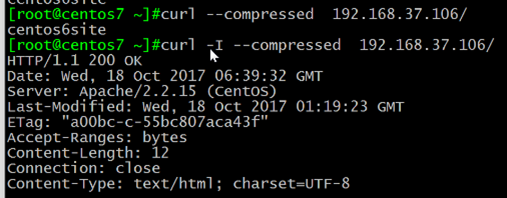
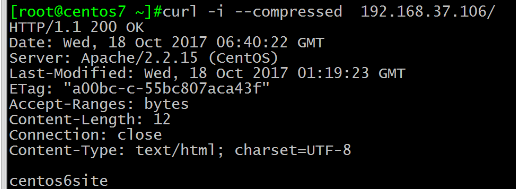
curl 192.168.37.106/test.html curl+ip地址 :测试该网段的服务
debug, info, notice, warn,error
定义 日志格式:LogFormat format strings
LogFormat "%h %l %u %t \"%r\" %>s %b
\"%{Referer}i\" \"%{User-Agent}i\"" combined
CustomLog logs/access_log combined
http://httpd.apache.org/docs/2.2/mod/mod_log_config
%l 远程用户, 启用mod_ident 才有效,通常为减号"-" "
%u 验证(basic ,digest )远程用户, 非登录访问时,为
• %r First line of request ,即表示请求报文的首行;记录了
• %b 响应报文的大小,单位是字节;不包括响应报文http 首部
• %{Referer}i 请求报文中首部"referer" 的值;即从哪个页
• %{User-Agent}i 请求报文中首部"User-Agent" 的值;即

http://www.magedu.com/download/bash.rpm
==>/www/htdocs/download/bash.rpm
http://www.magedu.com/download/bash.rpm
http://www.magedu.com/images/logo.png
==>/www/htdocs/images/logo.png
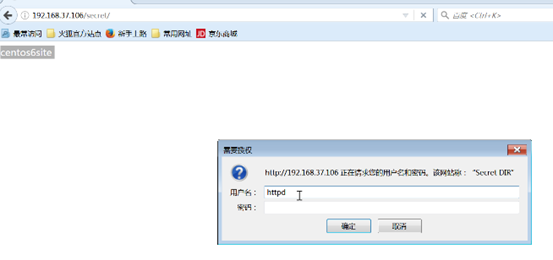
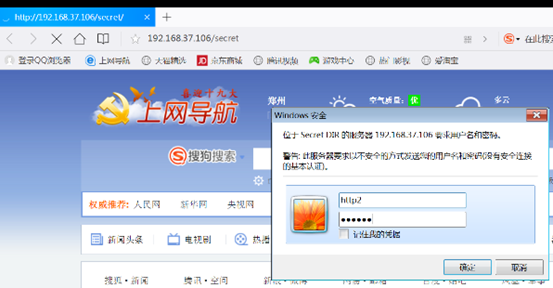
认证质询:WWW-Authenticate :响应码为401 ,拒绝客户端
认证:Authorization :客户端用户填入账号和密码后再次发送
安全域:需要用户认证后方能访问的路径;应该通过名称对其进
存储:文本文件,SQL 数据库,ldap 目录存储,nis等 等
<Directory "/path">(文件夹名称)
AuthType Basic(用什么认证方法)
AuthName "String"(描述用户密码干嘛用的)
AuthUserFile "/PATH/HTTPD_USER_PASSWD_FILE"(路径)
Require user username1 username2 ...

htpasswd [options] /PATH/HTTPD_PASSWD_FILE username
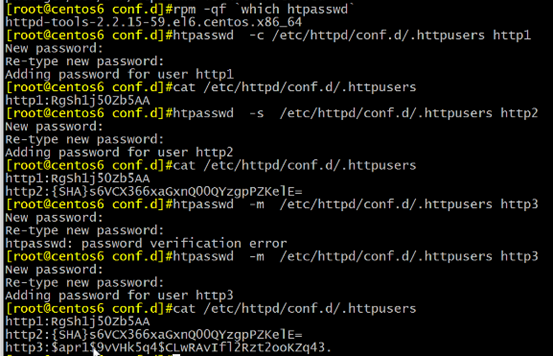

AuthUserFile "/PATH/HTTPD_USER_PASSWD_FILE"
AuthGroupFile "/PATH/HTTPD_GROUP_FILE"
Require group grpname1 grpname2 ...

GRP_NAME: username1 username2 ...
<Directory "/www/htdocs/admin">
AuthName "Administator private"
AuthUserFile "/etc/httpd/conf.d/.htpasswd"
AuthGroupFile "/etc/httpd/conf.d/.htgroup"
vim /etc/httpd/conf.d/.htgroup
注意:一般虚拟机不要与main 主机混用;因此,要使用虚拟主机,
DocumentRoot "/www/a.com/htdocs"
DocumentRoot "/www/b.net/htdocs"
DocumentRoot "/www/c.org/htdocs"
DocumentRoot "/www/a.com/htdocs"
<VirtualHost 172.16.100.6:808>
DocumentRoot "/www/b.net/htdocs"
<VirtualHost 172.16.100.6:8080>
DocumentRoot "/www/c.org/htdocs"
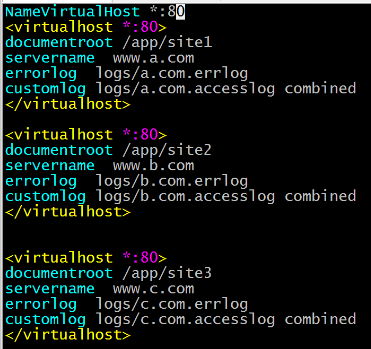
NameVirtualHost *:80 httpd2.4 不需要此指令
DocumentRoot "/www/a.com/htdocs"
DocumentRoot "/www/b.net/htdocs"
DocumentRoot "/www/c.o rg/htdocs"
LoadModule status_module modules/mod_status.so
http/0.9, http/1.0, http/1.1, http/2.0
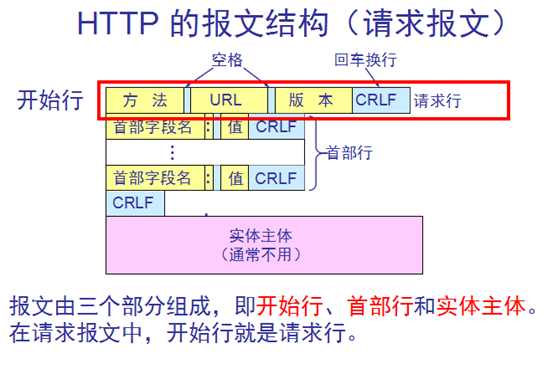
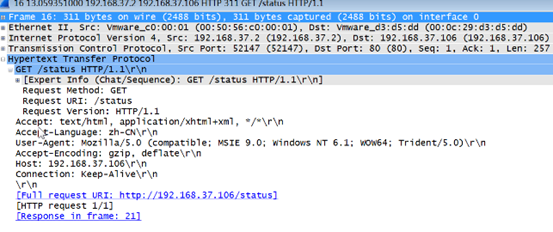
<method> <request-URL> <version>
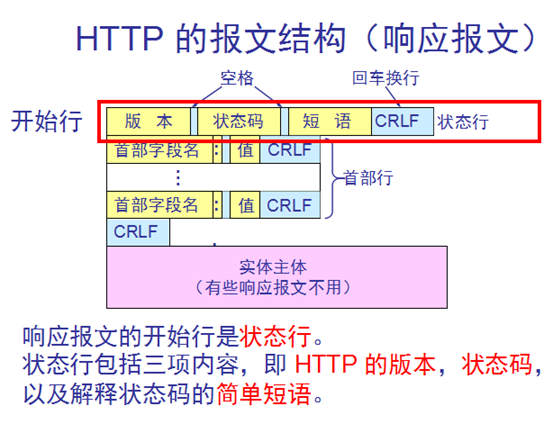
<version> <status> <reason-phrase>
method: 请求方法,标明客户端希望服务器对资源执行的动作
三位数字,如200 ,301, 302, 404, 502; 标记请求处
entity-body :请求时附加的数据或响应时附加的数据
OPTIONS :请求服务器返回对指定资源支持使用的请求方法
200: : 成功,请求数据通过响应报文的entity-body 部分发送;OK
301: : (永久的重定向) 请求的URL 指向的资源已经被删除;但在响应报文中通过首部
Location 指明了资源现在所处的新位置;Moved Permanently
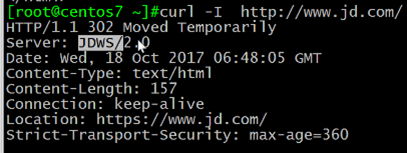
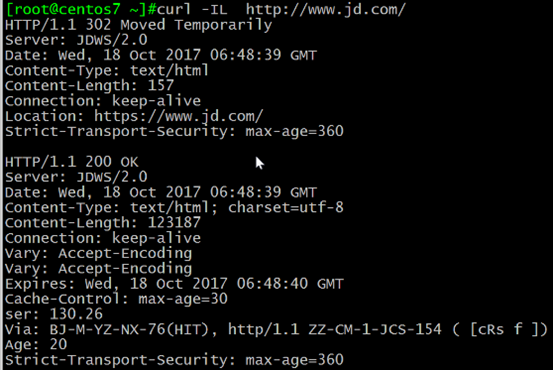
302: : (暂时的重定向 ) 响应报文Location置 指明资源临时新位置 Moved Temporarily
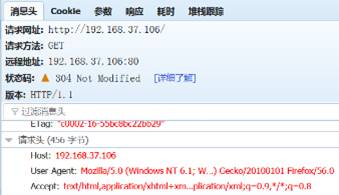
304: :(服务器端没变化,客户端利用缓存就行) 客户端发出了条件式请求,但服务器上的资源未曾发生改变
,则通过响应此响应状态码通知客户端;Not Modified
401: : 需要输入账号和密码认证方能访问资源;Unauthorized
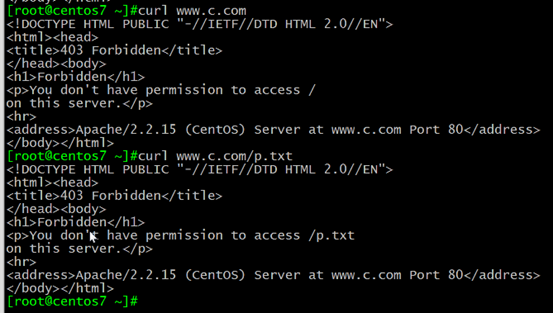
403: : (权限拒绝)请求被禁止;Forbidden
404: :(访问的资源不存在) 服务器无法找到客户端请求的资源;Not Found
500: : 服务器内部错误;Internal Server Error
502: : 代理服务器从后端服务器收到了一条伪响应,如无法连接到
503 – 服务器不可用,临时服务器维护或过载,服务器无法处理请求
Request URL:http://www.magedu.com/
Remote Address:101.200.188.230:80
Content-Type:text/html; charset=UTF-8
Date:Sun, 29 Jan 2017 14:32:30 GMT
X-Pingback:http://www.magedu.com/xmlrpc.php
Accept:text/html,application/xhtml+xml,application/xml;q=0.9,image/webp,*/*;q=0
Accept-Encoding:gzip, deflate, sdch
Accept-Language:zh-CN,zh;q=0.8
Cookie:53gid2=10104634518015; 53gid0=10104634518015;
53gid1=10104634518015; 53revisit=1485699843851; 53uvid=1;
onliner_zdfq72145423=0; CNZZDATA1260642320=1664910013-1485697454-
%7C1485697454; visitor_type=old; 53kf_72145423_keyword=;
Hm_lvt_4a78dc1643884da1c990c4c878832e70=1485699844;
Hm_lpvt_4a78dc1643884da1c990c4c878832e70=1485700088
User-Agent:Mozilla/5.0 (Windows NT 10.0; Win64; x64) AppleWebKit/537.36
(KHTML, like Gecko) Chrome/56.0.2924.76 Safari/537.36
Connection :连接状态,如keep-alive, close
Accept-Encoding :客户端可接受编码格式,如gzip
If-Modified-Since :自从指定的时间之后,请求的资源是否
If-None-Match :本地缓存中存储的文档的ETag 标签是否与
Authorization :向服务器发送认证信息,如账号和密码
WWW-Authenticate :来自服务器对客户端的质询列表
curl 是基于URL 语法在命令行方式下工作的文件传输工具,它
支持FTP, FTPS, HTTP, HTTPS, GOPHER, TELNET,
DICT, FILE 及LDAP 等协议。curl 支持HTTPS 认证,并且支持
HTTP 的POST 、PUT, 等方法, FTP, 上传, kerberos 认证,
HTTP 上传,代理服务器,cookies ,用户名/, 密码认证, 下载文
件断点续传,上载文件断点续传, http( 代理服务器管道( proxy
tunneling ),还支持IPv6 ,socks5 代理服务器,通过http 代理
-A/--user-agent <string> 设置用户代理发送给服务器
-k/--insecure 行 允许忽略证书进行 SSL 连接
-H/--header <line> 自定义首部信息传递给服务器
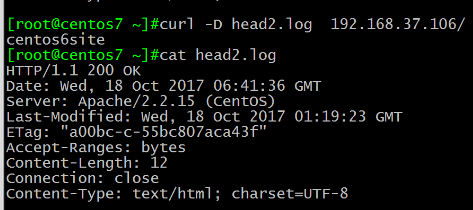
-D/--dump-header <file> 将url 的header 信息存放在指定文件中
-u/--user <user[:password]> 设置服务器的用户和密码
-c/--cookie-jar <file name> 将url 中cookie 存放在指定文件中
-x/--proxy <proxyhost[:port]> 指定代理服务器地址
-X/--request <command> 向服务器发送指定请求方法
-U/--proxy-user <user:password> 代理服务器用户和密码
-b name=data 从服务器响应set-cookie 得到值,返回给服务器
(1) 节约带宽,额外消耗CPU ;同时,可能有些较老浏览器不支持
LoadModule deflate_module modules/mod_deflate.so
# Restrict compression to these MIME types
AddOutputFilterByType DEFLATE text/plain
AddOutputFilterByType DEFLATE text/html
AddOutputFilterByType DEFLATE application/xhtml+xml
AddOutputFilterByType DEFLATE text/xml
AddOutputFilterByType DEFLATE application/xml
AddOutputFilterByType DEFLATE application/x-javascript
AddOutputFilterByType DEFLATE text/javascript
AddOutputFilterByType DEFLATE text/css
Level of compression (Highest 9 - Lowest 1)
BrowserMatch ^Mozilla/4 gzip-only-text/html
BrowserMatch ^Mozilla/4\.0[678] no-gzip
Internet Explorer 标识本身为"Mozilla / 4 ",但实际上是
" "MSIE "("B" " 为单词 边界") ,就 关闭之前定义的限制
BrowserMatch \bMSI[E] !no-gzip !gzip-only-
(a) 验证证书来源的合法性;用CA 的公钥解密证书上数字签名
(4) 客户端生成临时会话密钥(对称密钥),并使用服务器端的公钥加密
注意:SSL 是基于IP 地址实现, 单IP 的主机仅可以使用一个https 虚拟主机
配置文件:/etc/httpd/conf.d/ssl.conf
openssl s_client [-connect host:port] [-cert filename] [-
CApath directory] [-CAfile filename]
Redirect [status] URL-path URL
Permanent:Returns a permanent redirect status
(301) indicating that the resource has moved
Temp:Returns a temporary redirect status (302).
Redirect temp / https://www.magedu.com/
HSTS:HTTP Strict Transport Security
服务器端配置支持HSTS 后,会在给浏览器返回的HTTP 首部中携带
HSTS 字段。浏览器获取到该信息后,会将所有HTTP 访问请求在内部
是 是Chrome 浏览器中的HSTS 预载入列表,在该列表中的网站,使用
Chrome 浏览器访问时,会自动转换成HTTPS 。Firefox 、Safari、 、
vim /etc/httpd/conf/httpd.conf
Header always set Strict-Transport-Security "max-
RewriteRule ^(/.*)$ https://%{HTTP_HOST}$1 [redirect=301]
htpasswd :basic 认证基于文件实现时,用到的账号密码文件
apachectl :httpd 自带的服务控制脚本,支持start 和stop
apxs :httpd-devel 包提供,扩展httpd 使用第三方模块工具
access.log, acccess.1.log, access.2.log
suexec :访问某些有特殊权限配置的资源时,临时切换至指
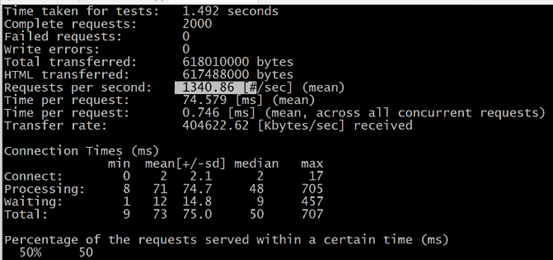
ab, webbench, http_load, seige
tcpcopy :网易,复制生产环境中的真实请求,并将之保存
1 、建立httpd 服务器,要求提供两个基于名称的虚拟主机:
(1)www.X.com ,页面文件目录为/web/vhosts/x; ; 错误日志为
/var/log/httpd/x.err ,访问日志为/var/log/httpd/x.access
(2)www.Y.com ,页面文件目录为/web/vhosts/y ;错误日志为
/var/log/httpd/www2.err ,访问日志为/var/log/httpd/y.access
(3) 为两个虚拟主机建立各自的主页文件index.html ,内容分别为其对应的主
(4) 通过www.X.com/server-status 输出httpd 工作状态相关信息
2 、为上面的第2 个虚拟主机提供https 服务,使得用户可以通过https 安全的
(1) 要求使用证书认证,证书中要求使用的国家(CN) 、州(Beijing) 、城市
(2) 设置部门为Ops ,主机名为www.Y.com ,邮件为admin@Y.com
基于FQDN 的虚拟主机不需要NameVirutalHost 指令
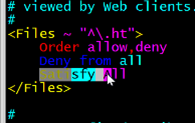
不再支持使用Order, Deny, Allow 来做基于IP 的访问控制
FastCGI Protocol backend for mod_proxy
Replaces the apparent client remote IP address
and hostname for the request with the IP address list
presented by a proxies or a load balancer via the
Provides Bandwidth Rate Limiting for Clients
/etc/httpd/conf.modules.d/*.conf
/usr/lib/systemd/system/httpd.service
systemctl enable|disable httpd.service
systemctl {start|stop|restart|status} httpd.service
Centos 7:/etc/httpd/conf.modules.d/00-mpm.conf
启用 要启用的MPM 相关的LoadModule 指令即 可
Include /etc/httpd24/extra/httpd-mpm.conf
Require ip IPADDR :授权指定来源的IP 访问
Require not ip IPADDR :拒绝特定的IP 访问
Require host HOSTNAME :授权特定主机访问
Require not ip 172.16.1.1 拒绝特定IP
基于FQDN 的虚拟主机不再需要NameVirutalHost 指令
DocumentRoot "/apps/b.net/htdocs"
<Directory "/apps/b.net/htdocs">
(4) ssl: 安装mod_ssl ,和httpd-2.2 相同配置
盘 硬盘 >> kernel buffer >> user buffer >> kernel socket buffer >> 协议栈
到 一般网络应用通过读硬盘数据,写数据到 socket 来完成网络传输, 底层执行过程:
1 用 系统调用 read() 从 产生一个上下文切换:从 user mode 到 切换到 kernel mode, ,
后 然后 DMA 个 执行拷贝,把文件数据从硬盘读到一个 kernel buffer 里。
2 从 数据从 kernel buffer 到 拷贝到 user buffer用 ,然后系统调用 read() 返回,这时
又产生一个上下文切换:从kernel mode 到 切换到 user mode
3 用 系统调用 write() 从 产生一个上下文切换:从 user mode 到 切换到 kernel mode, ,
然后把步骤2到 读到 user buffer 到 的数据拷贝到 kernel buffer (数据第2 次拷贝到
kernel buffer的 ),不过这次是个不同的 kernel buffer个 ,这个 buffer和 和 socket
4 用 系统调用 write() 从 返回,产生一个上下文切换:从 kernel mode 到 切换到 user
mode( 第4 次切换), 然后DMA从 从 kernel buffer 拷贝数据到协议栈(第4 次拷贝)
上面4 个步骤有4 次上下文切换,有4 次拷贝,如果能减少切换次数和拷贝次数将会
在 在kernel 2.0+ 用 版本中,系统调用 sendfile() 就是用来简化上面步
骤提升性能的。sendfile() 不但能减少切换次数而且还能减少拷贝
sendfile(socket, file, len);
盘 硬盘 >> kernel buffer ( 快速拷贝到kernel socket buffer)
1 用 系统调用 sendfile() 过 通过 DMA 到 把硬盘数据拷贝到 kernel
buffer被 ,然后数据被 kernel 与 直接拷贝到另外一个与 socket 相关
的 的 kernel buffer有 。这里没有 user mode 和 和 kernel mode 之间的
在 切换,在 kernel 个 中直接完成了从一个 buffer 个 到另一个 buffer
2 DMA 从 把数据从 kernel buffer 直接拷贝给协议栈,没有切换,
从 也不需要数据从 user mode 到 拷贝到 kernel mode ,因为数据就在
ProxyPass "/" "http://www.example.com/"
ProxyPassReverse "/" "http://www.example.com/"
ProxyPass "/images" "http://www.example.com/"
ProxyPassReverse "/images" http://www.example.com/
ProxyPass / http://localhost:8080/
ProxyPassReverse / http://localhost:8080/
APR(Apache portable Run-time libraries ,Apache 可移植
平台使用的底层支持接口库。在早期的Apache 版本中,应用
随着Apache 的进一步开发,Apache 组织决定将这些通用的函
Apache 中独立出来,Apache用 仅仅是使用 APR 而已。目前
APR 主要还是由Apache 使用,由于APR 的较好的移植性,因
此一些需要进行移植的C 程序也开始使用APR ,开源项目比如
用于服务器压力测试的 的Flood loader tester, , 该项目不仅仅
适用于Apache ,http://httpd.apache.org/test/flood
依赖于apr-1.4+, apr-util-1.4+, [apr-iconv]
apr: : apache portable runtime ,解决跨平台实现
CentOS 6 :默认:apr-1.3.9, apr-util-1.3.9
相关包:pcre-devel ,openssl-devel expat-devel
./configure --prefix=/app/apr-util --with-
./configure --prefix=/app/httpd24 --enable-so --
enable-ssl --enable-cgi --enable-rewrite --with-zlib
--with-pcre --with-apr=/app/apr/ --with-apr-
util=/app/apr-util/ --enable-modules=most --enable-
mpms-shared=all --with-mpm=prefork
cp -av apr-util-1.6.0 httpd-2.4.27/srclib/apr-util
cp -av apr-1.6.2 httpd-2.4.27/srclib/apr
./configure --prefix=/usr/local/httpd24 --enable-
so --enable-ssl --enable-cgi --enable-rewrite --
with-zlib --with-pcre --with-included-apr --
enable-modules=most --enable-mpms-shared=all --
Httpd 编译过程:/usr/local/apache24/build/config.nice
自带的服务控制脚本:/usr/local/httpd24/bin/apachectl
vim /etc/profile.d/httpd24.sh
export PATH=/app/http24/bin:$PATH
MANPATH /usr/local/apache24/man
自 定义启动脚本( 参考httpd-2.2 的服务脚本)
cp /etc/rc.d/init.d/httpd /etc/rc.d/init.d/httpd24
apachectl=/usr/local/httpd24/bin/apachectl
httpd=${HTTPD-/usr/local/httpd24/bin/httpd}
pidfile=${PIDFILE-/usr/local/httpd24/logs/httpd.pid}
lockfile=${LOCKFILE-/var/lock/subsys/httpd24}
chkconfig –add httpd24 ;chkconfig –list httpd24
authuserfile /etc/httpd/conf.d/.httpusers
authgroupfile /etc/httpd/conf.d/.htgroups
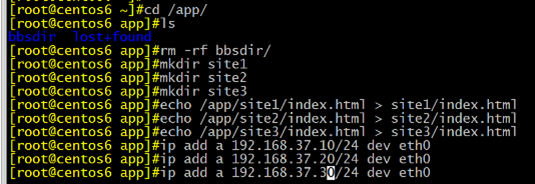
实验之前要先看看防火墙,selinux策略是否关了么,如果没关,就关掉
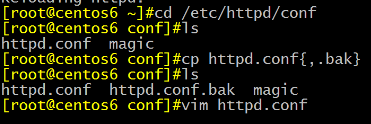
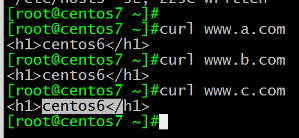
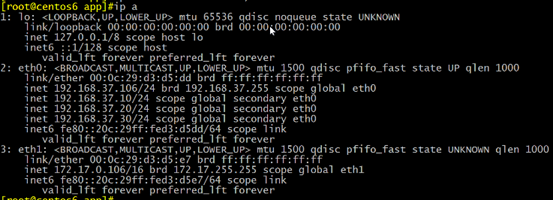
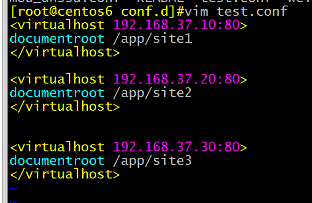
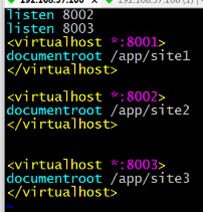
vim /etc/httpd/conf.d/test.conf
customlog logs/a.com.accesslog combined
customlog logs/b.com.accesslog combined
customlog logs/c.com.accesslog combined
AddOutputFilterByType DEFLATE text/plain
AddOutputFilterByType DEFLATE text/html
2 vim /etc/httpd/conf.d/ssl.conf
SSLCertificateFile /etc/httpd/conf.d/ssl/httpd.crt
SSLCertificateKeyFile /etc/httpd/conf.d/ssl/httpd.key
SSLCACertificateFile /etc/httpd/conf.d/ssl/cacert.pem
实验:在centos6.9编译httpd2.4.28 方法1
实验:在centos6.9编译httpd2.4.28 方法2
@@@@@@@@@@@@@@@@@@@@@@@@@@@@@@@@@@@@@@@@@@@@
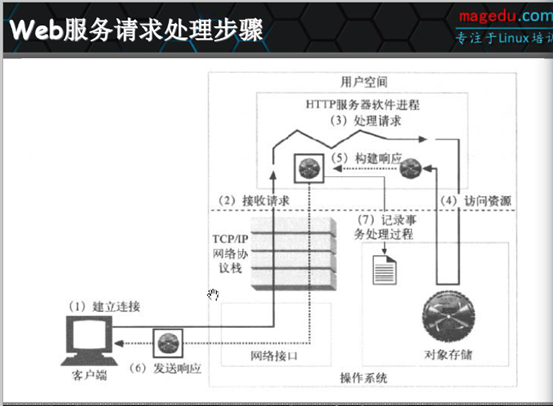
1:建立连接:用户客户端和web服务先建立连接,既三次握手,三次握手建立后;客户端就可以向服务器发起请求了,
2:接收请求:发起请求后,web服务器收到请求,这个请求有请求报文的格式,请求报文要封装请求报文的头部,(客户端发起请求三次握手后,将自己的请求封装在请求报文中发出去,);
3:处理请求:HTTP服务器软件进程处理请求:假设客户端发起一个get获取页面请求,web服务看到是一个get请求,页面通常是放在本机服务器的磁盘上的,所以web服务器就会去本机磁盘上去获取这个资源,
4:获取资源:获取资源并不是http自己有能力获取资源,因为http服务只是应用层的用户空间的服务,用户空间的程序是没有权限访问磁盘的;所以http服务将这个请求发送给内核空间处理,这个发送过程走的是系统调用,http通过系统调用将请求发送给内核,内核发现请求需要去磁盘上读取数据,所以内核将请求发送给磁盘,把磁盘里的文件读出来,读出来后到达内核的缓冲器,中的内存空间,再从内存空间将数据复制到http,
5:构建响应: http收到资源后暂时放在自己的缓冲区,拿到数据后开始构建响应报文,封装http报文头的首部,
7:记录事务处理过程: 数据发送出去后,将整个过程记录在日志中,比如访问的哪个页面,等
2:持久连接:keep-alive,长连接,重用TCP连接,以消除连接和关闭的时延,以事务个数和时间决定是否关闭连接
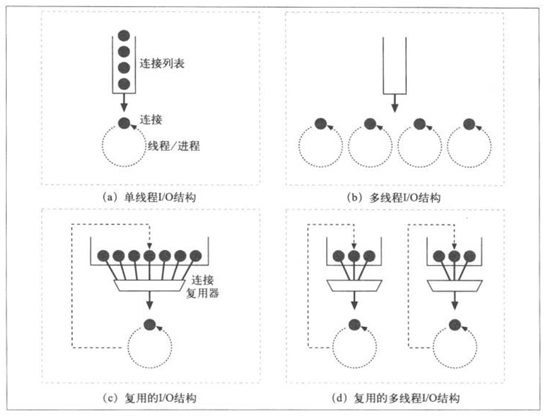
单进程I/O模型:启动一个进程处理用户请求,而且一次只处理一个,多个请求被串行响应
(来一个处理一个,处理完就没事了,就算多个进程一下子来需要处理,也是要一个个来,先来后到,适合访问量少的服务)
多进程I/O模型:并行启动多个进程,每个进程响应一个连接请求
复用的多进程I/O模型:启动M个进程,每个进程响应N个连接请求,同时接收M*N个请求
处理请求:服务器对请求报文进行解析,并获取请求的资源及请求方法等相关信息,根据方法,资源,首部和可选的主体部分对请求进行处理

































 浙公网安备 33010602011771号