linux的shell编程
1.什么是shell

命令解释器,将abcd翻译成010101发给内核,让机器看懂,内核处理后,返回101010,shell反编译成dcba呈现给终端,让人看懂。
2.shell分类
| shell类别 | 易学性 | 可移植性 | 编辑性 | 快捷性 |
| Bourne Shell -- sh | 容易 | 好 | 较差 | 较差 |
| Korn Shell -- ksh | 较难 | 较好 | 好 | 较好 |
| Bourne Again -- Bash | 难 | 较好 | 好 | 好 |
| POSIX Shell -- psh | 较难 | 好 | 好 | 较好 |
| C Shell -- csh | 较难 | 差 | 较好 | 较好 |
| TC Shell -- tcsh | 难 | 差 | 好 | 好 |
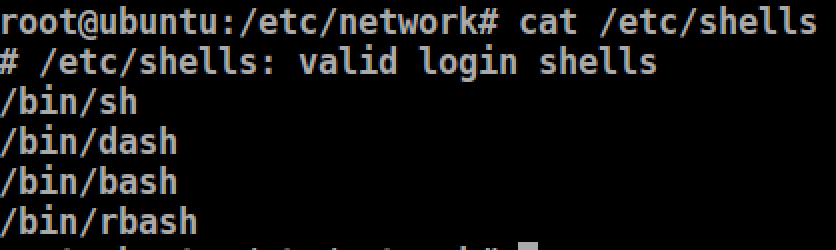
linux支持哪几种shell
centos7

ubuntu16.04
3. echo 输出命令
echo -e 输入转义字符
root@ubuntu:/etc/network# echo -e "\\"
\
\t 加制表符,需要和-e搭配使用
root@ubuntu:/etc/network# echo -e "a\tb\tc"
a    b    c
\n 换行,需要和-e搭配使用
root@ubuntu:/etc/network# echo -e "a\tb\tc\nd"
a    b    c
d
输出颜色 \e[1; 颜色值 abcd \e[0m 30m黑色,31m红色,32m绿色,33m黄色,34m青色,37m白色

脚本执行方法
root@ubuntu:/home/yanyanzhang/shell_study# cat shell01.sh
#!/bin/bash

echo -e "\e[1;31m hello world \e[0m"
执行方法一:chmod +x shell01.sh 通过路径执行 ./shell01.sh
执行方法二:bash或sh ./shell01.sh 通过命令执行,可以不赋予执行权限
4.Bash的基本功能
history 查看历史命令 history-c 清空历史命令文件 history-w 将当次命令强行写入文件中
输入输出重定向
例如:将输出在屏幕上的内容输出到文件中
> 覆盖
>> 追加,会换行追加
root@ubuntu:/home/yanyanzhang/shell_study# echo "hello world" > ./shell02.txt
root@ubuntu:/home/yanyanzhang/shell_study# cat shell02.txt
hello world
root@ubuntu:/home/yanyanzhang/shell_study# echo "hello world" >> ./shell02.txt
root@ubuntu:/home/yanyanzhang/shell_study# cat shell02.txt
hello world
hello world
xx
root@ubuntu:/home/yanyanzhang/shell_study# pwd > shell02.txt
root@ubuntu:/home/yanyanzhang/shell_study# cat shell02.txt
/home/yanyanzhang/shell_study
root@ubuntu:/home/yanyanzhang/shell_study# pwd >> shell02.txt
root@ubuntu:/home/yanyanzhang/shell_study# cat shell02.txt
/home/yanyanzhang/shell_study
/home/yanyanzhang/shell_study
重定向最典型的应用就是日志
输入报错信息
2>> 追加形式,但是怎么知道命令是错误的呢,因此不是很方便
常用这条命令输出错误和正确信息, 命令 &>> 文件
root@ubuntu:/home/yanyanzhang/shell_study# xxxx &>> shell02.txt
root@ubuntu:/home/yanyanzhang/shell_study# cat shell02.txt
xxxx: command not found
root@ubuntu:/home/yanyanzhang/shell_study# hostname &>> shell02.txt
root@ubuntu:/home/yanyanzhang/shell_study# cat shell02.txt
xxxx: command not found
ubuntu
root@ubuntu:/home/yanyanzhang/shell_study#
还有就是正确和错误分开输出到不同文件,这种更加灵活,正确与错误分开记录。
root@ubuntu:/home/yanyanzhang/shell_study# ls >> success.txt 2>> error.txt
root@ubuntu:/home/yanyanzhang/shell_study# ls
error.txt  shell01.sh  shell02.txt  success.txt
root@ubuntu:/home/yanyanzhang/shell_study# cat success.txt
error.txt
shell01.sh
shell02.txt
success.txt
root@ubuntu:/home/yanyanzhang/shell_study# cat error.txt
多命令执行
顺序执行:; 间隔
root@ubuntu:/home/yanyanzhang/shell_study# ls ; pwd
error.txt  shell01.sh  shell02.txt  success.txt
/home/yanyanzhang/shell_study
root@ubuntu:/home/yanyanzhang/shell_study#
前面正确执行后面才会执行 &&
root@ubuntu:/home/yanyanzhang/shell_study# ls && echo "success"
error.txt  shell01.sh  shell02.txt  success.txt
success
root@ubuntu:/home/yanyanzhang/shell_study# xxx && echo "success"
No command 'xxx' found, did you mean:
 Command 'xxd' from package 'vim-common' (main)
 Command 'x2x' from package 'x2x' (universe)
 Command 'xdx' from package 'xdx' (universe)
 Command 'xx' from package 'fex-utils' (universe)
xxx: command not found
root@ubuntu:/home/yanyanzhang/shell_study#
前面报错后面执行,前面正确后面不执行 ||
root@ubuntu:/home/yanyanzhang/shell_study# sssss || echo "ffff"
sssss: command not found
ffff
root@ubuntu:/home/yanyanzhang/shell_study# ls || echo "ffff"
error.txt  shell01.sh  shell02.txt  success.txt
&& 和 || 组合使用,可以知道命令是否正确执行,必须先&& 后 ||
root@ubuntu:/home/yanyanzhang/shell_study# ls && echo "sucess" || echo "fail"
error.txt  shell01.sh  shell02.txt  success.txt
sucess
root@ubuntu:/home/yanyanzhang/shell_study# lsssss && echo "sucess" || echo "fail"
lsssss: command not found
fail
其实可以单分支取代if
管道符
行提取命令:grep
过滤 grep xxx /xx/xx/test.txt 从test.txt中过滤出xxx后输出
root@ubuntu:/home/yanyanzhang/Desktop# grep a ./haha.py
print("haha")

-A 3 将匹配的内容后3行也输出
root@ubuntu:/home/yanyanzhang/Desktop/docker_flask/flask_demo# grep -A 3  app ./start.py
app = Flask(__name__)


@app.route("/")
def index():
    return jsonify({"message":"hello flaski"})

--
    app.run(port=5001)
-n 输出行号
root@ubuntu:/home/yanyanzhang/Desktop/docker_flask/flask_demo# grep -n  app ./start.py
3:app = Flask(__name__)
6:@app.route("/")
14:    app.run(port=5001)
-c 找到复合条件字符串的个数
root@ubuntu:/home/yanyanzhang/Desktop/docker_flask/flask_demo# grep -c app ./start.py
3
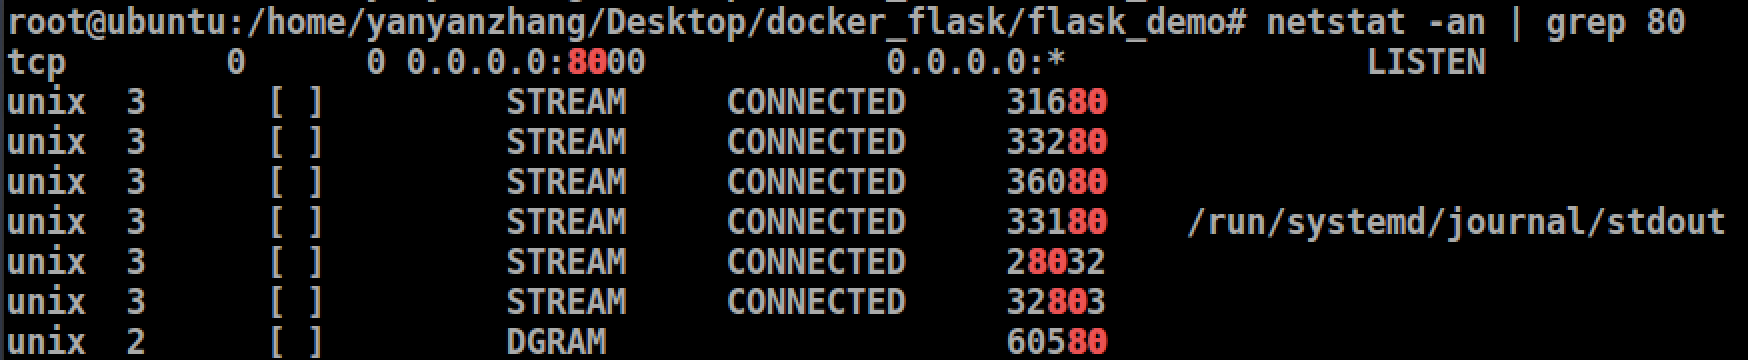
grep和管道符| 配合使用
root@ubuntu:/home/yanyanzhang/Desktop/docker_flask/flask_demo# netstat -an | grep 80
tcp        0      0 0.0.0.0:8000            0.0.0.0:*               LISTEN
unix  3      [ ]         STREAM     CONNECTED     31680
unix  3      [ ]         STREAM     CONNECTED     33280
unix  3      [ ]         STREAM     CONNECTED     36080
unix  3      [ ]         STREAM     CONNECTED     33180    /run/systemd/journal/stdout
unix  3      [ ]         STREAM     CONNECTED     28032
unix  3      [ ]         STREAM     CONNECTED     32803
unix  2      [ ]         DGRAM                    60580
通配符
. * ? []
其他特殊符号
单引号 '' :所有的特殊符号都没有含义,如$,`等都没有含义。
双引号 "" :所有的特殊符号都没有含义,除了 $, `,\例外,$调用变量值,`引用命令,\转义符
反引号 `` :反引号包括起来的是系统命令,在Bash中会先去执行它,和$()作用一样,不过推荐使用$(),因为反引容易看错。
$():和反引号一样,用来引用系统命令
root@ubuntu:/home# a=$(date)  #先在子shell执行date,然后将结果赋值给a
root@ubuntu:/home# echo $a # 获取a的值
Mon May 3 14:19:20 CST 2021
应用一: 获取执行脚本的位置,并将目录赋值给变量
#! /bin/bash
basedir=$(cd $(dirname $0) && echo $(pwd))
echo $basedir

#dirname的用法
direname /usr/bin  输出 /usr 返回给定路径的上层路径
root@cloud:/usr/lib/python2.7/dist-packages/ics# dirname "$0" # 返回 . 表示当前路径
.
():用于一串命令执行,()中的命令会在子shell中运行
root@ubuntu:/home# name="zhangsan"
root@ubuntu:/home# (name="lisi";echo $name)  # echo $name 输出的是子shell的变量值,之后子shell就关闭消失了
lisi
root@ubuntu:/home# echo $name # 输出的是当前shell的变量值,且值没有发生更改
zhangsan
{}:用于一串命令执行时候,{}的命令会在当前shell中执行,也可用于变量变形和替换
root@ubuntu:/home# name="zhangsan"
root@ubuntu:/home# { name="lisi";echo $name; }
lisi
root@ubuntu:/home# echo $name
lisi
[]:用于变量的测试,后面单独说明
#:注释
$:调用变量的值。
\:转义。
5.bash常用快捷键
| 快捷键 | 作用 |
| CTRL + A | 光标从任意位置移到命令开头 |
| CTRL + E | 光标从任意位置移到命令结尾 |
| CTRL + L | 清屏 = clear |
| CTRL + U | 删除或剪切光标之前的命令,不用使用退格键一个一个删除 |
| CTRL + K | 删除或剪切光标之后的命令。 |
| CTRL + Y | 粘贴ctrl+u和ctrl+K剪切的内容 |
| CTRL + R | 历史命令中搜索 |
| CTRL + C | 终止当前命令 |
6.bash的变量和运算规则
1.shell变量默认类型是字符串,如果要进行数值运算,需要指定变量类型为数值型。
2.变量命名规则和其他语言一样
3.变量命名=左右两边不能加空格
5.变量里面有空格,双引号阔起来
6.变量的默认值拼接
root@ubuntu:/home# test=123
root@ubuntu:/home# test="$test"456  # 另外一种写法 test=${test}456也行
root@ubuntu:/home# echo $test
123456
7.bash变量的分类
| 变量分类 | 说明 |
| 用户自定义变量 | 用户定义 |
| 环境变量 | 系统定义,用来保存系统操作环境的数据,系统变量的变量名可以自由定义,但是一般对系统起作用的环境变量的变量名是系统预先设定好的 |
| 位置参数变量 | 脚本传递,,变量名不能自定义,变量作用也是固定的 |
| 预定义变量 | Bash中已经定义好的变量,变量名不能自定义,变量作用也是固定的 |
用户自定义变量
增
root@ubuntu:/home# name=zhang  # 因为shell默认变量都是字符串类型,因此可以不用向其他语言一样需要加引号
root@ubuntu:/home# age="10"
root@ubuntu:/home# echo $name; echo $age # 调用变量必须加$
zhang
10
变量不存在和变量值为空,是两个概念
root@ubuntu:/home# name=""
root@ubuntu:/home# echo $name

root@ubuntu:/home# echo $school

root@ubuntu:/home#
# 但是输出的样子很像,怎么做区别呢?
查看变量
set -u 设定此选项,调用未声明变量会报错。
root@ubuntu:/home# set -u   # 临时生效,重启就没了,长久生效,需要加入环境变量
root@ubuntu:/home# echo $name

root@ubuntu:/home# echo $school
bash: school: unbound variable
-x 设定此选项,命令执行前,先把命令输出一次,set +x 取消这个设置
root@ubuntu:/home# echo $name
+ echo

root@ubuntu:/home#
set 查看环境变量---不全,能看到自定义变量,
env 查询环境变量---不全,看不到自定义变量
删除变量
unset 变量名
root@ubuntu:/home# age=100
+ age=100
root@ubuntu:/home# echo $age
+ echo 100
100
root@ubuntu:/home# unset age
+ unset age
root@ubuntu:/home# echo #age
+ echo
环境变量
用户自定义环境变量:只在当前shell生效,子shell中并不生效
export AGE = "18"
root@ubuntu:/home# export AGE="18"
+ export AGE=18
+ AGE=18
root@ubuntu:/home# echo $AGE
+ echo 18
18
env 查看,ubuntu16.04中set查看命令无效,只能env查看,centos7中set和env都有效
系统自带的环境变量
PATH环境变量:系统查看命令的路径
ubantu16.04的PATH
PATH=/root/.pyenv/shims:/root/.pyenv/bin:/root/.pyenv/shims:/root/.pyenv/bin:/root/.pyenv/shims:/root/.pyenv/bin:/usr/local/sbin:/usr/local/bin:/usr/sbin:/usr/bin:/sbin:/bin:/usr/games:/usr/local/games
centos7的PATH

ls 执行后,系统先去PATH定义的路径路径里面查找ls,找到就指定,找不到就报错,/bin,有ls
root@ubuntu:/bin# lslls
lslls: command not found # 在$PATH指定的路径下没找到
需求:如何让我们定义的hello.sh直接运行而不用指定路径 ./xxxx/xxx/hello.sh
方法一:加入
root@ubuntu:/home/yanyanzhang/shell_study# ls
error.txt  hello.sh  shell01.sh  shell02.txt  success.txt
root@ubuntu:/home/yanyanzhang/shell_study# cp ./hello.sh /bin/
root@ubuntu:/home/yanyanzhang/shell_study# ls
error.txt  hello.sh  shell01.sh  shell02.txt  success.txt
root@ubuntu:/home/yanyanzhang/shell_study# hello.sh
hello world
root@ubuntu:/home/yanyanzhang/shell_study# rm -rf /bin/hello.sh
root@ubuntu:/home/yanyanzhang/shell_study# hello.sh
bash: /bin/hello.sh: No such file or directory
方法二:搜索路径叠加
root@ubuntu:/home/yanyanzhang/shell_study/sh# PATH="$PATH":/home/yanyanzhang/shell_study/sh
root@ubuntu:/home/yanyanzhang/shell_study/sh# hello.sh
hello world
root@ubuntu:/home/yanyanzhang/shell_study/sh# echo $PATH
/root/.pyenv/shims:/root/.pyenv/bin:/root/.pyenv/shims:/root/.pyenv/bin:/root/.pyenv/shims:/root/.pyenv/bin:/usr/local/sbin:/usr/local/bin:/usr/sbin:/usr/bin:/sbin:/bin:/usr/games:/usr/local/games:/home/yanyanzhang/shell_study/sh
PS1环境变量:提示符
root@ubuntu:/home/yanyanzhang/shell_study/sh# echo $PS1
\[\e]0;\u@\h: \w\a\]${debian_chroot:+($debian_chroot)}\u@\h:\w\$
中文输出问题
1.安装中文字体和编码
2.操作终端支持中文显示和中文编码
root@ubuntu:/home/yanyanzhang/shell_study/sh# echo $LANG
en_US.UTF-8  #不支持中文
要支持中文,需要下载中文插件,还需要修改 /etc/sysconfig/il8n LANG="zh_CNN.UTF-8"
位置参数变量:传参
| 位置参数变量 | 作用 |
| $n | n为数字,$0表示命令本身,$1-9表示第一个到第九个参数,十个以上需要用大括号${} |
| $* | 表示命令行中的所有参数,$*将参数看做为一个整体 |
| $@ | 表示命令行中的所有参数,不过$@把每个参数分开对待 |
| $# | 表示命令行中所有参数的个数 |
练习一: 输入 count.sh 100 200 屏幕输出300
#! /bin/bash

#$0 代表命令本身
# args1  接收第一个位置参数
a=$1
# args2  接收第二个位置参数
b=$2
# must use double () for int plus int,必须使用$(()),shell才知道要做int形式的加法,而不是拼接字符串
sum=$((a+b))
echo $sum


######
root@ubuntu:/home/yanyanzhang/shell_study# ./count.sh 100 200
300
练习二:将传递的参数输出出来
#! /bin/bash

# echo 和"中间需要空一格格子,后面的当做参数,否则都当做命令了,command is not found
echo "\$* is $*"
echo "\$@ is $@"
echo "\$# is $#"


#######
root@ubuntu:/home/yanyanzhang/shell_study# ./test01.sh 11 22 33 44 55
$* is 11 22 33 44 55
$@ is 11 22 33 44 55
$# is 5
练习三:
#! /bin/bash

for i in 1 2 3 4

    do
        echo $i
    done

###
root@ubuntu:/home/yanyanzhang/shell_study# ./for.sh
1
2
3
4
通过循环查看$*和$@的区别
#! /bin/bash

for i in "$*"   # 将11 22 33 看成一整体字符串 "11 22 33"

    do
        echo $i
    done

echo "+++++++++++++++++++++++++++++++++++"

for y in "$@" # 将11 22 33 看成单独的个体字符串 "11" "22" "33"

    do
        echo $y
    done

#########
root@ubuntu:/home/yanyanzhang/shell_study# ./for_2.sh 11 22 33
11 22 33
+++++++++++++++++++++++++++++++++++
11
22
33
预定义变量
$?:保存上一条命令的返回状态,0代表上一条命令正确执行,非0表示错误执行
root@ubuntu:/home/yanyanzhang/shell_study# ls
count.sh  error.txt  for_2.sh  for.sh  hello.sh  sh  shell01.sh  shell02.txt  success.txt  test01.sh
root@ubuntu:/home/yanyanzhang/shell_study# echo $?
0
root@ubuntu:/home/yanyanzhang/shell_study# lsll
lsll: command not found
root@ubuntu:/home/yanyanzhang/shell_study# echo $?
127
场景:linux下确定nginx是否在运行
1. 查看Pid的方式

root@ubuntu:/home/yanyanzhang/shell_study# ps -C bash -o pid
   PID
  2773
 15655
 25439
root@ubuntu:/home/yanyanzhang/shell_study# ps -C nginx -o pid
   PID

2. 查看端口的方式

lsof -i:80
结合 $? 来判断 nginx是否在运行
root@ubuntu:/home/yanyanzhang/shell_study# ps -C nginx -o pid
   PID
root@ubuntu:/home/yanyanzhang/shell_study# echo $?
1
root@ubuntu:/home/yanyanzhang/shell_study# ps -C bash -o pid
   PID
  2773
 15655
 25439
root@ubuntu:/home/yanyanzhang/shell_study# echo $?
0

# 改成shell代码为
root@ubuntu:/home/yanyanzhang/shell_study# ps -C nginx -o pid || echo "nginx no running" 前错后执行
PID
nginx no running
root@ubuntu:/home/yanyanzhang/shell_study# ps -C nginx -o pid && echo "nginx running" 前对后执行
PID
逻辑与 && 逻辑或 || 的原理就是 $?, 通过$?的值决定后面是否执行
$$:返回当前进程的pid号
root@ubuntu:/home/yanyanzhang/shell_study# cd ..
root@ubuntu:/home/yanyanzhang# echo $$
25439
root@ubuntu:/home/yanyanzhang# ps -ef|grep bash
yanyanz+   2773   2766  0 01:36 pts/11   00:00:00 bash
root      15655  15654  0 02:01 pts/11   00:00:00 bash
root      25439  15655  0 05:22 pts/11   00:00:00 bash
root      44722  25439  0 14:17 pts/11   00:00:00 grep --color=auto bash
$!:后台运行的最后一个进程的pid号
# ubuntu不认
root@ubuntu:/home/yanyanzhang# echo $!
bash: $!: unbound variable

# centos认
[root@macbook ~]# echo $! #什么都不显示
8. read接收键盘输入
-p 提示信息,告诉输入者
-t 等待秒数
-n 字符数
-s 隐藏输入的数据,用于机密信息输入
练习一:带输入提示和等待时间的脚本
#! /bin/bash

read -t 30 -p "please input num1: " num1
echo "num1 is $num1"
read -t 30 -p "please input num2: " num2
echo "num2 is $num2"

sum=$(( $num1 + $num2  ))

echo "result is $sum"

######################
root@ubuntu:/home/yanyanzhang/shell_study# /bin/bash ./count2.sh
please input num1: 19
num1 is 19
please input num2: 23
num2 is 23
result is 42
相比位置参数,read面向的是脚本的使用者,位置参数 面向的是脚本的书写者。
9.shell运算
shell将所有的变量都默认是字符串类型,不便做数值运算。因此出现declare

declare      -    给变量设定类型
             +    取消变量的类型属性
            -a    将变量声明为数组型
            -i    将变量声明为整型
            -r    将变量声明为只读变量。
            -x    将变量声明为环境变量
            -p    显示指定变量的声明类型
数组赋值
# 标准赋值
root@ubuntu:/home/yanyanzhang/shell_study# declare -a name[0]=1
root@ubuntu:/home/yanyanzhang/shell_study# declare -a name[1]=2
root@ubuntu:/home/yanyanzhang/shell_study# echo ${name[*]}
1 2
root@ubuntu:/home/yanyanzhang/shell_study# echo ${name[0]}
1
root@ubuntu:/home/yanyanzhang/shell_study# echo ${name[1]}
2


# 简洁赋值
root@ubuntu:/home/yanyanzhang/shell_study# age[0]=1
root@ubuntu:/home/yanyanzhang/shell_study# age[1]=3
root@ubuntu:/home/yanyanzhang/shell_study# echo ${age[*]}
1 3
declear -x test="123" 将变量test变成环境变量,export test 的实现也是用declare -x test 的形式实现的,为了方便,用export代替。
declare -p 查看所有
root@ubuntu:/home/yanyanzhang/shell_study# declare -p
declare -x AGE="18"
declare -- BASH="/bin/bash"
declare -r BASHOPTS="checkwinsize:cmdhist:complete_fullquote:expand_aliases:extquote:force_fignore:histappend:hostcomplete:interactive_comments:progcomp:promptvars:sourcepath"
declare -ir BASHPID
declare -A BASH_ALIASES='()'
declare -a BASH_ARGC='()'
declare -a BASH_ARGV='()'
declare -A BASH_CMDS='()'
declare -- BASH_COMMAND
declare -a BASH_LINENO='()'
declare -a BASH_SOURCE='()'
declare -- BASH_SUBSHELL
declare -ar BASH_VERSINFO='([0]="4" [1]="3" [2]="48" [3]="1" [4]="release" [5]="x86_64-pc-linux-gnu")'
declare -- BASH_VERSION="4.3.48(1)-release"
declare -x CLUTTER_IM_MODULE="xim"
declare -- COLUMNS="160"
declare -x COMPIZ_BIN_PATH="/usr/bin/"
declare -x COMPIZ_CONFIG_PROFILE="ubuntu"
declare -- COMP_WORDBREAKS
查看指定
root@ubuntu:/home/yanyanzhang/shell_study# declare -p AGE
declare -- AGE="18"
root@ubuntu:/home/yanyanzhang/shell_study# declare -p age
declare -a age='([0]="1" [1]="3")'
expr和let加法运算
# 这种写法不推荐
root@ubuntu:/home/yanyanzhang/shell_study# a=11
root@ubuntu:/home/yanyanzhang/shell_study# b=22
root@ubuntu:/home/yanyanzhang/shell_study# declare -i c=$a+$b
root@ubuntu:/home/yanyanzhang/shell_study# echo $c
33

# $a和$b和+之间必须有空格,这种写法不推荐
root@ubuntu:/home/yanyanzhang/shell_study# d=$(expr $a + $b)
root@ubuntu:/home/yanyanzhang/shell_study# echo $d
33

# 这种方法也不推荐
root@ubuntu:/home/yanyanzhang/shell_study# let e=$a+$b
root@ubuntu:/home/yanyanzhang/shell_study# echo $e
33
推荐的做法:
root@ubuntu:/home/yanyanzhang/shell_study# a=11
root@ubuntu:/home/yanyanzhang/shell_study# b=22
root@ubuntu:/home/yanyanzhang/shell_study# c=$(($a+$b))
root@ubuntu:/home/yanyanzhang/shell_study# echo $c
33
练习:shell写一个加减乘除的计算器
#! /bin/sh

# 没有判断 num1和num2的类型等问题,后面会改进

read -t 20 -p "please input one num1: " num1
echo "$num1"
read -t 20 -n1 -p "please input one operator like [+,-,*,/]: " operator
echo "$operator"
read -t 20 -p "please input two num2: " num2
echo "$num2"
declare -i num1
declare -i num2
[ "$operator" == "+" ] && echo "ret is $(($num1 + $num2))"
[ "$operator" == "-" ] && echo "ret is $(($num1 - $num2))"
[ "$operator" == "*" ] && echo "ret is $(($num1 * $num2))"
[ "$operator" == "/" ] && [ "$num2" != 0 ] && echo "ret is $(($num1 / $num2))"
10. 变量测试及内容置换
| 变量置换方式 | 变量y没有定义 | 变量y值为空 | 变量y有值 |
| x=${y-新值} | x=新值 | x为空 | x=$y |
| x=${y:-新值} | x=新值 | x=新值 | x=$y |
| x=${y+新值} | x为空 | x=新值 | x=新值 |
| x=${y:+新值} | x为空 | x=新值 | x=新值 |
| x=${y=新值} | x=新值 y=新值 |
x为空 |
x=$y y不变 |
| x=${y:=新值} | x=新值 y=新值 |
x=新值 y=新值 |
x=$y y不变 |
| x=${y?新值} | 新值输出到标准错误 输出(屏幕) |
x为空 | x=$y |
| x=${y:?新值} | 新值输出到标准错误 输出(屏幕) |
新值输出到标准错误 输出(屏幕) |
x=$y |
为什么需要这个,原因是,怎么判断这个变量存在,还是这个变量为空,下面的方法通过set -u,不存在就报错形式可以判断,但比较麻烦。通过间接x来判断y,不存在还是为空
root@ubuntu:/home/yanyanzhang/shell_study# echo $aa

root@ubuntu:/home/yanyanzhang/shell_study# aa=""
root@ubuntu:/home/yanyanzhang/shell_study# echo $aa

root@ubuntu:/home/yanyanzhang/shell_study# set -u
root@ubuntu:/home/yanyanzhang/shell_study# echo $aa

root@ubuntu:/home/yanyanzhang/shell_study# echo $bb
bash: bb: unbound variable
测试
# aaa和bbb都没有定义
root@ubuntu:/home/yanyanzhang/shell_study# aaa=${bbb-100}
root@ubuntu:/home/yanyanzhang/shell_study# echo $aaa
100  # 推断出bbb没有定义
11. 环境变量配置文件
source 配置文件:加载配置文件,使其生效,否则需要重新登陆,才生效。
. 配置文件:加载配置文件,使其生效
linux系统登陆时,主要生效的配置文件有五个
/etc/profile  : 对所有用户生效,root及非root用户,

/etc/profile.d/*.sh: 对所有用户生效,root及非root用户
~/.bash_profile :只对当前用户生效

~/.bashrc :只对当前用户生效

/etc.bashrc : 对所有用户生效,root及非root用户
执行顺序:红色为登陆下的读取和加载顺序,蓝色为非登陆下的加载顺序,例如su,例如 bash bash等命令。
下图是基于centos6的流程图:

centos7的流程图:
(1)/etc/profile : 此文件为系统的每个用户设置系统环境信息,当用户登录时该文件被执行。

(2)~/.bash_profile(或.profile) : 每个用户都可使用该文件输入专用于自己使用的shell信息,当用户登录时,该文件仅仅执行一次!默认情况下,他设置一些环境变量,执行用户的.bashrc文件。

(3)~/.bashrc : 该文件包含专用于你的bash shell的bash信息,当登录时以及每次打开新的shell时,该该文件被读取。

(4)/etc/bashrc : 为每一个运行bash shell的用户执行此文件.当bash shell被打开时,该文件被读取.
ubuntu16.04的流程
ubuntu16.04默认只有四个环境变量:

/etc/profile:此文件为系统的每个用户设置环境信息,对/etc/profile有修改的话必须得重启你的修改才会生效,此修改对每个用户都生效。可以通过命令
source /etc/profile立即生效

/etc/bash.bashrc:为每一个运行bash shell的用户执行此文件.当bash shell被打开时,该文件被读取.如果你想对所有的使用bash的用户修改某个配置并在以后打开的bash都生效的话可以修改这个文件,
 修改这个文件不用重启,重新打开一个bash即可生效。

~/.bashrc:该文件包含专用于你的bash shell的bash信息,当登录时以及每次打开新的shell时,该文件被读取

~/.profile:每个用户都可使用该文件输入专用于当前用户使用的shell信息,当用户登录时,该文件仅仅执行一次!默认情况下,他设置一些环境变量,执行用户的.bashrc文件.

 此文件类似于/etc/profile,也是需要需要重启才会生效,/etc/profile对所有用户生效,~/.bash_profile只对当前用户生效。


# 区别

/etc/bash.bashrc对所有用户新打开的bash都生效, 项目中的Ubuntu修改了这个文件,增加了读取xxxx文件,实现了cdlog和cdcode的快速跳转
 ~/.bashrc只对当前用户新打开的bash生效。
命令提示符如果 -bash#,说明删除了环境变量配置文件
退出登陆会调用: ~/.bash_logout
历史命令保存文件: ~/.bash_history
自定义登陆提示信息
ubuntu16.04修改位置为
root@ubuntu:/etc/update-motd.d# ls
00-header  10-help-text  50-motd-news  90-updates-available  91-release-upgrade  92-unattended-upgrades  98-fsck-at-reboot  98-reboot-required  99-esm
root@ubuntu:/etc/update-motd.d# pwd
/etc/update-motd.d
内容
#!/bin/bash

printf "==================================================="
printf "welcome to my planet my old baby"
printf "==================================================="
执行效果
root@ubuntu:/etc/update-motd.d# run-parts /etc/update-motd.d/
Welcome to Ubuntu 16.04.7 LTS (GNU/Linux 4.15.0-133-generic x86_64)

 * Documentation:  https://help.ubuntu.com
 * Management:     https://landscape.canonical.com
 * Support:        https://ubuntu.com/advantage

 * Pure upstream Kubernetes 1.21, smallest, simplest cluster ops!

     https://microk8s.io/
===================================================welcome to my planet my old baby===================================================
109 packages can be updated.
64 updates are security updates.

New release '18.04.5 LTS' available.
Run 'do-release-upgrade' to upgrade to it.

root@ubuntu:/etc/update-motd.d#
自定义快捷键:项目中cdcode直接进入code文件夹,cdlog直接进入log文件夹
stty -a 查看所有的快捷键
root@ubuntu:/home/yanyanzhang# stty -a
speed 38400 baud; rows 51; columns 160; line = 0;
intr = ^C; quit = ^\; erase = ^?; kill = ^U; eof = ^D; eol = <undef>; eol2 = <undef>; swtch = <undef>; start = ^Q; stop = ^S; susp = ^Z; rprnt = ^R; werase = ^W;
lnext = ^V; discard = ^O; min = 1; time = 0;
-parenb -parodd -cmspar cs8 -hupcl -cstopb cread -clocal -crtscts
-ignbrk -brkint -ignpar -parmrk -inpck -istrip -inlcr -igncr icrnl ixon -ixoff -iuclc -ixany -imaxbel iutf8
opost -olcuc -ocrnl onlcr -onocr -onlret -ofill -ofdel nl0 cr0 tab0 bs0 vt0 ff0
isig icanon iexten echo echoe echok -echonl -noflsh -xcase -tostop -echoprt echoctl echoke -flusho -extproc
需求:定义一个快捷键,cdcode 直接进入 /home/yanyanzhang/code文件夹下。
# 1. 编写一个cdcode脚本
root@ubuntu:/home/yanyanzhang/shell_study# cat cdcode.sh
#! /bin/bash

cd /home/yanyanzhang/code

# 2. 直接执行脚本
./cdcode.sh 不会跳转,只有source ./cdcode.sh才会跳转。source不会创建子shell,而是在当前shell环境下执行

# 3. 给source ./cdcode.sh这条命令起一个别名,cdcode
在/root/.bashrc最后一句加上
# zhang edit 20210504
alias cdcode="source /home/yanyanzhang/shell_study/cdcode.sh"

#########
root@ubuntu:/home/yanyanzhang/shell_study# cd /
root@ubuntu:/# cdcode
root@ubuntu:/home/yanyanzhang/code#
使用source的原因是:
1. 在shell在执行脚本的时候,会创建一个子shell,并在子shell中逐条执行脚本中的指令

2. 子shell会从父shell中继承了环境变量,但是执行后不会改变父shell的环境变量

3. 在子shell中的操作和环境变量不会影响父进程,在执行完shell后又回到了父进程
12.正则
.   匹配换行符外任意字符
*  匹配0次或多次
?
^  开头
$   结尾
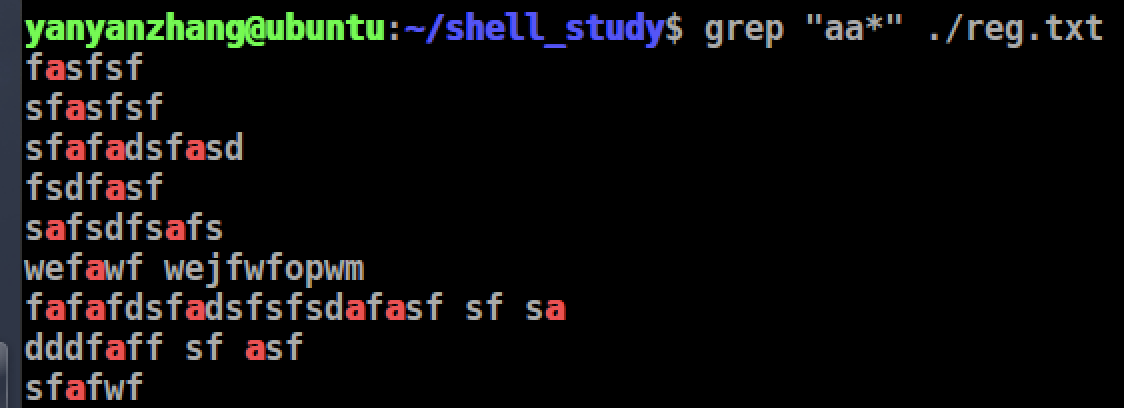
练习一: grep "a*" 就是列出所有内容, *代表0或任意个
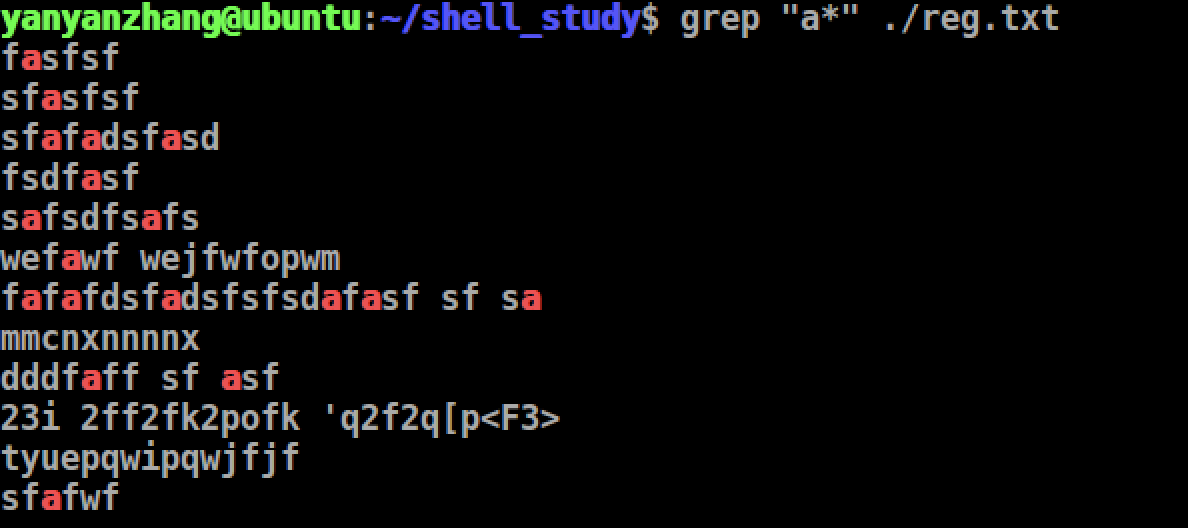
过滤包含a的行,至少包含一个a,"aa*"
grep :行匹配
-s: 非递归查找
-r:  递归查找
练习一:查找linux下包含 cdlog字符串的文件夹及路径
root@cloud:/# grep -r "cdlog" /*
/etc/ics/alias_common:alias cdlog='cd /var/log/ics'
grep: /etc/ics/docker.sock: No such device or address
^C
练习二:查找指定目录/etc下包含mysql字符串的文件及路径
root@cloud:/# grep -s mysql /etc/*
/etc/services:mysql             3306/tcp
/etc/services:mysql             3306/udp
/etc/services:mysql-proxy       6446/tcp                        # MySQL Proxy
/etc/services:mysql-proxy       6446/udp
grep -v 取反
root@cloud:/# grep -v log /etc/ics/alias_common # 不包含

alias shortcmd='cat /etc/bash.bashrc|grep "^alias" |grep -v "alias shortcmd="|sed "s/^alias //g"'
alias cd..='cd ..'
alias ..='cd ..'
alias cd...='cd ../..'
alias ...='cd ../..'
alias cd-='cd -'
alias ll='ls -l --color=auto'
alias cdetc='cd /etc/ics'
alias cddb='cd /var/lib/ics/db/'
alias cdcode='cd /usr/lib/python2.7/dist-packages/ics/'
alias cdvhost='cd /var/lib/ics/vhost/'
alias cdimg='cd /var/lib/ics/vhost/images'
alias cddesk='cd /var/lib/ics/vhost/instances/'
alias cdins='cd /var/lib/ics/vhost/install_src/'
alias cdbin='cd /usr/local/bin/'
alias cdsys='cd /lib/systemd/system/'
alias cdclouddisk='cd /var/lib/ics/vhost/clouddisk/'
alias cdservice='cd /lib/systemd/system/'
alias cdidesk='cd /var/lib/ics/vhost/iSingleSphere/images/'
alias rootssh="sed -i 's/^\s*#*\s*PermitRootLogin\s.*$/PermitRootLogin yes/g' /etc/ssh/sshd_config; service ssh restart"
alias offrootssh="sed -i 's/^\s*#*\s*PermitRootLogin\s.*$/PermitRootLogin prohibit-password/g' /etc/ssh/sshd_config; service ssh restart"
grep -n 显示行号
root@iZwz9434lxf5ptexiu13giZ:/etc# grep if ./bash.bashrc -n
9:# check the window size after each command and, if necessary,
13:# set variable identifying the chroot you work in (used in the prompt below)
14:if [ -z "${debian_chroot:-}" ] && [ -r /etc/debian_chroot ]; then
32:#if ! shopt -oq posix; then
33:#  if [ -f /usr/share/bash-completion/bash_completion ]; then
35:#  elif [ -f /etc/bash_completion ]; then
41:if [ ! -e "$HOME/.sudo_as_admin_successful" ] && [ ! -e "$HOME/.hushlogin" ] ; then
43:    if [ -x /usr/bin/sudo ]; then
53:# if the command-not-found package is installed, use it
54:if [ -x /usr/lib/command-not-found -o -x /usr/share/command-not-found/command-not-found ]; then
57:                if [ -x /usr/lib/command-not-found ]; then
60:                elif [ -x /usr/share/command-not-found/command-not-found ]; then
cut:列匹配
root@iZwz9434lxf5ptexiu13giZ:~# who
root     pts/0        2021-05-06 10:55 (117.36.118.125)
root     pts/1        2021-05-06 10:55 (117.36.118.125)

# 提取每行的时间

# -c 按照位数提取。
root@iZwz9434lxf5ptexiu13giZ:~# who|cut -c 15-39
        2021-05-06 10:55
        2021-05-06 10:55

# 带格式查看,notepadd++按照格式,则位数正确 15-39


-d -f 搭配使用 -d 指定按照什么切割,-f选择切割后的区域

root@iZwz9434lxf5ptexiu13giZ:~# who
root     pts/0        2021-05-06 10:55 (117.36.118.125)
root     pts/1        2021-05-06 10:55 (117.36.118.125)
root@iZwz9434lxf5ptexiu13giZ:~# who|cut -d "(" -f1
root     pts/0        2021-05-06 10:55
root     pts/1        2021-05-06 10:55
root@iZwz9434lxf5ptexiu13giZ:~# who|cut -d "(" -f2
117.36.118.125)
117.36.118.125)
awk
awk是一个强大的文本分析工具,简单来说awk就是把文件逐行读入,(空格,制表符)为默认分隔符将每行切片,切开的部分再进行各种分析处理

awk [-F field-separator] 'commands' input-file(s)
-F 指定分隔符,以:为分隔符,输出分割后的第一和第二列
root@iZwz9434lxf5ptexiu13giZ:/etc# awk -F : '{print $1,$2}'  /etc/passwd
root x
daemon x
bin x
sys x
sync x
games x
man x
lp x
install 命令
install -p -d -o root -g root  -m  755 ${DIR_DEBIAN}
install -p -d -o root -g root  -m  755 ${DIR_BUILD}/lib/systemd/system
install -p -d -o root -g root  -m  755 ${DIR_BUILD}/usr/bin
install -p -d -o root -g root  -m  755 ${DIR_PYTHON}
用 install命令去完成需要 cp, chmod, chown等一系列命令才能完成的操作。
-o : 指定owner 为 root
-g: 指定group 为 root
-d: 创建目录
-p:保存,时间为访问时间
-m:指定文件权限
说明:install和cp功能很像,但是在拷贝的过程中可以修改文件访问属性,组属性等其他操作,一般用于Makefile。
练习一:不存在创建目录,并修改权限
root@iZwz9434lxf5ptexiu13giZ:~/yanyan/shell_study# install -p -d -o root -g root -m 755 ~/yanyan/tmp/test     # test文件本来不存在 -d 创建出来的
root@iZwz9434lxf5ptexiu13giZ:~/yanyan/shell_study# ls
input_args.sh  shell_var  test1.sh  test2.sh  test3.sh  test4.sh
root@iZwz9434lxf5ptexiu13giZ:~/yanyan/shell_study# cd ~/yanyan/tmp/test/
root@iZwz9434lxf5ptexiu13giZ:~/yanyan/tmp/test# cd ..
root@iZwz9434lxf5ptexiu13giZ:~/yanyan/tmp# ll -rt
total 12
drwxr-xr-x 5 root root 4096 May  6 15:47 ../
drwxr-xr-x 2 root root 4096 May  6 15:48 test/  # -m 修改了权限 -p 修改了创建时间 -g指定了所属组,-o制定了所属人
drwxr-xr-x 3 root root 4096 May  6 15:48 ./
练习二:存在的文件复制到指定目录
root@iZwz9434lxf5ptexiu13giZ:~/yanyan/tmp/test# install -p -o root -g root -m 755  ~/yanyan/tmp/test/dragon.txt  ~/yanyan/tmp/test_two
root@iZwz9434lxf5ptexiu13giZ:~/yanyan/tmp/test# cd ../test_two/
root@iZwz9434lxf5ptexiu13giZ:~/yanyan/tmp/test_two# ls
dragon.txt
root@iZwz9434lxf5ptexiu13giZ:~/yanyan/tmp/test_two# ll -rt
total 8
drwxr-xr-x 4 root root 4096 May  6 15:57 ../
-rwxr-xr-x 1 root root    0 May  6 16:14 dragon.txt*
drwxr-xr-x 2 root root 4096 May  6 16:14 ./
cat 命令
cat <<EOF>> xxx.txt 将输入EOF之前的内容写入到 xxx,.txt中, cat <<EOF 输入EOF停止 >> 重定向
root@iZwz9434lxf5ptexiu13giZ:~/yanyan/tmp/test_two# cat <<EOF>> ~/yanyan/tmp/test_two/dragon.txt
> nnnnnnnnnnnnnnnnnnnnnnnnnnnnnnnnnnnnnnnnnn
> sdfasfaewf
> sdfasfsdfsdfasfasfasfasfas
> sfasfasfsfasdf
> EOF
root@iZwz9434lxf5ptexiu13giZ:~/yanyan/tmp/test_two# cat dragon.txt
faewsfafsfsfafe # 原来
nnnnnnnnnnnnnnnnnnnnnnnnnnnnnnnnnnnnnnnnnn # 下面都是新写入
sdfasfaewf
sdfasfsdfsdfasfasfasfasfas
sfasfasfsfasdf
root@iZwz9434lxf5ptexiu13giZ:~/yanyan/tmp/test_two#
权限说明
具体的权限是由数字来表示的,读取的权限等于4,用r表示;写入的权限等于2,用w表示;执行的权限等于1,用x表示;
通过4、2、1的组合,得到以下几种权限:0(没有权限);4(读取权限);5(4+1 | 读取+执行);6(4+2 | 读取+写入);7(4+2+1 | 读取+写入+执行)
以755为例:
1-3位7等于4+2+1,rwx,所有者具有读取、写入、执行权限;
4-6位5等于4+1+0,r-x,同组用户具有读取、执行权限但没有写入权限;
7-9位5,同上,也是r-x,其他用户具有读取、执行权限但没有写入权限。
chown 文件切换所属用户
root@iZwz9434lxf5ptexiu13giZ:~/yanyan/tmp/test# chown -R xiaoming ./dragon.txt
root@iZwz9434lxf5ptexiu13giZ:~/yanyan/tmp/test# ll -rt
total 8
drwxr-xr-x 4 root     root 4096 May  6 15:57 ../
-rw-r--r-- 1 xiaoming root    0 May  6 16:14 dragon.txt
drwxr-xr-x 2 root     root 4096 May  6 16:14 ./
chgrp 文件切换所属组
root@iZwz9434lxf5ptexiu13giZ:~/yanyan/tmp/test# chgrp -R xiaoming ./dragon.txt
root@iZwz9434lxf5ptexiu13giZ:~/yanyan/tmp/test# ll -rt
total 8
drwxr-xr-x 4 root     root     4096 May  6 15:57 ../
-rw-r--r-- 1 xiaoming xiaoming    0 May  6 16:14 dragon.txt
drwxr-xr-x 2 root     root     4096 May  6 16:14 ./
13 字符串处理
printf格式化输出
| 输出类型 | 说明 |
| %ns | 输出字符串,n是数字指代输出几个字符 |
| %ni | 输出整数,n代表输出几个数字 |
| %m.nf | 输出浮点数,m和n分别代表,输出位数和小数位数,如%8.2f,表示总共输出8位,小数部分2位,整数部分6位 |
| 输出格式 | 说明 |
| \a | 输出警告声音 |
| \b | 输出退格键 |
| \f | 清楚屏幕 |
| \n | 换行 |
| \r | 回车 |
| \t | 水平输出退格键,Tab键 |
| \v | 垂直输出退格键,Tab键 |
printf和其他命令一起使用
root@ubuntu:/home/yanyanzhang/shell_study# printf '%s' $(cat demo.txt)
NAMEAGEzhang10wang20li30root@ubuntu:/home/yanyanzhang/shell_study# cat demo.txt
NAME    AGE
zhang    10
wang    20
li        30
加上换行和制表符
root@ubuntu:/home/yanyanzhang/shell_study# printf '%s\t%s\t\n' $(cat demo.txt)
NAME    AGE
zhang    10
wang    20
li    30
awk
awk '条件1 {动作1} 条件2{动作2} ....' 文件名 说明:条件和动作必须被单引号包裹。
条件:
x>10 : 判断变量x是否大于10
x == y,是否相等
A ~ B,字符串A中是包含能匹配B表达式的子字符串
A !~ B,字符串A中是不包含能匹配B表达式的子字符串
动作:
格式化输出
控制流程语句
root@ubuntu:/home/yanyanzhang/shell_study# cat demo1.txt
ID    NAME    LINUX    PHP    JAVA    PYTHON    C
1    zhang    100    100    100    100    100
2    wang    90    90    90    90    90
3    li    80    80    80    80    80
4    zhao 70    70    70    70    70
5    sun    60    60    60    60    60
root@ubuntu:/home/yanyanzhang/shell_study# awk '{printf $1"\t" $2"\t" $4"\t\n"}' demo1.txt
ID    NAME    PHP
1    zhang    100
2    wang    90
3    li    80
4    zhao    70
5    sun    60
printf不能输出百分号, print可以
root@ubuntu:/home/yanyanzhang/shell_study# df -h
Filesystem      Size  Used Avail Use% Mounted on
udev            1.9G     0  1.9G   0% /dev
tmpfs           393M   46M  347M  12% /run
/dev/sda1        19G   12G  6.1G  66% /
tmpfs           2.0G  216K  2.0G   1% /dev/shm
tmpfs           5.0M  4.0K  5.0M   1% /run/lock
tmpfs           2.0G     0  2.0G   0% /sys/fs/cgroup
tmpfs           393M   64K  393M   1% /run/user/1000
root@ubuntu:/home/yanyanzhang/shell_study# df -h |grep -v "Size"| awk '{print $1 "\t" $5 "\t" }'
udev    0%
tmpfs    12%
/dev/sda1    66%
tmpfs    1%
tmpfs    1%
tmpfs    0%
tmpfs    1%
判断根分区的百分比超过90%,输出提示信息
root@ubuntu:/home/yanyanzhang/shell_study# df -h | grep "/dev/sda1"
/dev/sda1        19G   12G  6.1G  66% /
root@ubuntu:/home/yanyanzhang/shell_study# df -h | grep "dev/sda1" | awk  '{print $5}'
66%
root@ubuntu:/home/yanyanzhang/shell_study# df -h | grep "dev/sda1" | awk  '{print $5}' | cut -d"%" -f1
66
awk的执行条件
| 条件类型 | 条件 | 说明 |
| awk保留字 | BEGIN | 在awk程序一开始,尚未读取任何数据之前执行,BEGIN后的动作只在程序开始前执行一次 |
| END | 同上,程序结束前执行,执行一次 |
BEGIN
root@ubuntu:/home/yanyanzhang/shell_study# df -h | grep "dev/sda1" | awk  'BEGIN{printf "----start----\n"}  {print $5}' | cut -d"%" -f1
----start----
66
END
root@ubuntu:/home/yanyanzhang/shell_study# df -h | grep "dev/sda1" | awk  'END{printf "----end----\n"}  {print $5}' | cut -d"%" -f1
66
----end----
输出linux成绩大于等于80分的同学姓名
root@ubuntu:/home/yanyanzhang/shell_study# cat demo1.txt
ID    NAME    LINUX    PHP    JAVA    PYTHON    C
1    zhang    100    100    100    100    100
2    wang    90    90    90    90    90
3    li    80    80    80    80    80
4    zhao 70    70    70    70    70
5    sun    60    60    60    60    60
root@ubuntu:/home/yanyanzhang/shell_study# cat demo1.txt | grep -v "NAME" | awk '$3 >= 80 {printf $2 "\n"}'
zhang
wang
li
如果想让awk识别正则,必须用//包含才行
awk的执行过程是,循环读取一行的内容为 $0,然后一行中每列分别为$1,$2,.... $n,匹配其实是匹配的$0里面的内容。printf 不指定,就是打印所有列
例如,打印包含z的的所有行
root@ubuntu:/home/yanyanzhang/shell_study# cat demo1.txt
ID    NAME    LINUX    PHP    JAVA    PYTHON    C
1    zhang    100    100    100    100    100
2    wang    90    90    90    90    90
3    li    80    80    80    80    80
4    zhao 70    70    70    70    70
5    sun    60    60    60    60    60
root@ubuntu:/home/yanyanzhang/shell_study# awk '/z/ {print}' demo1.txt
1    zhang    100    100    100    100    100
4    zhao 70    70    70    70    70
在指定列中去匹配
root@ubuntu:/home/yanyanzhang/shell_study# cat demo1.txt
ID    NAME    LINUX    PHP    JAVA    PYTHON    C
1    zhang    100    100    100    100    100
2    wang    90    90    90    90    90
3    li    80    80    80    80    80
4    zhao 70    70    70    70    70
5    sun    60    60    60    60    60
root@ubuntu:/home/yanyanzhang/shell_study# awk '/z/ {print}' demo1.txt
1    zhang    100    100    100    100    100
4    zhao 70    70    70    70    70

# 第二列中是否包含字符串zhan,包含就打印
root@ubuntu:/home/yanyanzhang/shell_study# awk ' $2 ~ /zhan/ {print $1 "\t" $2 "\t" $3 "\t\n"}' demo1.txt
1    zhang    100
awk的内置变量
| awk内置变量 | 作用 |
| $0 | 代表awk所读入的整行数据,awk是一行一行读入数据的 |
| $n | 代表目前读入行的第几个字段,也就是第几列 |
| NF | 当前拥有的列总数 |
| NR | 当前awk所处理的行,是总数据的第几行 |
| FS | 用户自定义分隔符,awk默认的分隔符是任何空格,如果想使用其他的分隔符,如:,就需要FS变量定义 |
| ARGC | 命令行参数个数 |
| ARGV | 命令行参数数组 |
| FNR | 当前文件中的当前记录数(对输出文件起始为1) |
| OFMT | 数值的输出格式,模式是%.6g |
| OFS | 输出字段的分隔符,默认是空格 |
输出,cut可以替代
root@ubuntu:/home/yanyanzhang/shell_study# cat /etc/passwd | grep /bin/bash
root:x:0:0:root:/root:/bin/bash
yanyanzhang:x:1000:1000:yanyan zhang,,,:/home/yanyanzhang:/bin/bash
rootyanyanzhangroot@ubuntu:/home/yanyanzhang/shell_study# cat /etc/passwd | grep /bin/bash | awk 'BEGIN{FS=":"} {print $1}'
root
yanyanzhang
root@ubuntu:/home/yanyanzhang/shell_study# cat /etc/passwd | grep /bin/bash | cut -d ":" -f 1
root
yanyanzhang
条件输出,cut无法替代
root@ubuntu:/home/yanyanzhang/shell_study# cat /etc/passwd | awk 'BEGIN{FS=":"} $3>=900 {print $1}'
nobody
yanyanzhang
mysql
sed:用于数据的选取,替换,删除,新增等命令。
| 命令 | 作用 |
| -n | 一般sed命令会把所有数据都输出到屏幕上,通过n选择输出第几行 |
| -e | 允许对输入数据应用多条sed命令编辑 |
| -r | 在sed中支持正则表达式 |
| -f 脚本名称 | 从sed脚本中读入sed操作,和awk -f 相似 |
| -i | 用sed命令修改结果直接修改读取的文件,而不是由屏幕输出动作 |
| a \: | 追加,在当前行后面添加一行或多行,添加多行时,除最后一行外,每行末尾都需要用"\"代表数据未完结 |
| c \: | 行替换,同上 \ |
| i \: | 插入,同上\ |
| d: | 删除,删除指定的行 |
# TODO

 浙公网安备 33010602011771号