


vue文档的扫盲笔记
基础部分
1.模板语法
○ Attribute
属性动态绑定多个值
  const objectOfAttrs = {
    id: 'container',
    class: 'wrapper'
  }

  <div v-bind="objectOfAttrs"></div>
○ 指令
-
- § v-bind 等价于 :
   <a v-bind:[attributeName]="url"> ... </a>
    <!-- 简写 -->
    <a :[attributeName]="url"> ... </a>
    eg: :href;
    注:属性名要全部小写;大写会被浏览器强制转成小写。
-
- § v-on 等价于 @
    <a v-on:[eventName]="doSomething"> ... </a>
    <!-- 简写 -->
    <a @[eventName]="doSomething">
    eg:@click;@focus;
2.响应式基础
○ ref()
- 值是被包装在特殊对象中的
- 只能定义string、number、boolean这样的原始类型
- 一个 ref 会在作为响应式对象的属性被访问或修改时自动解包。换句话说,它的行为就像一个普通的属性:
const count = ref(0)
const state = reactive({
  count
})
console.log(state.count) // 0
state.count = 1
console.log(count.value) // 1
- 如果将一个新的 ref 赋值给一个关联了已有 ref 的属性,那么它会替换掉旧的 ref:
//继续接上一部分的代码
const otherCount = ref(2)
state.count = otherCount
console.log(state.count) // 2
// 原始 ref 现在已经和 state.count 失去联系
console.log(count.value) // 1

伪代码,便于理解一下。
  const myRef = {
    _value: 0,
    get value() {
      track()
      return this._value
    },
    set value(newValue) {
      this._value = newValue
      trigger()
    }
  }
○ reactive()
-
-
- 会使对象本身具有响应式
- 响应式对象是 JavaScript 代理,其行为就和普通对象一样。不同的是,Vue 能够拦截对响应式对象所有属性的访问和修改,以便进行依赖追踪和触发更新。
reactive()将深层地转换对象,shallowReactive()API 可以选择退出深层响应性- 只能定义对象类型(对象,数组,map,set这样的合集)
- 不能替换整个对象:由于 Vue 的响应式跟踪是通过属性访问实现的,因此我们必须始终保持对响应式对象的相同引用。这意味着我们不能轻易地“替换”响应式对象,因为这样的话与第一个引用的响应性连接将丢失:
-
let state = reactive({ count: 0 })
// 上面的 ({ count: 0 }) 引用将不再被追踪
// (响应性连接已丢失!)
state = reactive({ count: 1 })
-
-
- 对解构操作不友好:当我们将响应式对象的原始类型属性解构为本地变量时,或者将该属性传递给函数时,我们将丢失响应性连接:
-
const state = reactive({ count: 0 })

// 当解构时,count 已经与 state.count 断开连接
let { count } = state
// 不会影响原始的 state
count++

// 该函数接收到的是一个普通的数字
// 并且无法追踪 state.count 的变化
// 我们必须传入整个对象以保持响应性
callSomeFunction(state.count)
3. 计算属性
-
- 尽量在模板中不要写太多逻辑。
原代码:
<p>Has published books:</p>
<span>{{ author.books.length > 0 ? 'Yes' : 'No' }}</span>
vue文档推荐计算属性去描述响应式状态的复杂逻辑。以下为重构后的代码
<script setup>
import { reactive, computed } from 'vue'

const author = reactive({
  name: 'John Doe',
  books: [
    'Vue 2 - Advanced Guide',
    'Vue 3 - Basic Guide',
    'Vue 4 - The Mystery'
  ]
})

// 一个计算属性 ref
const publishedBooksMessage = computed(() => {
  return author.books.length > 0 ? 'Yes' : 'No'
})
</script>

<template>
  <p>Has published books:</p>
  <span>{{ publishedBooksMessage }}</span>
</template>
-
- 计算属性 vs 方法
计算属性和方法实现的结果是一样的,但是计算属性会给予响应式依赖被缓存。计算属性只会在其响应式依赖更新时才重新计算。而方法总是会在重新渲染发生时再次执行函数。
-
- 为什么需要计算属性缓存呢?
数据很大时会非常耗性能,为避免重复执行很多次数据的getter,所以计算属性缓存能减少性能。
-
- 计算属性默认是只读的,只在某些特殊场景中才需要用到计算属性的“可写”的属性
<script setup> import { ref, computed } from 'vue' const firstName = ref('John') const lastName = ref('Doe') const fullName = computed({ // getter get() { return firstName.value + ' ' + lastName.value }, // setter set(newValue) { // 注意:我们这里使用的是解构赋值语法 [firstName.value, lastName.value] = newValue.split(' ') } }) </script>
运行fullName.value = 'John Doe'时,setter 会被调用而firstName和lastName会随之更新。
-
- 计算属性的 getter 应只做计算而没有任何其他的副作用,这一点非常重要,请务必牢记。举例来说,不要在 getter 中做异步请求或者更改 DOM!一个计算属性的声明中描述的是如何根据其他值派生一个值。因此 getter 的职责应该仅为计算和返回该值。可以使用侦听器根据其他响应式状态的变更来创建副作用。
-
避免直接修改计算属性值。从计算属性返回的值是派生状态。可以把它看作是一个“临时快照”,每当源状态发生变化时,就会创建一个新的快照。更改快照是没有意义的,因此计算属性的返回值应该被视为只读的,并且永远不应该被更改——应该更新它所依赖的源状态以触发新的计算。
4. class与style绑定
class
-
- 绑定对象
常见且很有用的技巧,绑定一个返回对象的计算属性
const isActive = ref(true)
const error = ref(null)

const classObject = computed(() => ({
  active: isActive.value && !error.value,
  'text-danger': error.value && error.value.type === 'fatal'
}))
-
- 绑定数组
<div :class="[activeClass, errorClass]"></div>  //绑定多个class
<div :class="[isActive ? activeClass : '', errorClass]"></div>  //三元表达式
<div :class="[{ active: isActive }, errorClass]"></div>  //写多个三元表达式时代码会冗长,所以在数组中嵌套对象进行优化
<!-- 子组件模板 -->
<p class="foo bar">Hi!</p>

<!-- 在使用组件时 -->
<MyComponent class="baz boo" />

渲染结果:
<p class="foo bar baz boo">Hi!</p>
-
-
- 子组件有多个根元素时,需要通过组件的$attrs属性指定绑定到哪个根元素。
-
<!-- MyComponent 模板使用 $attrs 时 -->
<p :class="$attrs.class">Hi!</p>
<span>This is a child component</span>

<MyComponent class="baz" />

渲染结果:
<p class="baz">Hi!</p>
<span>This is a child component</span>
style 【变量名称推荐使用驼峰式命名】
-
- 绑定对象
const styleObject = reactive({
  color: 'red',
  fontSize: '13px'
})

<div :style="styleObject"></div>
-
- 绑定数组,给:style绑定一个包含多个样式对象的数组,这些对象会被合并后渲染到同一个元素。
<div :style="[baseStyles, overridingStyles]"></div>
5. 条件渲染
-
-
v-if,v-else,v-else-if
-
v-show
-
v-if的优先级高于v-for
6.列表渲染 v-for
-
-
渲染数组
-
const items = ref([{ message: 'Foo' }, { message: 'Bar' }])

<li v-for="item in items">
  {{ item.message }}
</li>

//也可以使用 of 作为分隔符来替代 in,这更接近 JavaScript 的迭代器语法:
<div v-for="item of items"></div>
v-for 是对应js的 forEach 回调的函数签名的。实际上,你也可以在定义 v-for 的变量别名时使用解构,和解构函数参数类似:
<li v-for="{ message } in items">
  {{ message }}
</li>

<!-- 有 index 索引时 -->
<li v-for="({ message }, index) in items">
  {{ message }} {{ index }}
</li>
-
-
v-for与对象
-
也可以使用 v-for 来遍历一个对象的所有属性。遍历的顺序会基于对该对象调用 Object.keys() 的返回值来决定。
const myObject = reactive({
  title: 'How to do lists in Vue',
  author: 'Jane Doe',
  publishedAt: '2016-04-10'
})

<li v-for="(value, key, index) in myObject">
  {{ index }}. {{ key }}: {{ value }}
</li>
//value:属性值,key:属性名,index:位置索引
-
-
通过key管理状态
- 推荐在任何可行的时候为
v-for提供一个唯一的keyattribute,以便它可以跟踪每个节点的标识,从而重用和重新排序现有的元素。 key绑定的值期望是一个基础类型的值,例如字符串或 number 类型。不要用对象作为v-for的 key。
- 推荐在任何可行的时候为
-
Vue 默认按照“就地更新”的策略来更新通过
v-for渲染的元素列表。当数据项的顺序改变时,Vue 不会随之移动 DOM 元素的顺序,而是就地更新每个元素,确保它们在原本指定的索引位置上渲染。默认模式是高效的,但只适用于列表渲染输出的结果不依赖子组件状态或者临时 DOM 状态 (例如表单输入值) 的情况。
-
-
在组件上使用v-for的todo list的案例
-
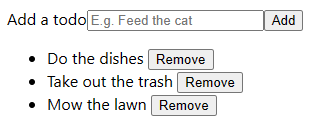
App.vue
<script setup>
import { ref } from 'vue'
import TodoItem from './TodoItem.vue'

const newTodoText = ref('')
const todos = ref([
  {
    id: 1,
    title: 'Do the dishes'
  },
  {
    id: 2,
    title: 'Take out the trash'
  },
  {
    id: 3,
    title: 'Mow the lawn'
  }
])

let nextTodoId = 4

function addNewTodo() {
  todos.value.push({
    id: nextTodoId++,
    title: newTodoText.value
  })
  newTodoText.value = ''
}
</script>

<template>
    <form v-on:submit.prevent="addNewTodo">
    <label for="new-todo">Add a todo</label>
    <input
      v-model="newTodoText"
      id="new-todo"
      placeholder="E.g. Feed the cat"
    />
    <button>Add</button>
  </form>
  <ul>
    <todo-item
      v-for="(todo, index) in todos"
      :key="todo.id"
      :title="todo.title"
      @remove="todos.splice(index, 1)"
    ></todo-item>
  </ul>
</template>
TodoItem.vuew
<script setup>
defineProps(['title'])
defineEmits(['remove'])
</script>

<template>
  <li>
    {{ title }}
    <button @click="$emit('remove')">Remove</button>
  </li>
</template>
-
-
数组变化侦测
- 改变原数组的方法,在调用这个方法时就会触发相关的更新:push()、pop()、shift()、unshift()、splice()、sort()、reverse()
- 不会改变原数组的方法,需要手动对原数组进行赋值变更数据:filter()、concat()、slice()等
-
// `items` 是一个数组的 ref
items.value = items.value.filter((item) => item.message.match(/Foo/))
-
-
展示过滤或排序后的结果,可以使用计算属性返回过滤或排序好的数据
-
const numbers = ref([1, 2, 3, 4, 5])

const evenNumbers = computed(() => {
  return numbers.value.filter((n) => n % 2 === 0)
})
<li v-for="n in evenNumbers">{{ n }}</li>
在计算属性不可行的情况下 (例如在多层嵌套的 v-for 循环中),你可以使用以下方法:
const sets = ref([
  [1, 2, 3, 4, 5],
  [6, 7, 8, 9, 10]
])

function even(numbers) {
  return numbers.filter((number) => number % 2 === 0)
}


<ul v-for="numbers in sets">
  <li v-for="n in even(numbers)">{{ n }}</li>
</ul>
注意:在计算属性中使用 reverse() 和 sort() 的时候务必小心!这两个方法将变更原始数组,计算函数中不应该这么做。请在调用这些方法之前创建一个原数组的副本:
- return numbers.reverse()
+ return [...numbers].reverse()
7. 事件处理
-
-
在内联事件处理器中访问事件参数
-
有时我们需要在内联事件处理器中访问原生 DOM 事件。你可以向该处理器方法传入一个特殊的 $event 变量,或者使用内联箭头函数:
<!-- 使用特殊的 $event 变量 -->
<button @click="warn('Form cannot be submitted yet.', $event)">
  Submit
</button>

<!-- 使用内联箭头函数 -->
<button @click="(event) => warn('Form cannot be submitted yet.', event)">
  Submit
</button>


function warn(message, event) {
  // 这里可以访问原生事件
  if (event) {
    event.preventDefault()
  }
  alert(message)
}
-
-
事件修饰符
-
在处理事件时调用event.preventDefault()或event.stopPropagation()是很常见的。尽管我们可以直接在方法内调用,但如果方法能更专注于数据逻辑而不用去处理 DOM 事件的细节会更好。
Vue 为 v-on 提供了事件修饰符。修饰符是用 . 表示的指令后缀
.stop
.prevent
.self
.capture
.once
.passive
<!-- 单击事件将停止传递 --> <a @click.stop="doThis"></a>
<!-- 提交事件将不再重新加载页面 --> <form @submit.prevent="onSubmit"></form>
<!-- 修饰语可以使用链式书写 --> <a @click.stop.prevent="doThat"></a>
<!-- 也可以只有修饰符 --> <form @submit.prevent></form>
<!-- 仅当 event.target 是元素本身时才会触发事件处理器 --> <!-- 例如:事件处理器不来自子元素 --> <div @click.self="doThat">...</div>
使用修饰符时需要注意调用顺序,因为相关代码是以相同的顺序生成的。因此使用@click.prevent.self会阻止元素及其子元素的所有点击事件的默认行为,而@click.self.prevent则只会阻止对元素本身的点击事件的默认行为。
.capture、.once 和 .passive 修饰符与原生 addEventListener 事件相对应:
<!-- 添加事件监听器时,使用 `capture` 捕获模式 -->
<!-- 例如:指向内部元素的事件,在被内部元素处理前,先被外部处理 -->
<div @click.capture="doThis">...</div>

<!-- 点击事件最多被触发一次 -->
<a @click.once="doThis"></a>

<!-- 滚动事件的默认行为 (scrolling) 将立即发生而非等待 `onScroll` 完成 -->
<!-- 以防其中包含 `event.preventDefault()` -->
<div @scroll.passive="onScroll">...</div>
.passive 修饰符一般用于触摸事件的监听器,可以用来改善移动端设备的滚屏性能。
请勿同时使用 .passive 和 .prevent,因为 .passive 已经向浏览器表明了你不想阻止事件的默认行为。如果你这么做了,则 .prevent 会被忽略,并且浏览器会抛出警告。
-
- 按键修饰符
<!-- 仅在 `key` 为 `Enter` 时调用 `submit` -->
<input @keyup.enter="submit" />

<!-- 可以直接使用 KeyboardEvent.key 暴露的按键名称作为修饰符,但需要转为 kebab-case 形式。 -->
<input @keyup.page-down="onPageDown" />
-
-
-
按键别名
-
-
Vue 为一些常用的按键提供了别名:

.enter
.tab
.delete (捕获“Delete”和“Backspace”两个按键)
.esc
.space
.up
.down
.left
.right
-
- 系统按键修饰符
.ctrl
.alt
.shift
.meta


<!-- Alt + Enter -->
<input @keyup.alt.enter="clear" />

<!-- Ctrl + 点击 -->
<div @click.ctrl="doSomething">Do something</div>
-
-
-
.exact修饰符
-
-
.exact 修饰符允许控制触发一个事件所需的确定组合的系统按键修饰符。

<!-- 当按下 Ctrl 时,即使同时按下 Alt 或 Shift 也会触发 -->
<button @click.ctrl="onClick">A</button>

<!-- 仅当按下 Ctrl 且未按任何其他键时才会触发 -->
<button @click.ctrl.exact="onCtrlClick">A</button>

<!-- 仅当没有按下任何系统按键时触发 -->
<button @click.exact="onClick">A</button>
.left
.right
.middle
8.表单输入绑定
-
-
基本使用:
-
<!--  原生  -->
<input
  :value="text"
  @input="event => text = event.target.value">

↓↓↓
<!-- vue  -->
<input v-model="text">
文本
<input v-model="message" placeholder="edit me" />

多行文本
<textarea v-model="message" placeholder="add multiple lines"></textarea>

复选框
<input type="checkbox" id="checkbox" v-model="checked" />
<label for="checkbox">{{ checked }}</label>

多个复选框
const checkedNames = ref([])

<input type="checkbox" id="jack" value="Jack" v-model="checkedNames">
<label for="jack">Jack</label>

<input type="checkbox" id="john" value="John" v-model="checkedNames">
<label for="john">John</label>

<input type="checkbox" id="mike" value="Mike" v-model="checkedNames">
<label for="mike">Mike</label>

单选按钮

<input type="radio" id="one" value="One" v-model="picked" />
<label for="one">One</label>

<input type="radio" id="two" value="Two" v-model="picked" />
<label for="two">Two</label>


选择器
<div>Selected: {{ selected }}</div>

<select v-model="selected">
  <option disabled value="">Please select one</option>
  <option>A</option>
  <option>B</option>
  <option>C</option>
</select>

多选
<div>Selected: {{ selected }}</div>

<select v-model="selected" multiple>
  <option>A</option>
  <option>B</option>
  <option>C</option>
</select>

优化,选择器的选项可以使用 v-for 动态渲染:
const selected = ref('A')

const options = ref([
  { text: 'One', value: 'A' },
  { text: 'Two', value: 'B' },
  { text: 'Three', value: 'C' }
])

<select v-model="selected">
  <option v-for="option in options" :key="option.value" :value="option.value">
    {{ option.text }}
  </option>
</select>

<div>Selected: {{ selected }}</div>
-
-
值绑定
-
对于单选按钮,复选框和选择器选项,v-model 绑定的值通常是静态的字符串 (或者对复选框是布尔值):
<!-- `picked` 在被选择时是字符串 "a" -->
<input type="radio" v-model="picked" value="a" />

<!-- `toggle` 只会为 true 或 false -->
<input type="checkbox" v-model="toggle" />

<!-- `selected` 在第一项被选中时为字符串 "abc" -->
<select v-model="selected">
  <option value="abc">ABC</option>
</select>
- 复选框
<input
  type="checkbox"
  v-model="toggle"
  true-value="yes"
  false-value="no" />

true-value 和 false-value 是 Vue 特有的 attributes,仅支持和 v-model 配套使用。可绑定动态值。
<input
  type="checkbox"
  v-model="toggle"
  :true-value="dynamicTrueValue"
  :false-value="dynamicFalseValue" />
-
- 修饰符
.lazy:可以添加 lazy 修饰符来改为在每次 change 事件后更新数据:
lazy 修饰符来改为在每次 change 事件后更新数据:.number:让用户输入自动转换为数字
.trim:默认自动去除用户输入内容中两端的空格
9. 生命周期钩子
常用的是 onMounted、onUpdated 和 onUnmounted。
onMounted():组件挂在完成后执行。
onUpdated():组件因响应式状态变更而更新其DOM树之后调用。
onUnmounted():在组件实例被卸载之后调用。
onBeforeMount():在组件被挂在之前被调用。
onBeforeUpdate():在组件即将因为响应式状态变更而更新其DOM树之前调用。这个钩子在服务器渲染期间不会被调用。
onBeforeUnmount():在组件实例被卸载之前调用。
onErrorCaptured():捕获了后代组件传递的错误时调用。
onRenderTracked():这是一个调试钩子,当组件渲染过程中追踪到响应式依赖时调用。这个钩子仅在开发模式下可用,且在服务器渲染期间不会被调用。
onRenderTriggered():这是一个调试钩子,当像饮食依赖的变更出发了组件渲染时调用。这个钩子仅在开发模式下可用,且在服务器渲染期间不会被调用。
onActivated():注册一个回调函数,若组件实例是 <KeepAlive> 缓存树的一部分,当组件被插入到 DOM 中时调用。这个钩子在服务器端渲染期间不会被调用。
onDeactivated():注册一个回调函数,若组件实例是 <KeepAlive> 缓存树的一部分,当组件从 DOM 中被移除时调用。这个钩子在服务器端渲染期间不会被调用。
onServerPrefetch():注册一个异步函数,在组件实例在服务器上被渲染之前调用。
10.侦听器 watch
- 计算属性允许我们声明性地计算衍生值。
- 侦听器在状态变化时执行一些“副作用”
在组合式 API 中,我们可以使用 watch 函数在每次响应式状态发生变化时触发回调函数:
watch 默认是懒执行的,immediate: true可以强制侦听器的回调立即执行。
<script setup>
import { ref, watch } from 'vue'

const question = ref('')
const answer = ref('Questions usually contain a question mark. ;-)')

// 可以直接侦听一个 ref
watch(question, async (newQuestion, oldQuestion) => {
  if (newQuestion.indexOf('?') > -1) {
    answer.value = 'Thinking...'
    try {
      const res = await fetch('https://yesno.wtf/api')
      answer.value = (await res.json()).answer
    } catch (error) {
      answer.value = 'Error! Could not reach the API. ' + error
    }
  }
})
</script>

<template>
  <p>
    Ask a yes/no question:
    <input v-model="question" />
  </p>
  <p>{{ answer }}</p>
</template>
-
-
侦听数据源类型
-
watch 的第一个参数可以是不同形式的“数据源”:它可以是一个 ref (包括计算属性)、一个响应式对象、一个 getter 函数、或多个数据源组成的数组:
const x = ref(0)
const y = ref(0)

// 单个 ref
watch(x, (newX) => {
  console.log(`x is ${newX}`)
})

// getter 函数
watch(
  () => x.value + y.value,
  (sum) => {
    console.log(`sum of x + y is: ${sum}`)
  }
)

// 多个来源组成的数组
watch([x, () => y.value], ([newX, newY]) => {
  console.log(`x is ${newX} and y is ${newY}`)
})
注意,你不能直接侦听响应式对象的属性值,例如:
const obj = reactive({ count: 0 })

// 错误,因为 watch() 得到的参数是一个 number
watch(obj.count, (count) => {
  console.log(`count is: ${count}`)
})

这里需要用一个返回该属性的 getter 函数:
// 提供一个 getter 函数
watch(
  () => obj.count,
  (count) => {
    console.log(`count is: ${count}`)
  }
)
-
-
watchEffect()
-
侦听器的回调使用与源完全相同的响应式状态是很常见的。例如下面的代码,在每当 todoId 的引用发生变化时使用侦听器来加载一个远程资源:

const todoId = ref(1)
const data = ref(null)

watch(todoId, async () => {
  const response = await fetch(
    `https://jsonplaceholder.typicode.com/todos/${todoId.value}`
  )
  data.value = await response.json()
}, { immediate: true })


watchEffect()函数简化上面的代码

watchEffect(async () => {
  const response = await fetch(
    `https://jsonplaceholder.typicode.com/todos/${todoId.value}`
  )
  data.value = await response.json()
})
这个例子中,回调会立即执行,不需要指定 immediate: true。在执行期间,它会自动追踪 todoId.value 作为依赖(和计算属性类似)。每当 todoId.value 变化时,回调会再次执行。有了 watchEffect(),我们不再需要明确传递 todoId 作为源值。
watchvs.watchEffect
watch和watchEffect都能响应式地执行有副作用的回调。它们之间的主要区别是追踪响应式依赖的方式:
watch只追踪明确侦听的数据源。它不会追踪任何在回调中访问到的东西。另外,仅在数据源确实改变时才会触发回调。watch会避免在发生副作用时追踪依赖,因此,我们能更加精确地控制回调函数的触发时机。
watchEffect,则会在副作用发生期间追踪依赖。它会在同步执行过程中,自动追踪所有能访问到的响应式属性。这更方便,而且代码往往更简洁,但有时其响应性依赖关系会不那么明确。
11.模板引用
ref 是一个特殊的 attribute,和 v-for 章节中提到的 key 类似。
<script setup>
import { ref, onMounted } from 'vue'

// 声明一个 ref 来存放该元素的引用
// 必须和模板里的 ref 同名
const input = ref(null)

onMounted(() => {
  input.value.focus()
})
</script>

<template>
  <input ref="input" />
</template>
-
-
v-for中的模板引用
-
<script setup>
import { ref, onMounted } from 'vue'

const list = ref([
  /* ... */
])

const itemRefs = ref([])

onMounted(() => console.log(itemRefs.value))
</script>

<template>
  <ul>
    <li v-for="item in list" ref="itemRefs">
      {{ item }}
    </li>
  </ul>
</template>

应该注意的是,ref 数组并不保证与源数组相同的顺序。
-
-
函数模板引用
-
<input :ref="(el) => { /* 将 el 赋值给一个数据属性或 ref 变量 */ }">

ref attribute 还可以绑定为一个函数,会在每次组件更新时都被调用。该函数会收到元素引用作为其第一个参数:
-
-
组件上的ref
-
<script setup> import { ref, onMounted } from 'vue' import Child from './Child.vue' const child = ref(null) onMounted(() => { // child.value 是 <Child /> 组件的实例 }) </script> <template> <Child ref="child" /> </template>
如果一个子组件使用的是选项式 API 或没有使用<script setup>,被引用的组件实例和该子组件的this完全一致,这意味着父组件对子组件的每一个属性和方法都有完全的访问权。这使得在父组件和子组件之间创建紧密耦合的实现细节变得很容易,当然也因此,应该只在绝对需要时才使用组件引用。大多数情况下,你应该首先使用标准的 props 和 emit 接口来实现父子组件交互。
如果一个子组件使用的是选项式 API 或没有使用 <script setup>,被引用的组件实例和该子组件的 this 完全一致,这意味着父组件对子组件的每一个属性和方法都有完全的访问权。这使得在父组件和子组件之间创建紧密耦合的实现细节变得很容易,当然也因此,应该只在绝对需要时才使用组件引用。大多数情况下,你应该首先使用标准的 props 和 emit 接口来实现父子组件交互。
有一个例外的情况,使用了 <script setup> 的组件是默认私有的:一个父组件无法访问到一个使用了 <script setup> 的子组件中的任何东西,除非子组件在其中通过 defineExpose 宏显式暴露:
<script setup>
import { ref } from 'vue'

const a = 1
const b = ref(2)

// 像 defineExpose 这样的编译器宏不需要导入
defineExpose({
  a,
  b
})
</script>
12.组件
(1)组件注册
-
- 全局注册
1. 全局注册,但并没有被使用的组件无法在生产打包时被自动移除 (也叫“tree-shaking”)。如果你全局注册了一个组件,即使它并没有被实际使用,它仍然会出现在打包后的 JS 文件中。
2. 全局注册在大型项目中使项目的依赖关系变得不那么明确。在父组件中使用子组件时,不太容易定位子组件的实现。和使用过多的全局变量一样,这可能会影响应用长期的可维护性。

相比之下,局部注册的组件需要在使用它的父组件中显式导入,并且只能在该父组件中使用。它的优点是使组件之间的依赖关系更加明确,并且对 tree-shaking 更加友好。
-
- 局部注册
1. 在使用 <script setup>中
<script setup>
import ComponentA from './ComponentA.vue'
</script>

<template>
  <ComponentA />
</template>
2. 如果没有使用 <script setup>,则需要使用 components 选项来显式注册:
import ComponentA from './ComponentA.js'

export default {
  components: {
    ComponentA
  },
  setup() {
    // ...
  }
}
-
- 组件名格式
使用 PascalCase 作为组件名的注册格式
- PascalCase 是合法的 JavaScript 标识符。这使得在 JavaScript 中导入和注册组件都很容易,同时 IDE 也能提供较好的自动补全。
<PascalCase />在模板中更明显地表明了这是一个 Vue 组件,而不是原生 HTML 元素。同时也能够将 Vue 组件和自定义元素 (web components) 区分开来。
(2)props
一个组件需要显式声明它所接受的 props,这样 Vue 才能知道外部传入的哪些是 props,哪些是透传 attribute
- 在使用 <script setup> 的单文件组件中,props 可以使用 defineProps() 宏来声明:
<script setup>
const props = defineProps(['foo'])
console.log(props.foo)
</script>
- 在没有使用 <script setup> 的组件中,prop 可以使用 props 选项来声明:
export default {
props: ['foo'],
setup(props) { // setup() 接收 props 作为第一个参数
console.log(props.foo)
}
}
除了使用字符串数组来声明 prop 外,还可以使用对象的形式:
-
- // 使用 <script setup>
defineProps({ title: String, likes: Number })
-
- // 非 <script setup>
export default { props: { title: String, likes: Number } }
如果你正在搭配 TypeScript 使用 <script setup>,也可以使用类型标注来声明 props:
<script setup lang="ts">
defineProps<{
  title?: string
  likes?: number
}>()
</script>
使用一个对象绑定多个 prop
const post = {
  id: 1,
  title: 'My Journey with Vue'
}

<BlogPost v-bind="post" />

等价于:
<BlogPost :id="post.id" :title="post.title" />
prop校验
例:
defineProps({
  // 基础类型检查
  // (给出 `null` 和 `undefined` 值则会跳过任何类型检查)
  propA: Number,
  // 多种可能的类型
  propB: [String, Number],
  // 必传,且为 String 类型
  propC: {
    type: String,
    required: true
  },
  // Number 类型的默认值
  propD: {
    type: Number,
    default: 100
  },
  // 对象类型的默认值
  propE: {
    type: Object,
    // 对象或数组的默认值
    // 必须从一个工厂函数返回。
    // 该函数接收组件所接收到的原始 prop 作为参数。
    default(rawProps) {
      return { message: 'hello' }
    }
  },
  // 自定义类型校验函数
  propF: {
    validator(value) {
      // The value must match one of these strings
      return ['success', 'warning', 'danger'].includes(value)
    }
  },
  // 函数类型的默认值
  propG: {
    type: Function,
    // 不像对象或数组的默认,这不是一个
    // 工厂函数。这会是一个用来作为默认值的函数
    default() {
      return 'Default function'
    }
  }
})
(3)组件事件
<!-- 子组件-->
<button @click="$emit('someEvent')">click me</button>
<!-- 声明触发的事件-->
<script setup>
defineEmits(['someEvent'])
</script>


<!-- 父组件-->
<MyComponent @some-event="callback" />
(4) v-model 绑定
- 多个
v-model绑定
<UserName
  v-model:first-name="first"
  v-model:last-name="last"
/>

<script setup>
defineProps({
  firstName: String,
  lastName: String
})

defineEmits(['update:firstName', 'update:lastName'])
</script>

<template>
  <input
    type="text"
    :value="firstName"
    @input="$emit('update:firstName', $event.target.value)"
  />
  <input
    type="text"
    :value="lastName"
    @input="$emit('update:lastName', $event.target.value)"
  />
</template>
(5)透传Attributes
“透传 attribute”指的是传递给一个组件,却没有被该组件声明为 props 或 emits 的 attribute 或者 v-on 事件监听器。最常见的例子就是 class、style 和 id。
例:
<!-- <MyButton> 的模板 -->
<button>click me</button>

父组件
<MyButton class="large" />

渲染结果
<button class="large">click me</button>
(6)插槽Slots
通过使用插槽,<FancyButton> 组件更加灵活和具有可复用性。现在组件可以用在不同的地方渲染各异的内容,但同时还保证都具有相同的样式。
例:
<FancyButton>
  Click me! <!-- 插槽内容 -->
</FancyButton>

<!--FancyButton模板 -- >
<button class="fancy-btn">
  <slot></slot> <!-- 插槽出口 -->
</button>

<!-- 渲染出来的DOM -->
<button class="fancy-btn">Click me!</button>
注:父组件模板中的表达式只能访问父组件的作用域;子组件模板中的表达式只能访问子组件的作用域。
-
-
-
具名作用域插槽
-
-
插槽
<MyComponent>
  <template #header="headerProps">
    {{ headerProps }}
  </template>

  <template #default="defaultProps">
    {{ defaultProps }}
  </template>

  <template #footer="footerProps">
    {{ footerProps }}
  </template>
</MyComponent>

向具名插槽中传入props
<slot name="header" message="hello"></slot>


注意插槽上的 name 是一个 Vue 特别保留的 attribute,不会作为 props 传递给插槽。因此最终 headerProps 的结果是 { message: 'hello' }。
13.组合式函数
- 在 Vue 应用的概念中,“组合式函数”(Composables) 是一个利用 Vue 的组合式 API 来封装和复用有状态逻辑的函数。
- 当构建前端应用时,我们常常需要复用公共任务的逻辑。例如为了在不同地方格式化时间,我们可能会抽取一个可复用的日期格式化函数。这个函数封装了无状态的逻辑:它在接收一些输入后立刻返回所期望的输出。复用无状态逻辑的库有很多,比如你可能已经用过的 lodash 或是 date-fns。
- 一个组合式函数可以调
- 用一个或多个其他的组合式函数。这使得我们可以像使用多个组件组合成整个应用一样,用多个较小且逻辑独立的单元来组合形成复杂的逻辑。实际上,这正是为什么我们决定将实现了这一设计模式的 API 集合命名为组合式 API。
// event.js
import { onMounted, onUnmounted } from 'vue'

export function useEventListener(target, event, callback) {
  // 如果你想的话,
  // 也可以用字符串形式的 CSS 选择器来寻找目标 DOM 元素
  onMounted(() => target.addEventListener(event, callback))
  onUnmounted(() => target.removeEventListener(event, callback))
}

// mouse.js
import { ref } from 'vue'
import { useEventListener } from './event'

export function useMouse() {
  const x = ref(0)
  const y = ref(0)

  useEventListener(window, 'mousemove', (event) => {
    x.value = event.pageX
    y.value = event.pageY
  })

  return { x, y }
}


使用方式:
<script setup>
import { useMouse } from './mouse.js'

const { x, y } = useMouse()
</script>

<template>Mouse position is at: {{ x }}, {{ y }}</template>
例子:异步状态示例
在做异步数据请求时,我们常常需要处理不同的状态:加载中、加载成功和加载失败。
// fetch.js
import { ref } from 'vue'

export function useFetch(url) {
  const data = ref(null)
  const error = ref(null)

  fetch(url)
    .then((res) => res.json())
    .then((json) => (data.value = json))
    .catch((err) => (error.value = err))

  return { data, error }
}

在组件里使用
<template>
  <div v-if="error">Oops! Error encountered: {{ error.message }}</div>
  <div v-else-if="data">
    Data loaded:
    <pre>{{ data }}</pre>
  </div>
  <div v-else>Loading...</div>
</template>

<script setup>
import { useFetch } from './fetch.js'

const { data, error } = useFetch('...')
</script>
在选项式 API 中使用组合式函数
import { useMouse } from './mouse.js'
import { useFetch } from './fetch.js'

export default {
  setup() {
    const { x, y } = useMouse()
    const { data, error } = useFetch('...')
    return { x, y, data, error }
  },
  mounted() {
    // setup() 暴露的属性可以在通过 `this` 访问到
    console.log(this.x)
  }
  // ...其他选项
}


【推荐】国内首个AI IDE,深度理解中文开发场景,立即下载体验Trae
【推荐】编程新体验,更懂你的AI,立即体验豆包MarsCode编程助手
【推荐】抖音旗下AI助手豆包,你的智能百科全书,全免费不限次数
【推荐】轻量又高性能的 SSH 工具 IShell:AI 加持,快人一步
· 被坑几百块钱后,我竟然真的恢复了删除的微信聊天记录!
· 没有Manus邀请码?试试免邀请码的MGX或者开源的OpenManus吧
· 【自荐】一款简洁、开源的在线白板工具 Drawnix
· 园子的第一款AI主题卫衣上架——"HELLO! HOW CAN I ASSIST YOU TODAY
· Docker 太简单,K8s 太复杂?w7panel 让容器管理更轻松!