vs+qt静态编译环境配置
一、简述
Qt官方提供二进制安装包+vs开发环境默认只能通过动态编译。可以通过Qt提供工具Windeployqt把相关qt依赖dll复制到当前目录(但是会有windows系统提供dll不能关联,所以在其他系统会提示需要运行时库)。
如果需要静态编译exe可执行程序,需要通过Qt源码自己编译。
二、编译安装
2.1环境准备
Qt:qt-everywhere-src-5.12.12
Qt Vs Tools:Vs扩展和更新
Python:Python2.7.18
Ruby:rubyinstaller-devkit-2.7.5-1-x64.exe
Perl:strawberry-perl-5.32.1.1-64bit
Qt源码:qt-everywhere-src-5.12.12.zip
2.2Qt参数修改
Qt解压目录:qtbase\mkspecs\common\msvc-desktop.conf
配置文件中:40、41、42行
  1 QMAKE_CFLAGS_RELEASE = $$QMAKE_CFLAGS_OPTIMIZE -MD
  2 QMAKE_CFLAGS_RELEASE_WITH_DEBUGINFO += $$QMAKE_CFLAGS_OPTIMIZE -Zi -MD
  3 QMAKE_CFLAGS_DEBUG = -Zi –MDd
改为下面内容:
  1 QMAKE_CFLAGS_RELEASE = $$QMAKE_CFLAGS_OPTIMIZE -MT
  2 QMAKE_CFLAGS_RELEASE_WITH_DEBUGINFO += $$QMAKE_CFLAGS_OPTIMIZE -Zi -MT
  3 QMAKE_CFLAGS_DEBUG = -Zi -MTd
2.3编译
编译x64编译环境:管理员运行VS环境的“适用于 VS 2017 的 x64 本机工具命令提示”
输入对应命令:
  1 切换工作目录:
  2 C:\Windows\System32>cd C:\Qt\Qt5.12.12_static\qt-everywhere-src-5.12.12\qt-everywhere-src-5.12.12
  3
  4 预编译,指定安装目录:
  5 C:\Qt\Qt5.12.12_static\qt-everywhere-src-5.12.12\qt-everywhere-src-5.12.12>configure.bat -mp -confirm-license -opensource -platform win32-msvc -debug-and-release -static -force-asserts -prefix C:\Qt\Qt5.12.12_static\Qt_msvc2017_x64_static -static-runtime -silent -opengl desktop -qt-sqlite -qt-pcre -qt-zlib -qt-freetype -qt-harfbuzz -qt-libpng -qt-libjpeg -nomake examples -nomake tests
  6
  7 编译,用默认nmake工具:
  8 C:\Qt\Qt5.12.12_static\qt-everywhere-src-5.12.12\qt-everywhere-src-5.12.12>nmake
  9
 10 对应的程序复制到安装目录:
 11 C:\Qt\Qt5.12.12_static\qt-everywhere-src-5.12.12\qt-everywhere-src-5.12.12>nmake install
configure结束:
  1   Use v8 snapshot ........................ yes
  2   Kerberos Authentication ................ yes
  3
  4 Note: Using static linking will disable the use of dynamically
  5 loaded plugins. Make sure to import all needed static plugins,
  6 or compile needed modules into the library.
  7
  8 Note: No wayland-egl support detected. Cross-toolkit compatibility disabled.
  9
 10 WARNING: QDoc will not be compiled, probably because libclang could not be located. This means that you cannot build the Qt documentation.
 11
 12 Either ensure that llvm-config is in your PATH environment variable, or set LLVM_INSTALL_DIR to the location of your llvm installation.
 13 On Linux systems, you may be able to install libclang by installing the libclang-dev or libclang-devel package, depending on your distribution.
 14 On macOS, you can use Homebrew's llvm package.
 15 On Windows, you must set LLVM_INSTALL_DIR to the installation path.
 16
 17 WARNING: 64-bit cross-building or native toolchain is required to build QtWebEngine.
 18
 19 Qt is now configured for building. Just run 'nmake'.
 20 Once everything is built, you must run 'nmake install'.
 21 Qt will be installed into 'C:\Qt\Qt5.12.9_static\x86'.
 22
 23 Prior to reconfiguration, make sure you remove any leftovers from
 24 the previous build.
nmake结束:
  1 Updating 'qtxmlpatterns_zh_CN.qm'...
  2     Generated 484 translation(s) (484 finished and 0 unfinished)
  3 lrelease qtxmlpatterns_zh_TW.ts
  4 Updating 'qtxmlpatterns_zh_TW.qm'...
  5     Generated 210 translation(s) (210 finished and 0 unfinished)
  6     Ignored 275 untranslated source text(s)
  7         cd qtdoc\ && ( if not exist Makefile C:\Users\admin\Desktop\qt-everywhere-src-5.12.12\qtbase\bin\qmake.exe -o Makefile C:\Users\admin\Desktop\qt-everywhere-src-5.12.12\qtdoc\qtdoc.pro ) && "C:\Program Files (x86)\Microsoft Visual Studio\2017\Enterprise\VC\Tools\MSVC\14.16.27023\bin\HostX86\x86\nmake.exe" -f Makefile
  8 Info: creating cache file C:\Users\admin\Desktop\qt-everywhere-src-5.12.12\qtdoc\.qmake.cache
  9
 10 Microsoft (R) 程序维护实用工具 14.16.27048.0 版
 11 版权所有 (C) Microsoft Corporation。  保留所有权利。
 12
 13         cd doc\ && ( if not exist Makefile C:\Users\admin\Desktop\qt-everywhere-src-5.12.12\qtbase\bin\qmake.exe -o Makefile C:\Users\admin\Desktop\qt-everywhere-src-5.12.12\qtdoc\doc\doc.pro ) && "C:\Program Files (x86)\Microsoft Visual Studio\2017\Enterprise\VC\Tools\MSVC\14.16.27023\bin\HostX86\x86\nmake.exe" -f Makefile
 14
 15 Microsoft (R) 程序维护实用工具 14.16.27048.0 版
 16 版权所有 (C) Microsoft Corporation。  保留所有权利。
 17
 18         "C:\Program Files (x86)\Microsoft Visual Studio\2017\Enterprise\VC\Tools\MSVC\14.16.27023\bin\HostX86\x86\nmake.exe" -f Makefile.Debug
 19
 20 Microsoft (R) 程序维护实用工具 14.16.27048.0 版
 21 版权所有 (C) Microsoft Corporation。  保留所有权利。
 22
nmake install完成后:
  1         C:\Users\admin\Desktop\qt-everywhere-src-5.12.12\qtbase\bin\qmake.exe -install qinstall C:\Users\admin\Desktop\qt-everywhere-src-5.12.12\qttranslations\translations\qtxmlpatterns_uk.qm C:\Qt\static\translations\qtxmlpatterns_uk.qm
  2         C:\Users\admin\Desktop\qt-everywhere-src-5.12.12\qtbase\bin\qmake.exe -install qinstall C:\Users\admin\Desktop\qt-everywhere-src-5.12.12\qttranslations\translations\qtxmlpatterns_zh_CN.qm C:\Qt\static\translations\qtxmlpatterns_zh_CN.qm
  3         C:\Users\admin\Desktop\qt-everywhere-src-5.12.12\qtbase\bin\qmake.exe -install qinstall C:\Users\admin\Desktop\qt-everywhere-src-5.12.12\qttranslations\translations\qtxmlpatterns_zh_TW.qm C:\Qt\static\translations\qtxmlpatterns_zh_TW.qm
  4         cd qtdoc\ && ( if not exist Makefile C:\Users\admin\Desktop\qt-everywhere-src-5.12.12\qtbase\bin\qmake.exe -o Makefile C:\Users\admin\Desktop\qt-everywhere-src-5.12.12\qtdoc\qtdoc.pro ) && "C:\Program Files (x86)\Microsoft Visual Studio\2017\Enterprise\VC\Tools\MSVC\14.16.27023\bin\HostX86\x86\nmake.exe" -f Makefile install
  5
  6 Microsoft (R) 程序维护实用工具 14.16.27048.0 版
  7 版权所有 (C) Microsoft Corporation。  保留所有权利。
  8
  9         cd doc\ && ( if not exist Makefile C:\Users\admin\Desktop\qt-everywhere-src-5.12.12\qtbase\bin\qmake.exe -o Makefile C:\Users\admin\Desktop\qt-everywhere-src-5.12.12\qtdoc\doc\doc.pro ) && "C:\Program Files (x86)\Microsoft Visual Studio\2017\Enterprise\VC\Tools\MSVC\14.16.27023\bin\HostX86\x86\nmake.exe" -f Makefile install
 10
 11 Microsoft (R) 程序维护实用工具 14.16.27048.0 版
 12 版权所有 (C) Microsoft Corporation。  保留所有权利。
 13
 14         "C:\Program Files (x86)\Microsoft Visual Studio\2017\Enterprise\VC\Tools\MSVC\14.16.27023\bin\HostX86\x86\nmake.exe" -f Makefile.Debug install
 15
 16 Microsoft (R) 程序维护实用工具 14.16.27048.0 版
 17 版权所有 (C) Microsoft Corporation。  保留所有权利。
2.4configure参数
  1 -static //指明是静态编译
  2 -prefix "D:\Qt\msvc2017_static" //指明安装的目录
  3 -confirm-license -opensource //指明是开源版本的qt
  4 -debug-and-release //指明需要debug版和release版,可以单独选择release版
  5 -platform win32-msvc //指明使用msvc编译
  6 -nomake examples -nomake tests //不编译样例
  7 -plugin-sql-sqlite -plugin-sql-odbc -qt-zlib -qt-libpng -qt-libjpeg //可选插件
  8 -opengl desktop
  9 -mp //多核编译
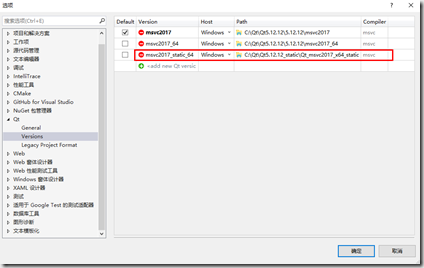
2.5vs环境配置
Vs->Qt VS Tools->Qt Versions
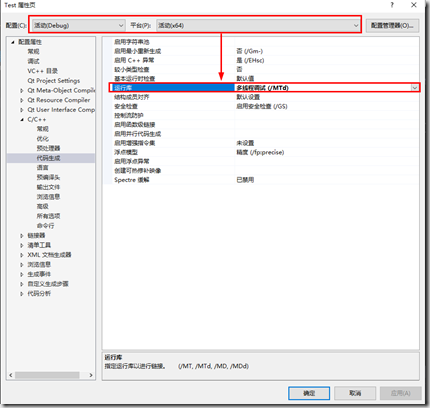
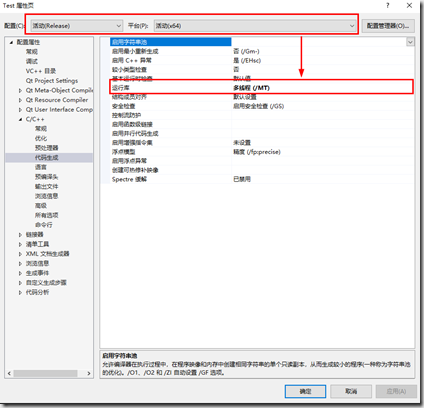
2.6新建项目及静态编译配置
Debug环境:
Release环境:
一种语言的开发环境往往会附带有语言库,这些库就是对操作系统的API的包装,我们也称这些语言库为运行库
对于MSVC的运行库(CRT),按照静态/动态链接,可以分为静态版和动态版;按照调试/发布,可以分为调试版本和发布版本;按照单线程/多线程,可以分为单线程版本和多线程版本(但是目前VS中已不提供单线程版本了)
在调试模式下,使用调试运行库:多线程调试(/MTd)、多线程调试DLL(/MDd)
在发布模式下,使用发布运行库:多线程(/MT)、多线程DLL(/MD)
调试模式下运行库带d,但发布模式不带。调试与发布的区别在于,发布模式省略了程序的调试信息,简单来说就是删除了调试模式下的用于调试的内容,所以一般情况下,发布模式下生成的可执行文件的大小比调试模式下生成的要小
静态链接:多线程(/MT)、多线程调试(/MTd)
动态链接:多线程DLL(/MD)、多线程调试DLL(/MDd)
动态链接为D,静态链接为T。两者的区别在于,静态链接将程序所依赖的运行库集成到了可执行文件中,可执行文件运行时不再需要运行库;动态链接没有把程序所依赖的运行库集成到可执行文件中,可执行文件运行时需要运行库。由于静态链接将程序所依赖的运行库集成到了可执行文件中,一般情况下,生成的可执行文件的大小大于动态链接生成的
对这四种运行库的选在位于VS的项目属性-》C/C++-》代码生成-》运行库:
三、参数详解
configure meta:
  1 -help,-h ............显示此帮助屏幕
  2 -verbose,-v .........在配置期间输出详细消息
  3 -continue............尽管有错误仍然继续配置
  4 -redo ................用以前使用的选项重新配置。其他选项可能会通过,但不会保存以供-redo稍后使用。
  5 -recheck .............放弃缓存的负配置测试结果。安装缺失的依赖关系后使用它。
  6 -recheck-all .........放弃所有缓存的配置测试结果。
  7 -feature- <特征> ...启用<特征>
  8 -no-feature- <feature>禁用<feature> [none]
  9 -list-features .......列出可用功能。请注意一些功能也有专用的命令行选项。
 10 -list-libraries ......列出可能的外部依赖关系。
 11
Build options:
  1 -opensource ..........构建Qt的开源版本
  2 -commercial ..........构建Qt的商业版
  3 -confirm-license .....自动确认许可证
  4 -release.............关闭调试版本的Qt [yes]
  5 -debug ...............打开调试生成Qt [no]
  6 -debug-and-release ...构建两个版本的Qt,包含和不包含打开调试[是](仅适用于Apple和Windows)
  7 -optimize-debug ......在调试版本中启用调试友好的优化[自动](MSVC不支持)
  8 -optimize-size .......优化发布版本的大小而不是速度[no]
  9 -optimized-tools .....甚至在调试版本中构建优化的主机工具[no]
 10 -force-debug-info ....为发布版本创建符号文件[no]
 11 -separate-debug-info。分离调试信息以分离文件[no]
 12 -strip ...............释放不需要的符号的二进制文件[是]
 13 -force-asserts .......即使在发布版本中启用Q_ASSERT [no]
 14 -developer-build .....编译并链接Qt以开发Qt本身(用于自动测试的出口,额外检查等)[no]
 15 -shared..............建立共享的Qt库[是](不适用于UIKit)
 16 -static ..............构建静态Qt库[no](对于UIKit是)
 17 -framework ...........构建Qt框架包[是](仅限Apple)
 18 -platform <target> ...选择主机mkspec [检测到]
 19 -xplatform <target> ..交叉编译时选择target mkspec [PLATFORM]
 20 -device <name> .......交叉编译设备<name>
 21 -device-option <key = value> ...为设备mkspec添加选项
 22 -appstore-compliant ..禁用平台应用商店中不允许使用的代码。默认情况下,默认情况下,默认情况下,平台需要通过默认应用商店进行分发,特别是Android,iOS,tvOS,watchOS和Universal Windows Platform。 [汽车]
 23 -qtnamespace <name> ..将所有Qt库代码封装在'namespace <name> {...}'中。
 24 -qtlibinfix <infix>将所有libQt5 * .so重命名为libQt5 * <infix> .so。
 25 -testcocoon ..........带有TestCocoon代码覆盖工具的仪器[no]
 26 -gcov ................具有GCov代码覆盖工具的仪器[no]
 27 -sanitize {address | thread | memory | undefined}仪器与指定的编译器消毒剂。
 28 -c ++ std <edition> ....选择C ++标准<edition> [c ++ 1z / c ++ 14 / c ++ 11](不支持MSVC)
 29 -sse2 ................使用SSE2指令[自动]
 30 -sse3 / -ssse3 / -sse4.1 / -sse4.2 / -avx / -avx2 / -avx512启用特定的x86指令[auto]启用的仍然受到运行时检测。
 31 -mips_dsp / -mips_dspr2使用MIPS DSP / rev2指令[auto]
 32 -qreal <type> ........ typedef qreal到指定的类型。 [双]注意:这会影响二进制兼容性。
 33 -R <string> ..........为Qt添加一个显式的运行时库路径库。支持相对于LIBDIR的路径。
 34 -rpath ...............使用库链接Qt库和可执行文件将路径安装为运行时库路径。如同-R LIBDIR。在苹果平台上,禁用这意味着使用绝对安装名称(基于         LIBDIR)动态库和框架。 [汽车]减少输出......减少输出符号的数量[自动]
 35 -reuce-relocations ..减少重定位量[auto](仅适用于Unix)
 36 -plugin-manifests ....将清单嵌入插件[no](仅限Windows)
 37 -static-runtime ......使用-static,使用静态运行时[no](仅限Windows)
 38 -pch .................使用预编译头文件[auto]
 39 -ltcg ................使用链接时间码生成[no]
 40 -use-gold-linker .....使用GNU gold链接器[auto]
 41 -incredibuild-xge ....使用IncrediBuild XGE [no](仅限Windows)
 42 -ccache ..............使用ccache编译器缓存[no](仅适用于Unix)
 43 -make-tool <tool> ....使用<tool>构建qmake [nmake](仅适用于Windows)
 44 -mp ..................使用多个处理器进行编译(仅限MSVC)
 45 -warnings-are-errors。将警告视为错误[no; yes如果-developer-build]
 46 -silent ..............减少构建输出以便发出警告和错误可以更容易地看到
 47
Build environment:
  1 -sysroot <dir> ....... 将<dir>设置为目标sysroot
  2 -gcc-sysroot ......... 使用-sysroot,将编译器通过--sysroot [yes]
  3 -pkg-config ..........使用pkg-config [auto](仅适用于Unix)
  4 -D <string> ..........传递附加的预处理器定义
  5 -I <string> ..........传递额外的包含路径
  6 -L <string> ..........传递额外的库路径
  7 -F <string> ..........传递额外的框架路径(仅适用于Apple)
  8 -sdk <sdk> ...........使用Apple提供的SDK <sdk>构建Qt。争论应该是以下列出的可用SDK之一'xcodebuild -showsdks'。请注意,该参数仅适用于Qt库和使用目标mkspec构建的应用程序 - 不是主机工具,如qmake,moc,rcc等。
  9 -android-sdk path ....设置Android SDK根路径[$ ANDROID_SDK_ROOT]
 10 -android-ndk路径....设置Android NDK根路径[$ ANDROID_NDK_ROOT]
 11 -android-ndk-platform设置Android平台
 12 -android-ndk-host ....设置Android NDK主机(linux-x86,linux-x86_64等)[$ ANDROID_NDK_HOST]
 13 -android-arch ........设置Android体系结构(armeabi,armeabi-v7a,arm64-v8a,x86,x86_64,mips,mips64)
 14 -android-toolchain-version ...设置Android工具链版本
 15 -android-style-assets自动从设备中提取样式资产运行。此选项使Android样式表现良好正确的,但也使得Android平台插件与LGPL2.1不兼容。 [是]
 16
Component selection:
  1 -skip <repo> .........从构建中排除整个存储库。
  2 -make <part> .........将<part>添加到要构建的零件列表中。指定此选项将首先清除默认列表。[库和例子,如果不是交叉构建也是工具,还测试是否 -
  3 开发人员构建]
  4 -nomake <part> .......从要构建的零件列表中排除<part>。
  5 -compile-examples ....未设置时,只安装示例的源代码[是]
  6 -gui .................构建Qt GUI模块和依赖[yes]
  7 -widgets .............编译Qt Widgets模块和依赖[yes]
  8 -no-dbus .............不要构建Qt D-Bus模块[Android和Windows默认]
  9 -dbus-linked .........构建Qt D-Bus并链接到libdbus-1 [auto]
 10 -dbus-runtime ........构建Qt D-Bus并动态加载libdbus-1 [no]
 11 -accessibility.......启用可访问性支持[是]注意:不建议禁用可访问性。
 12 -qml-debug ...........启用QML调试支持[yes]
 13 Qt附带一些第三方库的捆绑副本。这些被使用默认情况下,如果自动检测相应的系统库失败。
 14
Core options:
  1 -doubleconversion ....选择使用的双转换库[system / qt / no]没有暗示使用sscanf_l和snprintf_l(不精确)。
  2 -glib ................启用Glib支持[no;在Unix上自动]
  3 -eventfd .............启用eventfd支持
  4 -inotify .............启用inotify支持
  5 -iconv ...............启用iconv(3)支持[posix / sun / gnu / no](仅适用于Unix)
  6 -icu .................启用ICU支持[自动]
  7 -pcre ................选择使用的libpcre2 [system / qt]
  8 -pps .................启用PPS支持[自动](仅限QNX)
  9 -zlib ................选择用过的zlib [system / qt]
 10
Logging backends:
  1 -Journald ..........启用日志支持[no](仅限Unix)
  2 -syslog ............启用syslog支持[no](仅适用于Unix)
  3 -slog2 .............启用slog2支持[自动](仅限QNX)
  4
Network options:
  1 -ssl .................启用SSL支持方法[自动]
  2 -no-openssl ..........不要使用OpenSSL [Apple和WinRT上的默认]
  3 -openssl-linked ......使用OpenSSL并链接到libssl [no]
  4 -openssl-runtime .....使用OpenSSL并动态加载libssl [auto]
  5 -securetransport .....使用SecureTransport [auto](仅限Apple)
  6 -sctp ................启用SCTP支持[no]
  7 -libproxy ............启用libproxy的使用[no]
  8 -system-proxies ......默认使用系统网络代理[yes]
  9
Gui, printing, widget options:
  1 -cups ................启用CUPS支持[自动](仅适用于Unix)
  2 -fontconfig ..........启用Fontconfig支持[auto](仅适用于Unix)
  3 -freetype ............选择使用的FreeType [system / qt / no]
  4 -harfbuzz ............选择用过的HarfBuzz-NG [系统/ qt / no](不在Apple和Windows上自动检测)
  5 -gtk .................启用GTK平台主题支持[auto]
  6 -lgmon ...............启用lgmon支持[自动](仅限QNX)
  7 -no-opengl ...........禁用OpenGL支持
  8 -opengl <api> ........启用OpenGL支持。支持的API:es2(在Windows上默认),桌面(在Unix上默认),动态(仅限Windows)
  9 -opengles3 ...........启用OpenGL ES 3.x支持而不是ES 2.x [自动]
 10 -angle ...............使用捆绑的ANGLE支持OpenGL ES 2.0 [自动](仅限Windows)
 11 -combined-angle-lib ..将LibEGL和LibGLESv2合并到LibANGLE(仅限Windows)
 12 -qpa <name> ..........选择默认的QPA后端(例如,xcb,cocoa,windows)
 13 -xcb-xlib .............启用Xcb-Xlib支持[auto]
 14
Platform backends:
  1 -direct2d ..........启用Direct2D支持[自动](仅限Windows)
  2 -directfb ..........启用DirectFB支持[no](仅适用于Unix)
  3 -eglfs .............启用EGLFS支持[auto;没有在Android和Windows上]
  4 -gbm ...............为GBM [auto]启用后端(仅限Linux)
  5 -kms ...............启用KMS [auto]的后端(仅适用于Linux)
  6 -linuxfb ...........启用Linux Framebuffer支持[auto](仅限Linux)
  7 -mirclient .........启用Mir客户端支持[no](仅Linux)
  8 -xcb ...............选择使用的xcb- *库[system / qt / no](-qt-xcb仍然使用libxcb本身的系统版本)
  9
Input backends:
  1 -evdev .............启用evdev支持[auto]
  2 -imf ...............启用IMF支持[自动](仅限QNX)
  3 -libinput ..........启用libinput支持[auto]
  4 -mtdev .............启用mtdev支持[auto]
  5 -tslib .............启用tslib支持[自动]
  6 -xinput2 ...........启用XInput2支持[自动]
  7 -xkbcommon-x11 .....选择与xcb结合使用的xkbcommon[系统/ QT / NO]
  8 -xkb-config-root <dir> ...使用-qt-xkbcommon-x11,设置默认的XKB配置根目录<dir> [检测]
  9 -xkbcommon-evdev ...启用X-less xkbcommon与libinput结合使用[汽车]
 10
Image formats:
  1 -gif ...............启用对GIF的读取支持[自动]
  2 -ico ...............启用对ICO的支持[是]
  3 -libpng ............选择用过的libpng [system / qt / no]
  4 -libjpeg ...........选择使用的libjpeg [system / qt / no]
  5
Database options:
  1 -sql- <driver> ........启用SQL <驱动程序>插件。支持的驱动db2 ibase mysql oci odbc psql sqlite2 sqlite tds[全自动]
  2 -sqlite ..............选择用过的sqlite3 [系统/ qt]
  3
Qt3D options:
  1 -assimp ..............选择使用的assimp库[system / qt / no]
  2 -qt3d-profile-jobs ...启用作业分析[no]
  3 -qt3d-profile-gl .....启用OpenGL分析[no]
  4 -qt3d-simd ...........选择SIMD支持级别[no / sse2 / avx2]
  5 -qt3d-render .........启用Qt3D渲染方面[是]
  6 -qt3d-input ..........启用Qt3D输入方面[是]
  7 -qt3d-logic ..........启用Qt3D逻辑方面[是]
  8 -qt3d-extras .........启用Qt3D Extras方面[yes]
  9 -qt3d-animation .......启用Qt3D动画方面[是]
 10
Multimedia options:
  1 -pulseaudio ..........启用PulseAudio支持[自动](仅适用于Unix)
  2 -alsa ................启用ALSA支持[自动](仅适用于Unix)
  3 -no-gstreamer ........禁用对GStreamer的支持
  4 -gstreamer [版本]。启用GStreamer支持[自动]在没有参数的情况下,首先尝试1.0,然后再尝试0.10。
  5 -mediaplayer-backend <名称> ...选择媒体播放器后端(仅限Windows)支持的后端:directshow(默认),wmf
  6
Webengine options:
  1 -webengine-alsa ................启用ALSA支持[自动](仅限Linux)
  2 -webengine-pulseaudio ..........启用PulseAudio支持[自动](仅限Linux)
  3 -webengine-embedded-build ......启用Linux嵌入式构建[auto](仅限Linux)
  4 -webengine-icu .................使用系统ICU库[system / qt](仅限Linux)
  5 -webengine -ffmpeg ..............使用系统FFmpeg库[system / qt](仅限Linux)
  6 -webengine-opus ................使用系统Opus库[system / qt](仅限Linux)
  7 -webengine-webp ................使用系统WebP库[system / qt](仅限Linux)
  8 -webengine-pepper-plugins ......启用Pepper Flash和Widevine插件[自动]
  9 -webengine-printing-and-pdf ....启用打印和输出到PDF[汽车]
 10 -webengine-proprietary-codecs ..启用对专有编解码器的支持[no]
 11 -webengine-spellchecker ........启用对拼写检查程序的支持[是]
 12 -webengine-native-spellchecker。启用对原生拼写检查器的支持[否](仅限macOS)
 13 -webengine-webrtc ..............启用对WebRTC的支持[自动]
 14
四、相关参考
- Perl:
- Ruby:
- Python:
- https://www.python.org/downloads/
- https://cdn.npmmirror.com/binaries/python/2.7.18/python-2.7.18.amd64.msi
- Qt:
- https://doc.qt.io/qt-5/build-sources.html
- https://doc.qt.io/qt-5/windows-building.html
- https://wiki.qt.io/Building_Qt_5_from_Git
- https://iso.mirrors.ustc.edu.cn/qtproject/archive/qt/5.12/5.12.12/single/qt-everywhere-src-5.12.12.zip
- https://doc.qt.io/qt-6/build-sources.html
- https://doc.qt.io/qt-6/windows-building.html
- https://wiki.qt.io/Building_Qt_6_from_Git


【推荐】国内首个AI IDE,深度理解中文开发场景,立即下载体验Trae
【推荐】编程新体验,更懂你的AI,立即体验豆包MarsCode编程助手
【推荐】抖音旗下AI助手豆包,你的智能百科全书,全免费不限次数
【推荐】轻量又高性能的 SSH 工具 IShell:AI 加持,快人一步
· 阿里最新开源QwQ-32B,效果媲美deepseek-r1满血版,部署成本又又又降低了!
· 开源Multi-agent AI智能体框架aevatar.ai,欢迎大家贡献代码
· Manus重磅发布:全球首款通用AI代理技术深度解析与实战指南
· 被坑几百块钱后,我竟然真的恢复了删除的微信聊天记录!
· AI技术革命,工作效率10个最佳AI工具