problems_elk
problems_elk
1 java代码调用elasticSearch运行报错
报错内容如下:
MapperParsingException[Root mapping definition has unsupported parameters:  [properies : {id={type=integer}, name={type=text, analyzer=ik_max_word}, age={type=integer}, sex={type=text, analyzer=ik_max_word}, address={type=text, analyzer=ik_max_word}, phone={type=text}, email={type=text}, say={type=text, analyzer=ik_max_word}}]
]
原因:代码中properties单词写错了,
XContentFactory.jsonBuilder().startObject().startObject("properties") 写成了 XContentFactory.jsonBuilder().startObject().startObject("properies") 。其中 properties 少了一个 t。
2 java代码调用es的sql插件报错
报错内容如下:
java.sql.SQLInvalidAuthorizationSpecException: current license is non-compliant for [jdbc]
原因:授权问题。需要破解xpth,更新白金许可。
解决方法:
A.在/usr/develop/elasticsearch-6.7.0/modules/x-pack-core/目录下找到x-pack-core-6.7.0.jar复制一份出来。
B.新建两个java文件分别命名为LicenseVerifier.java和XPackBuild.java,将下面代码黏贴:
①:LicenseVerifier.java
package org.elasticsearch.license;

import java.nio.*;
import org.elasticsearch.common.bytes.*;
import java.util.*;
import java.security.*;
import org.elasticsearch.common.xcontent.*;
import org.apache.lucene.util.*;
import org.elasticsearch.core.internal.io.*;
import java.io.*;

public class LicenseVerifier
{
    public static boolean verifyLicense(final License license, final byte[] encryptedPublicKeyData) {
       return true;
    }

    public static boolean verifyLicense(final License license) {
         return true;
    }
}
②:XPackBuild.java
package org.elasticsearch.xpack.core;

import org.elasticsearch.common.io.*;
import java.net.*;
import org.elasticsearch.common.*;
import java.nio.file.*;
import java.io.*;
import java.util.jar.*;

public class XPackBuild
{
    public static final XPackBuild CURRENT;
    private String shortHash;
    private String date;

    @SuppressForbidden(reason = "looks up path of xpack.jar directly")
    static Path getElasticsearchCodebase() {
        final URL url = XPackBuild.class.getProtectionDomain().getCodeSource().getLocation();
        try {
            return PathUtils.get(url.toURI());
        }
        catch (URISyntaxException bogus) {
            throw new RuntimeException(bogus);
        }
    }

    XPackBuild(final String shortHash, final String date) {
        this.shortHash = shortHash;
        this.date = date;
    }

    public String shortHash() {
        return this.shortHash;
    }

    public String date() {
        return this.date;
    }

    static {
        final Path path = getElasticsearchCodebase();
        String shortHash = null;
        String date = null;
        Label_0157: {

            shortHash = "Unknown";
            date = "Unknown";
        }
        CURRENT = new XPackBuild(shortHash, date);
    }
}
C.使用javac 编译这两个java文件,需要引入import的依赖,使用-cp参数,需要依赖原本的x-pack-core-6.7.0.jar,lucene-core-7.7.0.jar,elasticsearch-6.7.0.jar,elasticsearch-core-6.7.0.jar这四个java包(windows下使用分号分隔jar路径,linux下使用冒号分隔,后三个jar包的路径为/usr/develop/elasticsearch-6.7.0/lib)
javac -cp "x-pack-core-6.7.0.jar路径:lucene-core-7.7.0.jar路径:elasticsearch-6.7.0.jar路径:elasticsearch-core-6.7.0.jar路径"    LicenseVerifier.java路径
javac -cp "x-pack-core-6.7.0.jar路径:lucene-core-7.7.0.jar路径:elasticsearch-6.7.0.jar路径:elasticsearch-core-6.7.0.jar路径"    XPackBuild.java路径

eg.
javac -cp "/usr/develop/elasticsearch-6.7.0/modules/x-pack-core/x-pack-core-6.7.0.jar:/usr/develop/elasticsearch-6.7.0/lib/lucene-core-7.7.0.jar:/usr/develop/elasticsearch-6.7.0/lib/elasticsearch-6.7.0.jar:/usr/develop/elasticsearch-6.7.0/lib/elasticsearch-core-6.7.0.jar" /usr/develop/elasticsearch-6.7.0/modules/x-pack-core/register/LicenseVerifier.java
javac -cp "/usr/develop/elasticsearch-6.7.0/modules/x-pack-core/x-pack-core-6.7.0.jar:/usr/develop/elasticsearch-6.7.0/lib/lucene-core-7.7.0.jar:/usr/develop/elasticsearch-6.7.0/lib/elasticsearch-6.7.0.jar:/usr/develop/elasticsearch-6.7.0/lib/elasticsearch-core-6.7.0.jar" /usr/develop/elasticsearch-6.7.0/modules/x-pack-core/register/XPackBuild.java
D.将编译生成的LicenseVerifier.class覆盖复制出来的x-pack-core-6.7.0.jar中目录org/elasticsearch/license下的LicenseVerifier.class,将生成的XPackBuild.class覆盖org/elasticsearch/xpack/core/目录下的XPackBuild.class。
E.将覆盖成功后的x-pack-core-6.7.0.jar复制回/usr/develop/elasticsearch-6.7.0/modules/x-pack-core/目录下覆盖原来的。
F.获取 license 证书:
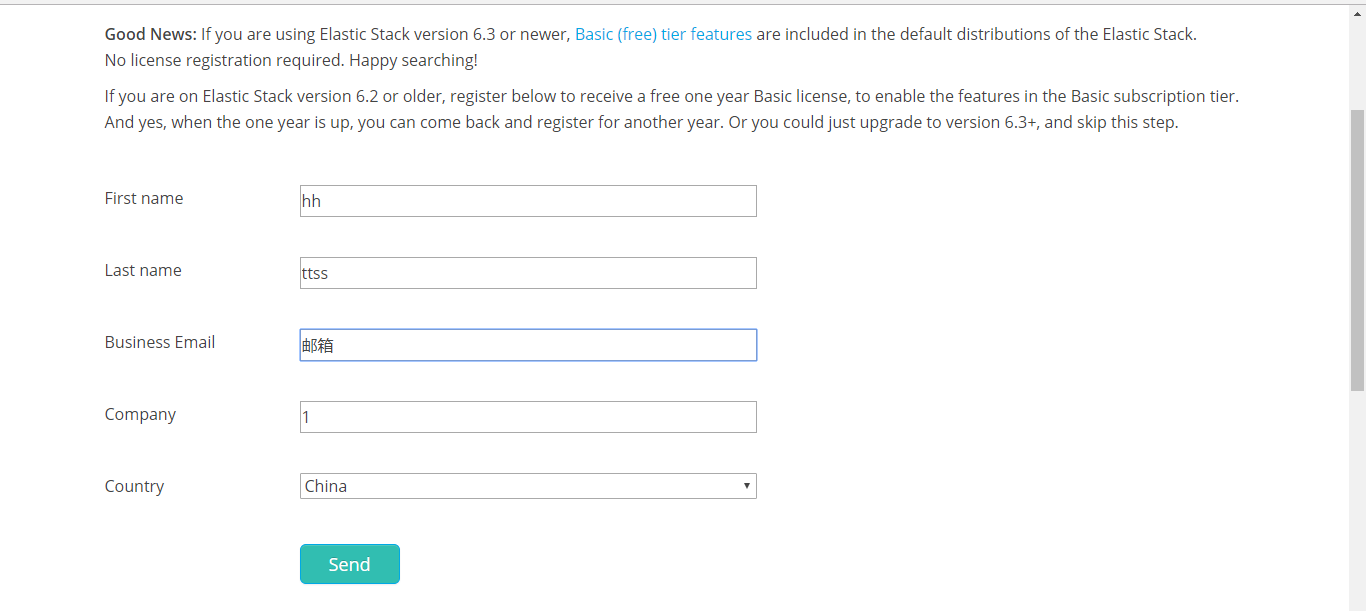
①https://license.elastic.co/registration 填写用户名,邮箱(重要,获取下载链接),Country选择China,其他信息随意填写,点击Send.

②打开邮箱获取的地址,将下载后的文件改名为license.json.
③修改文件中的内容,将两个属性改为以下:
将 "type":"basic" 替换为 "type":"platinum"  #基础班变更为铂金版
将 "expiry_date_in_millis":1561420799999替换为"expiry_date_in_millis":3107746200000  #1年变为50年.
④使用curl替换 license(license.json指的是刚刚下载修改属性后的证书,要开启elasticsearch服务)
cd /usr/develop/elasticsearch-6.7.0/modules/x-pack-core/register/
curl -XPUT 'http://cdh01:9200/_xpack/license?acknowledge=true' -H 'Content-Type:application/json' -d @license.json
⑤可能遇到Cannot install a [PLATINUM] license unless TLS is configured or security is disabled的错误,解决方法在elasticsearch.yml新增:
xpack.security.enabled: false
⑥上传后查看证书时间http://cdh01:9200/_license

G.至此可以使用jdbc连接。
参考链接:https://www.cnblogs.com/hts-technology/p/9282421.html
3 执行bin/logstash -f config/jdbc.conf报错
报错内容如下:
Sat Jan 18 22:58:00 CST 2020 WARN: Establishing SSL connection without server's identity verification is not recommended. According to MySQL 5.5.45+, 5.6.26+ and 5.7.6+ requirements SSL connection must be established by default if explicit option isn't set. For compliance with existing applications not using SSL the verifyServerCertificate property is set to 'false'. You need either to explicitly disable SSL by setting useSSL=false, or set useSSL=true and provide truststore for server certificate verification.
翻译:
请注意:不建议在没有服务器身份验证的情况下建立SSL连接。根据MySQL 5.5.45+、5.6.26+和5.7.6+的要求,如果不设置显式选项,则必须建立默认的SSL连接。您需要通过设置useSSL=false显式地禁用SSL,或者设置useSSL=true并为服务器证书验证提供信任存储
解决方法:
jdbc:mysql://127.0.0.1:3306/test?useUnicode=true&characterEncoding=utf-8&useSSL=false
参考链接:https://www.javazhiyin.com/4572.html


