一步一步学RenderMonkey(5)--渲染到纹理(RTT) 【转】
转载请注明出处: http://blog.csdn.net/tianhai110
渲染到纹理:
- 新建一个空effect;
- 添加渲染目标纹理, Add Texture-> Add Render Texture

3. 添加一个渲染pass

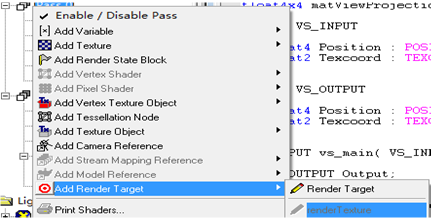
4. 将pass0 渲染到纹理上, add Render Target->renderTexture;

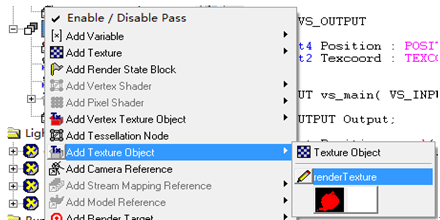
5. 在pass1中,引用纹理 Add Texture Object->renderTexture; 并改名为rttTexture;

6. 修改pass1的vertex shader 和pixel shader;
- float4x4 matViewProjection;
- struct VS_INPUT
- {
- float4 Position : POSITION0;
- float2 Texcoord : TEXCOORD0;
- };
- struct VS_OUTPUT
- {
- float4 Position : POSITION0;
- float2 Texcoord : TEXCOORD0;
- };
- VS_OUTPUT vs_main( VS_INPUT Input )
- {
- VS_OUTPUT Output;
- Output.Position = mul( Input.Position, matViewProjection );
- Output.Texcoord = Input.Texcoord;
- return( Output );
- }
PS:
- sampler2D rttTexture;
- float4 ps_main( float2 tex:TEXCOORD0) : COLOR0
- {
- return tex2D(rttTexture, tex) + float4( 0.6, 0.2, 0.5, 1);
- }
运行效果如下:

饮水思源,不忘初心。
要面包,也要有诗和远方。


【推荐】国内首个AI IDE,深度理解中文开发场景,立即下载体验Trae
【推荐】编程新体验,更懂你的AI,立即体验豆包MarsCode编程助手
【推荐】抖音旗下AI助手豆包,你的智能百科全书,全免费不限次数
【推荐】轻量又高性能的 SSH 工具 IShell:AI 加持,快人一步
· 记一次.NET内存居高不下排查解决与启示
· 探究高空视频全景AR技术的实现原理
· 理解Rust引用及其生命周期标识(上)
· 浏览器原生「磁吸」效果!Anchor Positioning 锚点定位神器解析
· 没有源码,如何修改代码逻辑?
· 全程不用写代码,我用AI程序员写了一个飞机大战
· MongoDB 8.0这个新功能碉堡了,比商业数据库还牛
· 记一次.NET内存居高不下排查解决与启示
· DeepSeek 开源周回顾「GitHub 热点速览」
· 白话解读 Dapr 1.15:你的「微服务管家」又秀新绝活了