CKEditor插件开发
以前做过一个教育项目,是有关在线考试的。其中对编辑器CKEditor做了扩充,增加了插入客观题、主观题、选择题和判断题的功能。这里记述下CKEditor插件开发的过程。
CKEditor以前叫FCKEditor,下载地址:http://ckeditor.com/download。我用的3.5.3版本,基本流程和方法应该也适用最新的版本。
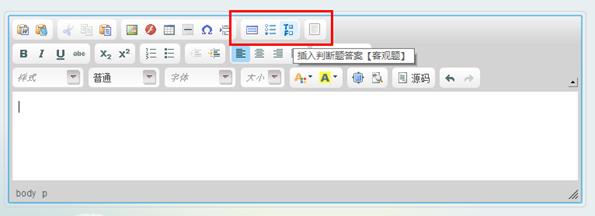
效果如下:
四个按钮从左到右分别是:插入填空题,插入选择题,插入判断题和插入主观题。
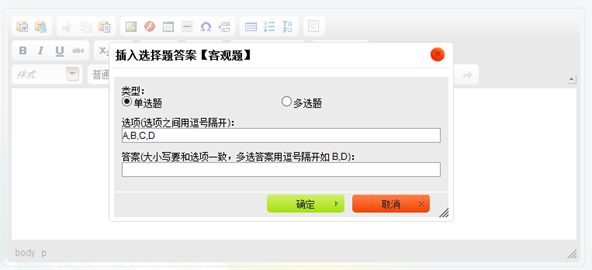
点击 插入选择题答案 按钮,出现操作框:
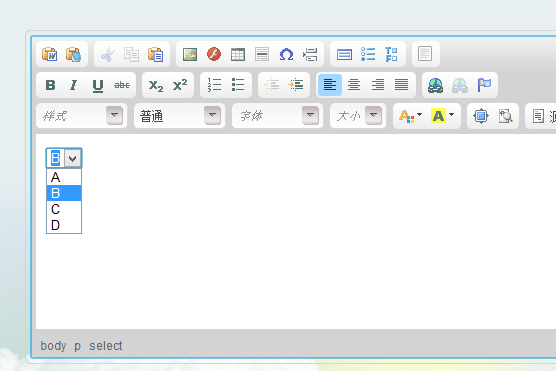
点击确定后在编辑器里插入一个下拉框:
四个插件基本流程是一样的,拿“插入选择题”的开发流程来做个说明。
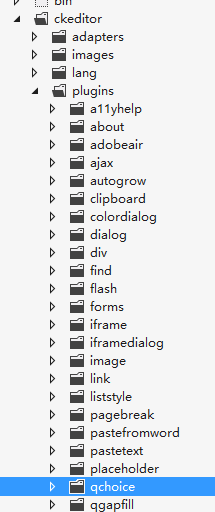
1.在ckeditor\plugins\ 下新建一个目录,名字为qchoice。我把这四个插件统一加了前缀字母q,是为了方便管理。
2.在qchoice下新建一个“plugin.js”,代码如下:
CKEDITOR.plugins.add('qchoice', {
    requires: ['dialog'],
    init: function (editor) {
        var b = editor.addCommand('qchoice', new CKEDITOR.dialogCommand('qchoice'));
        editor.ui.addButton('Choice', { //按钮名称:Choice,编辑器菜单上回用到
            label: '插入选择题答案【客观题】', //插件名称
            command: 'qchoice', //插件命令
            icon: this.path + 'images/choice.gif' //编辑器菜单的图标
        });
        CKEDITOR.dialog.add('qchoice', this.path + 'dialogs/insertanswer.js'); //点击按钮弹出对话框的js代码
    }
});
3.在qchoice里新建一个images目录,放进一个choice.gif。这个就是插件出现在编辑器菜单上的按钮图标。大小 16*16
4.在qchoice下新建dialogs目录。这个目录存放的是所有对话框。该目录下新建一个insertanswer.js文件,代码如下,我加了注释加以说明:
CKEDITOR.dialog.add('qchoice', function (editor) { //要和plugin.js 中的command 一致
    var escape = function (value) {
        return value;
    };
    return {
        title: '插入选择题答案【客观题】', //对话框标题
        minWidth: 400, //对话框宽度
        minHeight: 100,//对话框高度
        contents: [{   //对话框内容
            id: 'choice',
            name: 'choice',
            label: '插入选择题答案',
            title: '插入选择题答案',
            elements: [{
                id: 'rdType',
                type: 'radio', //表单元素类型:单选按钮
                label: '类型:', //标题
                items: [['单选题', 'c'], ['多选题', 'm']], //单选按钮选项
                'default': 'c' //默认值
            },
            {
                id: 'txtItems',
                type: 'text', //表单元素类型:输入框
                label: '选项(选项之间用逗号隔开):',
                'default': 'A,B,C,D'
            },
            {
                id: 'txtAnswer',
                type: 'text',
                label: '答案(大小写要和选项一致,多选答案用逗号隔开如 B,D):',
                validate: CKEDITOR.dialog.validate.notEmpty('请输入答案!') //验证
            }]
        }],
        onOk: function () { //点击确定按钮出发onOK事件。以下代码主要目的是构造一个select下拉框
            qtype = this.getValueOf('choice', 'rdType');
            txtitems = this.getValueOf('choice', 'txtItems');
            items = txtitems.split(/[',',',']/);
            txtanswer = this.getValueOf('choice', 'txtAnswer');
            answers = txtanswer.split(/[',',',']/);
            rtn = "<select answertype='" + qtype + "'>";
            flag = true;
            //答案是否在选项中
            for (var i in answers) {
                isAnswerInItem = false;
                if (answers[i] != "") {
                    for (var j in items) {
                        if (items[j] == answers[i]) {
                            isAnswerInItem = true;
                            break;
                        }
                    }
                    if (!isAnswerInItem) {
                        alert("答案" + answers[i] + "在选项中不存在!");
                        this.getContentElement('choice', 'txtAnswer').focus();
                        flag = false;
                        break;
                    }
                }
            }
            if (flag) {
                for (var i in items) {
                    if (items[i] != '') {
                        rtn += "<option ";
                        for (var j in answers) {
                            if (answers[j] == items[i]) {
                                rtn += "selected='selected'";
                            }
                        }
                        rtn += ">" + items[i] + "</option>";
                    }
                }
                rtn += "</select>";
                editor.insertHtml(rtn); //将select插入编辑器
            }
            else {
                return false;
            }
        }
    };
});
function htmlEncode(str) {
    var temp = document.createElement("div");
    (temp.textContent != null) ? (temp.textContent = str) : (temp.innerText = str);
    var output = temp.innerHTML;
    temp = null;
    return output;
}
5.接下来就是将这个插件加入到编辑器里。打开ckeditor/config.js,设置config.extraPlugins=“qchoice”,然后在config.toolbar中加入 “Choice”这个按钮名称:
CKEDITOR.editorConfig = function (config) {
    config.language = 'zh-cn';
    config.extraPlugins = 'qgapfill,qchoice,qtruefalse,qsubjective';
    config.toolbar =
    [
        ['PasteFromWord', 'PasteText', '-', 'Cut', 'Copy', 'Paste'],
        ['Image', 'Flash', 'Table', 'HorizontalRule', 'SpecialChar', 'PageBreak', '-', 'Gapfill', 'Choice', 'Truefalse', '-', 'Subjective'],
        '/',
        ['Bold', 'Italic', 'Underline', 'Strike', '-', 'Subscript', 'Superscript'],
        ['NumberedList', 'BulletedList', '-', 'Outdent', 'Indent'],
        ['JustifyLeft', 'JustifyCenter', 'JustifyRight', 'JustifyBlock'],
        ['Link', 'Unlink', 'Anchor'],
        '/',
        ['Styles', 'Format', 'Font', 'FontSize'],
        ['TextColor', 'BGColor'],
        ['Maximize', 'ShowBlocks', '-', 'Source', '-', 'Undo', 'Redo']
    ];
};
完成。


 浙公网安备 33010602011771号