(全)AppiumBy定位方法,元素操作(click等),触摸操作(滑动放大缩小等),手机操作(网络音量等),Toast信息,H5页面定位等
前提设置:
from appium import webdriver
# 模拟器/真机已经被电脑识别到(adb devices)
# 字典
# 1、设置终端参数项
desired_caps = {
    "platformName": "Android",
    "platformVersion": "6.1.1",
    "appPackage": "com.ss.android.article.news",
    "appActivity": "com.ss.android.article.news.activity.MainActivity",
    "deviceName": "JAD-AL50",
    "noReset": True,
    "unicodeKeyboard": True,  # 是否支持unicode的键盘。如果需要输入中文,要设置为“true”
    "resetKeyboard": True,  # 是否在测试结束后将键盘重轩为系统默认的输入法。
    "automationName": "UiAutomator2"  # 主要是版本引起的问题,有时候用的UiAutomator1
}
# 2、appium server进行启动
# 3、发送指令到appium server
driver = webdriver.Remote("http://127.0.0.1:4723/wd/hub", desired_caps)
夜神模拟器开启坐标:
手机桌面---->工具---->设置---->开发者选项---->打开“显示点按操作反馈”,“指针位置”
打开之后,我们鼠标滑动的时候就可以看到指定元素的位置坐标
一、元素定位方法
导入库
from appium.webdriver.common.appiumby import AppiumBy
可看出各种定位方式:
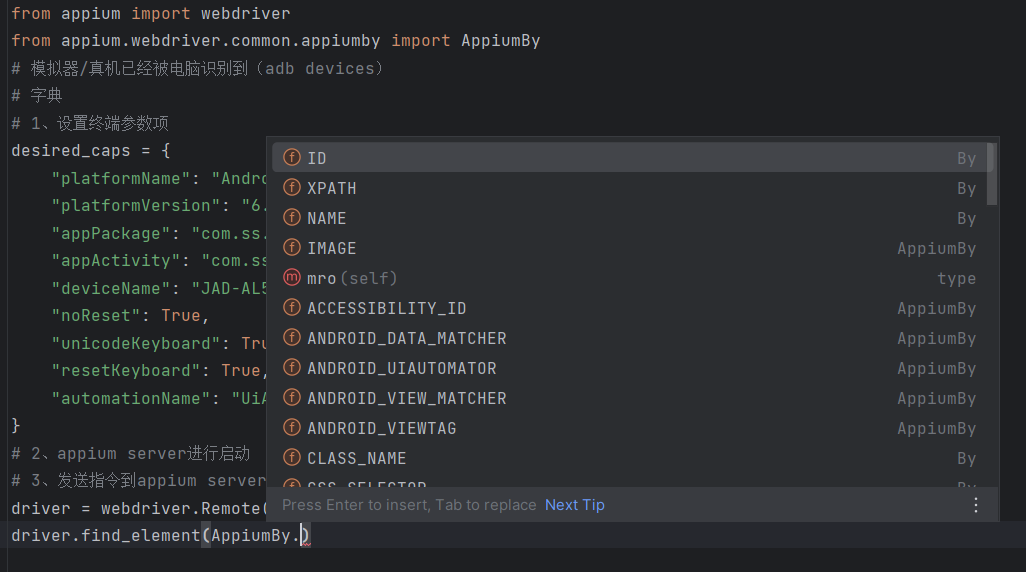

By: XPATH ID NAME WINDOWS_UI_AUTOMATION TAG_NAME CSS_SELECTOR CLASS_NAME LINK_TEXT PARTIAL_LINK_TEXT
AppiumBy: ACCESSIBILITY_ID ANDROID_UIAUTOMATOR ANDROID_VIEWTAG ANDROID_DATA_MATCHER ANDROID_VIEW_MATCHER CUSTOM IMAGE
常用:id/clss_name/content-desc/name/uiautomator/xpath
id :元素功能描述:
driver.find_element(AppiumBy.ID, "com.android.launcher3:id/tv_search")
class_name :元素功能描述
该方法一般不使用,由于界面元素的class重复度太高,基本上不存在唯一值
driver.find_element(AppiumBy.CLASS_NAME, "android.widget.TextView")
content-desc :元素功能描述
content-desc 属性是用来描述该元素的作用
find_element(AppiumBy.ACCESSIBILITY_ID, "com.android.launcher3:id/tv_search")
name :元素功能描述:注释:Appium1.5及之后的版本废弃了name属性
uiautomator:参考文章
固定写法:
driver.find_element(AppiumBy.ANDROID_UIAUTOMATOR,"new UiSelector().方法("value")")
方法包括很多:参考国外地址(需要FQ)
# JAVA中的实例化
new UI = UiSelector()
new UiSelector() # 简写不需要变量接收class

driver.find_element(AppiumBy.ANDROID_UIAUTOMATOR,'') :外侧用 '' (单引号) ,里面的字符串用 " " (双引号)

# 1.className定位
# UISelector.className方法:通过ClassName找到所有的TextView控件,然后再在这些TextView控件查找text是”Add note“的控件
driver.find_element(AppiumBy.ANDROID_UIAUTOMATOR,'new UiSelector().className("android.widget.TextView").text("重置")')
# UISelector.classNameMatches方法:通过正则表达式判断className是否和预期的一致
driver.find_element(AppiumBy.ANDROID_UIAUTOMATOR,'new UiSelector().classNameMatches(".*TextView$")')

# 2.通过文本信息来定位:
# UISelector.text方法 :通过直接查找当前界面上所有的控件来比较每个控件的text属性是否如预期值来定位控件
driver.find_element(AppiumBy.ANDROID_UIAUTOMATOR,'new UiSelector().text("重置")')
# UISelector.textContains方法,跟以上方法类似,但是不需要输入控件的全部text信息,如例子,只要写“重”或“置”即可。
driver.find_element(AppiumBy.ANDROID_UIAUTOMATOR,'new UiSelector().textContains("重")')
# UISelector.textStartsWith方法 通过判断一个控件的text的开始是否和预期的字串相吻合来获得控件
driver.find_element(AppiumBy.ANDROID_UIAUTOMATOR,'new UiSelector().textStartsWith("重置")')
# UISelector.textMatches方法 通过正则表达式的方式来比较控件的text来定位控件
driver.find_element(AppiumBy.ANDROID_UIAUTOMATOR,'new UiSelector().textMatches("^重.*")')

# 3.通过控件ID定位。
# UiSelector.resourceId方法
driver.find_element(AppiumBy.ANDROID_UIAUTOMATOR,'new UiSelector().resourceId("com.android.settings:id/title")')
# UiSelector.resourceIdMatches方法
driver.find_element(AppiumBy.ANDROID_UIAUTOMATOR,'new UiSelector().resourceIdMatches(".+id/title")')

# 4.通过控件contentDescription定位。即是 content'desc :contentDescription 一直是强调开发人员需要添加进去的
# UiSelector.description方法
driver.find_element(AppiumBy.ANDROID_UIAUTOMATOR,'new UiSelector().description("lmappDesc")')
# UiSelector.descriptionContains方法
driver.find_element(AppiumBy.ANDROID_UIAUTOMATOR,'new UiSelector().descriptionContains("lmapp")')
# UiSelector.descriptionStartWith方法
driver.find_element(AppiumBy.ANDROID_UIAUTOMATOR,'new UiSelector().descriptionStartsWith("lmapp")')
# UiSelector.descriptionMatches方法
driver.find_element(AppiumBy.ANDROID_UIAUTOMATOR,'new UiSelector().descriptionMatches("^lmapp.*$")')

# 5.1滑动屏幕查找 适用于 ANDROID 本身的滑动 存在滚动条的滑动,那么不显示滚动条执行报错!
e = 'new UiScrollable(new UiSelector().scrollable(true).instance(0)).'+'scrollIntoView(new UiSelector().text("Popup Menu").instance(0));'
driver.find_element(AppiumBy.ANDROID_UIAUTOMATOR,e).click()

# 5.2滑动屏幕查找:
ele = 'new UiScrollable(new UiSelector().scrollable(true).instance(0)).scrollIntoView(new UiSelector().description("活动中心").instance(0));'
driver.find_element(AppiumBy.ANDROID_UIAUTOMATOR, ele).click()

# 6.组合应用
driver.find_element(AppiumBy.ANDROID_UIAUTOMATOR,'new UiSelector().text("重置").resourceId("com.android.settings:id/title")')
xpath :元素功能描述(能不用就不同xpath,效率太低)
根据id属性定位
表达式://*[@resource-id='id属性']

根据text属性定位
表达式://*[@text='text文本属性']

根据class属性定位
表达式: //*[@class='class属性']

通过content-desc属性定位

表达式: //*[@content-desc='文本']
driver.find_element(AppiumBy.XPATH, "//*[@resource-id='com.android.launcher3:id/tv_search']").click()
driver.find_element(AppiumBy.XPATH, "//*[@text='xxxx']").click()
driver.find_element(AppiumBy.XPATH, "//*[@class='android.widget.TextView']").click()
driver.find_element(AppiumBy.XPATH, "//*[@content-desc='xxxx']").click()
模糊定位
contains是模糊匹配的定位方法,对于一些元素的属性是可变的,但有一部分是固定的,这种就可以模糊匹配
//*[contains(@text, '查看')]
//*[contains(@content-desc, '')]
//*[contains(@resource-id, 'id属性')]
//*[contains(@clsss, 'class属性')]
组合定位
当单个元素定位不唯一时,这时候我们就可以采用多个属性组合定位,xpath也可以同时匹配2个属性,text, resource-id,class ,index,content-desc 这些属性都能任意组合定位。
id_class = '//android.widget.TextView[@resource-id='com.netease.edu.study:id/look_more']'
desc_class = '//*[@text='查看更多' and @index='2']'
层级定位
元素属性除了class属性,其他属性都为空,且class属性又不唯一时候用层级:
父类定位子类:
'//[@resoure-id='com.android.launcher3:id/tv_search']/android.widget.TextView'
'//[@resoure-id='com.android.launcher3:id/tv_search']/com.android.launcher3:id/tv_search[2]'
子类定位父类
'//[@resource-id='com.android.launcher3:id/tv_search']/…'
'//[@resource-id='com.android.launcher3:id/tv_search']/parent::'
'//[@resource-id='com.android.launcher3:id/tv_search']/parent::android.widget.LinearLayout'
兄弟元素定位:
'//*[@resource-id='com.android.launcher3:id/tv_search']/…/android.widget.RelativeLayout'
二、Appium 元素操作
1.click()
//点击操作
也可以用tab实现点击操作
driver.find_element(AppiumBy.ID, “com.android.launcher3:id/tv_search”).click()
2.clear()
//清空输入框内容
driver.find_element(AppiumBy.ID, “com.android.launcher3:id/tv_search”).clear()
3.send_keys(xx)
//输入框内输入内容
driver.find_element(AppiumBy.ID, “com.android.launcher3:id/tv_search”).send_keys(“test content”)
4.text
//获得元素的text内容
print(driver.find_element(AppiumBy.ID, “com.android.launcher3:id/tv_search”).text)
5.get_attribute
// 返回元素的文本值
driver.element.get_attribute(“class”)
6.size
//获取元素的大小(高和宽)
driver.element.size
7.location
// 获取元素左上角的坐标
driver.location.size
8.get_window_size
// 获取手机的分辨率
driver.get_window_size()
9.page_source
// 获取当前页面的源码
driver.page_source
10.quit
// 退出
driver.quit()
11.get_screenshot_as_file
// 将手机屏幕截图并保存电脑上的文件
driver.get_screenshot_as_file(“路径”)
12.open_notifications
// 打系统通知栏(仅支持API 18 以上的安卓系统)
driver.open_notifications()
三、Appium 触摸操作
1.引入对象:TouchAction:触摸
from appium.webdriver.common.touch_action import TouchAction
TouchAction(driver)
TouchAction对象包含(tab)、press(短按)、move_to(滑动到某个坐标)等方法
通过TouchAction对象,添加tap、move_to等操作,然后perform()执行,可以实现解锁屏幕等功能
规范中的可用事件有:
短按 (press)
释放 (release)
移动到 (moveTo)
点击 (tap)
等待 (wait)
长按 (longPress)
取消 (cancel)
执行 (perform)
A.点击(轻敲)操作:driver.tap(坐标x,坐标y, 持续点击时间/s) — 坐标定位建议少用 不到万不得已
除了定位到元素的点击外,也可以通过定位表达式实现坐标的点击
第一种:
TouchAction(driver).tap(x=155, y=706, count=1).perform()
第二种:
TouchAction(driver).tap(ele, count=1).perform()
B.多次滑屏:建议少用坐标定位 下面只是举例子
from appium.webdriver.common.touch_action import TouchAction
# 短按之后要释放 长按之后也是需要释放的。
action=TouchAction(driver)
action.press(x=220,y=700).move_to(x=840, y=700).move_to(x=220, y=1530).move_to(x=840, y=1530).release().perform()
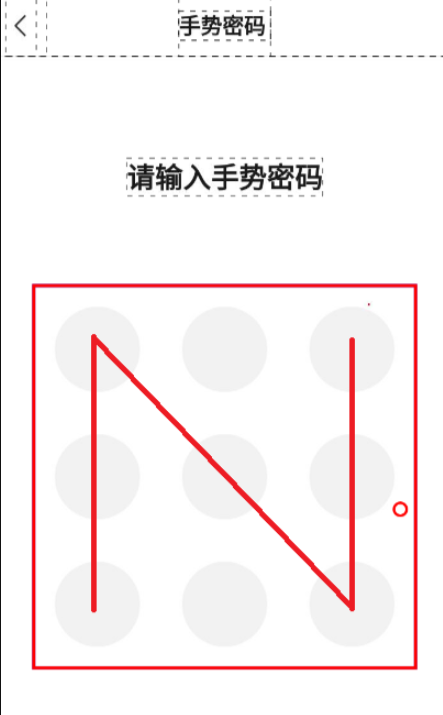
B.1 解锁微信服务里面九宫格例子:
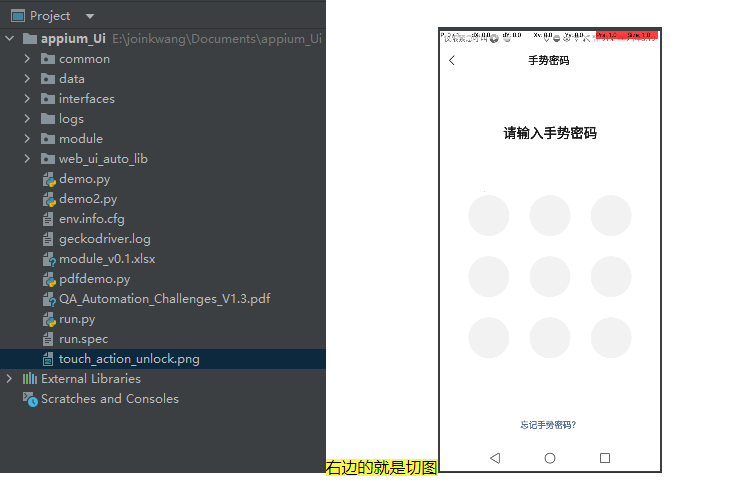
import time
from selenium.webdriver.support.wait import WebDriverWait
from selenium.webdriver.support import expected_conditions as EC
from appium import webdriver
from appium.webdriver.common.mobileby import MobileBy
from appium.webdriver.common.touch_action import TouchAction

desired_caps = {
    'platformName': 'Android',
    'platformVersion': '8.1',
    'deviceName': 'ye_shen_Android',
    'appPackage': 'com.tencent.mm',
    'appActivity': 'com.tencent.mm.ui.LauncherUI',
    'noReset': True,
    'autoAcceptAlerts': True,
    'newCommandTimeout': 240
}

driver = webdriver.Remote('http://127.0.0.1:4723/wd/hub', desired_caps)
driver.implicitly_wait(10)

# 点击 微信 我的
loc = (MobileBy.ANDROID_UIAUTOMATOR, 'new UiSelector().resourceId("com.tencent.mm:id/j5t")')
WebDriverWait(driver, 30).until(EC.visibility_of_element_located(loc))
TouchAction(driver).tap(x=540, y=1255).wait(200).perform()

# 点击 服务
locc = (MobileBy.ANDROID_UIAUTOMATOR, 'new UiSelector().text("服务")')
WebDriverWait(driver, 30).until(EC.visibility_of_element_located(locc))
ele = driver.find_element(MobileBy.ANDROID_UIAUTOMATOR, 'new UiSelector().text("服务")')
TouchAction(driver).tap(ele).wait(200).perform()

# 检查 请输入手势密码
loccs = (MobileBy.ANDROID_UIAUTOMATOR, 'new UiSelector().text("请输入手势密码")')
WebDriverWait(driver, 30).until(EC.visibility_of_element_located(loccs))

# 获取起始坐标-九宫格左上顶点
loc = driver.find_element(MobileBy.ID, "com.tencent.mm:id/hrs").location
print(loc)
# 获取九宫格元素大小 height width 宽 和 高
loc_size = driver.find_element(MobileBy.ID, "com.tencent.mm:id/hrs").size
print(loc_size)

# 获取分割后的均值,即下面要用到的九宫格的步长
step = loc_size["width"] / 6
step_x = loc_size["width"] / 6
step_y = loc_size["height"] / 6

# 计算出每个点的坐标
point1 = (loc["x"] + step, loc["y"] + step * 5)
point2 = (point1[0], point1[1] - step * 2)
point3 = (point2[0], point2[1] - step * 2)
point4 = (point3[0] + step * 2, point3[1] + step * 2)
point5 = (point4[0] + step * 2, point4[1] + step * 2)
point6 = (point5[0], point5[1] - step * 2)
point7 = (point6[0], point6[1] - step * 2)


# 进行滑动操作
TouchAction(driver).press(x=point1[0], y=point1[1]).wait(500). \
    move_to(x=point2[0], y=point2[1]). \
    move_to(x=point3[0], y=point3[1]). \
    move_to(x=point4[0], y=point4[1]). \
    move_to(x=point5[0], y=point5[1]). \
    move_to(x=point6[0], y=point6[1]). \
    move_to(x=point7[0], y=point7[1]). \
    release().perform()

time.sleep(10)
driver.quit()
如图:
C.例如:一个长按的例子:建议少用坐标定位 下面只是举例子
import time
from appium import webdriver
from appium.webdriver.common.touch_action import TouchAction
from appium.webdriver.webdriver import By
des = {
"platformName": "Android",
"platformVersion": "9",
"deviceName": "windwos虚拟机",
"appPackage": "com.android.settings",
"appActivity": "com.android.settings.Settings",
"udid": "192.168.0.101:5555",
"noReset": "True"
}
driver = webdriver.Remote('http://127.0.0.1:4723/wd/hub', des)
driver.implicitly_wait(10)
touch = TouchAction(driver)
#touch.press(x=720, y=1910).perform()
touch.long_press(x=720, y=1910).perform()
2.MultiAction ----- 多点触控 放大缩小操作
借鉴文章戳这里哦
背景:使用地图App、图片放大缩小场景中,我们经常需要对界面进行缩放操作来更加便利的查看位置或者图片放大操作。
2.1 根据解析手势操作放大缩小
-
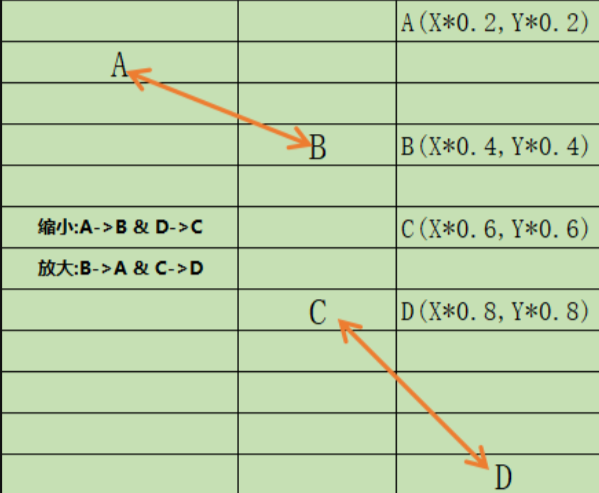
a.在 Appium 里面提供了 MultiAction 类来进行放大、缩小操作。模拟真实手指操作,如图:
-
![]()
-
b.MultiAction 是多点触控的类,可以模拟用户多点操作。主要包含 add() 和 perform() 两个方法, MultiAction可以结合前面所学的 ActionTouch可以模拟出用户的多个手指滑动的操作效果。
from appium.webdriver.common.multi_action import MultiAction
from appium.webdriver.common.touch_action import TouchAction
add 方法:touch_actions 就是 一个或多个TouchAction对象,描述一个手指要执行的动作
    def add(self, *touch_actions: 'TouchAction') -> None:
        """Add TouchAction objects to the MultiAction, to be performed later.

        Args:
            touch_actions: one or more TouchAction objects describing a chain of actions to be performed by one finger

        Usage:
            | a1 = TouchAction(driver)
            | a1.press(el1).move_to(el2).release()
            | a2 = TouchAction(driver)
            | a2.press(el2).move_to(el1).release()
            | MultiAction(driver).add(a1, a2)

        Returns:
            `MultiAction`: Self instance
        """
        for touch_action in touch_actions:
            if self._touch_actions is None:
                self._touch_actions = []

            self._touch_actions.append(copy.copy(touch_action))
perform 方法
    def perform(self: T) -> T:
        """Perform the actions stored in the object.

        Usage:
            | a1 = TouchAction(driver)
            | a1.press(el1).move_to(el2).release()
            | a2 = TouchAction(driver)
            | a2.press(el2).move_to(el1).release()
            | MultiAction(driver).add(a1, a2).perform()

        Returns:
            `MultiAction`: Self instance
        """
        self._driver.execute(Command.MULTI_ACTION, self.json_wire_gestures)

        # clean up and be ready for the next batch
        self._touch_actions = []

        return self
用法:
from appium.webdriver.common.multi_action import MultiAction
from appium.webdriver.common.touch_action import TouchAction

a1 = TouchAction(driver)
a1.press(el1).move_to(el2).release()

a2 = TouchAction(driver)
a2.press(el2).move_to(el1).release()

MultiAction(driver).add(a1, a2).perform()
代码实战:放大缩小微信中的地图
import time
from selenium.webdriver.support.wait import WebDriverWait
from selenium.webdriver.support import expected_conditions as EC
from appium import webdriver
from appium.webdriver.common.mobileby import MobileBy
from appium.webdriver.common.touch_action import TouchAction
from appium.webdriver.common.multi_action import MultiAction


desired_caps = {
    'platformName': 'Android',
    'platformVersion': '8.1',
    'deviceName': 'ye_shen_Android',
    'appPackage': 'com.tencent.mm',
    'appActivity': 'com.tencent.mm.ui.LauncherUI',
    'noReset': True,
    'autoAcceptAlerts': True,
    'newCommandTimeout': 240,
    # 'automationName': 'uiautomator2'
}

driver = webdriver.Remote('http://127.0.0.1:4723/wd/hub', desired_caps)
driver.implicitly_wait(10)

# 点击 微信 聊天框
loc = (MobileBy.ANDROID_UIAUTOMATOR, 'new UiSelector().text("通讯录")')
WebDriverWait(driver, 30).until(EC.visibility_of_element_located(loc))
# el = driver.find_element(MobileBy.ANDROID_UIAUTOMATOR,'new UiSelector().resourceId("com.tencent.mm:id/bth")')
TouchAction(driver).tap(x=152, y=315).wait(200).perform()

# 点击 里面的地图
locc = (MobileBy.ANDROID_UIAUTOMATOR, 'new UiSelector().textContains("西乡")')
WebDriverWait(driver, 30).until(EC.visibility_of_element_located(locc))
ele = driver.find_element(MobileBy.ANDROID_UIAUTOMATOR, 'new UiSelector().textContains("西乡")')
TouchAction(driver).tap(ele).wait(200).perform()

def getSize(driver):
    x = driver.get_window_size()['width']
    y = driver.get_window_size()['height']
    return x, y

# 放大
def narrow():
    x, y = getSize(driver)
    action1 = TouchAction(driver)
    action2 = TouchAction(driver)
    zoom_action = MultiAction(driver)
    action1.press(x=x*0.2, y=y*0.2).wait(1000).move_to(x=x*0.4, y=y*0.4).wait(1000).release()
    action2.press(x=x*0.8, y=y*0.8).wait(1000).move_to(x=x*0.6, y=y*0.6).wait(1000).release()
    zoom_action.add(action1, action2)
    zoom_action.perform()

# 缩小
def enlarge():
    x, y = getSize(driver)
    action1=TouchAction(driver)
    action2=TouchAction(driver)
    zoom_action=MultiAction(driver)
    action1.press(x=x*0.4,y=y*0.4).wait(1000).move_to(x=x*0.2,y=y*0.2).wait(1000).release()
    action2.press(x=x*0.6,y=y*0.6).wait(1000).move_to(x=x*0.8,y=y*0.8).wait(1000).release()
    zoom_action.add(action1,action2)
    zoom_action.perform()


if __name__ == '__main__':
    for i in range(5):
        narrow()

    for i in range(5):
        enlarge()
2.2 放大/缩小操作另一个方法:zoom/pinch
参数:percent:在某控件上执行放大操作,默认放大比例为200%,steps:表示 放大/缩小 动作分多少步完成,默认50
zoom(self, element=None, percent=200, steps=50)
pinch(self, element=None, percent=200, steps=50)
# 放大
driver.zoom(element)
# 缩小
driver.pinch(element)
3.滑屏操作:
借鉴文章戳这里哦
A.driver.swipe(x1, y1, x2, y2,duration)
swipe(起始X,起始Y, 结束X,结束Y)
起始X - 结束X:X滑动的距离
起始Y - 结束Y:Y滑动的距离
从坐标(x1,x2)滑动到坐标(x2,y2),duration:时长/毫秒,滑动时间(滑动的坐标不能超过屏幕的宽高)
size = driver.get_window_size()
print(driver.get_window_size())
返回的是:{'width': 1080, 'height': 1776}
利用 swipe(self, start_x, start_y, end_x, end_y, duration=0)方法:
start_x = size['width'] * 0.9  # 宽度
start_y = size['height'] * 0.5  # 高度
end_x = size['width'] * 0.1
end_y = size['height'] * 0.5
一个屏幕向上下左右活动的方法如下:
import time
from selenium.webdriver.support.wait import WebDriverWait
from selenium.webdriver.support import expected_conditions as EC
from appium import webdriver
from appium.webdriver.common.mobileby import MobileBy

desired_caps = {
    'platformName': 'Android',
    'platformVersion': '8.1',
    'deviceName': 'ye_shen_Android',
    'appPackage': 'com.tencent.mm',
    'appActivity': 'com.tencent.mm.ui.LauncherUI',
    'noReset': True,
    'autoAcceptAlerts': True,
    'newCommandTimeout': 240
}

driver = webdriver.Remote('http://127.0.0.1:4723/wd/hub', desired_caps)

loc = (MobileBy.ANDROID_UIAUTOMATOR, 'new UiSelector().resourceId("com.tencent.mm:id/cn_")')
WebDriverWait(driver, 10).until(EC.visibility_of_element_located(loc))


#获得屏幕大小宽和高
def getSize(driver):
    x = driver.get_window_size()['width']
    y = driver.get_window_size()['height']
    return (x, y)

#屏幕向上滑动
def swipeUp(driver,t=1000):
    l = getSize(driver)
    x1 = int(l[0] * 0.5)    #x坐标
    y1 = int(l[1] * 0.75)   #起始y坐标
    y2 = int(l[1] * 0.25)   #终点y坐标
    driver.swipe(x1, y1, x1, y2,t)

#屏幕向下滑动
def swipeDown(driver,t=1000):
    l = getSize(driver)
    x1 = int(l[0] * 0.5)  #x坐标
    y1 = int(l[1] * 0.25)   #起始y坐标
    y2 = int(l[1] * 0.75)   #终点y坐标
    driver.swipe(x1, y1, x1, y2,t)
#屏幕向左滑动
def swipLeft(driver,t):
    l=getSize(driver)
    x1=int(l[0]*0.75)
    y1=int(l[1]*0.5)
    x2=int(l[0]*0.05)
    driver.swipe(x1,y1,x2,y1,t)
#屏幕向右滑动
def swipRight(driver,t=1000):
    l=getSize(driver)
    x1=int(l[0]*0.05)
    y1=int(l[1]*0.5)
    x2=int(l[0]*0.75)
    driver.swipe(x1,y1,x2,y1,t)

#调用向下滑动的方法
swipeDown(driver)
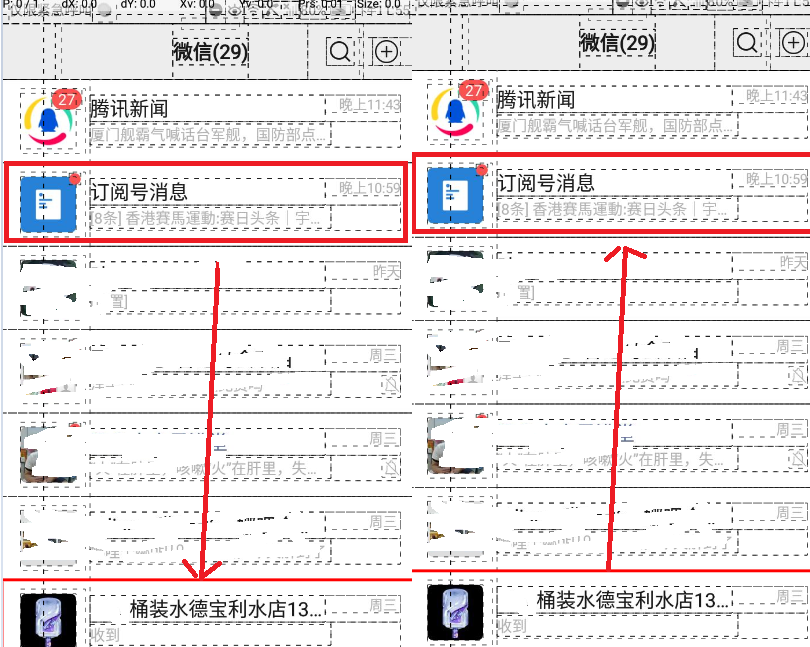
B.driver.scroll
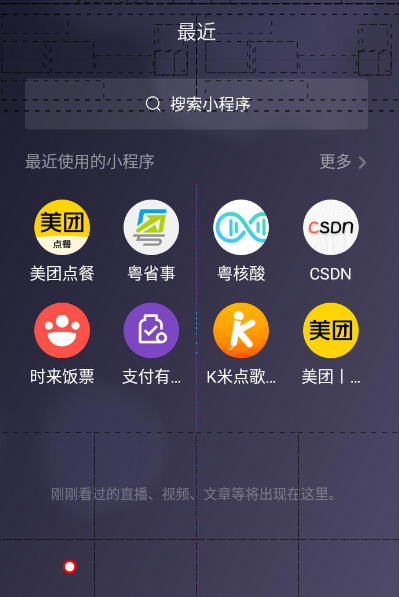
- 从一个元素滚动到另一个元素,只能是两个元素之间的滑动。
- 第一幅图是下拉打开小程序,第二个图是桶装水代替订阅号消息位置
方法详情:
参数:origin_el - 要滚动的起始元素;destination_el - 要滚动到的结束元素;duration - 持续时间,单位毫秒,默认为 600 ms
def scroll(self: T, origin_el: WebElement, destination_el: WebElement, duration: Optional[int] = None) -> T:
    if self.w3c and duration is None:
            duration = 600

        action = TouchAction(self)
        if duration is None:
            action.press(origin_el).move_to(destination_el).release().perform()
        else:
            action.press(origin_el).wait(duration).move_to(destination_el).release().perform()
        return self
代码实战:
from selenium.webdriver.support.wait import WebDriverWait
from selenium.webdriver.support import expected_conditions as EC
from appium import webdriver
from appium.webdriver.common.mobileby import MobileBy

desired_caps = {
    'platformName': 'Android',
    'platformVersion': '8.1',
    'deviceName': 'ye_shen_Android',
    'appPackage': 'com.tencent.mm',
    'appActivity': 'com.tencent.mm.ui.LauncherUI',
    'noReset': True,
    'autoAcceptAlerts': True,
    'newCommandTimeout': 240,
    # 'automationName': 'uiautomator2'
}

driver = webdriver.Remote('http://127.0.0.1:4723/wd/hub', desired_caps)
driver.implicitly_wait(10)

#点击 微信
loc = (MobileBy.ANDROID_UIAUTOMATOR, 'new UiSelector().text("通讯录")')
WebDriverWait(driver, 30).until(EC.visibility_of_element_located(loc))

# 订阅号消息
stop_element = driver.find_element(MobileBy.XPATH, '//*[@resource-id="com.tencent.mm:id/gkp"]/android.widget.LinearLayout[2]')

# 桶装水
start_element = driver.find_element(MobileBy.XPATH, '//*[@resource-id="com.tencent.mm:id/gkp"]/android.widget.LinearLayout[7]')

# 执⾏滑动操作 以下 二者选一执行
# 下拉微信的到小程序
driver.scroll(stop_element,start_element,3000)
# 桶装水代替订阅号消息
driver.scroll(start_element,stop_element,3000)
下拉至小程序
注意:操作过程有 惯性,需要添加duration参数,参数值越大,惯性越小。
C.driver.drag_and_drop
从一个元素拖曳到另一个元素,第二个元素代替第一个元素原本屏幕上的位置。
方法:参数:origin_el - 要滑动页面的起始元素;destination_el - 要滑动页面到结束元素。
def drag_and_drop(self: T, origin_el: WebElement, destination_el: WebElement) -> T:
    action = TouchAction(self)
    action.long_press(origin_el).move_to(destination_el).release().perform()
    return self
代码实战:
from selenium.webdriver.support.wait import WebDriverWait
from selenium.webdriver.support import expected_conditions as EC
from appium import webdriver
from appium.webdriver.common.mobileby import MobileBy

desired_caps = {
    'platformName': 'Android',
    'platformVersion': '8.1',
    'deviceName': 'ye_shen_Android',
    'appPackage': 'com.tencent.mm',
    'appActivity': 'com.tencent.mm.ui.LauncherUI',
    'noReset': True,
    'autoAcceptAlerts': True,
    'newCommandTimeout': 240,
    # 'automationName': 'uiautomator2'
}

driver = webdriver.Remote('http://127.0.0.1:4723/wd/hub', desired_caps)
driver.implicitly_wait(10)

#点击 微信
loc = (MobileBy.ANDROID_UIAUTOMATOR, 'new UiSelector().text("通讯录")')
WebDriverWait(driver, 30).until(EC.visibility_of_element_located(loc))

# 订阅号消息
stop_element = driver.find_element(MobileBy.XPATH, '//*[@resource-id="com.tencent.mm:id/gkp"]/android.widget.LinearLayout[2]')

# 桶装水
start_element = driver.find_element(MobileBy.XPATH, '//*[@resource-id="com.tencent.mm:id/gkp"]/android.widget.LinearLayout[7]')

# 执⾏滑动操作 以下 二者选一执行
# 下拉微信的到小程序
driver.drag_and_drop(stop_element,start_element)
# 桶装水代替订阅号消息
driver.drag_and_drop(start_element,stop_element)
driver.drag_and_drop 方法说明:不能设置持续时间,没有惯性。
总结上述三种方法:滑动和拖拽无非就是考虑是否具有“惯性”,以及传递的参数是“元素”还是“坐标”。
scroll:有 “惯性” ,传入 “元素”,可以通过设置duration参数来进行控制惯性大小
drag_and_drop:无 “惯性” ,传入 “元素”
swipe:有 “惯性” ,传入 “坐标”,可以通过设置duration参数来进行控制惯性大小
四、手机操作
借鉴文章戳这里
我们在自动化测试过程中,可能需要手机相关联的一些操作进行辅助测试,这些我们主要讲解获取手机分辨率、手机截图、获取和设置手机网络、发送手机按键到设备、操作手机通知栏。
1.获取手机分辨率
方法:
# driver.get_window_size()
window_size = driver.get_window_size()
print(window_size)
2.手机截图
方法:
get_screenshot_as_file(filename):参数是将截图保存为指定路径下、指定格式的图片。
实战代码:
from selenium.webdriver.support.wait import WebDriverWait
from selenium.webdriver.support import expected_conditions as EC
from appium import webdriver
from appium.webdriver.common.mobileby import MobileBy
from appium.webdriver.common.touch_action import TouchAction
from appium.webdriver.common.multi_action import MultiAction


desired_caps = {
    'platformName': 'Android',
    'platformVersion': '8.1',
    'deviceName': 'ye_shen_Android',
    'appPackage': 'com.tencent.mm',
    'appActivity': 'com.tencent.mm.ui.LauncherUI',
    'noReset': True,
    'autoAcceptAlerts': True,
    'newCommandTimeout': 240,
    'automationName': 'uiautomator2'
}

driver = webdriver.Remote('http://127.0.0.1:4723/wd/hub', desired_caps)
driver.implicitly_wait(10)

# 点击 微信 我的
loc = (MobileBy.ANDROID_UIAUTOMATOR, 'new UiSelector().resourceId("com.tencent.mm:id/j5t")')
WebDriverWait(driver, 30).until(EC.visibility_of_element_located(loc))
TouchAction(driver).tap(x=540, y=1255).wait(200).perform()

# 点击 服务
locc = (MobileBy.ANDROID_UIAUTOMATOR, 'new UiSelector().text("服务")')
WebDriverWait(driver, 30).until(EC.visibility_of_element_located(locc))
ele = driver.find_element(MobileBy.ANDROID_UIAUTOMATOR, 'new UiSelector().text("服务")')
TouchAction(driver).tap(ele).wait(200).perform()

# 检查 请输入手势密码
loccs = (MobileBy.ANDROID_UIAUTOMATOR, 'new UiSelector().text("请输入手势密码")')
WebDriverWait(driver, 30).until(EC.visibility_of_element_located(loccs))

driver.get_screenshot_as_file("./touch_action_unlock.png")
看图:
3.获取手机网络
方法:
driver.network_connection
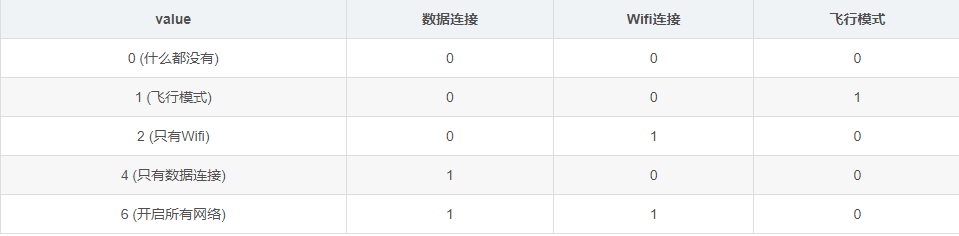
方法配置:
            +--------------------+------+------+---------------+
            | Value (Alias)      | Data | Wifi | Airplane Mode |
            +====================+======+======+===============+
            | 0 (None)           | 0    | 0    | 0             |
            +--------------------+------+------+---------------+
            | 1 (Airplane Mode)  | 0    | 0    | 1             |
            +--------------------+------+------+---------------+
            | 2 (Wifi only)      | 0    | 1    | 0             |
            +--------------------+------+------+---------------+
            | 4 (Data only)      | 1    | 0    | 0             |
            +--------------------+------+------+---------------+
            | 6 (All network on) | 1    | 1    | 0             |
            +--------------------+------+------+---------------+
结果打印:

4.设置手机网络
方法:
driver.set_network_connection(connectionType) 参数为网络类型。
实战代码:设置当前设备为飞行模式
driver.set_network_connection(1)
5.发送手机按键到设备
模拟按 “返回键” “home键” 等等操作,很多应用有按两次返回键退出应用的功能,如果这个功能 需要我们做自动化,那么一定会用到这个方法。
方法:
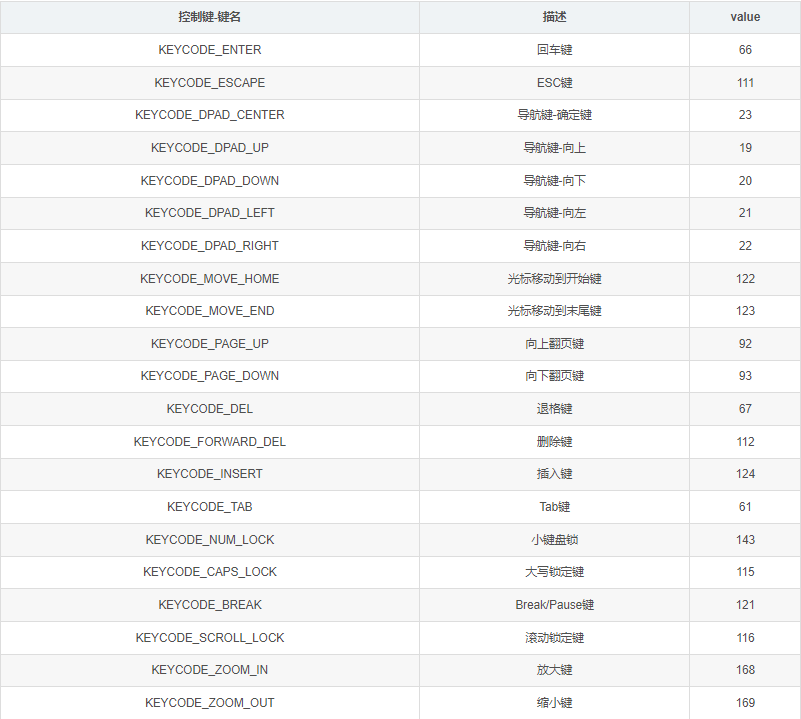
driver.press_keycode(keycode, metastate=None)
第一个参数是发送给设备的关键代码,第二个是关键代码的元信息,一般是默认值。
按键对应的编码,大家可以看appium官网介绍说明:戳这里哦
常用键
driver.press_keycode(value)
第一个表:
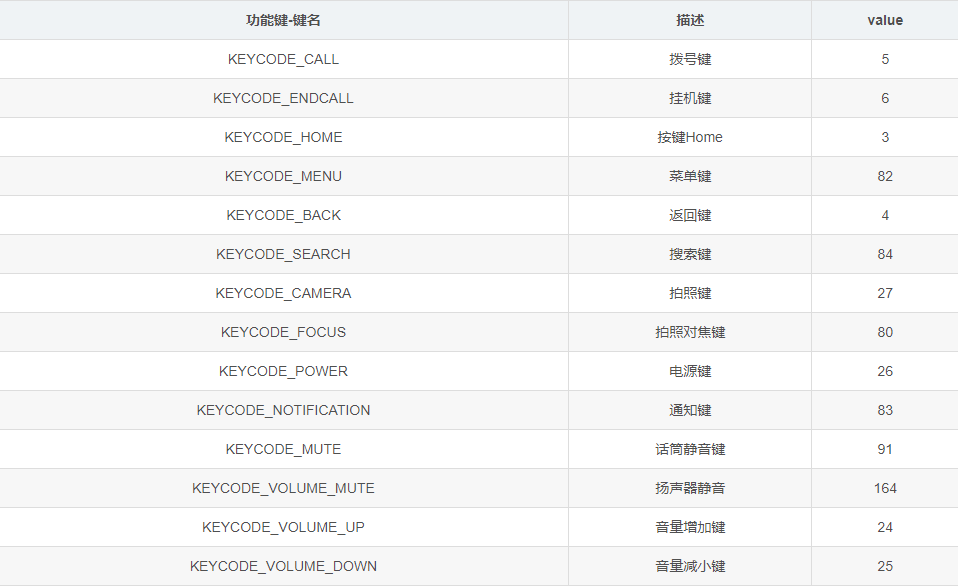
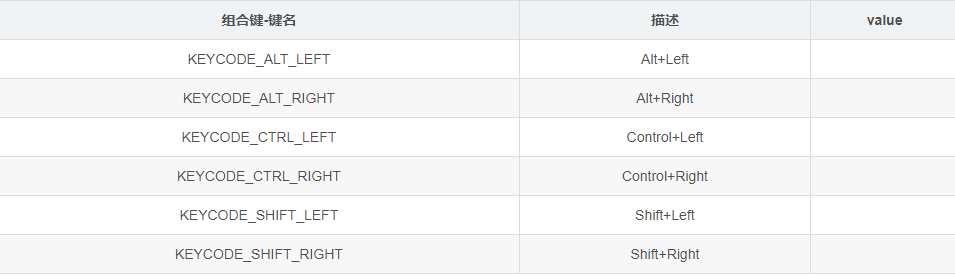
第二个表:
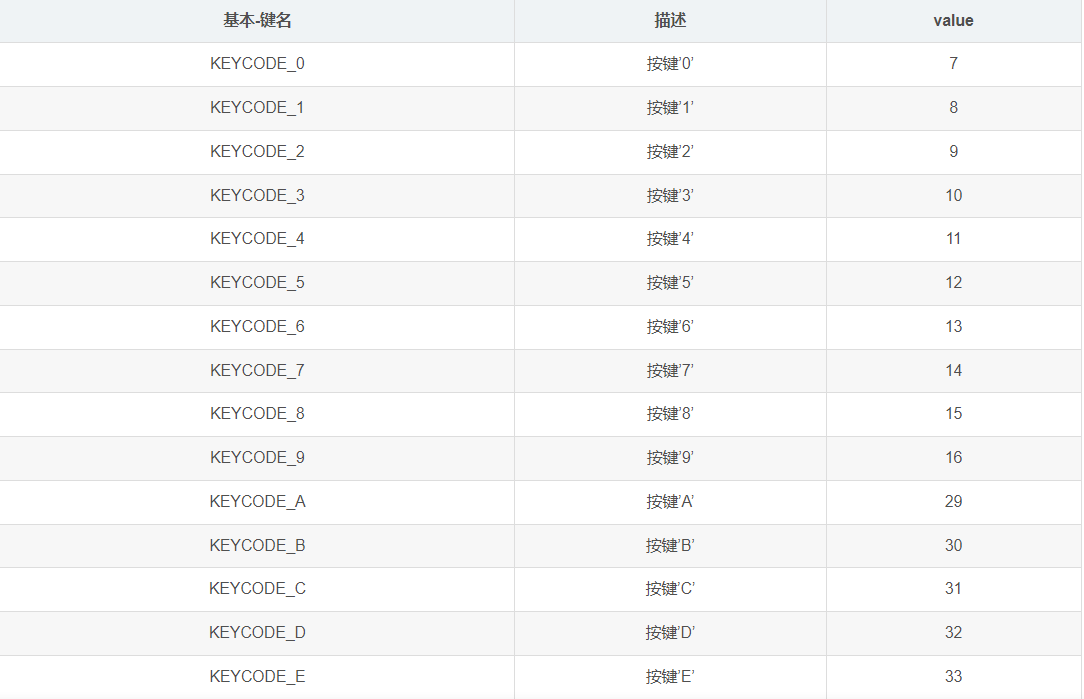
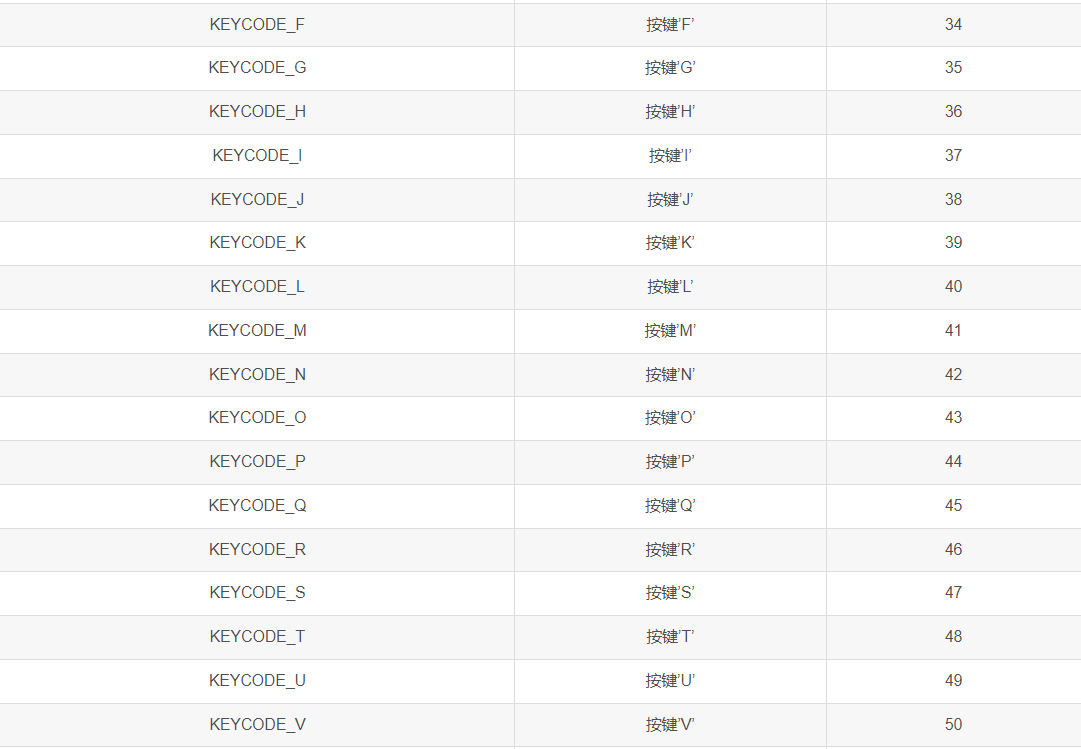
第三个表:
第四个表:

实战代码:
- 点击三次音量加,等待 3S,再点击三次音量减。
# 按音量 + 三次
for i in range(3):
    driver.press_keycode(24)
    time.sleep(1)

time.sleep(3)
# 按音量 - 三次
for i in range(3):
    driver.press_keycode(25)
    time.sleep(1)
6.操作手机通知栏
测试即时通信类软件的时候,如果收到其他人发送的一条消息,通知栏肯定会显示对应的消息。我们想通过通知栏来判断是否收到消息,一定要先操作手机的通知栏。
方法
driver.open_notifications():打开手机通知栏。
appium官方没有为我们提供关闭通知的Api,那么打开通知栏之后再怎么关闭呢,我们可以手指从下往上滑动或者按返回键。
实战代码:
- 打开通知栏,三秒后,关闭通知栏。
driver.open_notifications()
time.sleep(3)
driver.press_keycode(4)

# 或者:点击返回键
driver.keyevent(4)
7.page_source 获取当前页面的源码
driver.page_source 获取当前页面的源码
8.quit 退出
driver.quit()
五、等待操作
# 时间等待方式
# 第一种:固定延迟 5s
import time
time.sleep(5)

# 第二种:隐形等待 如果等到了进程马上运行,如没有等到,10秒后报错

from appium import webdriver
from appium.webdriver.common.appiumby import AppiumBy

# 启动Chrome驱动
driver = webdriver.Remote(command_executor='http://127.0.0.1:4723/wd/hub', desired_capabilities=desired_caps)
driver.implicitly_wait(10) # 在启动后到启动结束所有进程都保持10S处理时间。

# 第三种:显形等待
# 明确等待某个条件的满足之后,再去执行下一步的操作。
# 程序每隔XX秒看一眼,如果条件成立了,则执行下一步,否则继续等待,直到超过设置最长时间,然后抛出TimeoutException。

# 使用之前,引入相关的库
from appium import webdriver
from selenium.webdriver.support.wait import WebDriverWait
from selenium.webdriver.support import expected_conditions as EC
from appium.webdriver.common.appiumby import AppiumBy
from appium.webdriver.common.mobileby import MobileBy

# WebDriverWait类:显性等待类
# WebDriverWait(driver,等待时常,轮询周期).until()条件/until_not()直到条件不成立


# 以下是显性等待使用方法:
# 1、先确认元素的定位表达式
s_id = 'TANGRAM__PSP_11__regLink'

# 2、设置显性等待 WebDriverWait(driver,等待时常:10S,轮询周期:默认值0.5S).until()/until_not():条件成立/直到条件不成立
WebDriverWait(driver, 10).until(EC.presence_of_element_located((AppiumBy.ID, s_id)))  # 条件 (元素定位为的类型,元素定位的表达式)

# 3、使用后续的方法 比如:点击
driver.find_element(AppiumBy.ID, 'TANGRAM__PSP_11__regLink').click()
- 附:常用的 expected_conditions 模块下的条件:
# EC.presence_of_element_located():元素存在
# EC.visibility_of_element_located():元素可见
# EC.element_to_be_clickable():元素可点击
# EC.new_window_is_opened()  # 新窗口是否打开
# EC.frame_to_be_available_and_switch_to_it()  # 可用并且切换进去
# EC.alert_is_present()  # 弹出框的出现
# EC.element_selection_state_to_be()  # 下拉列表状态
# EC.element_to_be_selected()  # 某一个定位表达式的值应该是被选中的
# EC.element_selection_state_to_be()  # 定位表达式的选中状态是什么
# EC.element_to_be_selected()  # 元素可用被选中的
# EC.invisibility_of_element()  # 隐形的元素
# EC.number_of_windows_to_be()  # 窗口的个数应该为
# # EC.presence_of_all_elements_located()  # 所有元素应该都存在
# EC.text_to_be_present_in_element()  # 元素出现的文本内容
# EC.text_to_be_present_in_element_value()  # 元素出现的文本内容值
# EC.url_changes()  # url的改变
# EC.url_contains()  # url的包含
# EC.url_matches()  # url的匹配
# EC.url_to_be()  # url的应该是什么
六、Toast 信息操作
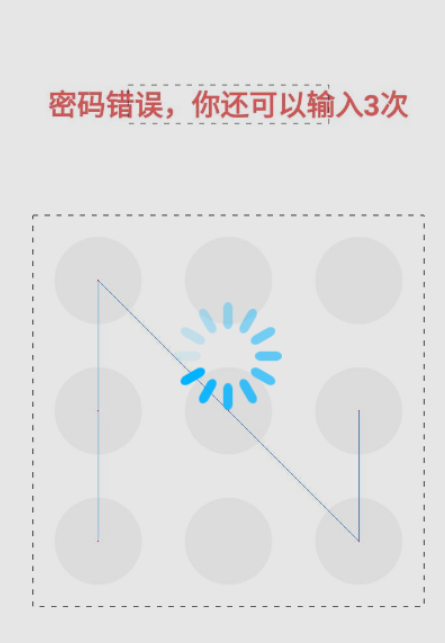
Toast是Android中用来显示显示信息的一种机制,和Dialog不一样的是,Toast是没有焦点的,而且Toast显示的时间有限,过一定的时间就会自动消失。
比如:密码输错后,移动端的提示。即是Toast 信息
要求环境:
Appium-Python-Client: 2.1.2
selenium: 4.1.0
Appium:1.6.3开始支持识别Toast内容 :v1.6.3起步
代码实现:
优先配置:desired_caps 配置
'automationName': 'uiautomator2'
微信输入手势密码错误,获取 toast:
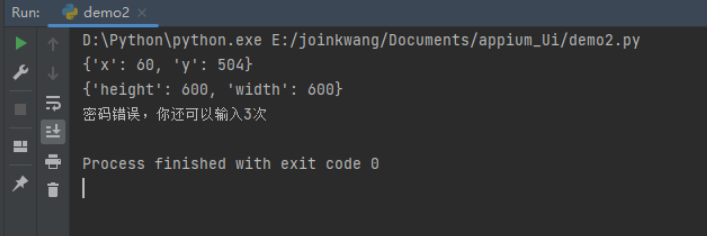
from selenium.webdriver.support.wait import WebDriverWait
from selenium.webdriver.support import expected_conditions as EC
from appium import webdriver
from appium.webdriver.common.mobileby import MobileBy
from appium.webdriver.common.touch_action import TouchAction

desired_caps = {
    'platformName': 'Android',
    'platformVersion': '8.1',
    'deviceName': 'ye_shen_Android',
    'appPackage': 'com.tencent.mm',
    'appActivity': 'com.tencent.mm.ui.LauncherUI',
    'noReset': True,
    'autoAcceptAlerts': True,
    'newCommandTimeout': 240,
    'automationName': 'uiautomator2'
}

driver = webdriver.Remote('http://127.0.0.1:4723/wd/hub', desired_caps)
driver.implicitly_wait(10)

# 点击 微信 我的
loc = (MobileBy.ANDROID_UIAUTOMATOR, 'new UiSelector().resourceId("com.tencent.mm:id/j5t")')
WebDriverWait(driver, 30).until(EC.visibility_of_element_located(loc))
TouchAction(driver).tap(x=540, y=1255).wait(200).perform()

# 点击 服务
locc = (MobileBy.ANDROID_UIAUTOMATOR, 'new UiSelector().text("服务")')
WebDriverWait(driver, 30).until(EC.visibility_of_element_located(locc))
ele = driver.find_element(MobileBy.ANDROID_UIAUTOMATOR, 'new UiSelector().text("服务")')
TouchAction(driver).tap(ele).wait(200).perform()

# 检查 请输入手势密码
loccs = (MobileBy.ANDROID_UIAUTOMATOR, 'new UiSelector().text("请输入手势密码")')
WebDriverWait(driver, 30).until(EC.visibility_of_element_located(loccs))

# 获取起始坐标-九宫格左上顶点
loc = driver.find_element(MobileBy.ID, "com.tencent.mm:id/hrs").location
print(loc)
# 获取九宫格元素大小 height width 宽 和 高
loc_size = driver.find_element(MobileBy.ID, "com.tencent.mm:id/hrs").size
print(loc_size)

# 获取分割后的均值,即下面要用到的九宫格的步长
step = loc_size["width"] / 6
step_x = loc_size["width"] / 6
step_y = loc_size["height"] / 6

# 计算出每个点的坐标
point1 = (loc["x"] + step, loc["y"] + step * 5)
point2 = (point1[0], point1[1] - step * 2)
point3 = (point2[0], point2[1] - step * 2)
point4 = (point3[0] + step * 2, point3[1] + step * 2)
point5 = (point4[0] + step * 2, point4[1] + step * 2)
point6 = (point5[0], point5[1] - step * 2)
point7 = (point6[0], point6[1] - step * 2)


# 进行滑动操作
TouchAction(driver).press(x=point1[0], y=point1[1]).wait(500). \
    move_to(x=point2[0], y=point2[1]). \
    move_to(x=point3[0], y=point3[1]). \
    move_to(x=point4[0], y=point4[1]). \
    move_to(x=point5[0], y=point5[1]). \
    move_to(x=point6[0], y=point6[1]).release().perform()
    # move_to(x=point7[0], y=point7[1]). \ 禁用最后一个手势

# 利用XPATH获取
toast_text = driver.find_element(MobileBy.XPATH, '//*[contains(@text,"密码错误")]').text
print(toast_text)
运行结果:
说明:
第一种方式:toast 获取主要使用一个通用的class属性获取,通过xpath的方式://*[@class="android.widget.Toast"]
第二种方式:xpath比如说文本匹配亦可:
loc = (MobileBy.XPATH, '//*[contains(@text,"%s")]' % '密码错误')
try:
    WebDriverWait(driver,10,0.02).until(EC.presence_of_element_located(loc))
    print(driver.find_element(MobileBy.XPATH,'//*[contains(@text,"密码错误")]').text)
except:
    print("没有匹配到toast!!!!!!!")
封装如下:
def is_toast_exist(driver, ele, texts):
    # ele = (MobileBy.XPATH, '//*[contains(@text,"%s")]' % '密码错误')
    """
     - driver - 传driver
     - timeout - 最大超时时间,默认20s 设定为 10
     - poll_frequency  - 间隔查询时间,默认0.5s查询一次 设定为0.02S
     - ele 表达式
     - texts 属性
    :Usage:
     is_toast_exist(driver)
    """
    try:
        WebDriverWait(driver,10,0.02).until(EC.presence_of_element_located(ele))
        print(driver.find_element(MobileBy.XPATH,'//*[contains(@text,%s)]' % texts).text)
    except:
        print("没有匹配到toast!!!!!!!")
七、H5页面的操作:包括元素定位等
借鉴文章戳这里
一、定义
1.H5,即是html5,超文本标记语言,用于描述网页内容结构的语言,网页编程中由它有负责描述页面数据和信息。
2.JS,即是JavaScript,广泛用于web应用开发中的脚本语言,负责响应用户的操作,为网页添加动态功能
3.Native App,即传统的原生APP开发模式,Android基于Java语言,底层调用Google的 API;iOS基于Objective-C或者Swift语言,底层调用App官方提供的API
4.Hybrid App,即原生和web的混合开发模式,由原生提供统一的API给js调用,实现跨平台的效果
二、鉴别方法
1.看断网时页面显示情况
断网时可正常显示页面即原生页面,显示404或报错则为H5页面。
2.看复制文章的提示
比如是文章资讯页面可以长按页面试试,如果出现文字选择、粘贴功能的是H5页面,否则是native原生页面。
注意:有些原生APP开放了复制粘贴功能或者关闭了。而H5的css屏蔽了复制选择功能等等情况。需要通过对目标测试APP进行对比才可知。
3.查看窗口页面的class属性(最经典的鉴别方法)
如果是:Android.webkit.WebView 属性,那代表这个是一个H5,移动端的网页。不是原生控件

三、优缺点
1.H5
(1)优点:支持跨平台,安卓、ios不需要单独开发,只需要开发一套即可;用户无需下载,打开网址即可访问;开发简单,开发成本低,入门门槛低。
(2)缺点: 每次打开页面,都需重新加载获取数据;过分依赖网络,访问速度无法保证。
2.原生 Native
(1)优点:直接依托于操作系统,交互性最强,性能最好。
(2)缺点 :开发成本高,无法跨平台;不同平台(Android和iOS)需要各自独立开发;开发人员入门门槛较高;app发布审核流程麻烦,维护成本高。
注意: 要从我们的原生控件切换到H5中(手机的html页面中):满足下面两个条件
1.识别到 WebView(Web视图)
2.两个硬性要求:首先.Android版本4.4以上 ;其次.WebView必须为debug版本(开发打开WebView权限的版本)
首先第1点:元素 class 属性是:Android.webkit.WebView:这一步是确认这个页面是html页面。这个属性可以在点击 “进入”一个html页面中的属性中查看。
Android.webkit.WebView 显示不了问题解决办法:
# 在自动化脚本中,进入到对应的H5页面,打印输出当前context,如果一直显示为Natvie App,则webview未开启
print(driver.contexts)  # 正常情况能获取得到 ['NATIVE_APP', 'WEBVIEW_com.xkw.client']

# 如果 只是打印出 NATIVE_APP 解决方法:如果只有 ['NATIVE_APP'] 代表当前页面是不能直接使用切换,无法debug
1.模拟器的contexts中有webview,但是有些手机没有
官方答案是:需要将手机root,然后再去获取。

2.找开发人员要解决:apk包需要debug模式(debug模式的来源:'app打包需要开户webview的debug属性setWebContentDebuggingEnabled(true)')

3.打开app对应的h5页面,在 chrome://inspect/#devices 地址中,检查是否显示对应的 webview,如没有,则当前未开启调试模式
开启方式:在WebView类中调用静态方法setWebContentsDebuggingEnabled,这种需要App开发人员操作
if (Build.VERSION.SDK_INT >=Build.VERSION_CODES.KITKAT) {
 WebView.setWebContentsDebuggingEnabled(true);
满足第一个条件之后,现在再去获取webview页面的元素定位,获取方式如下
1、chrome:chrome://inspect/#devices,需要FQ 前提是在手机和模拟器打开html网页才能显示。
2、使用driver.page_source获取html页面
3、找开发人员要源文件,自己找属性
4、uc-devtools不需要FQ
A.举例:第一种:1、chrome://inspect,需要FQ
步骤:目的:调试H5页面,查找元素
1、手机与电脑连接,开启USB调试模式,通过adb devices可查看到此设备
2、在手机端(模拟器)打开html的页面,进入H5页面
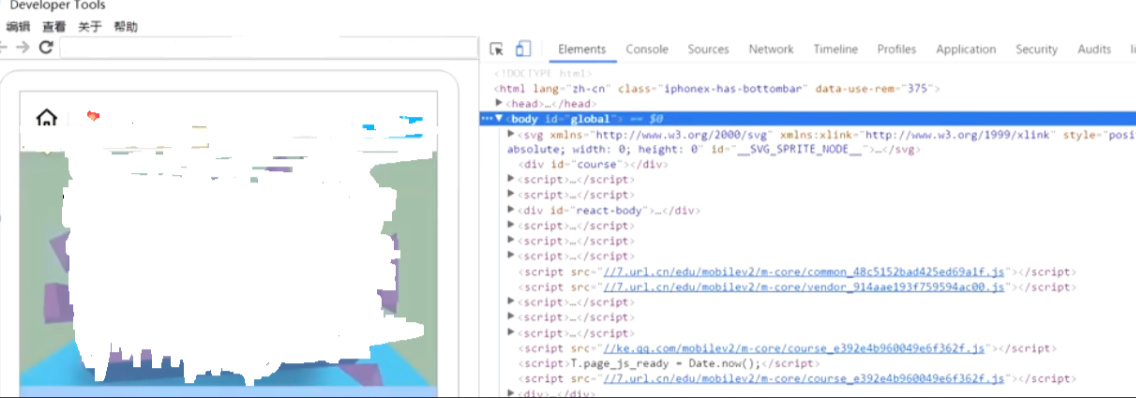
3、在电脑端Chrome浏览器地址栏输入chrome://inspect/#devices,进入调试模式
步骤 3:如下:

4、查看显示出来的参数。
注意:下载chrom浏览器驱动:70.0.3538.110 特别注意:只需要下载驱动就行,浏览器版本电脑或者手机没必要下载,你要搞清楚这个是指手机APP里面的html支持的驱动,不是指执行代码的电脑和手机chrom浏览器,半毛钱关系都没有!!!
驱动下载:http://chromedriver.storage.googleapis.com/index.html?path=70.0.3538.110/
在chrom浏览器中输入上面给的H5页面地址:https://m.zxxk.com/activity/czshk2022/?source=appb
5、将驱动放到一个本地执行python代码目录下,例如:.\data\chromedriver.exe
还需要注意在启动参数配置加上:'chromedriverExecutable': r".\data\chromedriver.exe",'chromeOptions': {'w3c': False},
6、还要注意:contexts上下文操作
获取所有上下文
driver.contexts

获取当前上下文
driver.context

切换上下文:切换 WEBVIEW 网页Html端
方法一:driver.switch_to.context('WEBVIEW_com.xkw.client')
方法二:contexts = driver.contexts
driver.switch_to.context(contexts[-1])

切回原生应用
driver.switch_to.context('NATIVE_APP')
实战场景:
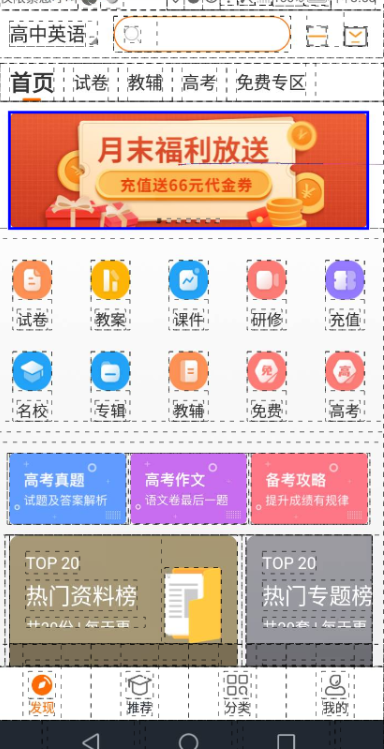
- 启动学科网APP应用,在页面点击月末福利放送
- 进入html页面
- 点击登录
- 点击返回html页面
- 返回主页。
实战代码:
import time
from appium import webdriver
from selenium.webdriver.support.wait import WebDriverWait
from selenium.webdriver.support import expected_conditions as EC
from appium.webdriver.common.mobileby import MobileBy
from appium.webdriver.common.touch_action import TouchAction
from appium.webdriver.common.multi_action import MultiAction


desired_caps = {
    'platformName': 'Android',
    'platformVersion': '8.1',
    'deviceName': 'ye_shen_Android',
    'appPackage': 'com.xkw.client',
    'appActivity': 'com.zxxk.page.main.LauncherActivity',
    'noReset': True,
    'autoAcceptAlerts': True,
    'newCommandTimeout': 240,
    'automationName': 'uiautomator2',
    'chromeOptions': {'w3c': False},
    'chromedriverExecutable': r'D:\exe\70.0.3538.97\chromedriver.exe' # 下载好的驱动放这个路径下
}

driver = webdriver.Remote('http://127.0.0.1:4723/wd/hub', desired_caps)
driver.implicitly_wait(10)

# 进入首页
loc = (MobileBy.ANDROID_UIAUTOMATOR, 'new UiSelector().text("首页")')
WebDriverWait(driver, 30, 1).until(EC.presence_of_element_located(loc))

# 点击活动入口
ele = driver.find_element(MobileBy.ANDROID_UIAUTOMATOR, 'new UiSelector().resourceId("com.xkw.client:id/discover_banner")')
TouchAction(driver).tap(ele).wait(200).perform()
time.sleep(5)

# 获取contexts:所有上下文 如果只有 ['NATIVE_APP'] 代表当前页面是不能直接使用切换,无法debug
context = driver.contexts
print(context)  # ['NATIVE_APP', 'WEBVIEW_com.xkw.client']

# 切换到H5窗口 :WEBVIEW_com.xkw.client 两种方式
# 第一种:
driver.switch_to.context(context[-1])
# 第二种:
# driver.switch_to.context('WEBVIEW_com.xkw.client')

# 可以打印页面源看是否进入H5页面
print(driver.page_source)

# 这一步骤执行一直报错:不用也罢 TypeError: appium.webdriver.webdriver.WebDriver.find_element() argument after * must be an iterable, not WebElement
# WebDriverWait(driver, 20).until(EC.presence_of_element_located(driver.find_element_by_class_name('login')))
time.sleep(3)

# 以下定位二选一
driver.find_element(MobileBy.CLASS_NAME, 'login').click()
# driver.find_element_by_class_name('login').click()


# 点击手机返回键,返回出手机html页面 回到APP主页
driver.keyevent(4)
time.sleep(3)
driver.keyevent(4)

# 切换到APP主页的原生页面
# 第一种:切换到Native 切换到手机app模式下
# driver.switch_to.context("NATIVE_APP")
# 第二种:切换到手机app模式下
driver.switch_to.context(context[0])
print(driver.page_source)
B.举例:第四种:没网的情况下下载这个工具也是一样可以查看页面元素和驱动:套路都是一样!


 浙公网安备 33010602011771号