有关于谷粒商城项目中遇到的问题
问题一:
放博客里面了。
问题二
我是提交的github,然后在最后是使用的:
ssh -T git@github.com
替换掉视频中的
ssh -T git@gitee.com
问题三
在P14中,点击compile之后编译报错:
解决Springboot启动报错:类文件具有错误的版本61.0,应为 52.0
问题解决:
参考链接:https://www.jb51.net/article/272985.htm
原因:
SpringBoot使用了3.0或者3.0以上,因为Spring官方发布从Spring6以及SprinBoot3.0开始最低支持JDK17,所以仅需将SpringBoot版本降低为3.0以下即可。
步骤:
将gulimall-coupon、gulimall-member、gulimall-order、gulimall-product、gulimall-ware这五个module中的pom.xml文件中的springboot依赖版本改成3.0以下,然后刷新即可。
例如:
<parent>
    <groupId>org.springframework.boot</groupId>
    <artifactId>spring-boot-starter-parent</artifactId>
    <version>2.7.5</version>
    <relativePath/> <!-- lookup parent from repository -->
</parent>
ps:在此处需要特别注意一点:版本一定需要对应起来。
问题四
P16:
npm install中遇到的问题:
npm版本:
v18.9.1

解决方法:
https://blog.csdn.net/qq_42217906/article/details/121698247
npm install --ignore-scripts
安装完成, 使用npm run dev之后前端显示不正常,
查看前端命令行显示如下错误:

解决:
Mac安装nvm解决npm版本问题:
参考链接:
https://blog.csdn.net/sebeefe/article/details/126773937
注意:去官网查看最新的安装命令, 安装nvm之前卸载掉之前安装的node:
https://gitcode.net/mirrors/nvm-sh/nvm?utm_source=csdn_github_accelerator
使用
curl -o- https://raw.githubusercontent.com/nvm-sh/nvm/v0.39.3/install.sh | bash
时别挂vpn;
并且使用
export NVM_DIR="$([ -z "${XDG_CONFIG_HOME-}" ] && printf %s "${HOME}/.nvm" || printf %s "${XDG_CONFIG_HOME}/nvm")"
[ -s "$NVM_DIR/nvm.sh" ] && \. "$NVM_DIR/nvm.sh" # This loads nvm
加载下载的nvm.
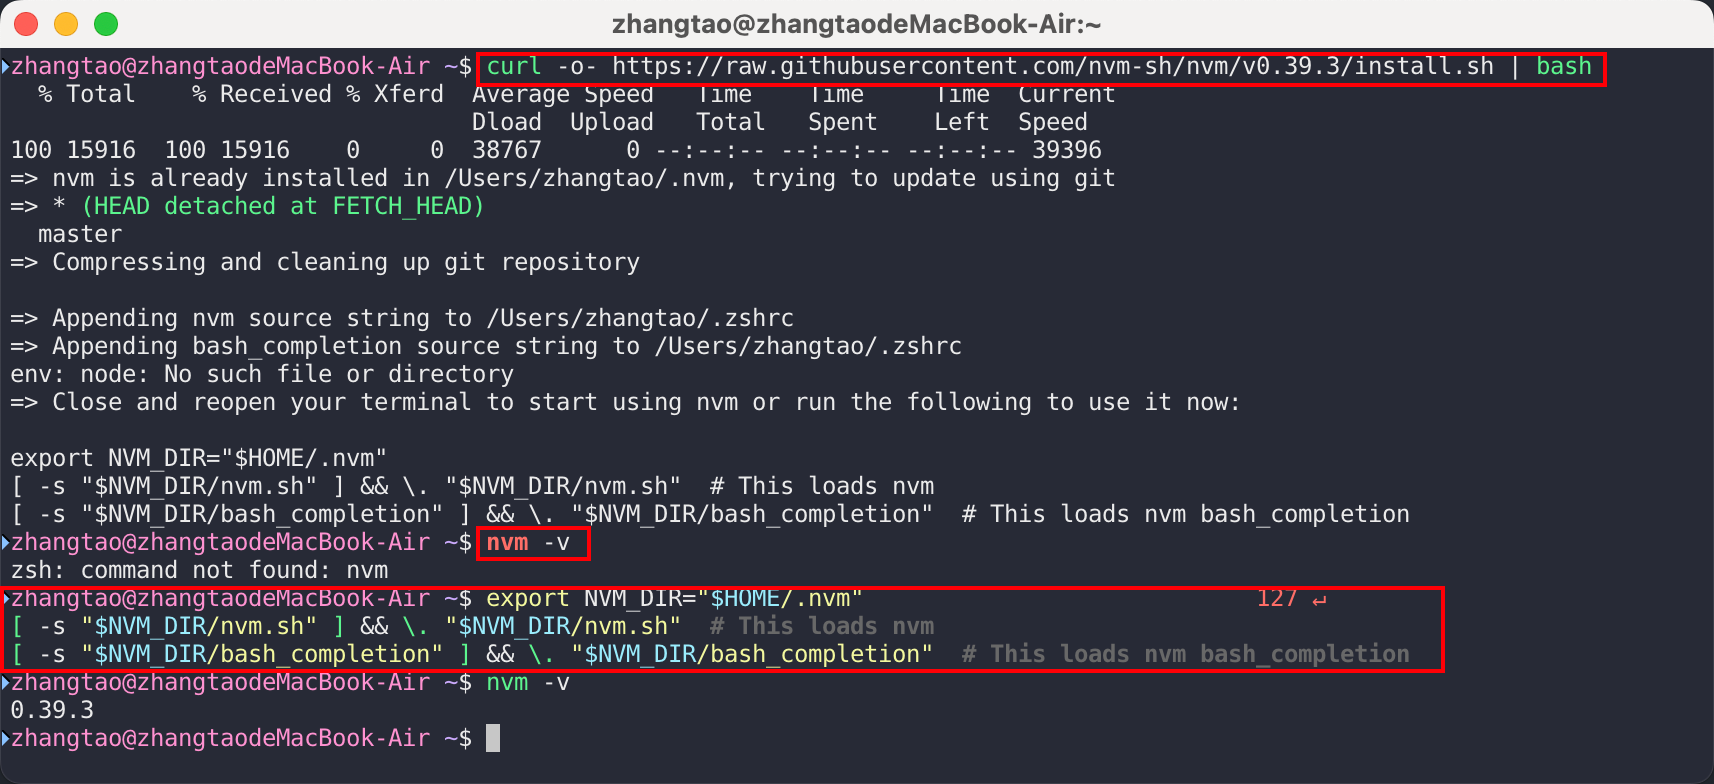
安装对应版本的node即可.
问题五
关于管理后端界面显示不了验证码的原因:
总结:
如果你前端安装的是renren-fast-vue,那么后端应该是renren-fast;
如果你前端安装的是renren-ui,那么后端应该是renren-security 。
注意:两个不同的后端对应的数据库是不一样的,部署不同后端应该创建不同的数据库。

我这里是安装的前端renren-ui
注意,下面这一段是我的错误示范,但是我还是保留了下来,从ERROR开始到END结束
--------------------------------------ERROR --------------------------------------
在查看帮助文档的时候,https://gitee.com/renrenio/renren-ui#安装
发现API请求地址是这样的:
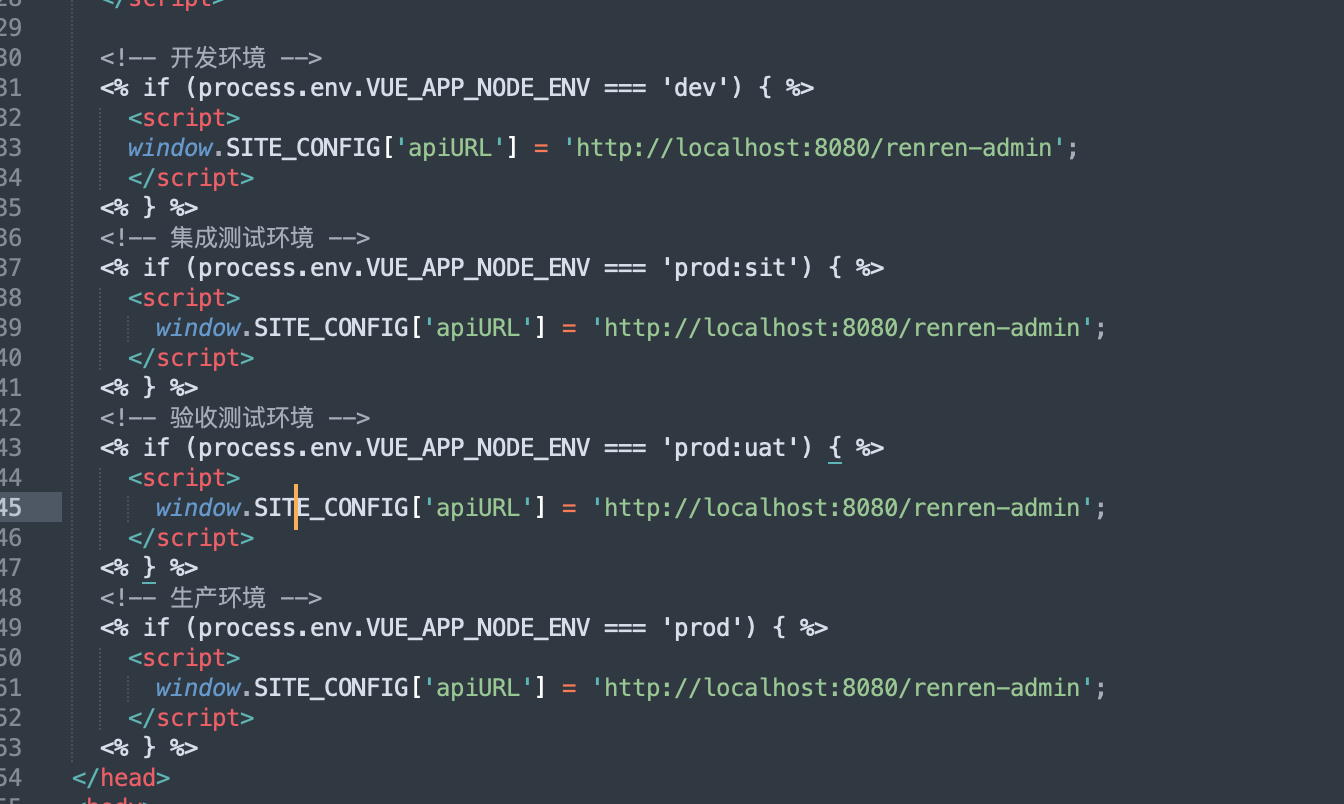
这个和后端的地址链接是“renren-admin”,但是去看后端的配置文件,就会发现这里是“renren-fast”
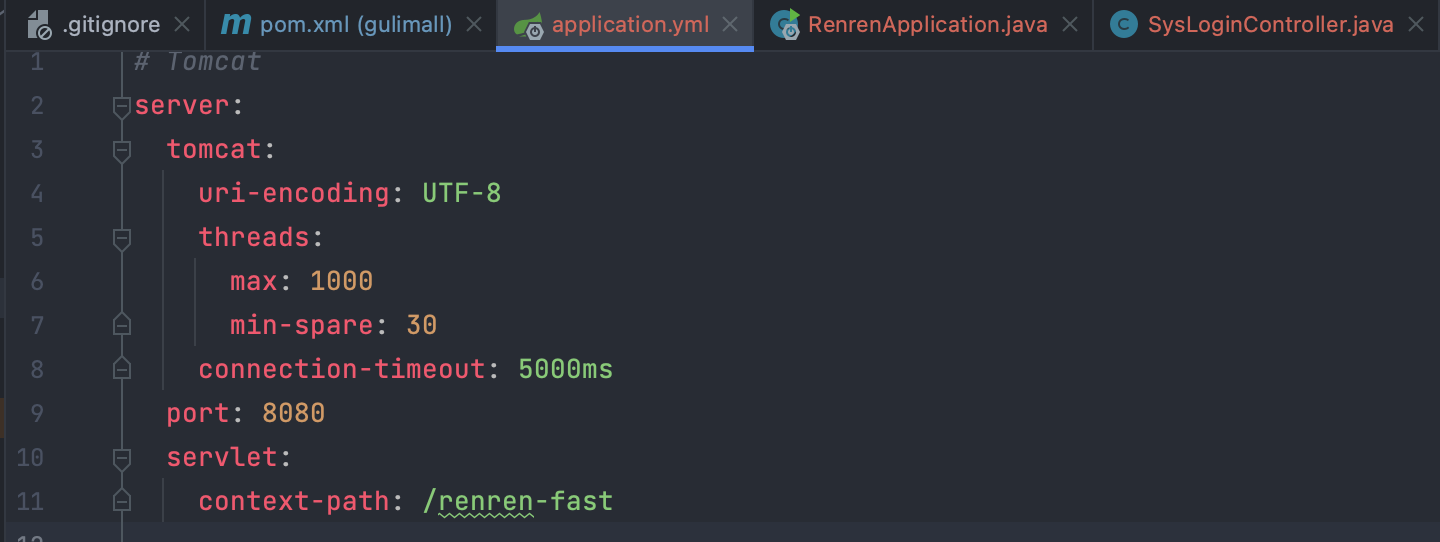
所以将后端配置文件修改为“renren-admin”即可.
注意:通过该方法没有解决这个问题,在此处选择跳过,因为是使用管理系统管理用户等信息,所以跳过。运行不成功的原因:前端和后端没有打通。
--------------------------------------ERROR --------------------------------------
进一步分析:查看renren官网发现前端的renren-ui是与后端renren-security相关联的,所以在此处部署renren-security。
记得在主pom文件中加入renren-security的依赖。
同时需要创建对应的renren-security数据库(在renren-admin -> db -> mysql.sql文件中)
成功:

2023-4-24
问题六
这里不需要修改,仍然为4.0.0版本。
P17中逆向工程,常见gulimall-common后,在其中添加mybatis-plus后gulimall-product中仍然报错的问题:
将gulimall-common中的maven版本改成之前的3.6.1版本即可。

注意:后续还是将其改成4.0.0版本.
2023-4-25
问题七:
该问题出现在P18中的运行测试文件:
Cannot instantiate interface org.springframework.boot.BootstrapRegistryInitializer : org.springframework.cloud.bootstrap.RefreshBootstrapRegistryInitializer
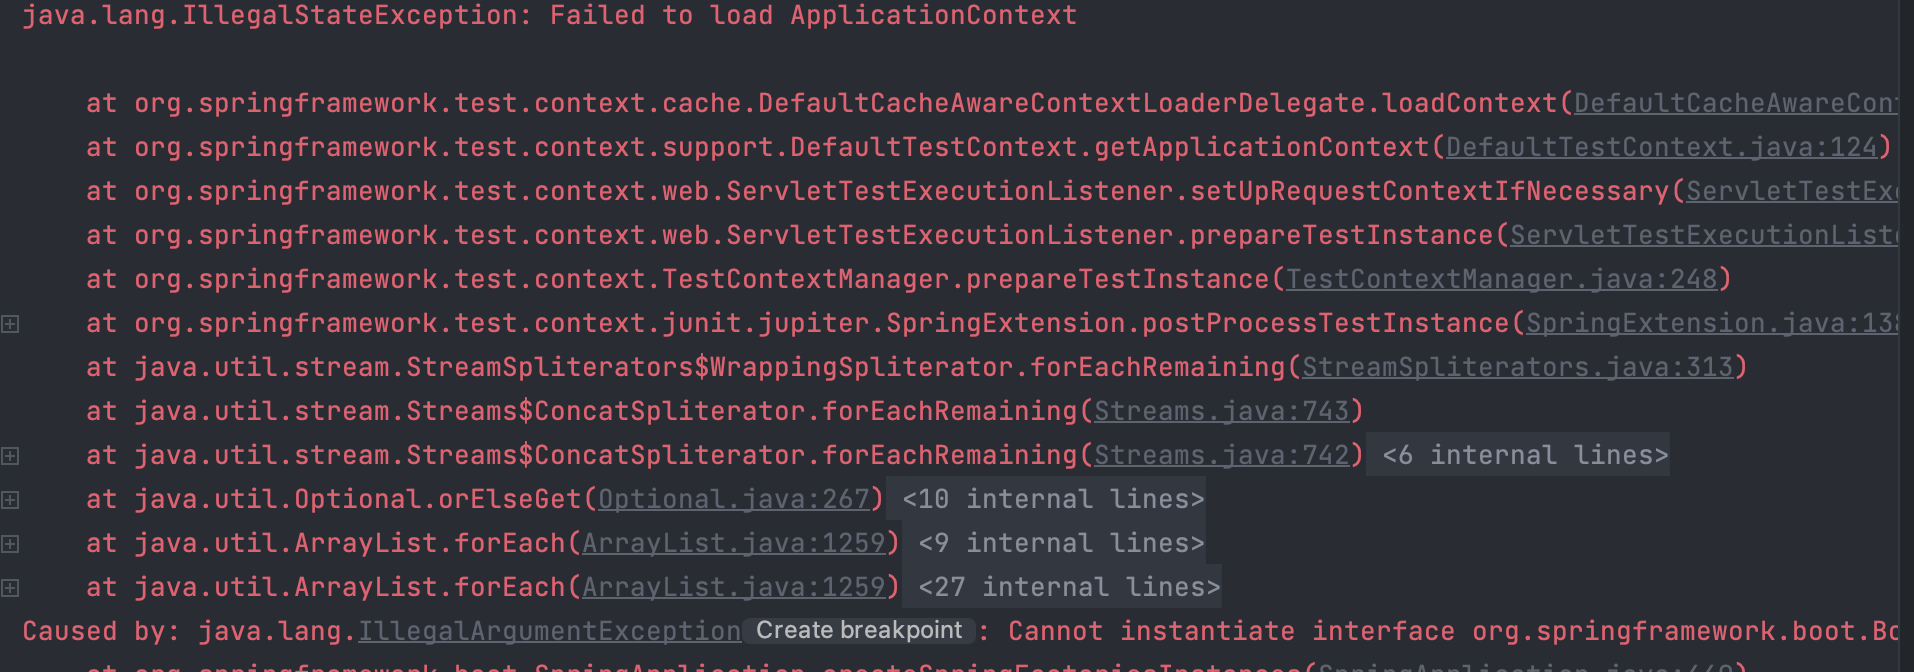
出现该问题是因为springboot版本和spring cloud版本不对应。
spring官网对应版本:https://start.spring.io/actuator/info
对应的版本(更新时间:2023-4-25):
"spring-cloud": {
			"Hoxton.SR12": "Spring Boot >=2.2.0.RELEASE and <2.4.0.M1",
			"2020.0.6": "Spring Boot >=2.4.0.M1 and <2.6.0-M1",
			"2021.0.0-M1": "Spring Boot >=2.6.0-M1 and <2.6.0-M3",
			"2021.0.0-M3": "Spring Boot >=2.6.0-M3 and <2.6.0-RC1",
			"2021.0.0-RC1": "Spring Boot >=2.6.0-RC1 and <2.6.1",
			"2021.0.5": "Spring Boot >=2.6.1 and <3.0.0-M1",
			"2022.0.0-M1": "Spring Boot >=3.0.0-M1 and <3.0.0-M2",
			"2022.0.0-M2": "Spring Boot >=3.0.0-M2 and <3.0.0-M3",
			"2022.0.0-M3": "Spring Boot >=3.0.0-M3 and <3.0.0-M4",
			"2022.0.0-M4": "Spring Boot >=3.0.0-M4 and <3.0.0-M5",
			"2022.0.0-M5": "Spring Boot >=3.0.0-M5 and <3.0.0-RC1",
			"2022.0.0-RC1": "Spring Boot >=3.0.0-RC1 and <3.0.0-RC2",
			"2022.0.0-RC2": "Spring Boot >=3.0.0-RC2 and <3.0.0",
			"2022.0.2": "Spring Boot >=3.0.0 and <3.1.0-M1"
		}
参考:https://blog.csdn.net/daohangtaiqian/article/details/127969748
因为我用的是2.7.5,所以在此处将spring cloud版本修改为:
<spring-cloud.version>2021.0.5</spring-cloud.version>
注意:这里修改了版本,其他的工程也需要全部修改
后续错误:

原因:提示没找到表,然后该表是renre-fast中的,在前面我们在gulimall-common中导入了renren-fast依赖,然后加载的话就不会加载gulimall-product的配置,而是先加载renren-fast里的配置,所以我们将那个依赖去除。
在这里需要注意的是,gulimall-common中的utils包下的Constant会报错,将对应的文件
import com.atguigu.common.utils.AliyunGroup;
import com.atguigu.common.utils.QiniuGroup;
import com.atguigu.common.utils.QcloudGroup;
导入到utils包下,然后导入即可。
最后成功运行:

成功之后数据库也应该更新了刚刚的数据。


 mac运行,谷粒商城中遇到的问题。


【推荐】国内首个AI IDE,深度理解中文开发场景,立即下载体验Trae
【推荐】编程新体验,更懂你的AI,立即体验豆包MarsCode编程助手
【推荐】抖音旗下AI助手豆包,你的智能百科全书,全免费不限次数
【推荐】轻量又高性能的 SSH 工具 IShell:AI 加持,快人一步
· 震惊!C++程序真的从main开始吗?99%的程序员都答错了
· 【硬核科普】Trae如何「偷看」你的代码?零基础破解AI编程运行原理
· 单元测试从入门到精通
· 上周热点回顾(3.3-3.9)
· winform 绘制太阳,地球,月球 运作规律