
Bamboo自动化部署
问题
现有的状态:需要部署最新代码时,手动在Bamboo上trigger build,然后手动到Nexus目录下下载tar包,然后手动用Filezila上传到Server对应目录下,解压后运行。
期望达成的状态:需要部署最新代码时,直接在Server上跑一个脚本,然后它会自动下载并解压。
分析
对于存在的问题,将其细化拆分,逐个分析解决方案。
问题1:需要每次手动trigger build。
解决1:在Bamboo上设置自动化的build schedule。
问题2:需要手动下载并解压build好的tar包。
解决2:写一个download package的脚本。
至此,上述的问题已经得到解决。
解决
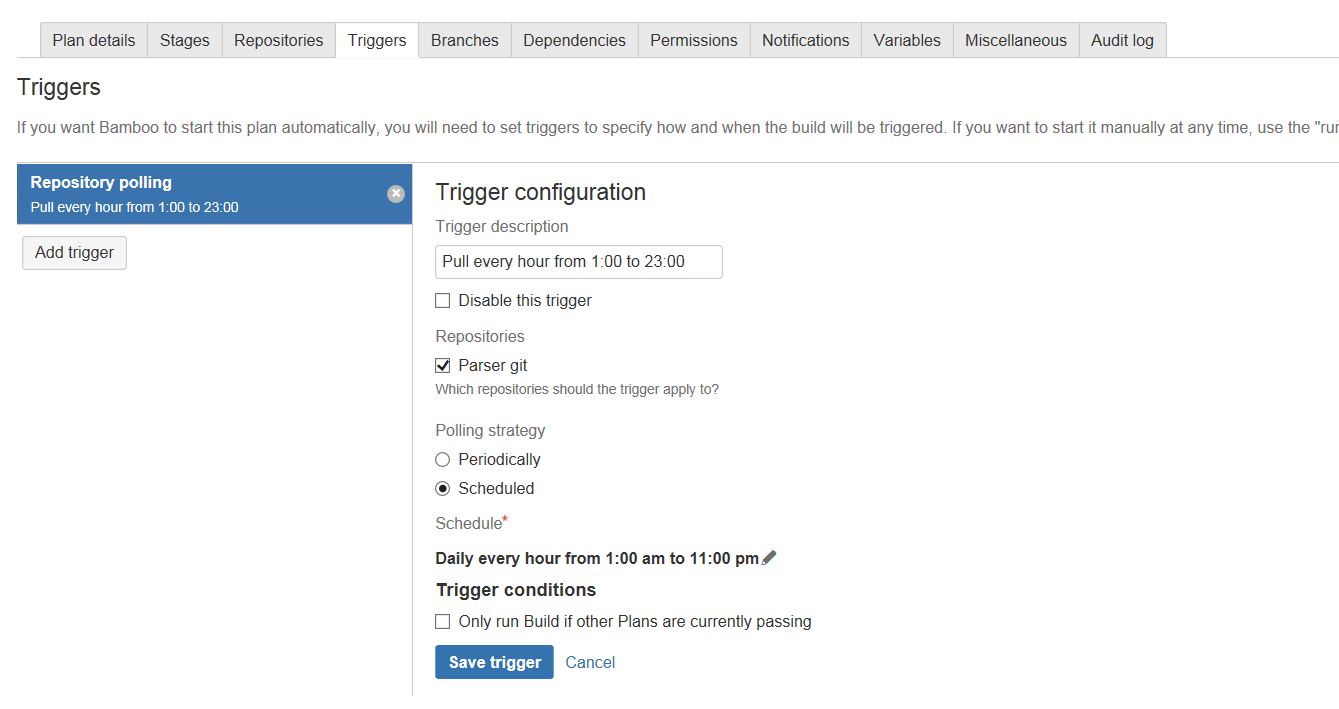
Fix 1: Configure build schedule -> Bamboo
Bamboo -> Action/Configure Branch -> Plan Configuration -> Triggers -> Add trigger
Bamboo上的trigger build strategy(笔者认为)可以分为两大类:一是poll build,去poll repo,有change的话就build。二是fix build,受到trigger后一定会做一个build,不管有没有change。
而这两大类有有各种细分:比如按频率来算,每小时一次。比如按时间来算,早晚8点一次。比如设置一个规则,满足条件的话trigger。具体的可以看这里:Triggering builds - Bamboo Support
总的来说,Bamboo的设置还是比较容易上手的。
Fix 2: Add download script -> shell
shell script可以分为三个部分,第一部分,读取输入参数。这里主要用到了getopts这个命令。
## get input params
while getopts hxp:b: arg; do
case $arg in
	h)
	echo "downloadsnap [-x (extract after download)] [-p <package-name>] [-b <branch>]"
	exit
	;;
	p)
	package=$OPTARG
	;;
	x)
	extract=1
	;;
	b)
	branch=/$OPTARG
	;;
esac
done
第二部分,实现核心逻辑,即下载。这里主要用到了wget命令。
## search on nexus and download latest snapshots
mkdir snaptemp
rm ./download_info.txt 2> /dev/null
date +%x_%H:%M:%S:%N >>download_info.txt
pkglst=$(wget -r -A package.tarxxx -P snaptemp --no-parent http://path/to/repo/${branch}/path/to/project/ \
	|& grep some_key_word | awk '{print $NF}' | sort -V | awk -F '/' '{ map[$(NF-2)]=$0;} END{for( key in map) print map[key];}' | grep -i "$package")
echo "$pkglst" | while read line; do
	echo $line
	wget -r -A package.tar -P snaptemp --no-parent $line
done
第三部分,后续一些清理工作。这里主要是清理文件(mv,rm),解压缩(tar)。
## move from temp folder to base folder and extract
for f in $(find snaptemp -name \*package.tar); do
	rm ./$(basename $f) &>/dev/null||:
	mv $f $(basename $f)
	if [[ $extract -eq 1 ]]
	then
		tar xvf $(basename $f)
		rm ./$(basename $f) &>/dev/null||:
	fi
done
rm -rf ./snaptemp
注:一些具体的路径名和其它细节已经隐去,不过大体实现的思路和逻辑都描述出来了。写任何的script,大都可以分为以上三块:读取输入,处理,清理环境。
优化
在实现的过程中,又发现一个问题,即所有build好的snapshot文件上传的路径都是一样的。如下在pom.xml中的定义:
<distributionManagement>
	<repository>
		<id>my-releases</id>
		<name>My Releases</name>
		<url>http://path/to/my/releases</url>
	</repository>
	<snapshotRepository>
		<id>my-snapshots</id>
		<name>My Snapshots</name>
		<url>http://path/to/my/snapshots</url>
	</snapshotRepository>
</distributionManagement>
当大家都用的是一个git branch的时候,完全没有问题,但是如果有多个branch同时开发并需要联动Bamboo自动化部署时,就有问题了。
这里的问题是:难以快速区分不同branch代码的build版本。举例,开发A用branch_a build出来的一个包是repo_1.5.5,开发B用branch_b build出来的一个包是repo_1.5.6,两者在同一目录下。
虽然两者的version不一样,但是很难快速区分,需要分别去看自己的build log,然后根据里面打出的version版本来做出判断。但是,以上的自动化方案没有办法做出这种判断。
解决的方案有很多,列举两个:
- 1.在build好的包中加入一些metadata信息,包含git branch,download script读取metadata,只抓去对应的branch的包。
- 2.根据路径区分不同branch,比如branch_a的包会上传到/branch_a/repo,以此类推。download script就只需要到对应的路径下抓取。
方案一的pom部分改动如下,主要是用了buildnumber-maven-plugin和maven-jar-plugin,前者生成一些git info,后者将这些信息写入jar。
<!-- generate build timestamp, version, branch related info -->
<plugin>
	<groupId>org.codehaus.mojo</groupId>
	<artifactId>buildnumber-maven-plugin</artifactId>
	<version>1.4</version>
	<executions>
		<execution>
			<id>generate-timestamp</id>
			<phase>validate</phase>
			<goals>
				<goal>create</goal>
			</goals>
			<configuration>
				<format>{0,date,MMM-dd HH:mm:ss z}</format>
				<items>
					<item>timestamp</item>
				</items>
				<buildNumberPropertyName>buildDateTime</buildNumberPropertyName>
				<getRevisionOnlyOnce>true</getRevisionOnlyOnce>
			</configuration>
		</execution>
		<execution>
			<id>generate-buildnumber</id>
			<phase>validate</phase>
			<goals>
				<goal>create</goal>
			</goals>
			<configuration>
				<revisionOnScmFailure>0</revisionOnScmFailure>
				<useLastCommittedRevision>true</useLastCommittedRevision>
				<buildNumberPropertyName>buildRevision</buildNumberPropertyName>
				<scmBranchPropertyName>buildBranch</scmBranchPropertyName>
			</configuration>
		</execution>
		<execution>
			<id>create-metadata</id>
			<phase>generate-resources</phase>
			<goals>
				<goal>create-metadata</goal>
			</goals>
			<configuration>
				<attach>true</attach>
				<properties>
					<buildBranch>${buildBranch}</buildBranch>
				</properties>
				<addOutputDirectoryToResources>true</addOutputDirectoryToResources>
			</configuration>
		</execution>
	</executions>
</plugin>

<!-- add git branch info to metadata when building jar -->
<plugin>
	<groupId>org.apache.maven.plugins</groupId>
	<artifactId>maven-jar-plugin</artifactId>
	<version>3.1.1</version>
	<configuration>
		<archive>
			<index>true</index>
			<manifestEntries>
				<Git-Revision>${buildRevision}</Git-Revision>
				<Build-Time>${buildDateTime}</Build-Time>
				<Git-Branch>${buildBranch}</Git-Branch>
			</manifestEntries>
		</archive>
	</configuration>
</plugin>
方案二的pom部分改动如下:主要是用了maven-deploy-plugin来override snapshot location。
<!-- set up overridden snapshot deploy location -->
<plugin>
	<groupId>org.apache.maven.plugins</groupId>
	<artifactId>maven-deploy-plugin</artifactId>
	<version>3.0.0-M1</version>
	<configuration>
		<altSnapshotDeploymentRepository>
			my-snapshots::some/path${buildBranch}
		</altSnapshotDeploymentRepository>
	</configuration>
</plugin>
总结
针对开发中的问题,本文从三个层次实现了自动化部署,提高了开发测试的效率。
- Configure build schedule -> Bamboo
- Add download script -> shell
- Change snapshot deploy location -> pom.xml

 浙公网安备 33010602011771号