PyCharm安装及使用
![](http://upload-images.jianshu.io/upload_images/1152061-422123902a95c1ca.jpg?imageMogr2/auto-orient/strip%7CimageView2/2/w/700)
搭建环境
1、win10_X64,其他Win版本也可以。
2、PyCharm版本:Professional-2016.2.3。
搭建准备
1、到PyCharm官网下载PyCharm安装包。
![](http://upload-images.jianshu.io/upload_images/1152061-af5f47123462aa88.png?imageMogr2/auto-orient/strip%7CimageView2/2/w/700)
2、选择Windows系统的专业版下载。
![](http://upload-images.jianshu.io/upload_images/1152061-d1c6c9303ad5b2c2.png?imageMogr2/auto-orient/strip%7CimageView2/2/w/700)
3、下载好的安装包。
![](http://upload-images.jianshu.io/upload_images/1152061-b24a4b04f3142d76.png?imageMogr2/auto-orient/strip%7CimageView2/2/w/700)
安装软件
1、双击安装包进行安装。
![](http://upload-images.jianshu.io/upload_images/1152061-a3294346b4102626.png?imageMogr2/auto-orient/strip%7CimageView2/2/w/502)
2、自定义软件安装路径(建议路径中不要中文字符)。
![](http://upload-images.jianshu.io/upload_images/1152061-473fe858918d46da.png?imageMogr2/auto-orient/strip%7CimageView2/2/w/499)
3、创建桌面快捷方式并关联*.py文件。
![](http://upload-images.jianshu.io/upload_images/1152061-0dc8a3e19e8ac295.png?imageMogr2/auto-orient/strip%7CimageView2/2/w/497)
4、选择开始菜单文件夹(默认即可),点击安装。
![](http://upload-images.jianshu.io/upload_images/1152061-ec05d51d8c387922.png?imageMogr2/auto-orient/strip%7CimageView2/2/w/496)
5、耐心等待安装。
![](http://upload-images.jianshu.io/upload_images/1152061-4c047b85f0c17ffe.png?imageMogr2/auto-orient/strip%7CimageView2/2/w/497)
6、安装完成,勾选立即运行PyCharm。
![](http://upload-images.jianshu.io/upload_images/1152061-ae2d233d08abc9bb.png?imageMogr2/auto-orient/strip%7CimageView2/2/w/497)
7、选择是否导入开发环境配置文件,我们选择不导入。
![](http://upload-images.jianshu.io/upload_images/1152061-005719e55dd709b9.png?imageMogr2/auto-orient/strip%7CimageView2/2/w/539)
8、阅读协议并同意(少年,选择略过吧)。
![](http://upload-images.jianshu.io/upload_images/1152061-1fa983d52b8106fd.png?imageMogr2/auto-orient/strip%7CimageView2/2/w/495)
9、修改hosts文件:C:\Windows\System32\drivers\etc\hosts
;
0.0.0.0 account.jetbrains.com
10、选择输入激活码激活软件(请阅读下一步获取激活码)。
![](http://upload-images.jianshu.io/upload_images/1152061-53453ffc2ec1df04.png?imageMogr2/auto-orient/strip%7CimageView2/2/w/413)
11、软件激活方式
1、推荐购买正版软件。
2、可以选择下载社区版本,免费的。
3、专业版本可以选择试用,免费试用30天。
4、网上寻找激活码或授权服务器。
我们使用第4种方法:
在IntelliJ IDEA 注册码网站,获取激活码,以前允许自定义用户名,现在已经是No了,只能直接获取激活码。
![](http://upload-images.jianshu.io/upload_images/1152061-ca8574ba996fff32.png?imageMogr2/auto-orient/strip%7CimageView2/2/w/700)
点击获取激活码后,文本默认是全选中的,直接右击选择复制即可。
![](http://upload-images.jianshu.io/upload_images/1152061-60cc9e5bd32f1475.png?imageMogr2/auto-orient/strip%7CimageView2/2/w/700)
12、将激活码粘贴到文本框,点击OK即可。
![](http://upload-images.jianshu.io/upload_images/1152061-8af69f786fe4ccb1.png?imageMogr2/auto-orient/strip%7CimageView2/2/w/414)
pycharm和IntelliJ IDEA永久激活
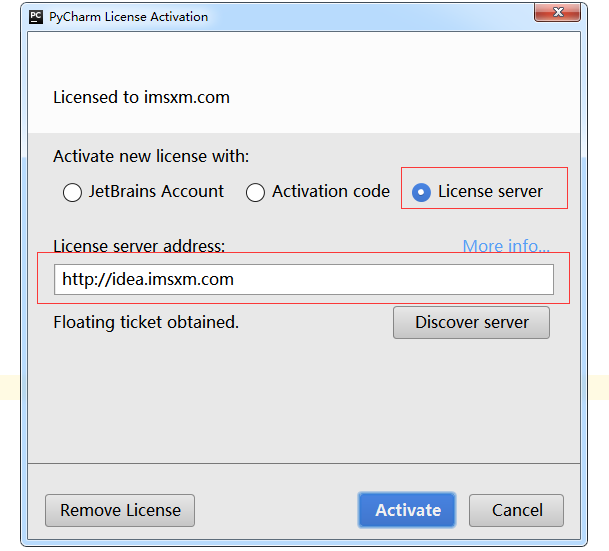
PyCharm 的激活方式:
直接打开pycharm,选License server激活,输入:http://idea.imsxm.com
可以尝试:
user name: yueting3527
key:
93347-12042010
00001FMHemWIs"6wozMZnat3IgXKXJ
2!nV2I6kSO48hgGLa9JNgjQ5oKz1Us
FFR8k"nGzJHzjQT6IBG!1fbQZn9!Vi
14、PyCharm的欢迎界面。
![](http://upload-images.jianshu.io/upload_images/1152061-18de2e0daaa49f4a.png?imageMogr2/auto-orient/strip%7CimageView2/2/w/641)
15、选择IDE主题与编辑区主题,建议Darcula主题(温馨提示:黑色更有利于保护眼睛噢!!!)。
![](http://upload-images.jianshu.io/upload_images/1152061-f0b7599e834fa79b.png?imageMogr2/auto-orient/strip%7CimageView2/2/w/660)
16、由于我们更改主题,故会提示重启IDE,选择Yes。
![](http://upload-images.jianshu.io/upload_images/1152061-2842d3a880be0f41.png?imageMogr2/auto-orient/strip%7CimageView2/2/w/660)
17、选择创建新项目。
![](http://upload-images.jianshu.io/upload_images/1152061-339c8a1fb47ee99c.png?imageMogr2/auto-orient/strip%7CimageView2/2/w/663)
18、自定义项目存储路径,IDE默认会关联Python解释器。
![](http://upload-images.jianshu.io/upload_images/1152061-3f2c4845eb472943.png?imageMogr2/auto-orient/strip%7CimageView2/2/w/662)
19、IDE提供的提示,我选择在启动时不显示提示。
![](http://upload-images.jianshu.io/upload_images/1152061-f7d733ed911cf04a.png?imageMogr2/auto-orient/strip%7CimageView2/2/w/571)