
我的电脑-----属性----高级-----环境变量-----环境变量-----新建
变量名:M2_HOME
变量值:F:\maven\apache-maven-3.0.3
找到path
在环境变量值尾部加入:;%M2_HOME%\bin;---前面注意分号

系统变量设置好后需要重新启动cmd,执行mvn -v才会成功
修改我们仓库地址,仓库用于存放我们项目所依赖的所有jar包。
我的仓库路径:F:\maven\repo----这个路径是我自己创建,你可以将路径创建在任何位置。
我们打开…\apache-maven-3.0.3\conf\目录下的setting.xml文件,设置成我们创建的仓库路径

下面我们用一个命令验证一下。打开命令提示符,输入:mvn help:system
该命令会打印出所有的java系统属性和环境变量。这些信息对我们日常的编程工作很有帮且。
如果运行的过程中没有错误,打开我们仓库(F:\maven\repo)会发现里面多了一些文件。这些文件就是我们从maven的中央仓库下载到本地仓库的。
先创建项目的根目录,比如c:\test,命令行窗口下输入
cd /d c:\test
mvn archetype:generate
mvn archetype:generate -DgroupId=com.mat -DartifactId=webtest -DarchetypeArtifactId=maven-archetype-webapp
首次运行时,mvn会从远程"中央仓库"下载一些必需的文件到"本地仓库" - (如果你有兴趣,可以在等待下载过程中,观察一下"C:\Users\当前用户名\.m2\repository"到底下载了些啥东东)
下载完成后(下一篇会讲解如何,在局域网环境中搭建“私服”,直接从局域网的代理仓库中下载这些依赖项),会自动进入交互模式,会让你输入一些基本信息,类似下面这样:
...
[INFO] Generating project in Interactive mode (这里会卡一会儿,因为要联网获取项目模板)
[INFO] No archetype defined. Using maven-archetype-quickstart (org.apache.maven.archetypes:maven-archetype-quickstart:1.0)
Choose archetype:
1: remote -> br.com.ingenieux:elasticbeanstalk-service-webapp-archetype (A Maven Archetype Encompassing RestAssured, Jetty, Jackson, Guice and Jersey for Publishing JAX-RS-based Services on AWS' Elastic Beanstalk Service)
... (这里会自动列出很多项目模板,每种模板前面会有一个数字序号)
336: remote -> org.apache.maven.archetypes:maven-archetype-quickstart (An archetype which contains a sample Maven project.)
...
Choose a number or apply filter (format: [groupId:]artifactId, case sensitive contains): 336: (这里根据每个人机器上安装的eclipse插件不同,可能默认的数字不是这个,先不管,直接回车)
Choose org.apache.maven.archetypes:maven-archetype-quickstart version:
1: 1.0-alpha-1
2: 1.0-alpha-2
3: 1.0-alpha-3
4: 1.0-alpha-4
5: 1.0
6: 1.1
Choose a number: 6: (直接回车)
Define value for property 'groupId': : cnblogs (可暂时先理解成类似package或namespace的名称,通常我们填写组织机构名称缩写)
Define value for property 'artifactId': : maven-hello-world (组件名称,可暂时理解成项目名称)
Define value for property 'version': 1.0-SNAPSHOT: : (版本号,直接回车,默认1.0-SNAPSHOT)
Define value for property 'package': cnblogs: : (打包后的jar文件名,相当于.net中项目最后生成的程序集dll名称)
Confirm properties configuration:
groupId: cnblogs
artifactId: maven-hello-world
version: 1.0-SNAPSHOT
package: cnblogs
Y: : (直接回车确认)
[INFO] ----------------------------------------------------------------------------
[INFO] Using following parameters for creating project from Old (1.x) Archetype: maven-archetype-quickstart:1.1
[INFO] ----------------------------------------------------------------------------
[INFO] Parameter: groupId, Value: cnblogs
[INFO] Parameter: packageName, Value: cnblogs
[INFO] Parameter: package, Value: cnblogs
[INFO] Parameter: artifactId, Value: maven-hello-world
...
[INFO] ------------------------------------------------------------------------
[INFO] BUILD SUCCESS (看到这个,表示项目创建成功!)
[INFO] ------------------------------------------------------------------------
...
2.2 maven项目的目录结构
C:\test\maven-hello-world>tree
Folder PATH listing for volume win7
Volume serial number is AA2C-6E70
C:.
├───src
│ ├───main
│ │ └───java
│ │ └───cnblogs
│ └───test
│ └───java
│ └───cnblogs
└───target
└───classes
└───cnblogs
注意上面带红色的目录名,maven项目采用“约定优于配置”的原则,src/main/java约定用于存放源代码,src/main/test用于存放单元测试代码,src/target用于存放编译、打包后的输出文件。这是全世界maven项目的通用约定,请记住这些固定的目录结构。
三、编译项目
先进入刚才创建项目的根目录
cd /d c:\test\maven-hello-world
然后执行 mvn clean compile
这样就能对项目进行编译了,编译后会自动在target目录中生成class文件,如果编译成功,会输出类似下面的信息
yangjunmingmatoMacBook-Pro-7:maven-hello-world jimmy$ mvn clean compile
[INFO] Scanning for projects...
[INFO]
[INFO] ------------------------------------------------------------------------
[INFO] Building maven-hello-world 1.0-SNAPSHOT
[INFO] ------------------------------------------------------------------------
[INFO]
[INFO] --- maven-clean-plugin:2.5:clean (default-clean) @ maven-hello-world ---
[INFO]
[INFO] --- maven-resources-plugin:2.6:resources (default-resources) @ maven-hello-world ---
[INFO] Using 'UTF-8' encoding to copy filtered resources.
[INFO] skip non existing resourceDirectory /Users/jimmy/Desktop/study/maven-hello-world/src/main/resources
[INFO]
[INFO] --- maven-compiler-plugin:2.5.1:compile (default-compile) @ maven-hello-world ---
[INFO] Compiling 1 source file to /Users/jimmy/Desktop/study/maven-hello-world/target/classes
[INFO] ------------------------------------------------------------------------
[INFO] BUILD SUCCESS
[INFO] ------------------------------------------------------------------------
[INFO] Total time: 1.515s
[INFO] Finished at: Wed Jan 01 19:08:32 CST 2014
[INFO] Final Memory: 10M/156M
[INFO] ------------------------------------------------------------------------
四、单元测试
mvn clean test
这样就能做单元测试了,so easy !
如果单元测试不通过,会提示出错信息,注意看输出。
注:从输出上可以发现,test前,会先执行compile,即先编译,再执行单元测试.
有兴趣的朋友,可以修改下/src/test/java/cnblogs/AppTest.java里的内容,把testApp()方法中的assertTrue( true );改成assertTrue( false );再跑下单元测试,看下有什么不同
五、项目打包
通常我们会把java项目打包成jar包或war包,maven中打包的命令为
mvn clean package
运行完后,会在target目录下生成jar包
注:从输出 可以发现,package前,会先执行compile,再执行test,最后才是package打包
六、项目运行
该项目中的App.java中有main方法,可以直接运行,常规方式下,我们如果想直接运行class文件,得敲一段很长的命令,maven中不必这么复杂,先用记事本打开项目根目录下的pom.xml文件,增加下面这节内容:

 1     <build>
 2         <finalName>${project.artifactId}</finalName>
 3         <plugins>
 4             <plugin>
 5                 <groupId>org.codehaus.mojo</groupId>
 6                 <artifactId>exec-maven-plugin</artifactId>
 7                 <version>1.2.1</version>
 8                 <executions>
 9                     <execution>
10                         <goals>
11                             <goal>exec</goal>
12                         </goals>
13                     </execution>
14                 </executions>
15                 <configuration>
16                     <executable>java</executable>
17                     <arguments>
18                         <argument>-classpath</argument>
19                         <classpath>
20                         </classpath>
21                         <argument>cnblogs.App</argument>
22                     </arguments>
23                 </configuration>
24             </plugin>
25         </plugins>
26     </build>
<build>
        <finalName>${project.artifactId}</finalName>
        <plugins>
            <plugin>
                <groupId>org.codehaus.mojo</groupId>
                <artifactId>exec-maven-plugin</artifactId>
                <version>1.2.1</version>
                <executions>
                    <execution>
                        <goals>
                            <goal>exec</goal>
                        </goals>
                    </execution>
                </executions>
                <configuration>
                    <executable>java</executable>
                    <arguments>
                        <argument>-classpath</argument>
                        <classpath>
                        </classpath>
                        <argument>cnblogs.App</argument>
                    </arguments>
                </configuration>
            </plugin>
        </plugins>
    </build>
上述这段内容插入在</project>之前即可。
然后在命令行下,输入
mvn exec:exec
即可直接运行,下面是输出:
C:\test\maven-hello-world>mvn exec:exec
[INFO] Scanning for projects...
[INFO]
[INFO] ------------------------------------------------------------------------
[INFO] Building maven-hello-world 1.0-SNAPSHOT
[INFO] ------------------------------------------------------------------------
[INFO]
[INFO] --- exec-maven-plugin:1.2.1:exec (default-cli) @ maven-hello-world ---
Hello World!
[INFO] ------------------------------------------------------------------------
[INFO] BUILD SUCCESS
[INFO] ------------------------------------------------------------------------
[INFO] Total time: 1.175s
[INFO] Finished at: Mon Jan 13 22:35:02 CST 2014
[INFO] Final Memory: 6M/111M
[INFO] ------------------------------------------------------------------------
七、项目部署
如果是web项目,使用命令
mvn clean jboss-as:deploy
就能自动将web项目部署到jboss中(前提是jboss web server已经成功启动),因为刚才我们创建的是一个最基本的maven项目,并非web项目,所以执行这条命令,应该会失败,后面会讲如何在eclipse中用插件部署web项目,这里可以先跳过。
另外:
有时候,我们的项目是一个类库,只是封装一些方法供其它项目引用,对于这种项目,我们可以用 mvn clean install 把生成的jar包,安装到“本地仓库”中,这样本机其它项目需要使用该jar包时,只要在pom里配置依赖项即可,不用把jar包复制到当前项目中。
八、eclipse中集成maven
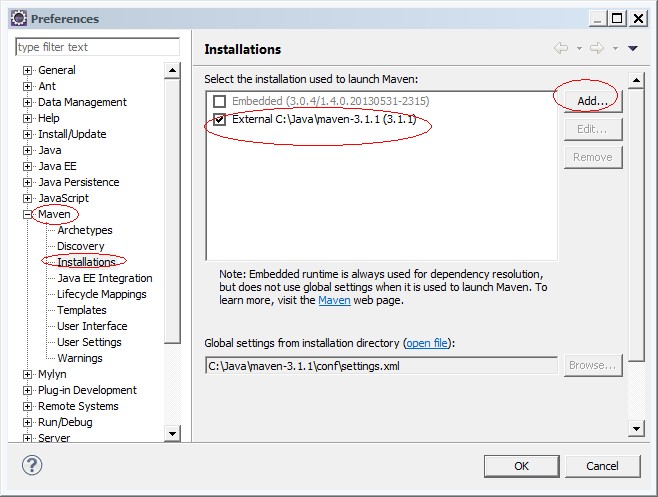
8.1 修改eclipse中使用的maven版本
eclipse自带了maven3.0.4,如果想使用最新的3.1.1,可以在eclipse -> window -> perferences -> Maven -> Installations 里参考下图设置一下

 浙公网安备 33010602011771号