
基于FPGA的图像差分运算及目标提取实现,包含testbench和MATLAB辅助验证程序
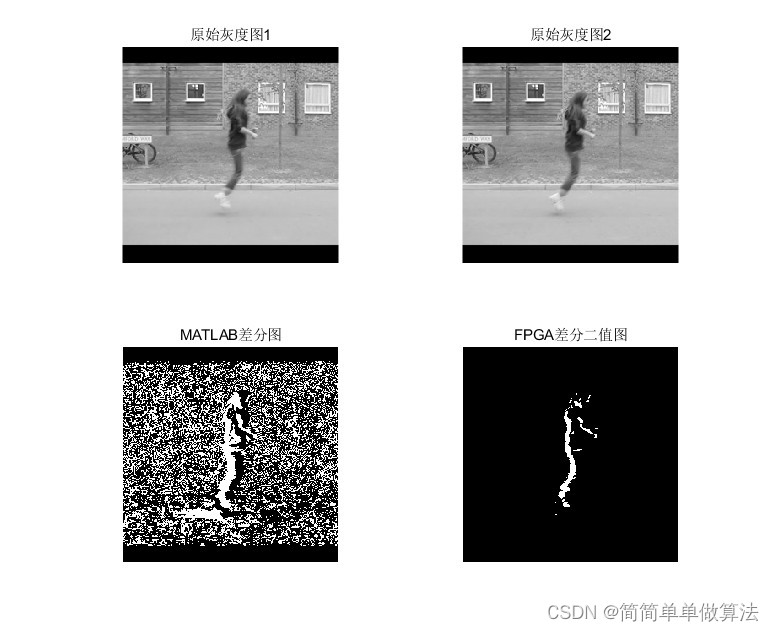
1.算法运行效果图预览

2.算法运行软件版本
matlab2022a
3.算法理论概述
基于FPGA(Field-Programmable Gate Array)的图像差分运算及目标提取实现主要涉及图像处理、差分运算和目标提取等原理和数学公式。
一、图像处理原理
图像处理是一种对图像信息进行加工、分析和理解的技术。其基本步骤包括图像采集、预处理、特征提取和目标提取等。在基于FPGA的图像处理中,我们通常需要设计并实现一个图像处理流水线,包括图像采集、预处理、特征提取和目标提取等模块。
二、差分运算原理
差分运算是一种常用的图像特征提取方法,能够得到图像中的边缘信息。差分运算分为横向差分和纵向差分两种。横向差分运算能够得到图像中横向的边缘信息,纵向差分运算能够得到图像中纵向的边缘信息。具体实现时,我们可以将输入图像分成若干个像素对,对于每个像素对,计算其灰度值的差值,即得到横向或纵向的边缘信息。边缘信息的强弱可以用差值的大小来表示。
三、目标提取原理
目标提取是指从图像中提取出感兴趣的目标,并将其与背景分离。基于FPGA的目标提取实现通常采用基于区域的分割方法,如阈值分割、区域生长等。阈值分割的基本原理是将像素的灰度值与一个阈值进行比较,根据比较结果将像素分为目标或背景。区域生长的基本原理是从一个或多个种子点开始,通过一定的规则将相邻的像素加入到同一区域中。
四、数学公式
基于FPGA的图像差分运算及目标提取实现涉及的主要数学公式如下:
横向差分公式:Dx(i,j) = |f(i,j) - f(i-1,j)|
纵向差分公式:Dy(i,j) = |f(i,j) - f(i,j-1)|
阈值分割公式:If(i,j) > T, then pixel(i,j) = 1; otherwise pixel(i,j) = 0
五、实现流程
基于FPGA的图像差分运算及目标提取实现的流程如下:
首先,通过图像采集模块获取输入图像;
接着,通过差分运算模块对预处理后的图像进行差分运算,得到目标信息;
再接着,通过目标提取模块对图像进行二值图处理进行目标提取;
最后,通过输出模块将提取的目标输出。
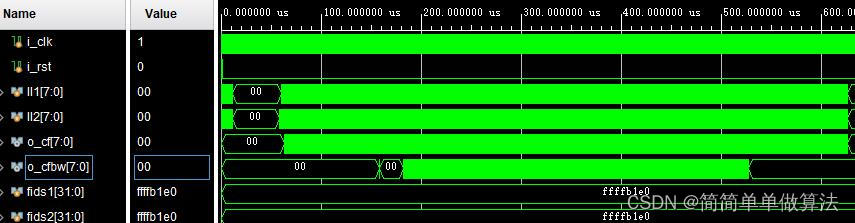
4.部分核心程序
`timescale 1ns / 1ps
//
// Company:
// Engineer:
//
// Create Date: 2022/07/28 01:51:45
// Design Name:
// Module Name: test_image
// Project Name:
// Target Devices:
// Tool Versions:
// Description:
//
// Dependencies:
//
// Revision:
// Revision 0.01 - File Created
// Additional Comments:
//
//


module test_image;
reg i_clk;

reg i_rst;

reg [7:0] Buffer1 [0:100000];
reg [7:0] Buffer2 [0:100000];
reg [7:0] II1;
reg [7:0] II2;
wire [7:0]o_cf;
wire [7:0]o_cfbw;
integer fids1,fids2,idx=0,dat1,dat2;


//D:\FPGA_Proj\FPGAtest\codepz
initial
begin
	fids1 = $fopen("D:\\FPGA_Proj\\FPGAtest\\codepz\\a.bmp","rb");//调用2个图片
	dat1  = $fread(Buffer1,fids1);
	$fclose(fids1);
end
initial
begin
	fids2 = $fopen("D:\\FPGA_Proj\\FPGAtest\\codepz\\b.bmp","rb");//调用2个图片
	dat2  = $fread(Buffer2,fids2);
	$fclose(fids2);
end


initial
begin
i_clk=1;
i_rst=1;

#1000;
i_rst=0;
end

always #5 i_clk=~i_clk;


always@(posedge i_clk or posedge i_rst)
begin
    if(i_rst)
    begin
    II1<=8'd0;
    II2<=8'd0;

    idx<=0;
    end
    else begin
        if(idx<=66413)
        begin
        II1<=Buffer1[idx];
        II2<=Buffer2[idx];
        end
        else begin
             II1<=8'd0;
             II2<=8'd0;
        end

        idx<=idx+1;
	end
end

//调用合并模块
tops tops_u(
.i_clk           (i_clk),
.i_rst           (i_rst),
.i_I1            (II1),
.i_I2            (II2),
.o_cf            (o_cf),
.o_cfbw          (o_cfbw)
);
//将合并后的模块保存到txt文件中
integer fout1;
initial begin
 fout1 = $fopen("SAVEcf.txt","w");
end

always @ (posedge i_clk)
 begin
    if(idx<=66619)
	$fwrite(fout1,"%d\n",o_cf);
	else
	$fwrite(fout1,"%d\n",0);
end


integer fout2;
initial begin
 fout2 = $fopen("SAVEcfbw.txt","w");
end

always @ (posedge i_clk)
 begin
    if(idx<=66619)
	$fwrite(fout2,"%d\n",o_cfbw);
	else
	$fwrite(fout2,"%d\n",0);
end

endmodule

 浙公网安备 33010602011771号