跟网页开发一样,在巴掌大的地方要显示更多的内容就要用到类似选项卡的功能,在iPhone中也有这样的视图控制器这个类就是UITabBarController。

如上图看到的,在屏幕的底部可以看到Tab Bar的样子,顶部用的是Navigation,很多情况都是TabBar和Navigation配合使用。就在iPhone开发之NavigationController的基础上来继续今天的TabBarController。
方法1:用代码来创建TabBar.
//  AppDelegate.h


#import <UIKit/UIKit.h>

@interface AppDelegate : UIResponder <UIApplicationDelegate>
{
    UINavigationController *navController;
    UITabBarController *tabBarController;
}

@property (strong, nonatomic) UIWindow *window;

@end
//  AppDelegate.m

#import "AppDelegate.h"
#import "RootViewController.h"
#import "SecondViewController.h"

@implementation AppDelegate

@synthesize window = _window;

- (BOOL)application:(UIApplication *)application didFinishLaunchingWithOptions:(NSDictionary *)launchOptions
{
    self.window = [[UIWindow alloc] initWithFrame:[[UIScreen mainScreen] bounds]];
    // create a tab bar controller
    tabBarController = [[UITabBarController alloc] init];
    // create each Navigation controller
    navController = [[UINavigationController alloc] init];

    RootViewController *rootViewController = [[RootViewController alloc] init];
    rootViewController.title = @"Root";
    rootViewController.tabBarItem = [[UITabBarItem alloc] initWithTabBarSystemItem:UITabBarSystemItemDownloads tag:0];

    SecondViewController *viewController = [[SecondViewController alloc] init];
    viewController.title = @"Second";
    viewController.tabBarItem = [[UITabBarItem alloc] initWithTabBarSystemItem:UITabBarSystemItemFavorites tag:0];

    [navController pushViewController:rootViewController animated:NO];

    // add navigation controllers to the tab bar controller
    tabBarController.viewControllers = [[NSArray alloc] initWithObjects:navController,viewController, nil];
    [self.window addSubview:tabBarController.view];
    [self.window makeKeyAndVisible];

    [rootViewController release];
    [viewController release];

    return YES;
}

...

- (void)dealloc
{
    [navController release];
    [tabBarController release];
    [self.window release];
    [super dealloc];
}

@end
运行结果

方法2:用Interface Builder来创建TabBar.
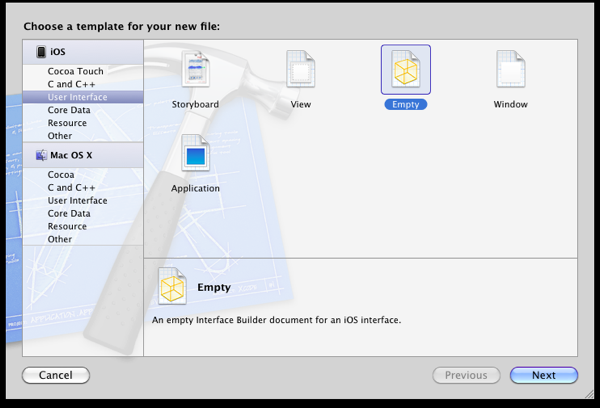
新建一个“Empty Application”项目,命名为“TabBarSimple”,再新建一个“XIB”,选择Empty,命名为“MainWindow”
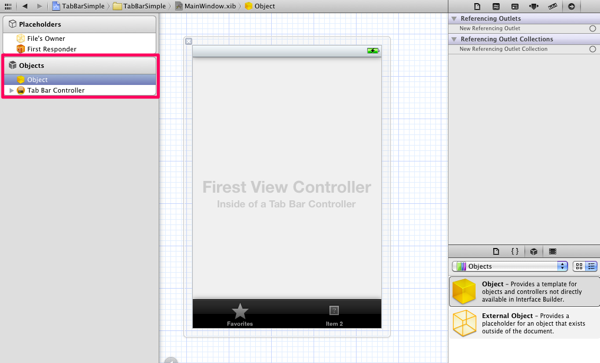
打开MainWindow.xib,拖“Object”和“Tab Bar Controller”到文件中,如图所示:
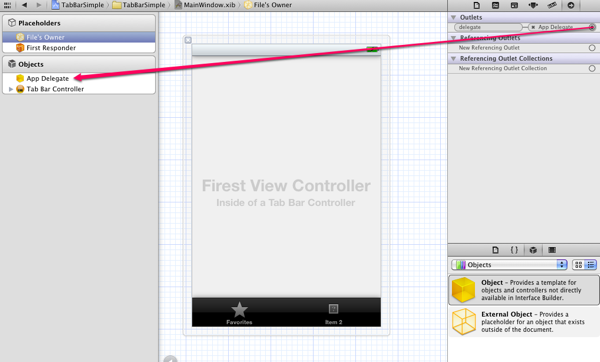
设置MainWindow.xib,“File’s Owner” Class设为UIApplication,“Object” Class设为AppDelegate,“File’s Owner” Outlets delegate设为App Delegate,如图所示:
修改AppDelegate类代码
//  AppDelegate.h

#import <UIKit/UIKit.h>

@class MainWindow;

@interface AppDelegate : UIResponder <UIApplicationDelegate>
{
    UITabBarController *tabBarController;
}

@property (strong, nonatomic) UIWindow *window;
@property (nonatomic, retain) IBOutlet UITabBarController *tabBarController;

@end
//  AppDelegate.m

#import "AppDelegate.h"

@implementation AppDelegate

@synthesize window = _window;
@synthesize tabBarController;

- (BOOL)application:(UIApplication *)application didFinishLaunchingWithOptions:(NSDictionary *)launchOptions
{
    self.window = [[UIWindow alloc] initWithFrame:[[UIScreen mainScreen] bounds]];

    // Override point for customization after application launch.
    [self.window addSubview:tabBarController.view];
    self.window.backgroundColor = [UIColor whiteColor];
    [self.window makeKeyAndVisible];
    return YES;
}

...

- (void)dealloc
{
    [tabBarController release];
    [super dealloc];
}

@end
现在把AppDelegate类中的Outlet变量tabBarController跟IB关联起来.
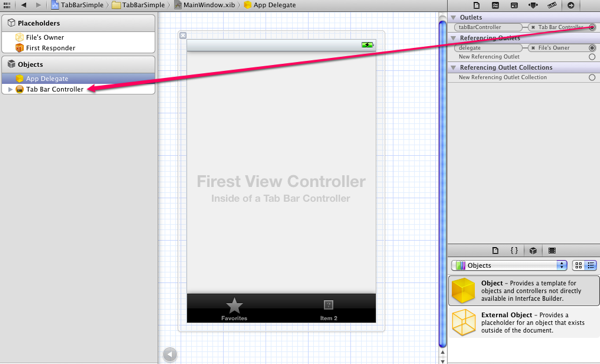
再创建两个视图控制器,命名为FirstViewController和SecondViewController,把两个视图控制器添加到Tab Bar Controller中,如图所示:
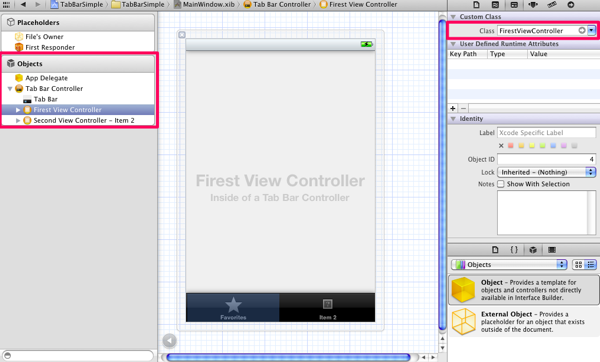
Tab Bar的图标可以自己修改,UIKit默认提供了一些的图标,也可以用自己的图片,但图片都会被特殊处理,只有蓝色和灰色

运行效果
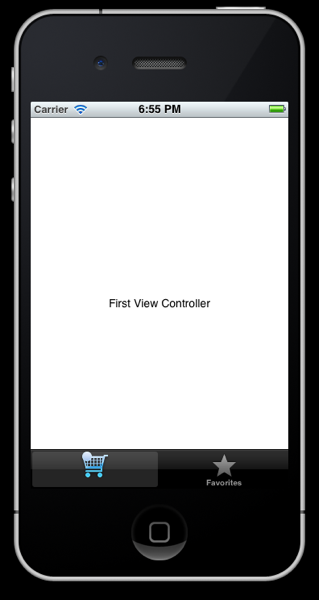
如果打开后是空白,需要设置项目的Main Interface为MainWindow,这样打开后不会是空白了.
完整代码 下载


