前言
前面讲过了Javamelody的基本配置,这里简单的介绍下,如何使用Javamelody来监控JDBC以及SQL。
手码不易,转载请注明:xingoo
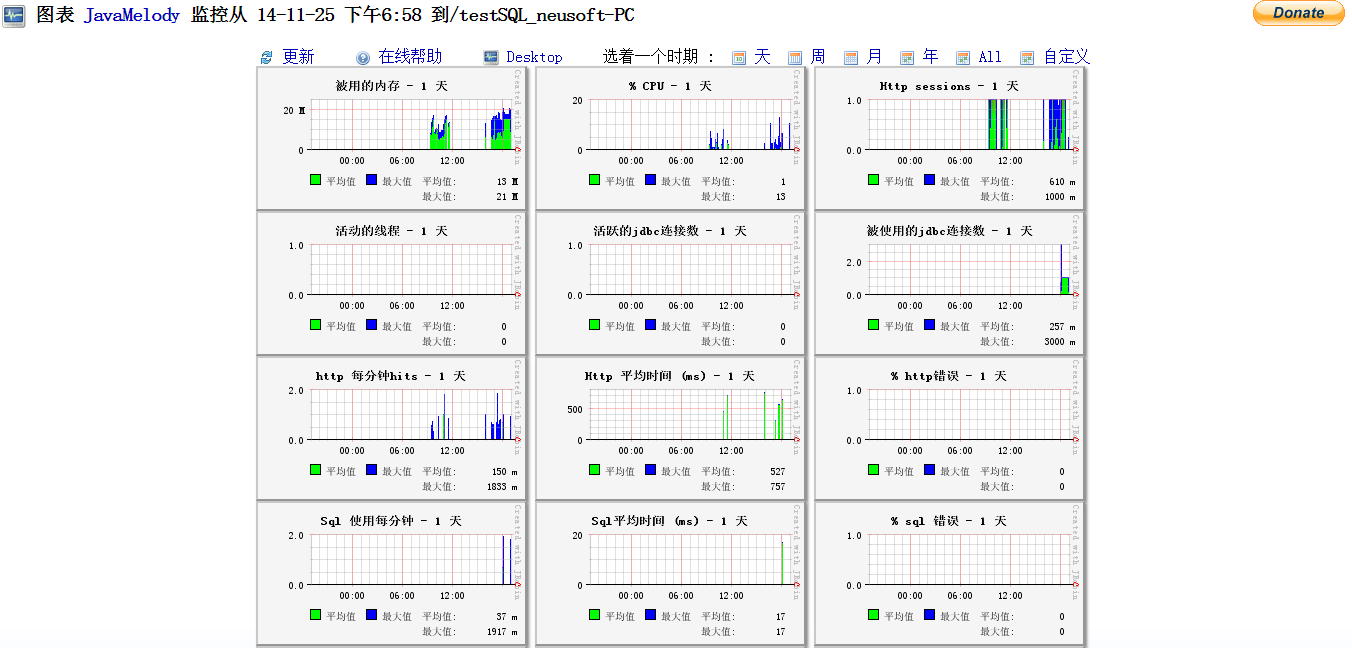
在网上搜索很多资料,仅有开源社区上的两篇帖子有点帮助,但对于监控SQL还是有很多问题,有不少的网友遇到了跟我同样的问题,监控页面打开可就是监控不到数据,SQL一栏无论如何都是0,要不就是NaN。
这个问题其实还是因为数据源的部分没有配置正确,这里介绍两种配置的方式。
第一种,直接配置数据源,添加额外的jdbc驱动
按照UserGuide的文档来说,可以使用Jndi配置数据源的方式,比如如果使用Hibernate,那么在hinernate.cfg.xml中配置
        <property name="hibernate.connection.driver_class">net.bull.javamelody.JdbcDriver</property>
        <property name="hibernate.connection.driver">com.mysql.jdbc.Driver</property>
        <property name="hibernate.connection.url">jdbc:mysql://localhost:3306/myschema</property>
        <property name="hibernate.connection.username">myuser</property>
        <property name="hibernate.connection.password">mypassword</property>
注意这个地方,可能一般的hibernate.cfg.xml参数并不是像上面的配置,不要紧。
只要保证原有的connection.driver是真是的驱动,上面添加一个参数connection.driver_class是javamelody的那个jdbc驱动即可。即参考我下面诶之oracle的hibernate数据源文件
<?xml version="1.0" encoding="GBK"?>
<!-- 指定Hibernate配置文件的DTD信息 -->
<!DOCTYPE hibernate-configuration PUBLIC
"-//Hibernate/Hibernate Configuration DTD 3.0//EN"
"http://hibernate.sourceforge.net/hibernate-configuration-3.0.dtd">
<!-- hibernate- configuration是连接配置文件的根元素 -->
<hibernate-configuration>
<session-factory>

<!-- 看这里!!!!!!!!!!!!!!!!!!!!!!!!!!!!!!!!!!!!!!!!!!!!!!!!!!!!!!!-->
<!-- 指定连接数据库所用的驱动  注意下面这句哦!!!!就是这句话起关键性的作用-->
<property name="connection.driver_class">net.bull.javamelody.JdbcDriver</property>

<property name="connection.driver">oracle.jdbc.driver.OracleDriver</property>
<!-- 指定连接数据库的url,hibernate连接的数据库名 -->
<property name="connection.url">jdbc:oracle:thin:@localhost:1521:orcl</property>
<property name="connection.useUnicode">true</property>
<property name="connection.characterEncoding">gbk</property>
<!-- 指定连接数据库的用户名 -->
<property name="connection.username">test</property>
<!-- 指定连接数据库的密码 -->
<property name="connection.password">test</property>
<!-- C3P0连接池设定-->
<property name="hibernate.connection.provider_class">org.hibernate.connection.C3P0ConnectionProvider</property>
<!-- 指定连接池里最大连接数 -->
<property name="hibernate.c3p0.max_size">20</property>
<!-- 指定连接池里最小连接数 -->
<property name="hibernate.c3p0.min_size">1</property>
<!-- 指定连接池里连接的超时时长 -->
<property name="hibernate.c3p0.timeout">120</property>
<!-- 指定连接池里最大缓存多少个Statement对象 -->
<property name="hibernate.c3p0.max_statements">0</property>
<property name="hibernate.c3p0.idle_test_period">60</property>
<property name="hibernate.c3p0.acquire_increment">2</property>
<property name="hibernate.c3p0.validate">true</property>
<property name="hibernate.c3p0.preferredTestQuery ">select sysdate from dual </property>
<property name="hibernate.c3p0.idleConnectionTestPeriod ">120</property>
<property name="hibernate.c3p0.maxIdleTime">1800</property>
<property name="hibernate.c3p0.testConnectionOnCheckout">true</property>

<!-- 指定数据库方言 -->
<property name="dialect">org.hibernate.dialect.Oracle9Dialect</property>
<!-- 根据需要自动创建数据库 -->
<property name="hbm2ddl.auto">update</property>
<!-- 显示Hibernate持久化操作所生成的SQL -->
<property name="show_sql">true</property>
<!-- 将SQL脚本进行格式化后再输出-->
<property name="hibernate.format_sql">true</property>
<!-- 罗列所有的映射文件-->
<mapping resource="Person.hbm.xml"/>

</session-factory>
</hibernate-configuration>
参考上面这样的配置,就可以了。打开监控页面,就可以看到SQL相关的参数了。


另一种呢,就是使用spring,如果使用spring,是不需要额外设置驱动类的。
前提是,必须在加载web.xml的时候指定加载的spring配置文件。需要在web.xml中实现一个监听,这个监听回使web应用在读取web.xml时,加载指定的spring文件。
<listener>
<listener-class>
org.springframework.web.context.ContextLoaderListener
</listener-class>
</listener>
然后我们通过设置参数,设置启动的spring文件
        <context-param>
          <param-name>contextConfigLocation</param-name>
          <param-value>
                classpath:net/bull/javamelody/monitoring-spring.xml
                classpath:context/services.xml
                classpath:context/data-access-layer.xml
                /WEB-INF/applicationContext.xml
          </param-value>
        </context-param>
注意monitoring-spring.xml与applicaitonContext.xml的位置,我好多次使用这种方式都没有成功,貌似就是这个位置的顺序颠倒了。是否是这个原因,还有待验证(明天测试,现在没有环境)。
整个web.xml的配置文件,参考下面:
<?xml version="1.0" encoding="GBK"?>
<web-app xmlns:xsi="http://www.w3.org/2001/XMLSchema-instance" xmlns="http://java.sun.com/xml/ns/javaee" xsi:schemaLocation="http://java.sun.com/xml/ns/javaee http://java.sun.com/xml/ns/javaee/web-app_3_0.xsd" id="WebApp_ID" version="3.0">
<!-- 指定spring的配置文件 -->
<context-param>
<param-name> contextConfigLocation</param-name>
<param-value>

classpath:net/bull/javamelody/monitoring-spring.xml
classpath:bean.xml

</param-value>
</context-param>

<filter>
<filter-name>struts</filter-name>
<filter-class>org.apache.struts2.dispatcher.FilterDispatcher</filter-class>

<init-param>
<param-name>struts.action.extension</param-name>
<param-value>action</param-value>
</init-param>
</filter>
<filter-mapping>
<filter-name>struts</filter-name>
<url-pattern>/*</url-pattern>
</filter-mapping>

<filter>
<filter-name>monitoring</filter-name>
<filter-class>net.bull.javamelody.MonitoringFilter</filter-class>

<init-param>
<param-name>log</param-name>
<param-value>true</param-value>
</init-param>
</filter>
<filter-mapping>
<filter-name>monitoring</filter-name>
<url-pattern>/*</url-pattern>
</filter-mapping>
<listener>
<listener-class> net.bull.javamelody.SessionListener</listener-class>
</listener>

<!-- 下面这个用于指定监听,会使web应用去加载spring的配置文件,而不是每次等到用的时候读取-->
<listener>
<listener-class>
org.springframework.web.context.ContextLoaderListener
</listener-class>
</listener>
<welcome-file-list>
<welcome-file>index.jsp</welcome-file>
</welcome-file-list>
</web-app>
另外,根据官方文档,如果你的应用与monitoring-spring.xml或者AOP之类的有冲突,那么使用monitoring-spring-datasource.xml文件替代monitoring-spring.xml就可以了,这个文件仅仅包含一个datasource的发送进程以及SpringDataSourceFactoryBean的一个例子。


 浙公网安备 33010602011771号