SpringCloud使用RabbitMQ 实现微服务之间的异步调用
最近公司内部员工为了完成小程序分裂考核任务,使用黑客软件发起大量请求刷任务,导致后台小程序模块A的微服务卡死,
微服务B调用了微服务A的微信消息推送功能,其他微服务又调用微服务B......
由于微服务A卡死,服务调用链产生阻塞,新的请求不断来到,阻塞的线程越来越多,最终因服务器资源耗尽而导致整个系统雪崩。
解决方法:使用RabbitMQ实现微服务之间的异步调用,从而实现解耦
具体步骤:
1、两个微服务工程 community 和 deliver 引入相同依赖(deliver异步调用community)
<!-- RabbitMQ消息队列  -->
        <dependency>
            <groupId>org.springframework.cloud</groupId>
            <artifactId>spring-cloud-starter-bus-amqp</artifactId>
        </dependency>
配置文件bootstrap.yml,我司框架有公共的云端配置文件,配置如下:
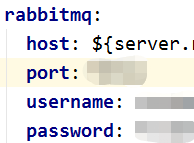
本地测试的配置如下:
rabbitmq:
    host: localhost
    port: 5672
    username: guest
    password: guest
2、 发送方微服务deliver代码
@Service("spTrDispatchDtlServiceImpl")
import org.springframework.amqp.rabbit.core.RabbitTemplate;
import org.springframework.amqp.core.Message;
import org.springframework.amqp.core.MessageProperties;
import org.springframework.amqp.rabbit.connection.CorrelationData;

@Autowired
private RabbitTemplate rabbitTemplate;
// 消息确认
final RabbitTemplate.ConfirmCallback confirmCallback = new RabbitTemplate.ConfirmCallback() {
    @Override
    public void confirm(CorrelationData correlationData, boolean ack, String cause) {
        if (!ack) {
            // 消息发送失败
            System.err.println("调用community发送微信消息异常处理……");
        }
    }
};

// 路由失败的监听 TODO rabbitmq接收信息失败后的处理
final RabbitTemplate.ReturnCallback returnCallback = new RabbitTemplate.ReturnCallback() {
    @Override
    public void returnedMessage(org.springframework.amqp.core.Message message, int replyCode, String replyText, String exchange, String routingKey) {
        System.err.println("return exchange:" + exchange + ",routingKey:" + routingKey + ",replyText:" + replyText + ",replyCode:" + replyCode);
    }
};

public void pushDispatchMessage(List<SpTrDispatchDtl> dtlList) {


                        Map<String,Object> messStr = new HashMap<String, Object>();
                        Map<String,Object> dataStr = new HashMap<String, Object> ();
                        Map<String,Object> firstStr = new HashMap<String, Object> ();
                        firstStr.put("value", "订单号");

                        dataStr.put("first",firstStr);
                        Map<String,Object> keyword1Str = new HashMap<String, Object> ();
                        keyword1Str.put("value", "商品名称");
                        dataStr.put("keyword1", keyword1Str);
                        Map<String,Object> keyword2Str = new HashMap<String, Object> ();
                        keyword2Str.put("value","用户名称");
                        dataStr.put("keyword2", keyword2Str);
                        Map<String,Object> keyword3Str = new HashMap<String, Object> ();
                        keyword3Str.put("value","用户电话");
                        keyword3Str.put("color", "#173177");
                        dataStr.put("keyword3", keyword3Str);


                        Map<String,Object> keyword4Str = new HashMap<String, Object> ();
                        keyword4Str.put("value", "配送地址");
                        keyword4Str.put("color", "#173177");
                        dataStr.put("keyword4", keyword4Str);
                        Map<String,Object> keyword5Str = new HashMap<String, Object> ();

                        keyword5Str.put("value", "配送时间");
                        keyword5Str.put("color", "#173177");
                        dataStr.put("keyword5", keyword5Str);

                        Map<String,Object> remarkStr = new HashMap<String, Object> ();
                        dataStr.put("remark", remarkStr);
                        messStr.put("touser", wxuser.get("openid").toString());//接收者openid
                        messStr.put("template_id", template_id);//微信模板ID
                        messStr.put("data",dataStr);
                        JSONObject jsonObj=new JSONObject(messStr);

                        rabbitTemplate.setConfirmCallback(confirmCallback);
                        rabbitTemplate.setReturnCallback(returnCallback);
                        // 发送消息
                        System.out.println("配送派工完成,向消息推送发送消息:"+jsonObj.toString());

                        MessageProperties messageProperties = new MessageProperties();
                        messageProperties.setContentType("application/json");
                        Message message = new Message(jsonObj.toString().getBytes(),messageProperties);
                        rabbitTemplate.convertAndSend("push_dispatch_**_exchange", "wxpush.msg.*", message); } } } }
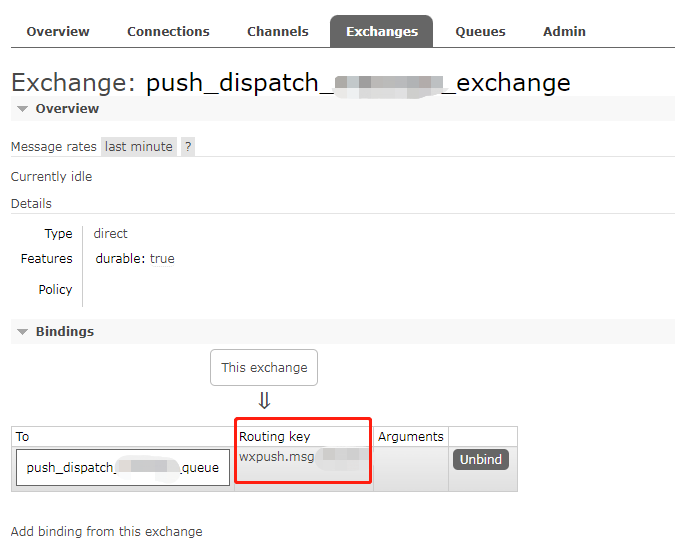
3、创建交换机和队列
下载安装RabbitMQ参考:https://www.misboot.com/docs/bushuyunwei/RabbitMQ-anzhuang
创建交换机:push_dispatch_**_exchange和队列 push_dispatch_**_queue
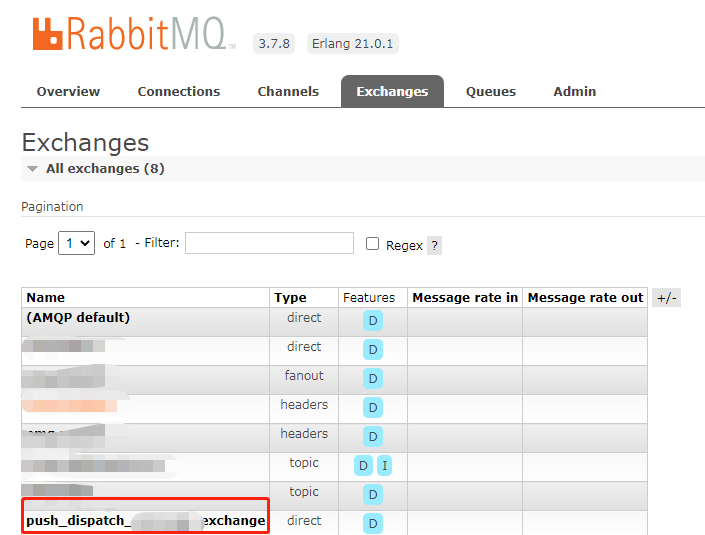
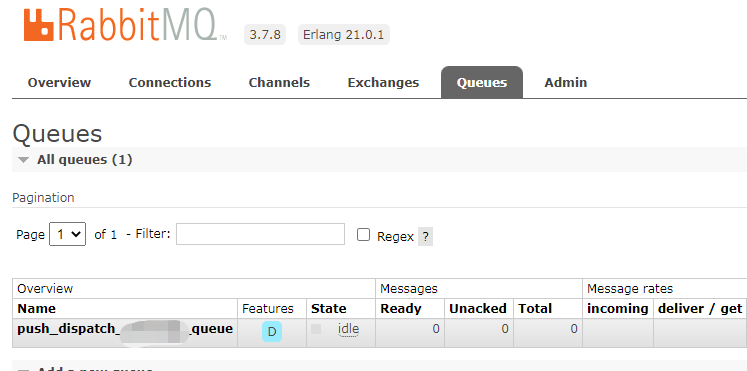
关联交换机和队列 ,指定BindingKey :wxpush.msg.*
4、接收方community 代码
启动类加注释 @EnableRabbit ,以及配置json转换器
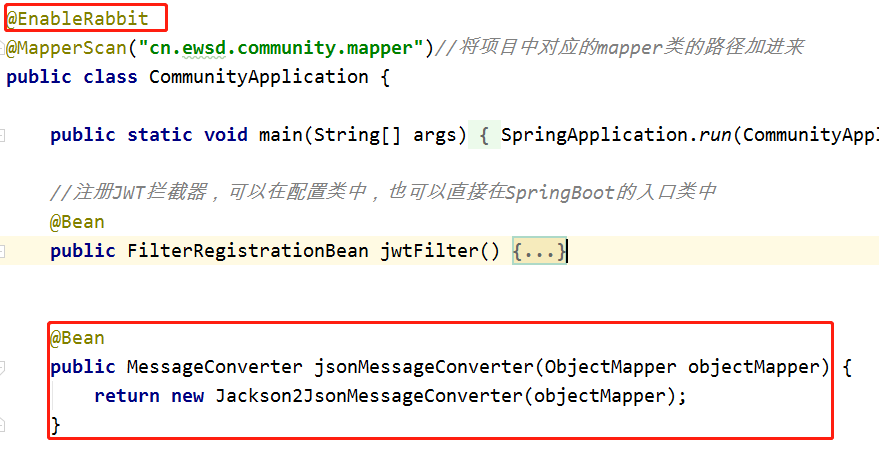
接受消息,创建监听者
package cn.ewsd.community.utils;


import com.rabbitmq.client.Channel;
import org.springframework.amqp.rabbit.annotation.*;
import org.springframework.amqp.support.AmqpHeaders;
import org.springframework.beans.factory.annotation.Autowired;
import org.springframework.messaging.handler.annotation.Headers;
import org.springframework.messaging.handler.annotation.Payload;
import org.springframework.stereotype.Component;

import java.io.IOException;
import java.util.ArrayList;
import java.util.Date;
import java.util.List;
import java.util.Map;

@Component
public class wechaPushMsg {

    @Autowired
    private WeChatServiceImpl wechatServiceImpl;
    @Autowired
    private WxPustInfoMapper wxPustInfoMapper;

    @RabbitListener(bindings = @QueueBinding(
            value = @Queue(value = "push_dispatch_**_queue", durable = "true"),
            exchange = @Exchange(
                    value = "push_dispatch_**_exchange",
                    durable = "true",
                    type = "direct",
                    ignoreDeclarationExceptions = "true"),
            key = "wxpush.msg.*"
    ))
    @RabbitHandler
    public void processMessage(@Payload Map<String,Object> pushMsg, Channel channel, @Headers Map<String, Object> headers) throws IOException {
        Long deliveryTag = (Long) headers.get(AmqpHeaders.DELIVERY_TAG);
        System.out.println("接受到了push_dispatch_**_queue信息");
        // 获取信息
        try {
            //调用消息推送方法
            Map<String,Object> resultMap = wechatServiceImpl.pushOneUser(pushMsg);
            if(resultMap.get("returncode").toString().equals("1")){

                //2 记录已推送表
                WxPustInfo wxPustInfo = new WxPustInfo();
                String memo = "推送内容:" + data.toString();
                //详细数据略过
                wxPustInfo.setMemo(memo);
                wxPustInfoMapper.insertSelective(wxPustInfo);
            }
        }catch (Exception e){
            System.out.println("【信息存储失败】"+e.getMessage());
            e.printStackTrace();
        }
        // 手工ack
        channel.basicAck(deliveryTag,false);
    }
}
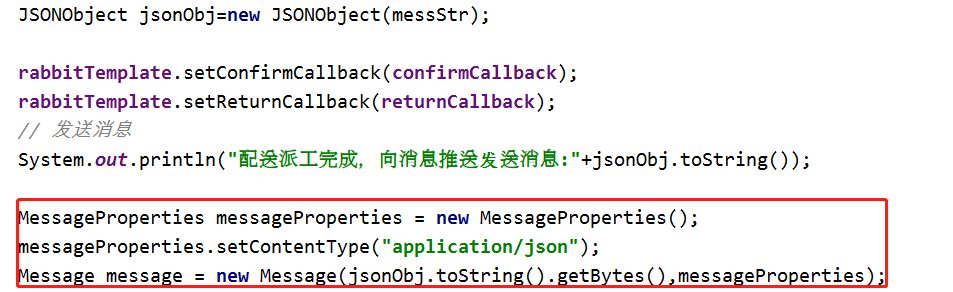
5、遇到的问题
前期直接发送json字符串,一直报错:
Could not convert incoming message with content-type [text/plain], 'json' keyword missing

后在发送时指定格式后解决问题,代码如下:
参考文章:
https://www.cnblogs.com/sss4/p/16423718.html
https://www.bilibili.com/read/cv4081623

 浙公网安备 33010602011771号