项目环境(NFS,环境配置)
前言
从头开始搭建在Centos6 搭建环境Nginx+apache+php+nodejs+jdk
系统环境搭建
1.安装VMware虚拟机软件,下载centos6,连接远程服务器安装系统。
2.系统安装后需要启动网卡配置ip
cd /etc/sysconfig/network-scripts/
vi ifcfg-eth0
(ifconfig eth0 up / ifup eth0)
修改内容如下
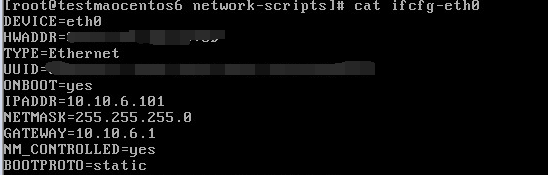
bootproto IP获取方式 dhcp(动态) static(静态)
如果无法上外网仔细查看输入的字母单词是否错误。
运行service network start/restart
ip a 查看分配的IP,可以使用xshell连接。
配置dns 上网
vi /etc/resolve.conf
nameserver 114.114.114.114
项目环境搭建
0x01 初始设置
mkdir soft data 文件夹
下载lnmp环境包
wget http://soft.vpser.net/lnmp/lnmp1.3-full.tar.gz
(若提示cmmand not found 则可能使用最小化安装没有安装wget命令,需使用 yum install wget 安装wget )
解压文件 tar zxvf lnmp1.3-full.tar.gz
在lnmp目录修改 lnmp.conf
MySQL_Data_Dir='/data/databases'
自动化脚本文件上传到服务器soft目录,文件解压文件 unzip SGautomartion.zip
0x02 安装node jdk
修改SGinstall脚本
#Install Nginx server
if [[ "$1" -eq "2" ]];then
      yum install pcre-devel pcre  openssl* gcc -y
    if [ $? -eq 0 ];then
        tar xvf $N_FILES && cd $N_FILES_DIR && ./configure --user=www --group=www --prefix=/usr/local/nginx --with-http_stub_status_module --with-http_ssl_module
chmod o+x SongGuo.sh 添加执行权限
/SGautomatioin ./SongGuo.sh 5|4|3 先安装glibc,jdk,node
/lnmp ./install.sh lamp
版本:apache2.2 php5.6.22 mysql 5.6.29
安装 nginx
./SongGuo.sh 2
0x03 php fileinfo
进入lnmp安装包位置(php版本根据安装的选择)

#cd /lnmp1.2-full/src/php-5.6.9/ext/fileinfo/
# /usr/local/php/bin/phpize
PHP Api Version:         20041225
Zend Module Api No:      20060613
Zend Extension Api No:   220060519
# ./configure --with-php-config=/usr/local/php/bin/php-config
# make && make install
Build complete.
Don't forget to run 'make test'.
Installing shared extensions:     /usr/local/php/lib/php/extensions/no-debug-non-zts-20060613/
# vi /usr/local/php/etc/php.ini
>>extension=fileinfo.so
# service httpd restart 重启服务
0x04 主机NFS部署
主机部署
安装包:nfs-utils rpcbind
# yum -y install nfs-utils rpcbind     安装包
# rpm -qa nfs-utils rpcbind            检查是否安装完成
# /etc/init.d/rpcbind start            启动rpcbind服务
# /etc/init.d/rpcbind status           检查rpcbind服务状态
# /etc/init.d/nfs start                启动nfs服务
# /etc/init.d/nfs status               查看nfs服务状态
设置开机启动
# chkconfig --level 35  nfs on         设置nfs服务开机启动
# chkconfig --list nfs                 查看开机启动列表
nfs             0:off   1:off   2:off   3:on    4:off   5:on    6:off
# chkconfig --level 35 rpcbind on      设置rpcbind开机启动
# chkconfig --list rpcbind             查看rbcbind开机启动列表
rpcbind       0:off   1:off   2:on    3:on    4:on    5:on    6:off
配置环境(配置文件路径 /etc/exports,并且默认是为空)
# ll /etc/exports
# cat /etc/exports
编辑配置文件
# vi /etc/exports
/var/www/html/img 192.168.1.0/24(rw,sync,all_squash)
这里要注意加all_squash是将所有的普通用户压缩成匿名用户nobody,如果参数不加,客户端普通用户有可能将没有写的权限
#mkdir -p /var/www/html/img   创建共享文件
#chown -R nfsnobody.nfsnobody /var/www/html/img 改变权限
# /etc/init.d/nfs reload ===exportfs -r  重新加载
# cat /var/lib/nfs/etab
/var/www/html/img serverip/24(rw,sync,wdelay,hide,nocrossmnt,secure,root_squash,all_squash,no_subtree_check,secure_locks,acl,anonuid=65534,anongid=65534,sec=sys,rw,root_squash,all_squash)
# showmount -e serverip
客户机NFS部署
# yum -y install nfs-utils rpcbind            安装包
# /etc/init.d/rpcbind start                   启动rpcbind服务
# chkconfig --level 35 rpcbind on         开机启动
# chkconfig --list rpcbind
#showmount -e server ip
#mount -t nfs serverip:/var/www/html/img/ /var/www/html/img/
环境文件配置:
前端:
1.Nginx配置
转发配置路径(/usr/local/nginx/conf/nginx.conf)
server {
        listen       443;
        server_name jijin.com.cn;
        root /var/www/html;
        location /thguess {
            root   /var/www/html;
            index  index.html index.htm;
        }
        location = /login {
        proxy_pass http://10.26.32.67:8080/login;
        proxy_redirect off;
        proxy_set_header X-Real-IP $remote_addr;
        proxy_set_header X-Forwarded-For $proxy_add_x_forwarded_for;
        }
        }
        location ~ \.php$ {
        proxy_pass http://127.0.0.1:80;
        proxy_set_header Host $host;
        proxy_set_header X-Real-IP $remote_addr;
        proxy_set_header X-Forwarded-For $proxy_add_x_forwarded_for;
        proxy_connect_timeout 30;
        proxy_send_timeout 30;
        proxy_read_timeout 30;
        client_max_body_size 10m;
        client_body_buffer_size 128k;
        proxy_buffer_size 4k;
        proxy_buffers 4 32k;
        proxy_busy_buffers_size 64k;
        proxy_temp_file_write_size 64k;
      }
jvm: "/usr/java/jdk1.8.0_65/jre/lib/amd64/server/libjvm.so",
ssl on;
ssl_certificate /usr/local/nginx/conf/sogood.crt;
ssl_certificate_key /usr/local/nginx/conf/sogood.key;
ssl_session_timeout 5m;
ssl_protocols TLSv1 TLSv1.1 TLSv1.2;
ssl_ciphers ALL:!DH:!EXPORT:!RC4:+HIGH:+MEDIUM:-LOW:!aNULL:!eNULL;
ssl_prefer_server_ciphers on;

【推荐】编程新体验,更懂你的AI,立即体验豆包MarsCode编程助手
【推荐】凌霞软件回馈社区,博客园 & 1Panel & Halo 联合会员上线
【推荐】抖音旗下AI助手豆包,你的智能百科全书,全免费不限次数
【推荐】博客园社区专享云产品让利特惠,阿里云新客6.5折上折
【推荐】轻量又高性能的 SSH 工具 IShell:AI 加持,快人一步