基础语言知识JAVA
1. 总结:
JAVA比较重要的博客:
http://www.runoob.com/java/java-tutorial.html (JAVA教程)
http://blog.csdn.net/jackfrued/article/details/44921941 (笔试题很好)
http://www.runoob.com/java/java-examples.html (练习题,很好)
相关博客:
总结下载:
java类:
| 所有异常的父类 | java.lang.Exception |
所有关键字:
| 类别 | 关键字 | 说明 |
|---|---|---|
| 访问控制 | private | 私有的 |
| protected | 受保护的 | |
| public | 公共的 | |
| 类、方法和变量修饰符 | abstract | 声明抽象 |
| class | 类 | |
| extends | 扩允,继承 | |
| final | 最终值,不可改变的 | |
| implements | 实现(接口) | |
| interface | 接口 | |
| native | 本地,原生方法(非Java实现) | |
| new | 新,创建 | |
| static | 静态 | |
| strictfp | 严格,精准 | |
| synchronized | 线程,同步 | |
| transient | 短暂 | |
| volatile | 易失 | |
| 程序控制语句 | break | 跳出循环 |
| case | 定义一个值以供switch选择 | |
| continue | 继续 | |
| default | 默认 | |
| do | 运行 | |
| else | 否则 | |
| for | 循环 | |
| if | 如果 | |
| instanceof | 实例 | |
| return | 返回 | |
| switch | 根据值选择执行 | |
| while | 循环 | |
| 错误处理 | assert | 断言表达式是否为真 |
| catch | 捕捉异常 | |
| finally | 有没有异常都执行 | |
| throw | 抛出一个异常对象 | |
| throws | 声明一个异常可能被抛出 | |
| try | 捕获异常 | |
| 包相关 | import | 引入 |
| package | 包 | |
| 基本类型 | boolean | 布尔型 |
| byte | 字节型 | |
| char | 字符型 | |
| double | 双精度浮点 | |
| float | 单精度浮点 | |
| int | 整型 | |
| long | 长整型 | |
| short | 短整型 | |
| null | 空 | |
| 变量引用 | super | 父类,超类 |
| this | 本类 | |
| void | 无返回值 | |
| 保留关键字 | goto | 是关键字,但不能使用 |
| const | 是关键字,但不能使用 |
数据类型:
- 原始类型:boolean, char, byte,short, int(默认), long(默认), float,double
- 包装类型:Boolean,Character, Byte,Short, Integer, Long, Float,Double
1、float f=3.4;是否正确?
答:不正确。3.4是双精度数,将双精度型(double)赋值给浮点型(float)属于下转型(down-casting,也称为窄化)会造成精度损失,因此需要强制类型转换float f =(float)3.4; 或者写成float f =3.4F;。
2、short s1 = 1; s1 = s1 + 1;有错吗?short s1 = 1; s1 += 1;有错吗?
答:对于short s1 = 1; s1 = s1 + 1;由于1是int类型,因此s1+1运算结果也是int 型,需要强制转换类型才能赋值给short型。而short s1 = 1; s1 += 1;可以正确编译,因为s1+= 1;相当于s1 = (short)(s1 + 1);其中有隐含的强制类型转换。
形参实参:
名词解析:
1.形参:用来接收调用该方法时传递的参数。只有在被调用的时候才分配内存空间,一旦调用结束,就释放内存空间。因此仅仅在方法内有效。
2.实参:传递给被调用方法的值,预先创建并赋予确定值。
3.传值调用:传值调用中传递的参数为基本数据类型,参数视为形参。
4.传引用调用:传引用调用中,如果传递的参数是引用数据类型,参数视为实参。在调用的过程中,将实参的地址传递给了形参,形参上的改变都发生在实参上。
案例分析:
1.基础数据类型(传值调用)
传值,方法不会改变实参的值。
举两个例子:
(1)方法体内改变形参引用,但不会改变实参引用 ,实参值不变。
public class TestFun2 {
    public static void testStr(String str){
        str="hello";//型参指向字符串 “hello”
    }
    public static void main(String[] args) {
        String s="1" ;
        TestFun2.testStr(s);
        System.out.println("s="+s); //实参s引用没变,值也不变
    }
}
public class TestFun4 {
    public static void testStringBuffer(StringBuffer sb){
        sb.append("java");//改变了实参的内容
    }
    public static void main(String[] args) {
        StringBuffer sb= new StringBuffer("my ");
        new TestFun4().testStringBuffer(sb);
        System.out.println("sb="+sb.toString());//内容变化了
    }
}
执行结果,打印:sb=my java 。
所以比较参数是String和StringBuffer 的两个例子就会理解什么是“改变实参对象内容”了。
总结:
1.java的基本数据类型是传值调用,对象引用类型是传引用。
2.当传值调用时,改变的是形参的值,并没有改变实参的值,实参的值可以传递给形参,但是,这个传递是单向的,形参不能传递回实参。
3.当引用调用时,如果参数是对象,无论对对象做了何种操作,都不会改变实参对象的引用,但是如果改变了对象的内容,就会改变实参对象的内容。
上诉的String和StringBuffer:简单地说,就是一个变量和常量的关系。StringBuffer对象的内容可以修改;而String对象一旦产生后就不可以被修改,重新赋值其实是两个对象。
http://blog.csdn.net/lclai/article/details/6141548
instanceof
子类是父类的类型,但父类不是子类的类型。
子类的实例可以声明为父类型,但父类的实例不能声明为子类型。
class Vehicle {}

public class Car extends Vehicle {
    public static void main(String args[]){
        Vehicle v1 = new Vehicle(); //父类型
        Vehicle v2 = new Car(); //子类的实例可以声明为父类型
        Car c1 = new Car();    // 子类型
        Car c2 = new Vehicle(); //这句会报错,父类型的实例不能声明为子类型

        //Car(子类)是Vehicle(父类)类型, Vehicle(父类)不是Car(子类)类型
        boolean result1 =  c1 instanceof Vehicle;    // true
        boolean result2 =  c1 instanceof Car;        // true
        boolean result3 =  v1 instanceof Vehicle;    // true
        boolean result4 =  v1 instanceof Car;          // false
        boolean result5 =  v2 instanceof Vehicle;    // true
        boolean result6 =  v2 instanceof Car;          // true

        System.out.println(result1);
        System.out.println(result2);
        System.out.println(result3);
        System.out.println(result4);
        System.out.println(result5);
        System.out.println(result6);
   }
}
从执行结果来看,虽然 v2 被声明为了 Vehicle(父类),但它既是 instanceof Vehicle,又是 instanceof Car,所以 v2 其实是 Car(子类),否则 v2 instanceof Car 应该为 false。
Java增强for循环
Java5 引入了一种主要用于数组的增强型 for 循环。
Java 增强 for 循环语法格式如下:
for(声明语句 : 表达式)
{
    //代码句子
}
声明语句:声明新的局部变量,该变量的类型必须和数组元素的类型匹配。其作用域限定在循环语句块,其值与此时数组元素的值相等。
表达式:表达式是要访问的数组名,或者是返回值为数组的方法。
实例
Test.java 文件代码:
public class Test {
   public static void main(String args[]){
      int [] numbers = {10, 20, 30, 40, 50};

      for(int x : numbers ){
         System.out.print( x );
         System.out.print(",");
      }
      System.out.print("\n");
      String [] names ={"James", "Larry", "Tom", "Lacy"};
      for( String name : names ) {
         System.out.print( name );
         System.out.print(",");
      }
   }
}
以上实例编译运行结果如下:
10,20,30,40,50,
James,Larry,Tom,Lacy,
Number & Math类
所有的包装类(Integer、Long、Byte、Double、Float、Short)都是抽象类Number的子类。
这种由编译器特别支持的包装称为装箱,所以当内置数据类型被当作对象使用的时候,编译器会把内置类型装箱为包装类。相似的,编译器也可以把一个对象拆箱为内置类型。Number类属于java.lang包。
下面的表中列出的是 Number & Math 类常用的一些方法:
| 序号 | 方法与描述 |
|---|---|
| 1 | xxxValue() 将 Number 对象转换为xxx数据类型的值并返回。 |
| 2 | compareTo() 将number对象与参数比较。 |
| 3 | equals() 判断number对象是否与参数相等。 |
| 4 | valueOf() 返回一个 Number 对象指定的内置数据类型 |
| 5 | toString() 以字符串形式返回值。 |
| 6 | parseInt() 将字符串解析为int类型。 |
| 7 | abs() 返回参数的绝对值。 |
| 8 | ceil() 对整形变量向上取整,返回类型为double型。 |
| 9 | floor() 对整型变量向下取整。返回类型为double类型。 |
| 10 | rint() 返回与参数最接近的整数。返回类型为double。 |
| 11 | round() 返回一个最接近的int、long型值。 |
| 12 | min() 返回两个参数中的最小值。 |
| 13 | max() 返回两个参数中的最大值。 |
| 14 | exp() 返回自然数底数e的参数次方。 |
| 15 | log() 返回参数的自然数底数的对数值。 |
| 16 | pow() 返回第一个参数的第二个参数次方。 |
| 17 | sqrt() 求参数的算术平方根。 |
| 18 | sin() 求指定double类型参数的正弦值。 |
| 19 | cos() 求指定double类型参数的余弦值。 |
| 20 | tan() 求指定double类型参数的正切值。 |
| 21 | asin() 求指定double类型参数的反正弦值。 |
| 22 | acos() 求指定double类型参数的反余弦值。 |
| 23 | atan() 求指定double类型参数的反正切值。 |
| 24 | atan2() 将笛卡尔坐标转换为极坐标,并返回极坐标的角度值。 |
| 25 | toDegrees() 将参数转化为角度。 |
| 26 | toRadians() 将角度转换为弧度。 |
| 27 | random() 返回一个随机数。 |
常用类:
1. Character类
Character 类用于对单个字符进行操作。
Character 类在对象中包装一个基本类型 char 的值
char ch = 'a';
// Unicode 字符表示形式
char uniChar = '\u039A';
// 字符数组
char[] charArray ={ 'a', 'b', 'c', 'd', 'e' };
| 1 | isLetter() 是否是一个字母 |
| 2 | isDigit() 是否是一个数字字符 |
| 3 | isWhitespace() 是否是一个空格 |
| 4 | isUpperCase() 是否是大写字母 |
| 5 | isLowerCase() 是否是小写字母 |
| 6 | toUpperCase() 指定字母的大写形式 |
| 7 | toLowerCase() 指定字母的小写形式 |
| 8 | toString() 返回字符的字符串形式,字符串的长度仅为1 |
2. String类
String 类是不可改变的,所以你一旦创建了 String 对象,那它的值就无法改变了
如果需要对字符串做很多修改,那么应该选择使用 StringBuffer & StringBuilder 类。
1. 字符串长度
public class StringDemo {
    public static void main(String args[]) {
        String site = "www.runoob.com";
        int len = site.length();
        System.out.println( "长度 : " + len );
   }
}
以上实例编译运行结果如下:
长度 : 14
2. 创建格式化字符串
String 类使用静态方法 format() 返回一个String 对象而不是 PrintStream 对象。
String 类的静态方法 format() 能用来创建可复用的格式化字符串,而不仅仅是用于一次打印输出。
如下所示:
String fs;
fs = String.format("浮点型变量的值为 " +
                   "%f, 整型变量的值为 " +
                   " %d, 字符串变量的值为 " +
                   " %s", floatVar, intVar, stringVar);
3. String 类是不可改变的解析
例如:
String s = "Google";
System.out.println("s = " + s);

s = "Runoob";
System.out.println("s = " + s);
输出结果为:
Google
Runoob
从结果上看是改变了,但为什么门说String对象是不可变的呢?
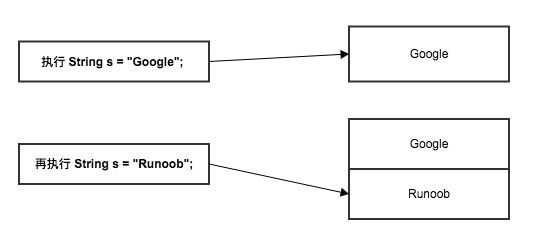
原因在于实例中的 s 只是一个 String 对象的引用,并不是对象本身,当执行 s = "Runoob"; 创建了一个新的对象 "Runoob",而原来的 "Google" 还存在于内存中。
4. length()方法,length属性和size()的方法的区别:
- 1.length()方法是针对字符串来说的,要求一个字符串的长度就要用到它的length()方法;
- 2.length属性是针对Java中的数组来说的,要求数组的长度可以用其length属性;
- 3.java中的size()方法是针对泛型集合说的,如果想看这个泛型有多少个元素,就调用此方法来查看!
这个例子来演示这两个方法和一个属性的用法:
public static void main(String[] args) {
    String []list={"ma","cao","yuan"};
    String a="macaoyuan";
    System.out.println(list.length);
    System.out.println(a.length());
    List array=new ArrayList();
    array.add(a);
    System.out.println(array.size());
}
输出的值为:
3
9
1
5. 下面是 String 类支持的方法:
IO流:
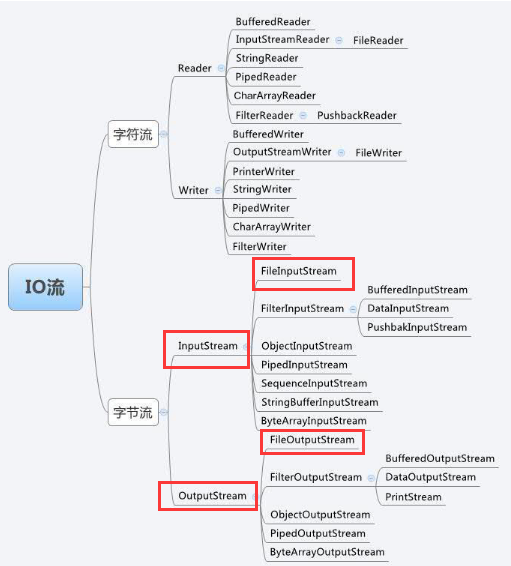
如下图所示:分为两个部分,字节流(input/output)和字符流(reader/writer)
字节流就是一个字节一个字节的传(write/read只有byte接口)
字符流就是可以传送字符串数据(有String之类的接口)
package com.hanchao.test;

import java.io.BufferedInputStream;
import java.io.BufferedOutputStream;
import java.io.File;
import java.io.FileInputStream;
import java.io.FileOutputStream;

public class Test_two {

    public static void main(String[] args) throws Exception{

        /**
         * InputStream与OutputStream的使用例子
         *
         * (缓冲文件输入流)BufferedInputStream → (文件输入流)FileInputStream → (输入流)java.io.InputStream
         *
         * (缓冲文件输出流)BufferedOuputStream → (文件输出流)FileOuputStream → (输出流)java.io.OutputStream
         */

        /**
         * 1.通过流复制一个图片的例子
         */
/*      File file = new File("c:/images/1.png");
        File outfile = new File("C:/temp.png");

        FileInputStream inputStream = new FileInputStream(file);
        FileOutputStream outputStream = new FileOutputStream(outfile);

        int i = 0;
        while(i != -1) {
            i = inputStream.read();
            outputStream.write(i);
        }
        //注意流的关闭(★必须的)
        inputStream.close();
        outputStream.close();
*/

        /**
         * 2.如果我们想提高要提高复制的速度,可以采用缓冲文件输入\输出流,如下:
         */
/*      File file = new File("C:/images/1.png");
        File outfile = new File("C:/temp1.jpg");

        //文件输入流
        FileInputStream inputStream = new FileInputStream(file);
        //文件输出流
        FileOutputStream outputStream = new FileOutputStream(outfile);

        //缓冲文件输入流
        BufferedInputStream bufferedInputStream = new BufferedInputStream(inputStream);
        //缓冲文件输出流
        BufferedOutputStream bufferedOutputStream = new BufferedOutputStream(outputStream);

        int i = 0;
        while(i != -1) {
            i = bufferedInputStream.read();
            bufferedOutputStream.write(i);
        }
        //流的关闭
        bufferedOutputStream.flush();//强制清除缓冲区的内容
        bufferedInputStream.close();
        bufferedOutputStream.close();
*/

        /**
         * 3.当文件很大,我们要做一个缓冲处理来提高速度。如下:当文件的大小大于512个字节时,每次读入512个字节后再做处理
         *
         */
/*      File file = new File("C:/images/1.png");
        File outfile = new File("C:/temp2.png");

        //文件输入流
        FileInputStream inputStream = new FileInputStream(file);
        //文件输出流
        FileOutputStream outputStream = new FileOutputStream(outfile);

        int i = 0;
        //缓冲大小为512字节
        byte[] buffer = new byte[512];
        while(true) {
            if(inputStream.available() < 512) {
                while(i != -1) {
                    i = inputStream.read();
                    outputStream.write(i);
                }
                break;//注意此处不能忘记哦
            } else {
                //当文件的大小大于512字节时
                inputStream.read(buffer);
                outputStream.write(buffer);
            }
        }

        //流的关闭
        //注意流的关闭(★必须的)
        inputStream.close();
        outputStream.close();
*/

        /**
         * 4.根据上面的例子,我们可以知道:我们可以做一个双缓冲的文件复制
         */
        File file = new File("C:/images/1.png");
        File outfile = new File("C:/temp3.png");

        //文件输入流
        FileInputStream inputStream = new FileInputStream(file);
        //文件输出流
        FileOutputStream outputStream = new FileOutputStream(outfile);

        //缓冲文件输入流
        BufferedInputStream bufferedInputStream = new BufferedInputStream(inputStream);
        //缓冲文件输出流
        BufferedOutputStream bufferedOutputStream = new BufferedOutputStream(outputStream);

        int i = 0;
        //缓冲区的大小
        byte[] buffer = new byte[512];

        while(true) {
            if(bufferedInputStream.available() < 512) {
                while(i != -1) {
                    i = bufferedInputStream.read();
                    bufferedOutputStream.write(i);
                }
                break;
            } else {
                //当文件的大小还大于512字节时
                bufferedInputStream.read(buffer);
                bufferedOutputStream.write(buffer);

            }
        }

        //强制清空缓冲区的内容
        bufferedOutputStream.flush();
        //流的关闭
        bufferedInputStream.close();
        bufferedOutputStream.close();

    }
}
异常:
1. 异常的方法:
| 序号 | 方法及说明 |
|---|---|
| 1 | public String getMessage() 返回关于发生的异常的详细信息。这个消息在Throwable 类的构造函数中初始化了。 |
| 2 | public Throwable getCause() 返回一个Throwable 对象代表异常原因。 |
| 3 | public String toString() 使用getMessage()的结果返回类的串级名字。 |
| 4 | public void printStackTrace() 打印toString()结果和栈层次到System.err,即错误输出流。 |
| 5 | public StackTraceElement [] getStackTrace() 返回一个包含堆栈层次的数组。下标为0的元素代表栈顶,最后一个元素代表方法调用堆栈的栈底。 |
| 6 | public Throwable fillInStackTrace() 用当前的调用栈层次填充Throwable 对象栈层次,添加到栈层次任何先前信息中。 |
集合(容器):
Java集合类: Set、List、Map、Queue使用场景梳理:推荐这个
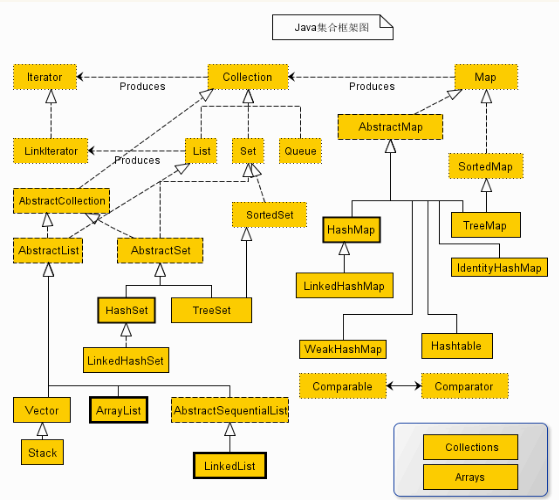
Collection接口是集合类的根接口,Java中没有提供这个接口的直接的实现类。但是却让其被继承产生了两个接口,就是Set和List。Set中不能包含重复的元素。List是一个有序的集合,可以包含重复的元素,提供了按索引访问的方式。
Map是Java.util包中的另一个接口,它和Collection接口没有关系,是相互独立的,但是都属于集合类的一部分。Map包含了key-value对。Map不能包含重复的key,但是可以包含相同的value。
几种重要的接口和类简介
1、List(有序、可重复) :ArrayList/LinkedList/Vector
List里存放的对象是有序的,同时也是可以重复的,List关注的是索引,拥有一系列和索引相关的方法,查询速度快。因为往list集合里插入或删除数据时,会伴随着后面数据的移动,所有插入删除数据速度慢。
Vector为线程同步的数组,
ArrayList为非线程同步的数组
LinkedList为非线程同步的链表
2、Set(无序、不能重复):TreeSet /HashSet
Set里存放的对象是无序,不能重复的,集合中的对象不按特定的方式排序,只是简单地把对象加入集合中。
3、Map(键值对、键唯一、值不唯一):HashMap /TreeMap
Map集合中存储的是键值对,键不能重复,值可以重复。根据键得到值,对map集合遍历时先得到键的set集合,对set集合进行遍历,得到相应的值。
在类集中提供了以下四种的常见输出方式:
1)Iterator:迭代输出,是使用最多的输出方式。
2)ListIterator:是Iterator的子接口,专门用于输出List中的内容。
3)foreach输出:JDK1.5之后提供的新功能,可以输出数组或集合。
4)for循环
Collection:
泛型:
http://blog.csdn.net/daniel_h1986/article/details/5708605
- 所有泛型方法声明都有一个类型参数声明部分(由尖括号分隔),该类型参数声明部分在方法返回类型之前(在下面例子中的<E>)。
- 每一个类型参数声明部分包含一个或多个类型参数,参数间用逗号隔开。一个泛型参数,也被称为一个类型变量,是用于指定一个泛型类型名称的标识符。
- 类型参数能被用来声明返回值类型,并且能作为泛型方法得到的实际参数类型的占位符。
- 泛型方法体的声明和其他方法一样。注意类型参数只能代表引用型类型,不能是原始类型(像int,double,char的等)。
public class GenericMethodTest
{
   // 泛型方法 printArray
   public static < E > void printArray( E[] inputArray )
   {
      // 输出数组元素
         for ( E element : inputArray ){
            System.out.printf( "%s ", element );
         }
         System.out.println();
    }

    public static void main( String args[] )
    {
        // 创建不同类型数组: Integer, Double 和 Character
        Integer[] intArray = { 1, 2, 3, 4, 5 };
        Double[] doubleArray = { 1.1, 2.2, 3.3, 4.4 };
        Character[] charArray = { 'H', 'E', 'L', 'L', 'O' };

        System.out.println( "整型数组元素为:" );
        printArray( intArray  ); // 传递一个整型数组

        System.out.println( "\n双精度型数组元素为:" );
        printArray( doubleArray ); // 传递一个双精度型数组

        System.out.println( "\n字符型数组元素为:" );
        printArray( charArray ); // 传递一个字符型数组
    }
}
编译以上代码,运行结果如下所示:
整型数组元素为:
1 2 3 4 5

双精度型数组元素为:
1.1 2.2 3.3 4.4

字符型数组元素为:
H E L L O
限制泛型的可用类型
如果我们要限制class GenericsFoo<T>类型持有者T的范围为集合接口类型,只需使用class GenericsFoo<T extends Collection>,这样类中的泛型T只能是Collection接口的实现类,传入非Collection接口编译会出错。
通配符泛型
为了解决类型不能动态根据实例来确定的缺点,引入了“通配符泛型”,使得一个参数可以用来表示一组实例化后的模板。
其中,
“?”代表未知类型(类中的泛型)
extends关键字声明了类型的上界,表示参数化的类型可能是所指定的类型,或者是此类型的子类
super关键字声明了类型的下界,表示参数化的类型可能是所指定的类型,或者是此类型的父类型,直至Object;
例如(Par super String)
在这里Par可以是Object,也就是说Par必须是String的父类或者自己本身

//泛型其实就是C++里面的模板

//1.在类里面使用泛型
class Person<T> {
    private T age;
    public void setAge(T age) {
        this.age = age;
    }
    public T getAge() {
        return this.age;
    }
}
//3.1 子类使用泛型:子类可以继续使用泛型
class Student<T> extends Person<T> {
}
//3.2 子类使用泛型:如果子类不想继续使用,则要父类指定泛型
class Student2 extends Person<String> {
}
//4  接口使用泛型
interface Person<T> {
    public void setAge(T age);
    public T getAge();
}
//4.1 接口未指定的泛型
class Student<T> implements Person<T> {
    T age;
    public void setAge(T age)
    {
        this.age = age;
    }
    public T getAge() {
        return this.age;
    }
}
//4.2 接口指定的泛型
class Student2 implements Person<String> {
    String age;
    public void setAge(String age)
    {
        this.age = age;
    }
    public String getAge() {
        return this.age;
    }
}

//5 泛型的上限
/* Integer, Float */
class Student<T extends Number> implements Person<T> {
    T age;
    public void setAge(T age)
    {
        this.age = age;
    }
    public T getAge() {
        return this.age;
    }
}

public class Generics {
    public static void main(String args[]) {
        Person<String> p = new Person<String>();
        p.setAge("3 years old");
        System.out.println(p.getAge());

        Person<Integer> p2 = new Person<Integer>();  //注意:泛型不能使用基本数据类型,只能使用引用类型,Integer为引用类型的int
        p2.setAge(3);
        System.out.println(p2.getAge());

        Person<?> p3;   //这里的?为通配符,任何类型都可以使用
        p3 = p;
        //p3.setAge("4 years");   //这一句是错的,因为不能进行设置
        p3.getAge();   //但是可以读出来

        printInfo2(p);
        printInfo2(p2);
        printInfo2(p3);

        Student<Integer> s = new Student<Integer>();
        s.setAge(10);
        printInfo(s);

        Student2 s2 = new Student2();
        s2.setAge("11 years");
        printInfo(s2);


}
    //?为通配符,也就是任意类型都可以
    public static void printInfo(Person<?> p) {
        System.out.println(p.getAge());
    }

    //2.在方法里面使用泛型:这里多了一个<T>,表示是泛型
    public static <T> void printInfo2(Person<T> p) {
        System.out.println(p.getAge());
    }
    //6.泛型的下线:不能在定义的时候使用,只能在使用的时候使用
public static void printInfo(Person<? super String> p) {
        System.out.println(p.getAge());
    }
}
反射:
参考资料:
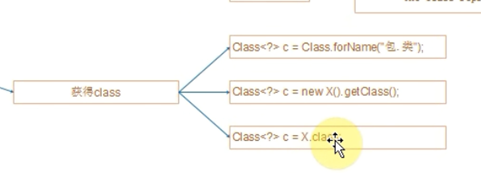
如下:以前都是导入类名,再new,来得到实例化对象
现在我们可以使用反射,通过实例化对象反射得到完整的类名和包

lesson1:
package a.b.c.d;

class Person {
    private String name;

    void setName(String name) { this.name = name; }
    String getName() { return this.name; }

};

public class Reflect {
    public static void main(String args[]) {
        Person p = new Person();
        Class<?> c1 = null;

        try {
             //三种获得class的方法
            //1.1 获得class方法
            c1 = Class.forName("a.b.c.d.Person");
        } catch (ClassNotFoundException e) {
            System.out.println(e);
        }
        //1.2 获得class的方法
        Class<?> c2 = p.getClass();
        //1.3 获得class的方法
        Class<?> c3 = Person.class;

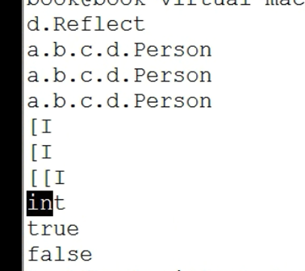
        System.out.println(c1.getName());
        System.out.println(c2.getName());
        System.out.println(c3.getName());

        int arr[] = {1,2,3};
        int arr2[][] = {{1,2,3,4},{1}};

        Class<?> c4 = arr.getClass();
        Class<?> c5 = arr.getClass();

        Class<?> c6 = int.class;
        System.out.println(c4.getName());
        System.out.println(c5.getName());
        System.out.println(c6.getName());
        System.out.println((c4 == c5));
        System.out.println((c4 == c6));
    }
}
【:代表是数组, I代表是整数
lesson2:
在\a\b\c\d这个目录下
package a.b.c.d;

public class Person {
    private String name;

    void setName(String name) { this.name = name; }
    String getName() { return this.name; }

    public Person() {
        System.out.println("Constructor of Person");
    }
    public Person(String name) {
        this.name = name;
        System.out.println("Constructor2 of Person, name is "+this.name);
    }
};
在根目录下
使用反射则不需要再使用import了
//import a.b.c.d.Person;

import java.lang.reflect.Constructor;

public class Reflect {
    public static void main(String args[]) throws Exception {
        Class<?> c = null;

        try {
            c = Class.forName("a.b.c.d.Person");
        } catch (ClassNotFoundException e) {
            System.out.println(e);
        }

        Object p = null;

        try {
            p = c.newInstance();
        } catch (InstantiationException e) {
            System.out.println(e);
        }
        //带参数的构造
        Constructor<?> con = c.getConstructor(String.class);
        Object p2 = con.newInstance("weidongshan");
        //获得类的方法
Method set = c.getMethod("setName", String.class);
//对象使用方法
        set.invoke(p2, "123");
        set.invoke(p, "abc");

        Method get = c.getMethod("getName");

        System.out.println(get.invoke(p));
        System.out.println(get.invoke(p2));

        //获得和设置属性:不建议用,会破坏封装性
        //获得属性:可以是公有的和私有的
Field name = c.getDeclaredField("name");
        //获得属性:只能是公有的
//Field name = c.getField("name");
        //设置属性为可被外部访问的,也就是public
        //name.setAccessible(true);

        name.set(p, "www");
        name.set(p2, "100ask");
        System.out.println(name.get(p));
        System.out.println(name.get(p2));
}
}

lesson3:
lesson3:
在\a\b\c\d这个目录下再增加一个Student.java文件
package a.b.c.d;

public class Student {
    public String name;

    public void setName(String name) { this.name = name; }
    public String getName() { return this.name; }

    public Student() {
        System.out.println("Constructor of Student");
    }
    public Student(String name) {
        this.name = name;
        System.out.println("Constructor2 of Student, name is "+this.name);
    }
};
//根目录修改为
public class Reflect {
    public static void main(String args[]) throws Exception {
        Class<?> c = null;

        try {
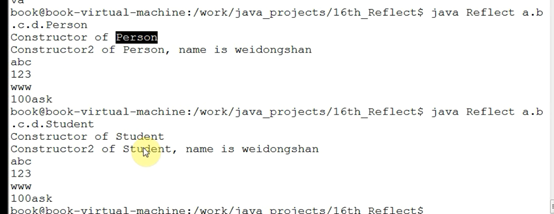
            c = Class.forName(args[0]);   //就修改这里,其他地方一样
        } catch (ClassNotFoundException e) {
            System.out.println(e);
        }

        。。。
}
更加不同参数或者配置文件,可以实例化不同的对象,更加增加了灵活性
线程


