使用PrintDocument定制打印格式
虽然说使在IE上直接调用打印插件打印已经不常用,但是有时候还是会用到,这里就记录一下。
首先我们列出来我们的打印类

  1     public class PrintService
  2     {
  3         //打印机名称
  4         private static readonly string _printerName = "";
  5         //业务名称
  6         private static string _printStr = "";
  7
  8         /// <summary>
  9         /// 打印
 10         /// </summary>
 11         /// <param name="printStr"></param>
 12         /// <returns>0:success;1:未找到打印机;2:fail</returns>
 13         public static int PrintNo(string printStr)
 14         {
 15             try
 16             {
 17                 _printStr = printStr;
 18                 PrintDocument pd = new PrintDocument();
 19                 //取消打印弹窗(PrintDocment默认的PrintController 是PrintControllerWithStatusDialog)
 20                 pd.PrintController = new StandardPrintController();
 21                 //pd.PrinterSettings.PrinterName = "打印机的名字";
 22                 //打印机名称可以不配置,取默认打印机
 23                 pd.DocumentName = string.Format("取号{0:yyyyMMddHHmmss}", DateTime.Now);
 24                 pd.OriginAtMargins = true;
 25                 pd.DefaultPageSettings.Margins = new Margins(0, 0, 0, 20);
 26                 //打印开始前
 27                 pd.BeginPrint += new PrintEventHandler(pd_BeginPrint);
 28                 //打印输出(过程)
 29                 pd.PrintPage += new PrintPageEventHandler(pd_PrintPage);
 30                 //打印结束
 31                 pd.EndPrint += new PrintEventHandler(pd_EndPrint);
 32                 pd.Print();
 33
 34                 return 0;
 35             }
 36             catch (Exception ex)
 37             {
 38                 NLog.Error(ex.ToString());
 39                 return 2;
 40             }
 41         }
 42
 43         private static void pd_EndPrint(object sender, PrintEventArgs e)
 44         {
 45             //打印结束后相关操作
 46         }
 47
 48         private static void pd_PrintPage(object sender, PrintPageEventArgs e)
 49         {
 50             try
 51             {
 52                 int pagewidth = e.MarginBounds.Width;
 53                 float y = 0;
 54                 _title = _title ?? string.Empty;
 55                 int titlerowspan = (_title.Length / 11) + 1;
 56                 y = CreateRectangleF(0, y, pagewidth, e.Graphics.MeasureString("-", new Font("微软雅黑", 14, FontStyle.Bold)).Height, "------------------------------------", new Font("微软雅黑", 14, FontStyle.Bold), e);
 57                 y = CreateRectangleF(0, y, pagewidth, e.Graphics.MeasureString("中A1", new Font("宋体", 11, FontStyle.Bold)).Height, _printStr, new Font("宋体", 11, FontStyle.Bold), e);
 58             }
 59             catch (InvalidPrinterException ex)
 60             {
 61                 return;
 62             }
 63         }
 64
 65         private static void pd_BeginPrint(object sender, PrintEventArgs e)
 66         {
 67             //也可以把一些打印的参数放在此处设置;
 68         }
 69
 70         /// <summary>
 71         /// 绘制一个矩形区域文本文字
 72         /// </summary>
 73         private static float CreateRectangleF(float x, float y, float width, float height, string str, Font font, PrintPageEventArgs e)
 74         {
 75             StringFormat sf = new StringFormat { LineAlignment = StringAlignment.Center, Alignment = StringAlignment.Center };
 76             //RectangleF rect = new RectangleF(x, y, width, height);
 77             var size = MeasureStringExtend(e.Graphics, str, font, (int)width);
 78             RectangleF rect = new RectangleF(x,y,size.Width, size.Height);
 79             e.Graphics.DrawString(str, font, System.Drawing.Brushes.Black, rect, sf);
 80             return rect.Bottom;
 81         }
 82         //多行文本自动换行
 83         public static SizeF MeasureStringExtend(Graphics g, string text, Font font, int desWidth)
 84         {
 85             string tempString = text;
 86             string workString = "";//当前打印的文本
 87             int npos = 1;//文字个数
 88             int sp_pos = 0;//
 89             int line = 0;//所在行数
 90             int nWidth = 0;
 91
 92             //获取文字的Size对象
 93             SizeF size = g.MeasureString(text, font);
 94             //多行文本:文本的宽度大于纸张的宽度
 95             if (size.Width > desWidth)
 96             {
 97                 while (tempString.Length > 0)
 98                 {
 99                     //判断最后一行
100                     if (npos > tempString.Length)
101                     {
102                         line++;
103                         break;
104                     }
105                     //截取npos个文字,用于检测是否超出纸张宽度
106                     workString = tempString.Substring(0, npos);
107                     //获取当前文本的宽度
108                     nWidth = (int)g.MeasureString(workString, font).Width;
109                     //仍然大于纸张宽度
110                     if (nWidth > desWidth)
111                     {
112                         //最后一个空格的位置
113                         sp_pos = workString.LastIndexOf(" ");
114                         if (sp_pos > 0)
115                         {
116                             //从空格后一个字符作为起点,继续循环,可用于去除空格。这里并没有这么做。
117                             tempString = tempString.Substring((sp_pos + 1), tempString.Length - (sp_pos + 1));
118                             line++;
119                             npos = 0;
120                         }
121                         else //没有空格
122                         {
123                             tempString = tempString.Substring(npos, tempString.Length - npos);
124                             line++;
125                             npos = 0;
126                         }
127                     }
128                     npos++;
129                 }
130                 return new SizeF(desWidth, (line * size.Height));
131             }
132             else
133                 return size;
134
135         }
136     }
调用的时候
PrintSrivce.PrintNo(“这里是打印的文字内容,可以写很多,它会自动换行哦”);
为了做成Acivex插件,所以这里我们这么做:
1     [Guid("F83174A0-087D-4634-B6AE-0094CD392FD1")]//IE浏览器通过这个GUID可以查到打印方法,调用打印方法,打印。
2     public class PrinterHelper:ActiveXControl
3     {
4         public int Printing(string printStr)
5         {
6             return PrintService.PrintNo(printStr);
7         }
8     }
下面是打印的HTML页面
<object id="printer-ActiveX" classid="clsid:F83174A0-087D-4634-B6AE-0094CD392FD1" codebase="Printer.CAB#version=1,0,0" style="display: none;"></object>
1 var printerActiveX = document.getElementById('printer-ActiveX');
2 printerActiveX.Printing('这里是打印的文字内容,可以写很多,它会自动换行哦');
为什么这样就可以打印了呢?
其实之前省略了如何制作Acivex的步骤,下面介绍一下:
一、IObjectSafety接口
为了让ActiveX控件获得客户端的信任,控件类还需要实现一个名为“IObjectSafety”的接口。先创建该接口(注意,不能修改该接口的GUID值),接口内容如下:
 1     ComImport, Guid("CB5BDC81-93C1-11CF-8F20-00805F2CD064")]
 2     [InterfaceType(ComInterfaceType.InterfaceIsIUnknown)]
 3     public interface IObjectSafety
 4     {
 5         [PreserveSig]
 6         int GetInterfaceSafetyOptions(ref Guid riid, [MarshalAs(UnmanagedType.U4)] ref int pdwSupportedOptions, [MarshalAs(UnmanagedType.U4)] ref int pdwEnabledOptions);
 7
 8         [PreserveSig()]
 9         int SetInterfaceSafetyOptions(ref Guid riid, [MarshalAs(UnmanagedType.U4)] int dwOptionSetMask, [MarshalAs(UnmanagedType.U4)] int dwEnabledOptions);
10     }
二、ActiveXControl控件基类

 1     public abstract class ActiveXControl : IObjectSafety
 2     {
 3         #region IObjectSafety 成员
 4
 5         private const string _IID_IDispatch = "{00020400-0000-0000-C000-000000000046}";
 6         private const string _IID_IDispatchEx = "{a6ef9860-c720-11d0-9337-00a0c90dcaa9}";
 7         private const string _IID_IPersistStorage = "{0000010A-0000-0000-C000-000000000046}";
 8         private const string _IID_IPersistStream = "{00000109-0000-0000-C000-000000000046}";
 9         private const string _IID_IPersistPropertyBag = "{37D84F60-42CB-11CE-8135-00AA004BB851}";
10
11         private const int INTERFACESAFE_FOR_UNTRUSTED_CALLER = 0x00000001;
12         private const int INTERFACESAFE_FOR_UNTRUSTED_DATA = 0x00000002;
13         private const int S_OK = 0;
14         private const int E_FAIL = unchecked((int)0x80004005);
15         private const int E_NOINTERFACE = unchecked((int)0x80004002);
16
17         private bool _fSafeForScripting = true;
18         private bool _fSafeForInitializing = true;
19
20
21         public int GetInterfaceSafetyOptions(ref Guid riid, ref int pdwSupportedOptions, ref int pdwEnabledOptions)
22         {
23             int Rslt = E_FAIL;
24
25             string strGUID = riid.ToString("B");
26             pdwSupportedOptions = INTERFACESAFE_FOR_UNTRUSTED_CALLER | INTERFACESAFE_FOR_UNTRUSTED_DATA;
27             switch (strGUID)
28             {
29                 case _IID_IDispatch:
30                 case _IID_IDispatchEx:
31                     Rslt = S_OK;
32                     pdwEnabledOptions = 0;
33                     if (_fSafeForScripting == true)
34                         pdwEnabledOptions = INTERFACESAFE_FOR_UNTRUSTED_CALLER;
35                     break;
36                 case _IID_IPersistStorage:
37                 case _IID_IPersistStream:
38                 case _IID_IPersistPropertyBag:
39                     Rslt = S_OK;
40                     pdwEnabledOptions = 0;
41                     if (_fSafeForInitializing == true)
42                         pdwEnabledOptions = INTERFACESAFE_FOR_UNTRUSTED_DATA;
43                     break;
44                 default:
45                     Rslt = E_NOINTERFACE;
46                     break;
47             }
48
49             return Rslt;
50         }
51
52         public int SetInterfaceSafetyOptions(ref Guid riid, int dwOptionSetMask, int dwEnabledOptions)
53         {
54             int Rslt = E_FAIL;
55
56             string strGUID = riid.ToString("B");
57             switch (strGUID)
58             {
59                 case _IID_IDispatch:
60                 case _IID_IDispatchEx:
61                     if (((dwEnabledOptions & dwOptionSetMask) == INTERFACESAFE_FOR_UNTRUSTED_CALLER) &&
62                             (_fSafeForScripting == true))
63                         Rslt = S_OK;
64                     break;
65                 case _IID_IPersistStorage:
66                 case _IID_IPersistStream:
67                 case _IID_IPersistPropertyBag:
68                     if (((dwEnabledOptions & dwOptionSetMask) == INTERFACESAFE_FOR_UNTRUSTED_DATA) &&
69                             (_fSafeForInitializing == true))
70                         Rslt = S_OK;
71                     break;
72                 default:
73                     Rslt = E_NOINTERFACE;
74                     break;
75             }
76
77             return Rslt;
78         }
79
80         #endregion
81     }
三、就是我们上面写的PrinterHelper类,并在这个类库的属性里设置“使程序集COM可见”。
四、使用VS2012发布
具体步骤如下:
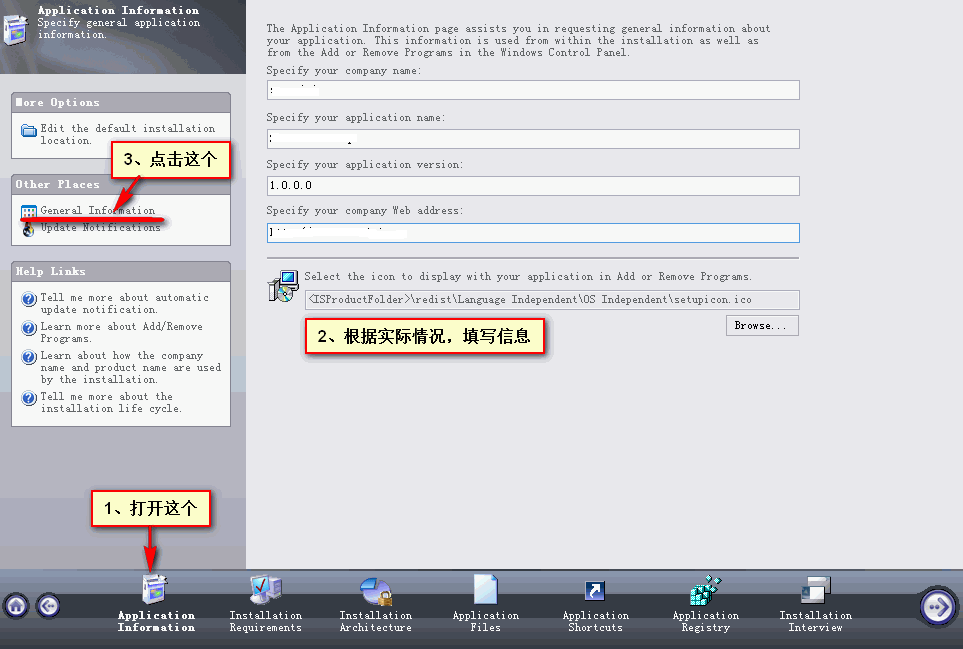
1、

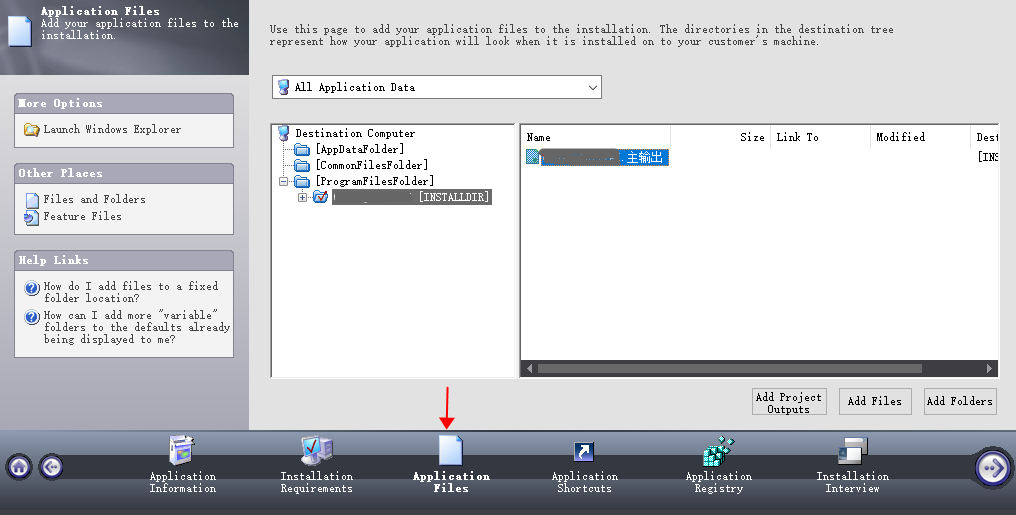
2、

3、


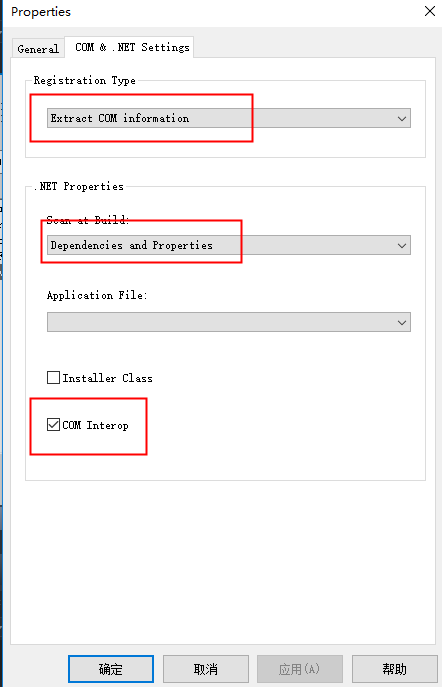
5、这一步很重要,在主输出上点右键属性

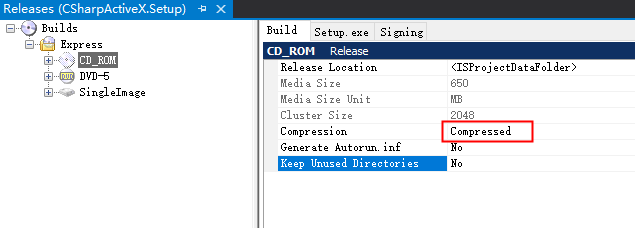
6、点击“6 Prepare for Release”下方的Release

注意点:该解决方案需要以管理员身份运行。
生成两个文件:
PrinterActiveX.MSI和Data1.cab
剩下一步就是签名了。
makecab.exe   /f   "cab.ddf"
signtool sign -f mantishell.pfx -p mantishell PrinterActiveX.CAB
.OPTION   EXPLICIT
.Set Cabinet=on
.Set Compress=on
.Set MaxDiskSize=CDROM
.Set ReservePerCabinetSize=6144
.Set DiskDirectoryTemplate="."
.Set CompressionType=MSZIP
.Set CompressionLevel=7
.Set CompressionMemory=21
.Set CabinetNameTemplate="PrinterActiveX.CAB"
"installer.inf"
"PrinterActiveX.MSI"
"Data1.cab"
1、生成公钥文件
makecert -# 01 -r -n "CN=xxxx公司,O=xxxx,OU=xxxx,C=China,S=NanJing" -e 08/07/2019 -sky signature -sv mantishell.pvk d:\mantishell.cer
-e表示截至时间:如果去掉截至时间到2039年
私钥密码设置为:mantishell
2、生成证书
pvk2pfx.exe /pvk mantishell.pvk /pi mantishell /spc mantishell.cer /pfx mantishell.pfx /f
makecert -# 01 -r -n "CN=xxxx公司,O=xxxx公司,OU=xxxx公司,C=China,S=Nanjing" -sky signature -sv d:\ActiveX\CAB\mantishell.pvk d:\ActiveX\PrinterActiveX\CAB\mantishell.cer


 浙公网安备 33010602011771号