Update Firmware for EtherCAT Devices (“FoE”)
The “File over EtherCAT” (FoE) communications protocol makes it possible to transfer files within an EtherCAT system. Communication via FoE can be used in parallel to process data communication. The update mechanism via FoE is defined by the EtherCAT specification and is already implemented and usable for many EtherCAT devices.
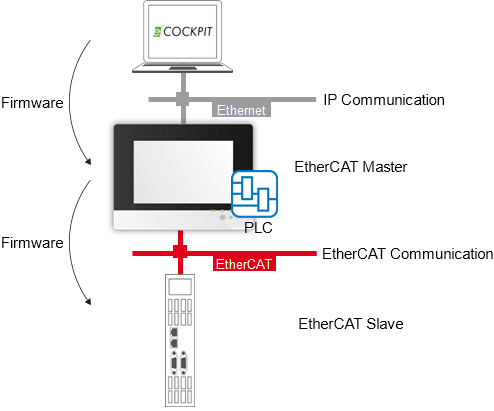
In this example, you use FoE to update the firmware for an EtherCAT slave. To do this, the slave is set to a special mode (“bootstrap”). The firmware is uploaded to the slave in the form of a file with a specific name (device-specific) and used as new firmware after a restart. Using FoE, this update can be made from a connected WAGO controller without connecting the slave to an engineering PC directly.
 Transfer Firmware to an EtherCAT Slave
Requirements
- The EtherCAT slave is connected to a WAGO controller (PFC, TP600 or Edge Controller).
- The WAGO controller is connected to an engineering PC on whiche!COCKPIT is installed.
- The WAGO controller is configured as the EtherCAT master.
- The network structure is configured in e!COCKPIT. There is an EtherCAT connection between devices.
- The state of the EtherCAT Master is set to “RUN” (e.g., via the [Start] button in the ribbon, “PROGRAM” tab).
- The “Automatic Restart Slaves” must be disabled for the EtherCAT Master .
If necessary, check in the “Settings” control panel > “EtherCAT” tab > [Interface Settings]. Automatic restart must be disabled so that the slave can be switched to “Bootstrap” mode required for the update and the system does not immediately switch back to “Operational” mode.
Update the Firmware
- Save the required firmware files on your PC.
Tip: You can download the current firmware in the Download area at http://www.wago.com. - Select the EtherCAT slave in the project.
- Click [Interface Settings] in the “Settings” control panel in the “EtherCAT” tab.
- Select the “Enable Expert Settings” option in the ” EtherCAT Interface Settings” dialog for the slave.
This setting is required to display the required “Online” Tab in the fieldbus configurator. - Close the dialog.
- Go online by clicking the [Connect] button.
- Open the fieldbus configurator of the connection.
- Open the “Online” Tab in the fieldbus configurator.
- To set the slave to EtherCAT “Bootstrap” mode, click [Bootstrap].
- Click [Download...] under “File Access over EtherCAT”.
- Select the firmware file in the PC file system and click [Open].
- Click [OK] to confirm the dialog.
- The bar graph and grayed out [Download...] button show you the progress of the firmware update.
Note: The firmware update is only complete when the button is no longer grayed out. During the update, the RUN LED on the controller flashes quickly and the DS LED flashes slowly. After the firmware update has been completed, the DS LED flashes red / green and the controller restarts. - In the “PROGRAM” ribbon, click [Reset (cold)] to restart the EtherCAT network.
- The EtherCAT slave has the new firmware after restarting.
Note: If the device description file has changed in addition to the firmware and you have it, update the device description via the Backstage view (“Product Catalog” page > “Import device”).


