webpack学习笔记
一、简介
webpack:JavaScript应用的静态模块打包工具
grunt/gulp(其它打包工具)
grunt/gulp的核心是配置一系列的task,定义task要处理的事务(es6、ts转换,图片压缩,scss转css)
让grunt/gulp执行这些task,让整个流程自动化
grunt/gulp也被称为前端自动化任务管理工具。
当工程模块依赖非常简单是可以通过grunt/gulp进行简单的合并、压缩。
gurnt/gulp重点在于前端流程的自动化,webpack强调的是模块化开发管理,文件压缩合并只是附加功能。
二、简单使用
安装webpack
首先安装好node环境,
npm install webpack@3.6.0 -g安装低版本方便学习webpack
1.CommonJS的打包方式
// mathUtils.js
function add(num1, num2) {
  return num1 + num2;
}

function mul(num1, num2) {
  return num1 * num2;
}

module.exports = {
  add,
  mul,
}
//main.js
const {add,mul} require('mathUtils.js')
console.log(add(1, 2))
console.log(mul(1, 2))
通过webpack进行打包,执行下面的命令
webpack main.js bundle.js
<body>
</body>
<script src="./dist/bundle.js"></script>
</html>
2.ES6的打包方式
//info.js
export const name = 'outFile';
export const age = 18;
export const height = 1.88;
const { add, mul } = require('.mathUtils.js')

console.log(add(1, 2))
console.log(mul(1, 2))

import { name, age, height } from '.info'
console.log(name, age)
console.log(height)
重新执行打包命令
三、webpack配置
1.简单配置
在项目目录下新建一个webpack.config.js文件
const path = require('path')
module.export = {
  //输入,入口
  entry: '/src/main.js',
  //输出
  output: {
    // 需要动态获取
    path: './dist/',
    filename: 'bundle.js'
  },
}
注:path需要动态获取,不能写死也不能写相对路径,这个时候就需要用的node的path了
依赖node的环境,需要先进行初始化npm init,会生成一个package.json的文件(npm包管理)。如果有依赖需要再执行npm install,最后再执行webpack
2.与npm build做映射
修改package.json
{
  "name": "meetwebpack",
  "version": "1.0.0",
  "description": "",
  "main": "index.js",
  "scripts": {
    "test": "echo \"Error: no test specified\" && exit 1",
    //添加命令,优先从本地查找命令,如果是终端运行是先从全局查找
    "build": "webpack"
  },
  "author": "",
  "license": "ISC"
}
要保证局部的webpack版本与使用的一致,安装webpack时一般
npm install webpack@3.6.0 --save-dev,表示开发时依赖,项目打包后不再继续使用。
四、loader
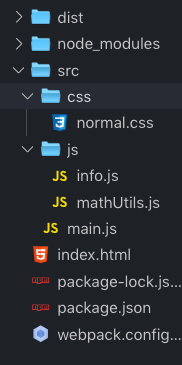
当我们将css样式也当做模块化开发时,就不能像以前一样再通过一个个链接引用了,而应该使用模块化的思想,新建一个样式,并在入口js中引用,通过
webpack进行打包,首先查看目录。
1.简单使用
/* normal.css */
body{
  background-color: red
}
...
//main.js中引用
require('./css/normal.css')
通过webpack进行打包

提示You may need an appropriate loader to handle this file type报错信息。
我们需要将ES6转换为ES5的代码,typescript转成ES5,或者是将scss、less转成css等等,就需要给webpack扩展对应的loader。
首先需要通过npm安装需要使用的loader,然后在webpack.config.js中的modules关键字下进行配置
1.安装对应的loader
npm install --save-dev css-loader
2.在webpack.config.js中配置
const path = require('path')
module.exports = {
  entry: './src/main.js',
  output: {
    // 需要动态获取
    path: path.resolve(__dirname, 'dist'),
    filename: 'bundle1.js'
  },
  module:{
    rules: [
      { test: /\.css$/, use: 'css-loader' },
    ]
  }
}
注:css-loader只负责文件加载,所以还需要安装style-loader将样式添加到dom中,执行命令npm install --save-dev style-loader
在规则中继续配置
...
module: {
    rules: [
        // 使用多个loader时,从右往左
      { test: /\.css$/, use: ['style-loader', 'css-loader'] },
    ]
  }
要是需要使用less,可以参考webpack官网,配置less-lader
2.在css中添加图片
body{
  background: url("../img/2.jpg")
}
直接通过
webpack打包发现,需要安装loader,于是我们先安装url-loader
配置webpack_config.js:
module.exports = {
  module: {
    rules: [
      {
        test: /\.(png|jpg|gif)$/,
        use: [
          {
            loader: 'url-loader',
            options: {
              //当图片小于limit时,会将图片编译成base64字符串形式。
              //当图片大于limit时,需要使用file-loader模块进行加载,通过npm安装
              limit: 8192
            }
          }
        ]
      }
    ]
  }
}
再次打包,访问网页会发现图片没有加载,发现
dist文件夹下慧多一个图片,
需要在webpackconfig.js中的output中配置publicPath: 'dist/',这个代表在路径前加入dist/
图片的命名规则为32位hash值,目的是防止名字重复。但是实际开发中需要使用原来的名字,还要防止重复。所以我们可以在option中添加以下参数
- img:文件要打包到的文件夹
- name:获取图片原来的名字,放在该位置
- hash:8:为了防止图片名称冲突,依然使用hash,但是我们只保留8位
- ext:使用图片原来的扩展名
{
            loader: 'url-loader',
            options: {
              limit: 6000,
              // 变量名要使用中括号,hash取八位
              name: 'img/[name].[hash:8].[ext]'
            },

          }
3.ES6转ES5(babel)
安装:
npm install --save-dev babel-loader@7 babel-core babel-preset-es2015
// webpackconfig.js配置规则
{
      test: /\.js$/,
      exclude: /(node_modules|bower_components)/,
      use: {
        loader: 'babel-loader',
        options: {
          presets: ['es2015']
        }
      }
    }
五、webpack配置Vue
1.简单使用
安装vue:
npm install vue --save
装好之后在main.js中引入,index.html中使用
//main.js
...
import Vue from 'vue'

const app = new Vue({
  el: '#app',
  data: {
    message: 'webpack'
  }
})
<body>
  <div id="app">
    <h2>{{message}}</h2>
  </div>
</body>
编译运行,控制台报错,报错信息显示使用的
runtime-only版本的vue
runtime-only代码中不可以有任何的templateruntime-compiler可以有template,因为compiler可以编译template
修改webpack的配置信息。
module:{...},
resolve: {
    //alias别名,指定使用哪个版本的vue
    alias: {
      'vue$': 'vue/dist/vue.esm.js'
    }
  }
2.el和template的区别
1.同时有el和template时,会将el替换成template的内容。
//main.js
new Vue({
  el: '#app',
  // 同时有el有template会自动替换vue挂载的地方
  template:
    `<div>
      <h2>{{message}}</h2>
      <button>按钮</button>
    </div>`
  ,
  data: {
    message: 'webpack'
  }
})
六、plugin
webpack现有功能的扩展,比如打包优化,文件压缩等等。
与loader的区别:
- loader主要用于转换类型,是一个转换器
- plugin是扩展器。
使用步骤与loader类似,通过npm安装,再在webpack.config.js中配置即可。
1.版权声明插件
const webpack = require('webpack')

module.exports = {
  ...
  plugins:[
    new webpack.BannerPlugin('最终版权归xx所有')
  ]
}
重新打包即可看到信息。
2.打包html的plugin
自动生成
index.html文件(可以指定模板来生成),将打包的js文件,通过script插入到body中
npm install html-webpack-plugin --save-dev
//webpack.config.js
const HtmlWebpackPlugin = require('html-webpack-plugin')

//plugins中添加
plugin:[
    new HtmlWebpackPlugin({
      template:'index.html' //根据index.html模板生成index.html文件
    })
]
注:这个时候需要注释之前的publicPath:'dist/'
3.js压缩
npm insall uglifyjs-webpack-plugin --save-dev
//webpack.config.js

cost uglifyjsPlugin = require('uglifyJsPlugin-webpack-plugin')
plugins:[
    new uglifyJsPlugin()
]


