Nginx的继续学习
一、Nginx的优点
- 资源消耗低,性能强;
- 成本低;
- 支持压缩功能;
- 支持高可用配置,稳定;
二、Nginx编译安装
2.1、Nginx的版本
nginx.com 商业版
nginx.org 开源版
Tegine 淘宝开发版本
2.2、安装方式
rpm包安装;
yum工具安装;
源代码编译安装,指定安装路径,开启nginx的第三方功能;
2.3、安装依赖包
yum -y install make zlib-devel gcc *c++ libtool opensl openssl-devel autoconf automake make zlib zlib-devel pcre pcre-devel wget httpd-tools vim
2.4、下载安装包
[root@localhost opt]# wget http://nginx.org/download/nginx-1.18.0.tar.gz
淘宝nginx下载
wget https://tengine.taobao.org/download/tengine-2.3.3.tar.gz
2.5、解压缩
[root@localhost opt]# tar -zxvf tengine-2.3.3.tar.gz
解压缩后查看
[root@localhost tengine-2.3.3]# ll
total 388
-rw-rw-r--.  1 root root    931 Mar 29  2021 AUTHORS.te
drwxrwxr-x.  6 root root   4096 Mar 29  2021 auto
-rw-rw-r--.  1 root root 302927 Mar 29  2021 CHANGES
-rw-rw-r--.  1 root root  27289 Mar 29  2021 CHANGES.cn
-rw-rw-r--.  1 root root  34831 Mar 29  2021 CHANGES.te
drwxrwxr-x.  2 root root    184 Mar 29  2021 conf
-rwxrwxr-x.  1 root root   2502 Mar 29  2021 configure
drwxrwxr-x.  4 root root    109 Mar 29  2021 contrib
drwxrwxr-x.  4 root root     67 Mar 29  2021 docs
drwxrwxr-x.  2 root root     40 Mar 29  2021 html
-rw-rw-r--.  1 root root   1715 Mar 29  2021 LICENSE
drwxrwxr-x.  2 root root     21 Mar 29  2021 man
drwxrwxr-x. 26 root root   4096 Mar 29  2021 modules
drwxrwxr-x.  3 root root     20 Mar 29  2021 packages
-rw-rw-r--.  1 root root   3450 Mar 29  2021 README.markdown
drwxrwxr-x. 10 root root    103 Mar 29  2021 src
drwxrwxr-x.  4 root root     43 Mar 29  2021 tests
-rw-rw-r--.  1 root root     43 Mar 29  2021 THANKS.te
2.6、编译安装
./configure --prefix=/opt/tenginx232 --with-http_ssl_module --with-http_flv_module --with-http_gzip_static_module --with-http_stub_status_module --with-threads --with-file-aio
输入make指令
make
输入make install指令
make install
安装完成查看
[root@localhost tenginx232]# ls
conf  html  logs  sbin
conf 保存配置文件;
html 保存网页根目录;
logs 日志;
sbin 可执行命令;
访问测试

2.7、将nginx变量写入环境变量
[root@localhost sbin]# cd /etc/profile.d
[root@localhost profile.d]# vi nginx.sh
export PATH="$PATH:/opt/tenginx232/sbin/"
写入后需要重新登陆
三、Nginx配置文件
3.1、配置文件在vim下高亮显示
[root@localhost ~]# mkdir -p ~/.vim
[root@localhost ~]# cp -r /opt/tengine-2.3.3/contrib/vim/* ~/.vim
3.2、简介配置
1~6行,全局配置参数
7~9行,链接数限制
10~27行,核心配置参数
15~21行,虚拟主机配置
        #user  nobody;
        worker_processes  1;
        #error_log  logs/error.log;
      4 #error_log  logs/error.log  notice;
      5 #error_log  logs/error.log  info;
      6 #error_log  "pipe:rollback logs/error_log interval=1d baknum=7 maxsize=2G";
      7 events {
      8     worker_connections  1024;
      9 }
     10 http {
     11     include       mime.types;
     12     default_type  application/octet-stream;
     13     sendfile        on;
     14     keepalive_timeout  65;
     15     server {
     16         listen       80;
     17         server_name  localhost;
     18         location / {
     19             root   html;
     20             index  index.html index.htm;
     21         }
     22         error_page   500 502 503 504  /50x.html;
     23         location = /50x.html {
     24             root   html;
     25         }
     26     }
     27 }
3.4、配置文件语法
- 由指令和指令块组成;
- 每行语句由分号结束;
- 支持$变量
- 支持include语句,组合多个配置文件 include /*.conf;
① user www;修改用户需要重新载入
② worker_processes; 建议设置为CPU的总核心数
③ gzip 压缩功能
④ upstream 配置负载均衡
    upstream dubbo_backend {
        multi 1;
        server 127.0.0.1:20880;
     }
支持四种方式的分配:1、轮询(默认);2、weight;3、ip_hash;4、url_hash
⑤ server 虚拟主机配置

四、Nginx常用命令
4.1、启动
[root@localhost ~]# nginx
4.2、停止
[root@localhost ~]# nginx -s stop
4.3、重新加载
[root@localhost ~]# nginx -s reload
4.4、查看版本
[root@localhost ~]# nginx -V
Tengine version: Tengine/2.3.3
nginx version: nginx/1.18.0
built by gcc 4.8.5 20150623 (Red Hat 4.8.5-44) (GCC)
built with OpenSSL 1.0.2k-fips  26 Jan 2017
TLS SNI support enabled
configure arguments: --prefix=/opt/tenginx232 --with-http_ssl_module --with-http_flv_module --with-http_gzip_static_module --with-http_stub_status_module --with-threads --with-file-aio
4.5、检查配置
[root@localhost ~]# nginx -t
nginx: the configuration file /opt/tenginx232/conf/nginx.conf syntax is ok
nginx: configuration file /opt/tenginx232/conf/nginx.conf test is successful
五、Nginx热部署功能(版本升级)
5.1、查看旧的版本
[root@localhost ~]# nginx -v
Tengine version: Tengine/2.3.3
nginx version: nginx/1.18.0
运行状态
[root@localhost ~]#


root       3846      1  0 00:38 ?        00:00:00 nginx: master process nginx
www        3850   3846  0 00:38 ?        00:00:00 nginx: worker process
www        3851   3846  0 00:38 ?        00:00:00 nginx: worker process
查看编译参数
[root@localhost sbin]# nginx -V
Tengine version: Tengine/2.3.3
nginx version: nginx/1.18.0
built by gcc 4.8.5 20150623 (Red Hat 4.8.5-44) (GCC)
built with OpenSSL 1.0.2k-fips  26 Jan 2017
TLS SNI support enabled
configure arguments: --prefix=/opt/tenginx232 --with-http_ssl_module --with-http_flv_module --with-http_gzip_static_module --with-http_stub_status_module --with-threads --with-file-aio
5.2、备份旧的版本命令
[root@localhost sbin]# mv nginx nginx232
5.3、下载新的版本
[root@localhost opt]# wget https://tengine.taobao.org/download/tengine-2.4.0.tar.gz
解压缩
[root@localhost opt]# tar -zxvf tengine-2.4.0.tar.gz
进入解压目录编译安装,参数和上一版本一致
[root@localhost opt]# cd tengine-2.4.0
[root@localhost tengine-2.4.0]# ls
AUTHORS.te  CHANGES     CHANGES.te  configure  docs  LICENSE  modules   README.markdown  tests
auto        CHANGES.cn  conf        contrib    html  man      packages  src              THANKS.te
[root@localhost tengine-2.4.0]# ./configure --prefix=/opt/tenginx232 --with-http_ssl_module --with-http_flv_module --with-http_gzip_static_module --with-http_stub_status_module --with-threads --with-file-aio
make安装
[root@localhost tengine-2.4.0]# make && make install
5.4、升级成功
[root@localhost sbin]# ./nginx -v
Tengine version: Tengine/2.4.0
nginx version: nginx/1.22.1
六、Nginx日志
6.1、日志位置
[root@localhost logs]# ll
total 12
-rw-r--r--. 1 root root  409 Mar 29 03:58 access.log
-rw-r--r--. 1 root root 2889 Mar 31 06:13 error.log
-rw-r--r--  1 root root    5 Mar 31 20:43 nginx.pid
6.2、用ab命令测试给服务器发请求
[root@localhost logs]# ab -kc 1000 -n 20000 http://192.168.43.29/
6.3、nginx日志切割
首先移动原有日志
[root@localhost logs]# mv access.log access.log_$(date +"%Y-%m-%d")
重新加载日志
[root@localhost logs]# nginx -s reopen
编写一个日志分割脚本
[root@localhost myscript]# vi cut_nginxlog.sh
#! /bin/bash

logs_path="/opt/tenginx232/logs/"
mkdir -p ${logs_path}$(date -d "yesterday" +"%Y")/$(date -d "yesterday" +"%m")
mv ${logs_path}access.log ${logs_path}$(date -d "yesterday" +"%Y")/$(date -d "yesterday" +"%m")/access_$(date -d 'yesterday' +"%Y-%m-%d").log

kill -USR1 `cat ${logs_path}nginx.pid`
将脚本添加到定时任务
[root@localhost myscript]# crontab -e
0 0 * * * /bin/bash  /opt/myscript/cut_nginxlog.sh
七、Nginx静态网站搭建
利用nginx的虚拟主机的功能,可以基于一台服务器,一个nginx进程,实现多个站点的配置;
7.1、静态网站搭建
实验修改server虚拟主机的location字段:
        location / {
            root   /www/html;
            index  index.html index.htm;
        }
然后添加一个index.html,访问测试
[root@localhost ~]# mkdir -p /www/html
[root@localhost ~]# cd /www/html/
[root@localhost html]# ls
[root@localhost html]# vi index.html
7.2、静态资源压缩
修改配置文件,添加压缩相关的参数;
user  www;
worker_processes  2;
events {
    worker_connections  1024;
}
http {
    include       mime.types;
    default_type  application/octet-stream;
    sendfile        on;
    keepalive_timeout  65;

    gzip on;      # 开启压缩
    gzip_http_version 1.1;
    gzip_comp_level 4;     #设置压缩级别,越高资源消耗越大,但压缩效果越好
    gzip_types text/plain application/javascript text/css application/xml text/javascript image/jpeg image/gif image/png;    #指定会被压缩的文件类型

    server {
        listen       80;
        server_name  localhost;
        charset utf-8;
        location / {
            root   /www/html;
            index  index.html index.htm;
        }
        error_page   500 502 503 504  /50x.html;
        location = /50x.html {
            root   html;
        }
    }
}
重新加载生效
[root@localhost html]# nginx -s reload
八、基于多IP的虚拟主机配置
8.1、给虚拟机添加两个测试地址
[root@localhost html]# ifconfig ens33:1 192.168.43.145 netmask 255.255.255.0  broadcast 192.168.43.255 up
[root@localhost html]# ifconfig ens33:2 192.168.43.146 netmask 255.255.255.0  broadcast 192.168.43.255 up
[root@localhost html]# ping 192.168.43.145
PING 192.168.43.145 (192.168.43.145) 56(84) bytes of data.
64 bytes from 192.168.43.145: icmp_seq=1 ttl=64 time=0.052 ms
^C
--- 192.168.43.145 ping statistics ---
1 packets transmitted, 1 received, 0% packet loss, time 0ms
rtt min/avg/max/mdev = 0.052/0.052/0.052/0.000 ms
[root@localhost html]# ping 192.168.43.146
PING 192.168.43.146 (192.168.43.146) 56(84) bytes of data.
64 bytes from 192.168.43.146: icmp_seq=1 ttl=64 time=0.049 ms
^C
--- 192.168.43.146 ping statistics ---
1 packets transmitted, 1 received, 0% packet loss, time 0ms
rtt min/avg/max/mdev = 0.049/0.049/0.049/0.000 ms
8.2、配置三个server,修改listen和location的位置
[root@localhost conf]# cat nginx.conf
user  www;
worker_processes  2;
events {
    worker_connections  1024;
}
http {
    include       mime.types;
    default_type  application/octet-stream;
    sendfile        on;
    keepalive_timeout  65;

    gzip on;
    gzip_http_version 1.1;
    gzip_comp_level 4;
    gzip_types text/plain application/javascript text/css application/xml text/javascript image/jpeg image/gif image/png;

    server {
        listen   192.168.43.29:80;
        server_name  localhost;
        charset utf-8;
        location / {
            root   /www/29;
            index  index.html index.htm;
        }
        error_page   500 502 503 504  /50x.html;
        location = /50x.html {
            root   html;
        }
    }

    server {
        listen   192.168.43.145:80;
        server_name  localhost;
        charset utf-8;
        location / {
            root   /www/145;
            index  index.html index.htm;
        }
        error_page   500 502 503 504  /50x.html;
        location = /50x.html {
            root   html;
        }
    }

    server {
        listen   192.168.43.146:80;
        server_name  localhost;
        charset utf-8;
        location / {
            root   /www/146;
            index  index.html index.htm;
        }
        error_page   500 502 503 504  /50x.html;
        location = /50x.html {
            root   html;
        }
    }
}
8.3、准备访问的数据文件
[root@localhost www]# mkdir 29 145 146
修改么每个文件夹下的index.html文件,可以区别;
重新加载,实现访问不同的IP地址,出现不同的页面;
[root@localhost html]# nginx -s reload


九、基于多域名的虚拟主机配置
9.1、修改host文件
C:\Windows\System32\drivers\etc
192.168.43.29   www.nginx01.com
192.168.43.29   www.nginx02.com
192.168.43.29   www.nginx03.com
9.2、修改配置文件
[root@www conf]# cat nginx.conf
user  www;
worker_processes  2;
events {
    worker_connections  1024;
}
http {
    include       mime.types;
    default_type  application/octet-stream;
    sendfile        on;
    keepalive_timeout  65;

    gzip on;
    gzip_http_version 1.1;
    gzip_comp_level 4;
    gzip_types text/plain application/javascript text/css application/xml text/javascript image/jpeg image/gif image/png;

    server {
        listen  80;
        server_name  www.nginx01.com;
        charset utf-8;
        location / {
            root   /www/nginx01;
            index  index.html index.htm;
        }
        error_page   500 502 503 504  /50x.html;
        location = /50x.html {
            root   html;
        }
    }

    server {
        listen  80;
        server_name  www.nginx02.com;
        charset utf-8;
        location / {
            root   /www/nginx02;
            index  index.html index.htm;
        }
        error_page   500 502 503 504  /50x.html;
        location = /50x.html {
            root   /www/nginx02;
        }
    }

    server {
        listen   80;
        server_name  www.nginx03.com;
        charset utf-8;
        location / {
            root   /www/nginx03;
            index  index.html index.htm;
        }
        error_page   500 502 503 504  /50x.html;
        location = /50x.html {
            root   html;
        }
    }
}
9.3、添加数据测试文件
root@www www]# mkdir -p {nginx01,nginx02,nginx03}
重启nginx,访问测试


十、不同虚拟主机设置不同日志
不同虚拟主机如果不设置各自的日志,日志默认保存在同一个日志文件中;
   server {
        listen  80;
        server_name  www.nginx01.com;

        access_log logs/nginx01_access.log;

        charset utf-8;
        location / {
            root   /www/nginx01;
            index  index.html index.htm;
        }
        error_page   500 502 503 504  /50x.html;
        location = /50x.html {
            root   html;
        }
    }
重新加载配置文件,配置生效;
十一、Nginx访客日志
在http代码块添加关于access日志设置的相关配置;
http {
    include       mime.types;
    default_type  application/octet-stream;
    sendfile        on;
    keepalive_timeout  65;

    log_format  main  '$remote_addr - $remote_user [$time_local] "$request" '
                      '$status $body_bytes_sent "$http_referer" '
                      '"$http_user_agent" "$http_x_forwarded_for"';

    access_log  logs/access.log  main;
    access_log  "pipe:rollback logs/access_log interval=1d baknum=7 maxsize=2G"  main;

十二、Nginx的目录浏览功能
修改配置文件,添加autoindex参数
location / {
            root   /www/nginx01;
           # index  index.html index.htm;
            autoindex on;
        }

十三、Nginx状态信息
这个功能在编译安装nginx的时候,添加--with-http-stud-status_module参数
13.1、查看nginx拥有的模块
[root@localhost ~]# nginx -V
Tengine version: Tengine/2.4.0
nginx version: nginx/1.22.1
built by gcc 4.8.5 20150623 (Red Hat 4.8.5-44) (GCC)
built with OpenSSL 1.0.2k-fips  26 Jan 2017
TLS SNI support enabled
configure arguments: --prefix=/opt/tenginx232 --with-http_ssl_module --with-http_flv_module --with-http_gzip_static_module --with-http_stub_status_module --with-threads --with-file-aio
13.2、通过添加额外配置的方式添加该模块的参数
[root@localhost conf]# mkdir extra
[root@localhost extra]# touch status.conf
server{
  listen 85;
  location /{
    stub_status on;
    access_log off;
  }
}
在nginx.conf中引用该配置
include extra/*.conf;
}
重新加载nginx
[root@localhost conf]# nginx -s reload
13.3、访问测试:

13.4、使用ab命令压力测试
[root@localhost conf]# yum install httpd-tools -y
ab命令参数:
-n 一共发送的请求数量;
-c 并发请求数量;
-k keeplive保持请求连接;
发送测试命令
[root@localhost conf]# ab -kc 100 -n 1000 http://127.0.0.1/
查看状态页面

十四、Nginx错误日志
可以写在http块中,记录所有所有虚拟主机server的错误日志,也可以单独记录在单个server块中,记录某个虚拟主机的日志。
user  root;
worker_processes 2;
error_log   logs/error.log;
http{

    server {

       error_log   logs/server1_error.log;
   }

    server {

       error_log   logs/server2_error.log;
   }
}
十五、Nginx的location匹配
根据用户的访问url,来进行不同的处理;
location / {
            root   /www/nginx01;
           # index  index.html index.htm;
            autoindex on;
        }
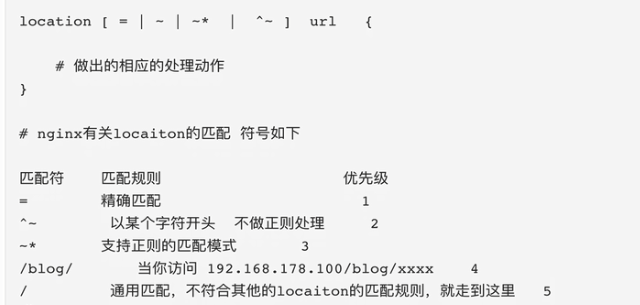
15.1、location的相关语法

在server中,可以定义多个location,对用户的url进行解析;
十六、Nginx的URL重写
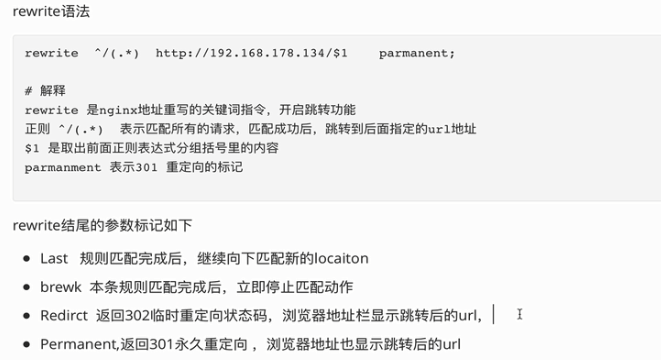
16.1、rewrite功能能够实现url跳转,实现url规范化;

16.2、实际操作
[root@www conf]# vi extra/learn_rewrite.conf

server{
  listen 90;
  server_name _;

  location / {
     rewrite ^/(.*)  http:www.baidu.com/$1  permanent;
  }
}
十七、Nginx认证
生成一个密码文件
[root@www ~]# cd /opt/tenginx232/conf/extra/
[root@www extra]# htpasswd -bc ./htpassd zs 666
Adding password for user zs
创建一个配置文件
server{
  listen 84;
  server_name _;
  location / {
    root  /www/;
    index index.html;
    auth_basic "learn nginx auth_module";
    auth_basic_user_file /opt/tenginx232/conf/extra/htpassd;
  }
}
验证

十八、LNMP架构
nginx服务器/PHP服务器 192.168.43.29 mysql服务器: 192.168.43.30
18.1、nginx安装
源代码编译安装优点:自由下载版本,自定义安装路径,自定义安装第三方扩展功能;
18.2、MySQL安装
卸载系统自带的mariadb
[root@localhost ~]# rpm -e --nodeps mariadb-libs-5.5.64-1.el7.x86_64
下载二进制包
[root@localhost opt]# wget https://downloads.mysql.com/archives/get/p/23/file/mysql-5.7.40-linux-glibc2.12-x86_64.tar.gz
添加用户
[root@localhost ~]# useradd -s /sbin/nologin mysql
解压
[root@localhost opt]# tar -zxvf mysql-5.7.40-linux-glibc2.12-x86_64.tar.gz
重命名
[root@localhost opt]# mv mysql-5.7.40-linux-glibc2.12-x86_64 mysql
编辑配置文件
vi  /etc/my.cnf

[mysqld]
basedir=/opt/mysql
datadir=/opt/mysql/data
socket=/tmp/mysql.sock
server_id=1
port=3306
log_error=/opt/mysql/data/mysql_err.log

[mysql]
安装依赖包
[root@localhost opt]# yum install libaio-devel -y
创建数据目录
[root@localhost opt]# mkdir -p /opt/mysql/data/
修改属主
[root@localhost ~]# chown -R mysql.mysql /opt/mysql
初始化数据库
[root@localhost ~]# /opt/mysql/bin/mysqld --initialize-insecure --user=mysql --basedir=/opt/mysql/ --datadir=/opt/mysql/data/
初始化完成后查看
[root@localhost data]# ls
auto.cnf    client-cert.pem  ibdata1      mysql               private_key.pem  server-key.pem
ca-key.pem  client-key.pem   ib_logfile0  mysql_err.log       public_key.pem   sys
ca.pem      ib_buffer_pool   ib_logfile1  performance_schema  server-cert.pem
编辑启动文件
vi /etc/systemd/system/mysqld.service

[Unit]
Description=MySQL Server
Documentation=man:mysqld(8)
Documentation=http://dev.mysql.com/doc/refman/en/using-systemd.html
After=network.target
After=syslog.target
[Install]
WantedBy=multi-user.target
[Service]
User=mysql
Group=mysql
ExecStart=/opt/mysql/bin/mysqld --defaults-file=/etc/my.cnf
LimitNOFILE=5000
启动数据库
[root@localhost data]# systemctl start mysqld
添加环境变量
[root@localhost ~]# vi /etc/profile
export PATH=/usr/bin:/usr/sbin:/bin:/sbin:/usr/X11R6/bin:/opt/mysql/bin
检查
[root@localhost ~]# which mysql
/opt/mysql/bin/mysql
修改密码
[root@localhost ~]# mysqladmin -uroot password 'root'
mysqladmin: [Warning] Using a password on the command line interface can be insecure.
Warning: Since password will be sent to server in plain text, use ssl connection to ensure password safety.
18.3、PHP安装
cgi通用网关接口,用于HTTP服务器和其他应用服务器通信;
fastcgi是一个可伸缩的,在HTTP服务器和动态脚本服务器之间通信的网关接口;
安装依赖
yum -y install gd \
libjpeg libjpeg-devel \
libpng libpng-devel \
freetype freetype-devel \
libxml2 libxml2-devel \
zlib zlib-devel \
curl curl-devel \
openssl openssl-devel
下载安装包
https://www.php.net/releases/
安装编译
cd /opt
tar jxvf php-7.1.10.tar.bz2

cd php-7.1.10
./configure \
--prefix=/usr/local/php \
--with-mysql-sock=/usr/local/mysql/mysql.sock \
--with-mysqli \
--with-zlib \
--with-curl \
--with-gd \
--with-jpeg-dir \
--with-png-dir \
--with-freetype-dir \
--with-openssl \
--enable-fpm \
--enable-mbstring \
--enable-xml \
--enable-session \
--enable-ftp \
--enable-pdo \
--enable-tokenizer \
--enable-zip

make && make install
路径优化
ln -s /usr/local/php/bin/* /usr/local/bin/
ln -s /usr/local/php/sbin/* /usr/local/sbin/
调整配置
php有三个配置文件:
php.ini            主配置文件
php-fpm.conf    进程服务配置文件
www.conf        扩展配置文件

#调整主配置文件:
cp /opt/php-7.1.10/php.ini-development /usr/local/php/lib/php.ini
vim /usr/local/php/lib/php.ini
--1170行--修改
mysqli.default_socket = /usr/local/mysql/mysql.sock
--939行--取消注释,修改
date.timezone = Asia/Shanghai

php -m                     #验证安装的模块
调整配置
#调整进程服务配置文件:
cd /usr/local/php/etc/
cp  php-fpm.conf.default php-fpm.conf
vim php-fpm.conf
--17行--去掉";"注释
pid = run/php-fpm.pid
调整配置
#调整扩展配置文件:
cd /usr/local/php/etc/php-fpm.d/
cp www.conf.default www.conf
调整配置
/usr/local/php/sbin/php-fpm -c /usr/local/php/lib/php.ini
netstat -anpt | grep 9000

#PHP-FPM(FastCGI Process Manager:FastCGI 进程管理器)是一个 PHPFastCGI 管理器, 由于Nginx服务器不能处理动态页面,需要由 Nginx 把动态请求交给 php-fpm 进程进行解析。

cd /opt/php-7.1.10/sapi/fpm
cp php-fpm.service /usr/lib/systemd/system/php-fpm.service
systemctl restart php-fpm.service
18.4、配置nginx配置文件支持php
server {
listen 80;
server_name localhost;
#charset koi8-r;
#access_log logs/host.access.log main;
#access_log "pipe:rollback logs/host.access_log interval=1d baknum=7 maxsize=2G" main;
location / {
root html;
index index.html index.htm;
}
location ~ \.php$ {
root html;
fastcgi_pass 127.0.0.1:9000;
fastcgi_index index.php;
fastcgi_param SCRIPT_FILENAME /opt/tenginx232/html$fastcgi_script_name; #将/scripts 修改为nginx的工作目录
include fastcgi_params;
}
创建php文件夹及测试文件
[root@localhost ~]# cd /opt/tenginx232/html/
[root@localhost html]#  echo "<?php echo '<p>Hello World</p>'; ?>" >index.php
访问测试:

18.5、wordpress搭建
数据库服务器 192.168.43.30
启动数据库
[root@localhost ~]# systemctl start mysqld
进入数据库
[root@localhost ~]# mysql -uroot -proot
创建数据库
mysql> create database wordpress;
Query OK, 1 row affected (0.01 sec)
创建用户
mysql> create user wordpress;
Query OK, 0 rows affected (0.00 sec)
授权
mysql> grant all on wordpress.* to wordpress@'%' identified by 'wordpress';
Query OK, 0 rows affected, 1 warning (0.00 sec)
刷新
mysql> flush privileges;
Query OK, 0 rows affected (0.01 sec)
查看用户
mysql> select user,authentication_string,host from user;
+---------------+-------------------------------------------+------------+
| user          | authentication_string                     | host       |
+---------------+-------------------------------------------+------------+
| root          | *81F5E21E35407D884A6CD4A731AEBFB6AF209E1B | localhost  |
| mysql.session | *THISISNOTAVALIDPASSWORDTHATCANBEUSEDHERE | localhost  |
| mysql.sys     | *THISISNOTAVALIDPASSWORDTHATCANBEUSEDHERE | localhost  |
| wordpress     |                                           | %          |
| wordpress     | *C260A4F79FA905AF65142FFE0B9A14FE0E1519CC | loacalhost |
+---------------+-------------------------------------------+------------+
5 rows in set (0.00 sec)
下载wordpress,在nginx的服务器
[root@localhost ~]# wget https://cn.wordpress.org/wordpress-5.6.13-zh_CN.tar.gz
解压
[root@localhost ~]# tar -zxvf wordpress-5.6.13-zh_CN.tar.gz
移动文件
[root@localhost ~]# mv wordpress /opt/tenginx232/html/
访问

点击开始

提交

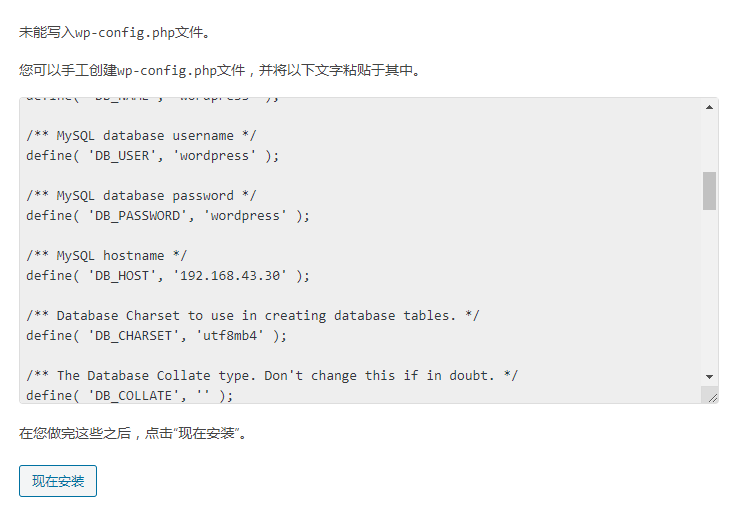
编辑文件
[root@localhost wordpress]# pwd
/opt/tenginx232/html/wordpress
[root@localhost wordpress]# vi wp-config.php

<?php
/**
 * The base configuration for WordPress
 *
 * The wp-config.php creation script uses this file during the
 * installation. You don't have to use the web site, you can
 * copy this file to "wp-config.php" and fill in the values.
 *
 * This file contains the following configurations:
 *
 * * MySQL settings
 * * Secret keys
 * * Database table prefix
 * * ABSPATH
 *
 * @link https://wordpress.org/support/article/editing-wp-config-php/
 *
 * @package WordPress
 */

// ** MySQL settings - You can get this info from your web host ** //
/** The name of the database for WordPress */
define( 'DB_NAME', 'wordpress' );

/** MySQL database username */
define( 'DB_USER', 'wordpress' );

/** MySQL database password */
define( 'DB_PASSWORD', 'wordpress' );

/** MySQL hostname */
define( 'DB_HOST', '192.168.43.30' );

/** Database Charset to use in creating database tables. */
define( 'DB_CHARSET', 'utf8mb4' );

/** The Database Collate type. Don't change this if in doubt. */
define( 'DB_COLLATE', '' );

/**#@+
 * Authentication Unique Keys and Salts.
 *
 * Change these to different unique phrases!
 * You can generate these using the {@link https://api.wordpress.org/secret-key/1.1/salt/ WordPress.org secret-key service}
 * You can change these at any point in time to invalidate all existing cookies. This will force all users to have to log in again.
 *
 * @since 2.6.0
 */
define( 'AUTH_KEY',         ' @jLSa:8y@C&lWqTy)LYxApTJRXFD`0lvT<j6dI/xMrj*3v7#s/fvmck@}KIWiUo' );
define( 'SECURE_AUTH_KEY',  'Qs,(KH39O?QbMt3}T.mZ 6E7.u1AYoTuwk}/r0&j7+M(xhW4~qabLaCd4_P;Br8s' );
define( 'LOGGED_IN_KEY',    'NA5<z[0E&gz).06IwE`)zIqpr<FaJ;^62`F6!q<y~4n[qG8DLe|M+Cmpw%+^.|vi' );
define( 'NONCE_KEY',        'LpFhLtxj:A{NuT[H;&F=uq[xu<k>9~t*8z=IT;>!<Mejkk_niN:0TP<gfjymw)15' );
define( 'AUTH_SALT',        'bmur|5ULfH6MUJMdA2-=pIA^b*6NB]S`tcH60}i1cDRK!vc:w0_m8rb(J^F>x`MP' );
define( 'SECURE_AUTH_SALT', '6Iru(rC8.^>Jh9<,&}g[ySx@zFSR2]FOcjW0Zzy=gm7W+kP[*K9>Hep V3RJcUNP' );
define( 'LOGGED_IN_SALT',   ']XtpV~$A7)N&5nM*No;95,<z{k@Y(G7%5<^F,2D,5 QI`<3c_%AnS2OvomxVx%UY' );
define( 'NONCE_SALT',       'XP9gd$Yl/cVZs U}pKm+e%3iW849NmyvtGQCZaShTitEa2R?b-<]`?fmg)L+~2#d' );

/**#@-*/

/**
 * WordPress Database Table prefix.
 *
 * You can have multiple installations in one database if you give each
 * a unique prefix. Only numbers, letters, and underscores please!
 */
$table_prefix = 'wp_';

/**
 * For developers: WordPress debugging mode.
 *
 * Change this to true to enable the display of notices during development.
 * It is strongly recommended that plugin and theme developers use WP_DEBUG
 * in their development environments.
 *
 * For information on other constants that can be used for debugging,
 * visit the documentation.
 *
 * @link https://wordpress.org/support/article/debugging-in-wordpress/
 */
define( 'WP_DEBUG', false );

/* That's all, stop editing! Happy publishing. */

/** Absolute path to the WordPress directory. */
if ( ! defined( 'ABSPATH' ) ) {
    define( 'ABSPATH', __DIR__ . '/' );
}

/** Sets up WordPress vars and included files. */
require_once ABSPATH . 'wp-settings.php';
现在安装

成功


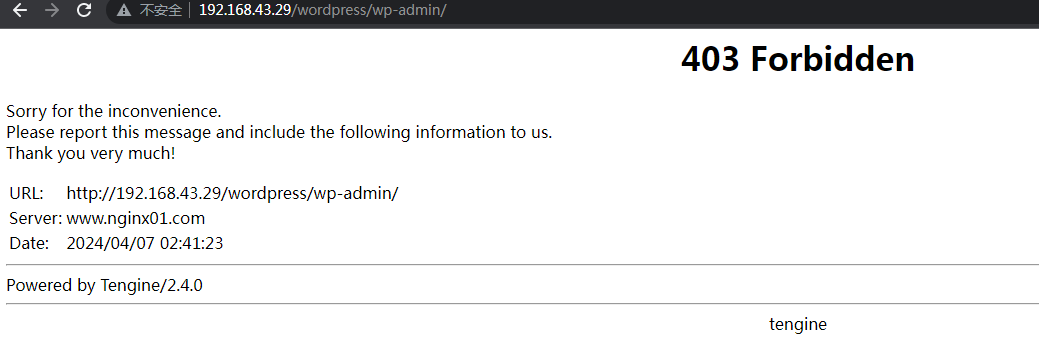
登陆报错:

解决办法,修改nginx配置,加入index.php
        location / {
            root   html;
            index  index.html index.htm index.php;
        }
https://blog.csdn.net/dsw175/article/details/132239319
https://blog.51cto.com/u_15060510/4256238#13%E3%80%81%E5%AE%89%E8%A3%85%E9%85%8D%E7%BD%AE-php-%E8%A7%A3%E6%9E%90%E7%8E%AF%E5%A2%83

