
MySQL复习
官方文档:https://dev.mysql.com/doc/refman/5.7/en/
https://dev.mysql.com/doc/refman/5.7/en/preface.html
配置mysql标签可以显示当前的库
[mysql]
prompt=(\\u@\\h) [\\d]>\\_
1、简单来说,关系型数据库就是采用二维表来组织数据的数据库;非关系型数据库是采用key-value来维护数据;
2、事务特性
原子性(Atomicity)事务中的全部操作在数据库中是不可分割的,要么全部完成,要么全部不执行;
一致性(Consistency)指事务使数据库状态从一个状态转换为另外一个状态,事务执行前后,数据库逻辑一致;
隔离性(Isolation)一个事务的执行不受其他事务的干扰;
持久性(Durability)一个事务一旦提交了,对数据库的改变是永久的。
3、MySQL版本:社区版、企业版、集群版;
Final正式发布版本、Release发行版本;
4、MySQL安装
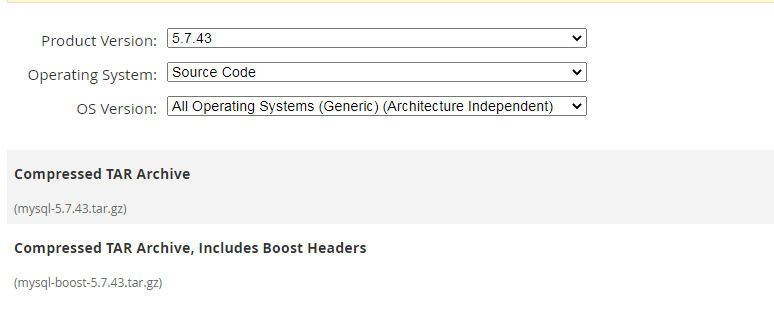
Source Code源码安装
https://downloads.mysql.com/archives/community/
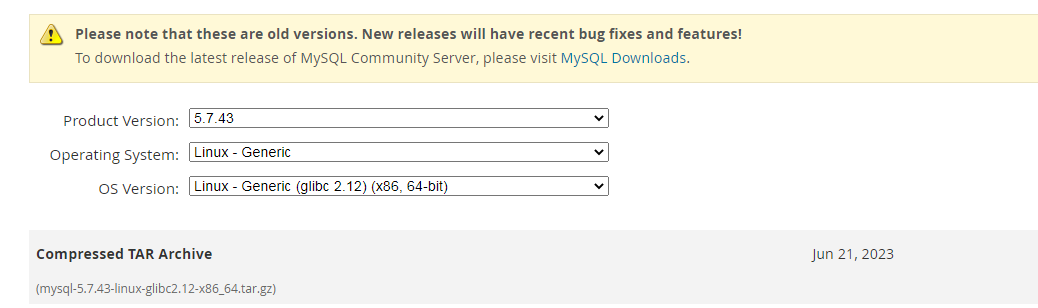
二进制安装Generic
https://downloads.mysql.com/archives/community/
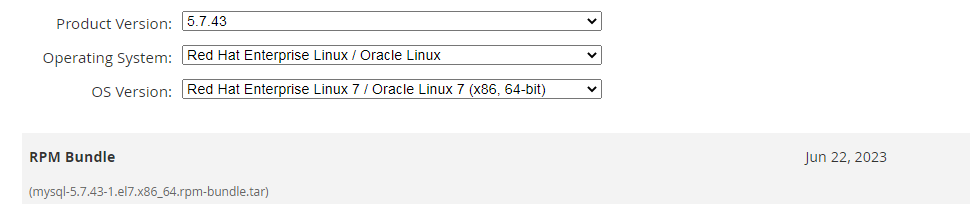
rmp包安装
https://downloads.mysql.com/archives/community/
5、安装前系统配置
[root@localhost ~]# hostnamectl set-hostname mysql
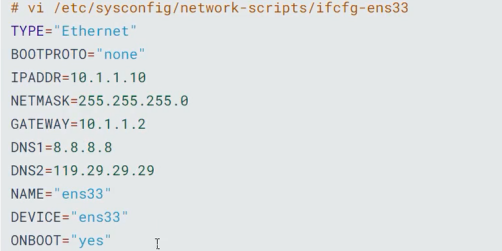
网卡
关闭防火墙
[root@mysql ~]# systemctl disable firewalld
[root@mysql ~]# systemctl stop firewalld
关闭SELINUX
[root@mysql ~]# setenforce 0
setenforce: SELinux is disabled
[root@mysql ~]# vi /etc/selinux/config
配置yum
http://mirrors.cloud.tencent.com/help/centos.html
wget -O /etc/yum.repos.d/CentOS-Base.repo http://mirrors.cloud.tencent.com/repo/centos7_base.repo
安装常用的包
[root@mysql yum.repos.d]# yum install bash-completion vim net-tools ntpdate wget -y
配置ntp
http://ntp.org.cn/pool
[root@mysql yum.repos.d]# ntpdate 120.25.108.11
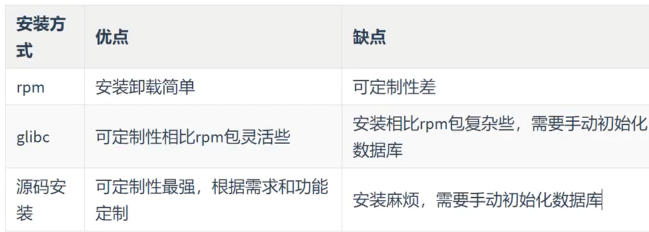
6、安装方式的区别
7、glibc方式安装
官方文档 https://dev.mysql.com/doc/refman/5.7/en/binary-installation.html
安装软件包
[root@mysql yum.repos.d]# rpm -qa | grep libaio
libaio-0.3.109-13.el7.x86_64
创建用户及组
[root@mysql ~]# groupadd mysql
[root@mysql ~]# useradd -r -g mysql -s /bin/nologin mysql
查看
[root@mysql soft]# id mysql
uid=997(mysql) gid=1000(mysql) groups=1000(mysql)
清理环境
[root@mysql ~]# rpm -qa | grep mariadb
mariadb-libs-5.5.64-1.el7.x86_64
[root@mysql ~]# yum remove mariadb-libs-5.5.64-1.el7.x86_64
Loaded plugins: fastestmirror
Resolving Dependencies
--> Running transaction check
---> Package mariadb-libs.x86_64 1:5.5.64-1.el7 will be erased
清理文件
[root@mysql soft]# rm -rf /etc/my.cnf
上传解压
[root@mysql soft]# tar -zxvf mysql-5.7.26-linux-glibc2.12-x86_64.tar.gz
解压后移动
[root@mysql ~]# mv /root/soft/mysql-5.7.26-linux-glibc2.12-x86_64 /mysql3306
创建文件目录
[root@mysql ~]# cd /mysql3306/
[root@mysql mysql3306]# mkdir mysql-files
更改权限
[root@mysql mysql3306]# chown mysql:mysql mysql-files
[root@mysql mysql3306]# chmod 750 mysql-files
初始化数据库
[root@mysql mysql3306]# bin/mysqld --initialize --user=mysql --basedir=/mysql3306
2023-12-22T01:35:24.737443Z 0 [Warning] TIMESTAMP with implicit DEFAULT value is deprecated. Please use --explicit_defaults_for_timestamp server option (see documentation for more details).
2023-12-22T01:35:27.433596Z 0 [Warning] InnoDB: New log files created, LSN=45790
2023-12-22T01:35:27.674812Z 0 [Warning] InnoDB: Creating foreign key constraint system tables.
2023-12-22T01:35:28.114703Z 0 [Warning] No existing UUID has been found, so we assume that this is the first time that this server has been started. Generating a new UUID: 62e3edff-a06a-11ee-af8d-000c29f92eed.
2023-12-22T01:35:28.117268Z 0 [Warning] Gtid table is not ready to be used. Table 'mysql.gtid_executed' cannot be opened.
2023-12-22T01:35:28.120298Z 1 [Note] A temporary password is generated for root@localhost: TTC&%FYrX1qk
设置安全加密连接(数据的传输采用加密的形式)
[root@mysql mysql3306]# bin/mysql_ssl_rsa_setup --datadir=/mysql3306/data
Generating a 2048 bit RSA private key
..................+++
................+++
writing new private key to 'ca-key.pem'
-----
Generating a 2048 bit RSA private key
................+++
................................................................+++
writing new private key to 'server-key.pem'
-----
Generating a 2048 bit RSA private key
......................................+++
.....................+++
writing new private key to 'client-key.pem'
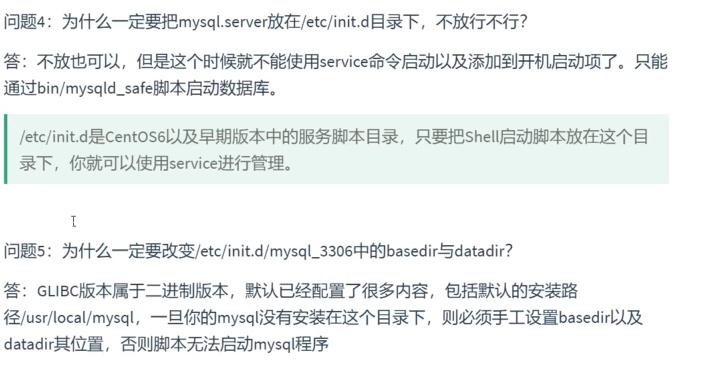
拷贝启动文件
[root@mysql ~]# cp /mysql3306/support-files/mysql.server /etc/init.d/mysqld
编辑启动文件
vi /etc/init.d/mysqld
basedir=/mysql3306
datadir=/mysql3306/data
启动数据库
[root@mysql ~]# service mysqld start
Starting MySQL.Logging to '/mysql3306/data/mysql.err'.
. SUCCESS!
常见问题答疑

设置开机自动启动,主要看3和5
[root@mysql etc]# chkconfig --add mysqld
[root@mysql etc]# chkconfig --list

Note: This output shows SysV services only and does not include native
      systemd services. SysV configuration data might be overridden by native
      systemd configuration.

      If you want to list systemd services use 'systemctl list-unit-files'.
      To see services enabled on particular target use
      'systemctl list-dependencies [target]'.

mysqld             0:off    1:off    2:on    3:on    4:on    5:on    6:off
netconsole         0:off    1:off    2:off    3:off    4:off    5:off    6:off
network            0:off    1:off    2:on    3:on    4:on    5:on    6:off
开启chkconfig2、3、4、5全部开启(3字符界面,5图形界面)
[root@mysql etc]# chkconfig mysqld on
修改密码:
方法一:
[root@mysql mysql3306]# bin/mysqladmin -uroot password 'root' -p
Enter password:
mysqladmin: [Warning] Using a password on the command line interface can be insecure.
Warning: Since password will be sent to server in plain text, use ssl connection to ensure password safety.
方法二:
[root@mysql mysql3306]# bin/mysql -uroot -p
Enter password:
Welcome to the MySQL monitor.  Commands end with ; or \g.
Your MySQL connection id is 4
Server version: 5.7.26 MySQL Community Server (GPL)

Copyright (c) 2000, 2019, Oracle and/or its affiliates. All rights reserved.

Oracle is a registered trademark of Oracle Corporation and/or its
affiliates. Other names may be trademarks of their respective
owners.

Type 'help;' or '\h' for help. Type '\c' to clear the current input statement.

mysql> set password='123';
Query OK, 0 rows affected (0.00 sec)
配置环境变量
[root@mysql mysql3306]# echo 'export PATH=$PATH:/mysql3306/bin' >> /etc/profile
[root@mysql mysql3306]# source /etc/profile
手动定义MySQL配置文件
[mysqld]
basedir=/mysql3306
datadir=/mysql3306/data
socket=/tmp/mysql.sock
[mysqld] 代表针对服务器端进行配置
basedir 代表数据的安装目录
datadir 代表数据目录,以后专门存放数据文件的(核心目录)
socket 代表套子节文件,专门为客户端与服务器端连接提供的一个桥梁
安全配置
[root@mysql ~]# mysql_secure_installation

Securing the MySQL server deployment.

Enter password for user root:
The 'validate_password' plugin is installed on the server.
The subsequent steps will run with the existing configuration
of the plugin.
Using existing password for root.

Estimated strength of the password: 25
Change the password for root ? ((Press y|Y for Yes, any other key for No) :

 ... skipping.
By default, a MySQL installation has an anonymous user,
allowing anyone to log into MySQL without having to have
a user account created for them. This is intended only for
testing, and to make the installation go a bit smoother.
You should remove them before moving into a production
environment.

Remove anonymous users? (Press y|Y for Yes, any other key for No) : y
Success.


Normally, root should only be allowed to connect from
'localhost'. This ensures that someone cannot guess at
the root password from the network.

Disallow root login remotely? (Press y|Y for Yes, any other key for No) : y
Success.

By default, MySQL comes with a database named 'test' that
anyone can access. This is also intended only for testing,
and should be removed before moving into a production
environment.


Remove test database and access to it? (Press y|Y for Yes, any other key for No) : y
 - Dropping test database...
Success.

 - Removing privileges on test database...
Success.

Reloading the privilege tables will ensure that all changes
made so far will take effect immediately.

Reload privilege tables now? (Press y|Y for Yes, any other key for No) : y
Success.

All done!
如何关闭密码强度检测
[mysqld]
basedir=/mysql3306
datadir=/mysql3306/data
socket=/tmp/mysql.sock
validate_password=OFF
8、MySQL默认数据库
mysql> show databases;
+--------------------+
| Database           |
+--------------------+
| information_schema |
| mysql              |
| performance_schema |
| sys                |
+--------------------+
4 rows in set (0.00 sec)
information_schema 对象信息数据库,提供数据库元数据的访问,有关MySQl服务器的信息,例如数据库或表的名称,列的数据列下或访问权限等,
在information_schema中,有数个只读表,他们实际上是视图,而不是基本表,因此你将服务器看到与之相关的任何文件;
视图,是一个虚表,即视图所对应的数据不进行实际存储,数据库中只存储视图的定义,在对视图的数据进行操作时候,系统根据视图的定义去操作与视图相关联的基本表;
mysql:数据库是系统数据库,它包含存储MySQL服务器运行时候所需要的信息的表,比如权限表,对象信息表、日志系统表、时区系统表、优化器系统表、杂项系统表等;
performance_schema MySQl5.5开始新增的一个数据库,主要用于收集数据库服务器性能;
sys 5.7增加的系统数据库,通过这个库可以快速了解系统的元数据信息,sys库方便DBA发现数据库的很多信息,解决性能瓶颈;sys库通过视图的形式吧information_schema和performance_schema结合起来,查询出更加令人容易理解的数据
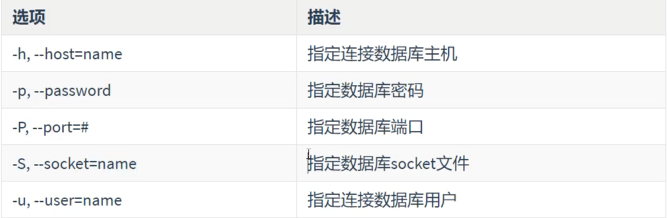
8、客户端工具 mysqladmin
连接参数-e
[root@mysql ~]# mysql -e "show databases;" -uroot -p
Enter password:
+--------------------+
| Database           |
+--------------------+
| information_schema |
| mysql              |
| performance_schema |
| sys                |
+--------------------+
修改密码
[root@mysql ~]# mysqladmin password 'root' -uroot -p
Enter password:
mysqladmin: [Warning] Using a password on the command line interface can be insecure.
Warning: Since password will be sent to server in plain text, use ssl connection to ensure password safety.
关闭数据库
[root@mysql ~]# mysqladmin shutdown -p
Enter password:
查看预值变量
[root@mysql ~]# mysqladmin variables -p
查看版本
[root@mysql ~]# mysqladmin version -p
Enter password:
mysqladmin  Ver 8.42 Distrib 5.7.26, for linux-glibc2.12 on x86_64
Copyright (c) 2000, 2019, Oracle and/or its affiliates. All rights reserved.

Oracle is a registered trademark of Oracle Corporation and/or its
affiliates. Other names may be trademarks of their respective
owners.

Server version        5.7.26
Protocol version    10
Connection        Localhost via UNIX socket
UNIX socket        /tmp/mysql.sock
Uptime:            4 min 15 sec

Threads: 1  Questions: 12  Slow queries: 0  Opens: 108  Flush tables: 1  Open tables: 101  Queries per second avg: 0.047
9、用户的创建
mysql> create user 'tom'@'localhost' identified by '1234';
Query OK, 0 rows affected (0.02 sec)
查看权限表
mysql> select user,host from mysql.user;
+---------------+-----------+
| user          | host      |
+---------------+-----------+
| mysql.session | localhost |
| mysql.sys     | localhost |
| root          | localhost |
| tom           | localhost |
+---------------+-----------+
4 rows in set (0.00 sec)
10、用户的删除
mysql> drop user 'tom'@'localhost';
Query OK, 0 rows affected (0.00 sec)
或者直接操作mysql.user数据表
mysql> delete from mysql.user where user='xue';
Query OK, 1 row affected (0.02 sec)
11、用户重命名
mysql> rename user 'wen'@'%' to 'janwen'@'%';
Query OK, 0 rows affected (0.00 sec)
12、权限管理
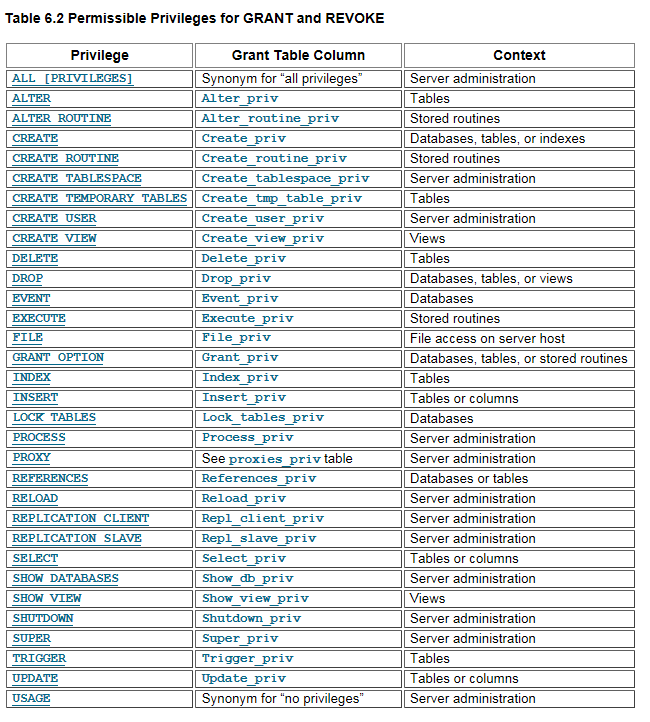
userage 无权限,只能登陆数据库
all 所有权限
with grant options选项表示允许把自己的权限授予其他用户,或者从其他用户收回自己的权限,分配权限的时候,如果没有这个选项,表示该用户不能下发权限给其他用户;
权限的保存位置
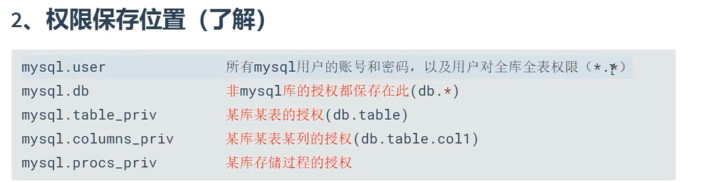
给用户授权
*.* 表示所有数据库的说有数据表
给用户授权
mysql> grant select on db1.* to 'sun'@'%';
Query OK, 0 rows affected (0.00 sec)
给用户更改的权限
mysql> grant update on db1.* to 'sun'@'%';
Query OK, 0 rows affected (0.00 sec)
13、查询用户的权限
+---------------------------------------------------------------------+
| Grants for root@localhost                                           |
+---------------------------------------------------------------------+
| GRANT ALL PRIVILEGES ON *.* TO 'root'@'localhost' WITH GRANT OPTION |
| GRANT PROXY ON ''@'' TO 'root'@'localhost' WITH GRANT OPTION        |
+---------------------------------------------------------------------+
查询某一用户的权限
mysql> show grants for 'sun'@'%';
+------------------------------------------------------+
| Grants for sun@%                                     |
+------------------------------------------------------+
| GRANT USAGE ON *.* TO 'sun'@'%'                      |
| GRANT SELECT, INSERT, UPDATE ON `db1`.* TO 'sun'@'%' |
+------------------------------------------------------+
14、with grant options
此选项代表,可以为其他用户下发权限,但是下发的权限不能超过自身的权限。
15、用grant创建用户
mysql> grant all on *.* to 'long'@'%' identified by '1234';
Query OK, 0 rows affected, 1 warning (0.01 sec)
16、revoke回收权限
mysql> revoke insert on db1.* from 'sun'@'%';
Query OK, 0 rows affected (0.00 sec)
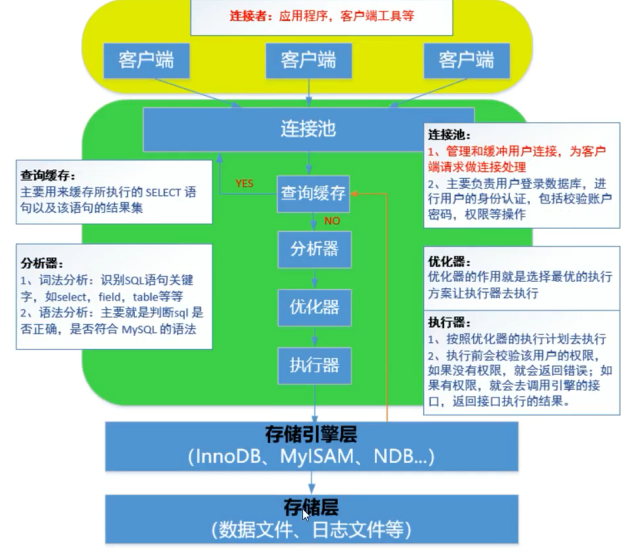
17、MSQL体系结构
查看引擎
mysql> show engines    -> ;
+--------------------+---------+----------------------------------------------------------------+--------------+------+------------+
| Engine             | Support | Comment                                                        | Transactions | XA   | Savepoints |
+--------------------+---------+----------------------------------------------------------------+--------------+------+------------+
| CSV                | YES     | CSV storage engine                                             | NO           | NO   | NO         |
| MRG_MYISAM         | YES     | Collection of identical MyISAM tables                          | NO           | NO   | NO         |
| MyISAM             | YES     | MyISAM storage engine                                          | NO           | NO   | NO         |
| BLACKHOLE          | YES     | /dev/null storage engine (anything you write to it disappears) | NO           | NO   | NO         |
| PERFORMANCE_SCHEMA | YES     | Performance Schema                                             | NO           | NO   | NO         |
| MEMORY             | YES     | Hash based, stored in memory, useful for temporary tables      | NO           | NO   | NO         |
| ARCHIVE            | YES     | Archive storage engine                                         | NO           | NO   | NO         |
| InnoDB             | DEFAULT | Supports transactions, row-level locking, and foreign keys     | YES          | YES  | YES        |
| FEDERATED          | NO      | Federated MySQL storage engine                                 | NULL         | NULL | NULL       |
+--------------------+---------+----------------------------------------------------------------+--------------+------+------------+
9 rows in set (0.07 sec)
MyISAM引擎:擅长查询,支持全文索引
InnoDB:Supports transactions, row-level locking, and foreign keys
18、存储层
创建数据库
mysql> create database test;
Query OK, 1 row affected (0.00 sec)
查看对应的文件夹
[root@mysql ~]# cd /mysql3306/data/test/
[root@mysql test]# ls
db.opt
查看opt文件内容
[root@mysql test]# cat db.opt
default-character-set=latin1
default-collation=latin1_swedish_ci
创建MyISAM引擎的biao
mysql> use test;
Database changed
mysql> create table tt(id int) engine=myisam default charset=utf8;
Query OK, 0 rows affected (0.01 sec)
查看对应文件夹下生产的文件
[root@mysql test]# ls
db.opt  tt.frm  tt.MYD  tt.MYI
db.opt 创建数据库的时候产生的,数据库的编码格式
tt.frm 数据表的表结构
tt.MYD 数据表的数据
tt.MYI 数据表的索引
19、InnoDB存储引擎
mysql> create database liang;
Query OK, 1 row affected (0.00 sec)

mysql> use liang;
Database changed
mysql> create table li(id int);
Query OK, 0 rows affected (0.22 sec)
查看数据文件
[root@mysql data]# cd liang/
[root@mysql liang]# ls
db.opt
[root@mysql liang]# ls
db.opt  li.frm  li.ibd
.frm 框架文件,定义数据表结构;
.idb 索引文件+数据文件
20、MySQL备份工具
mysqldump(逻辑备份,只能全量备份)
企业版和社区版都包含;
本质上使用SQL语句描述数据库及数据并导出;
在MYISAM引擎上锁表,InnoDB引擎上锁行;
数据量很大的时候不推荐使用;
Xtrabackup
xtrabackup是一个对InooDB做数据备份的工具,支持在线热备份,(备份时候不影响数据读写);
xtrabackup只能备份InnoDB和XtraDB两种数据表,不能备份myisam类型的表;
21、错误日志文件
配置日志文件的配置
[mysqld]
basedir=/mysql3306
datadir=/mysql3306/data
socket=/tmp/mysql.sock
log_error=/mysql3306/log/mysql.err
有些版本需要自己创建日志文件 https://www.yisu.com/zixun/31129.html
22、二进制日志
数据库的所有更改操作(DDL、DML、DCL)不包含select,show这类语句;
应用场景:
用于主从复制中,master主服务器将二进制日志的更改发送给slave从服务器,从服务器执行这些更改操作使得和主服务器更改相同;
用于数据的恢复操作;
添加binlog配置
[mysqld]
server-id=1
basedir=/mysql3306
datadir=/mysql3306/data
socket=/tmp/mysql.sock
log_error=/mysql3306/log/mysql.err
log-bin=/mysql3306/binlog/binlog
查看生成的文件
[root@mysql binlog]# ls
binlog.000001  binlog.index
23、备份过程必须考虑的因素
必须制定详细的别发计划(策略)
备份数据应该房子非数据库本地,并建议有多副本;
必须做好数据恢复演练;
依据数据库的应用场合、特点选择正确的备份工具;
数据的一致性;
服务的可用性;
24、备份的类型
逻辑备份
备份实质:就是把要备份的数据导出成.sql或者.txt文件
物理备份
直接复制数据库文件,一般实在数据库彻底关闭,或者不提供服务的前提下进行备份;
在线热备
主从复制等;
25、备份方法
完全备份;
增量备份;
26、逻辑备份
mysqldump基本备份:
本质:导出的是sql语句文件;
优点: 无论什么存储引擎,都可以使用mysqldump备份成sql语句;
缺点:速度较慢,导入的时候,可能会出现格式不兼容的情况,无法直接做增量备份;
提供三种基本的备份,表级、库级、全库级别
导出单个表:
[root@mysql ~]# mysqldump -p db1 tb_article >/tmp/tb_article.sql
Enter password:
还原(db1是数据库名称)
[root@mysql ~]# mysql db1 < /tmp/tb_article.sql -p
Enter password:
方法二
mysql> source /tmp/tb_article.sql
27、数据库的导出
[root@mysql ~]# mysqldump --databases db1 > /tmp/db1.sql -p
Enter password:
还原
[root@mysql ~]# mysql < /tmp/db1.sql -p
Enter password:
还原二
ysql> source /tmp/db1.sql
28、全库级别备份


全库备份
[root@mysql ~]# mysqldump --all-databases --master-data --single-transaction>/tmp/all.sql -p
Enter password:
mysqldump总结

29、增量备份的核心原理
全备+binlog日志
备份全库
[root@mysql ~]# mysqldump --single-transaction --master-data=2 --all-databases --flush-logs > /tmp/all2.sql -p
Enter password:
插入一条数据
mysql> select * from tb_article;
+------+-------+--------+---------+
| id   | title | author | content |
+------+-------+--------+---------+
|    1 | NULL  | NULL   | NULL    |
+------+-------+--------+---------+
1 row in set (0.00 sec)

mysql> insert into tb_article values(2,'oracle','xbl','ll');
Query OK, 1 row affected (0.01 sec)
模拟删除数据库
mysql> drop database db1;
Query OK, 2 rows affected (0.05 sec)
先恢复全备
[root@mysql tmp]# mysql < all2.sql -p
Enter password:
查看数据,最新的数据并没有出现
mysql> select * from tb_article;
+------+-------+--------+---------+
| id   | title | author | content |
+------+-------+--------+---------+
|    1 | NULL  | NULL   | NULL    |
+------+-------+--------+---------+
1 row in set (0.01 sec)
查看binlog中删除数据库的位置
# at 436
#240102 22:03:51 server id 1  end_log_pos 501 CRC32 0x789473b6     Anonymous_GTID    last_committed=1    sequence_number=rbr_only=no
SET @@SESSION.GTID_NEXT= 'ANONYMOUS'/*!*/;
# at 501
#240102 22:03:51 server id 1  end_log_pos 590 CRC32 0xe967bd22     Query    thread_id=2    exec_time=0    error_code=0
SET TIMESTAMP=1704251031/*!*/;
drop database db1
/*!*/;
# at 590
#240102 22:15:04 server id 1  end_log_pos 634 CRC32 0xcb365913     Rotate to binlog.000006  pos: 4
SET @@SESSION.GTID_NEXT= 'AUTOMATIC' /* added by mysqlbinlog */ /*!*/;
DELIMITER ;
# End of log file
/*!50003 SET COMPLETION_TYPE=@OLD_COMPLETION_TYPE*/;
/*!50530 SET @@SESSION.PSEUDO_SLAVE_MODE=0*/;
恢复binlog日志
[root@mysql binlog]# mysqlbinlog --start-position=4 --stop-position=436 /mysql3306/binlog/binlog.000005 |mysql -p
Enter password:
查看删库后添加的数据
mysql> select * from tb_article;
+------+--------+--------+---------+
| id   | title  | author | content |
+------+--------+--------+---------+
|    1 | NULL   | NULL   | NULL    |
|    2 | oracle | xbl    | ll      |
+------+--------+--------+---------+
2 rows in set (0.00 sec)
30、逻辑的导入导出
mysql> select * into outfile '/tmp/tb_article.txt' from tb_article;
ERROR 1290 (HY000): The MySQL server is running with the --secure-file-priv option so it cannot execute this statement
报错了,没有指定导出的路径
[mysqld]
server-id=1
basedir=/mysql3306
datadir=/mysql3306/data
socket=/tmp/mysql.sock
log_error=/mysql3306/log/mysql.err
log-bin=/mysql3306/binlog/binlog
secure_file_priv=/tmp
重新导出
mysql> select * into outfile '/tmp/tb_article2.txt' from tb_article;
Query OK, 2 rows affected (0.00 sec)
数据的导入
mysql> truncate tb_article;
Query OK, 0 rows affected (0.03 sec)
导入数据
mysql> load data local infile '/tmp/tb_article2.txt' into table tb_article;
Query OK, 2 rows affected (0.02 sec)
Records: 2  Deleted: 0  Skipped: 0  Warnings: 0

mysql> select * from tb_article;
+------+--------+--------+---------+
| id   | title  | author | content |
+------+--------+--------+---------+
|    1 | NULL   | NULL   | NULL    |
|    2 | oracle | xbl    | ll      |
+------+--------+--------+---------+
2 rows in set (0.00 sec)
导入数据的方法二(文件名必须是表名称)
[root@mysql tmp]# mysqlimport db1 /tmp/tb_article.txt -p
Enter password:
db1.tb_article: Records: 2  Deleted: 0  Skipped: 0  Warnings: 0
31、数据导入示例
CREATE TABLE `passd` (
  `uname` varchar(50) DEFAULT NULL,
  `pass` char(2) DEFAULT NULL,
  `uid` int(11) DEFAULT NULL,
  `gid` int(11) DEFAULT NULL,
  `comment` varchar(255) DEFAULT NULL,
  `home` varchar(50) DEFAULT NULL,
  `shell` varchar(50) DEFAULT NULL
) ENGINE=InnoDB DEFAULT CHARSET=utf8mb4;
将password文件拷贝到/tmp下
[root@mysql tmp]# cp /etc/passwd /tmp
[root@mysql tmp]# mv passwd passd
导入文件
[root@mysql tmp]# mysqlimport db1 --fields-terminated-by=':' --lines-terminated-by='\n' /tmp/passd -p
Enter password:
db1.passd: Records: 21  Deleted: 0  Skipped: 0  Warnings: 0
32、MySQL的物理备份
xtrabackup备份介绍
优点:备份快速、可靠;支持增量备份;备份过程不会打断执行的事务;能够基于压缩功能节约空间和流量;实现自动备份检验;还原速度快;
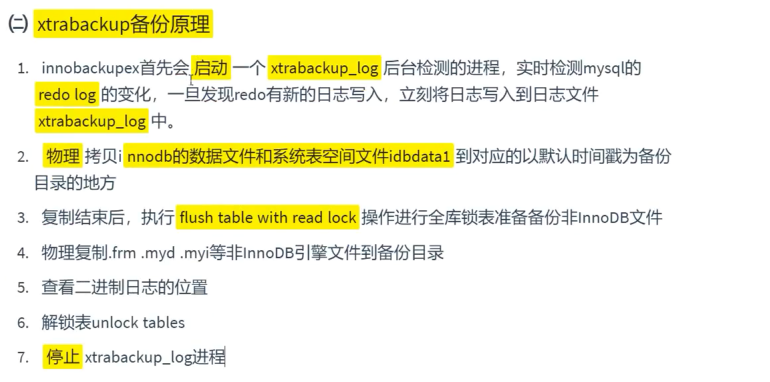
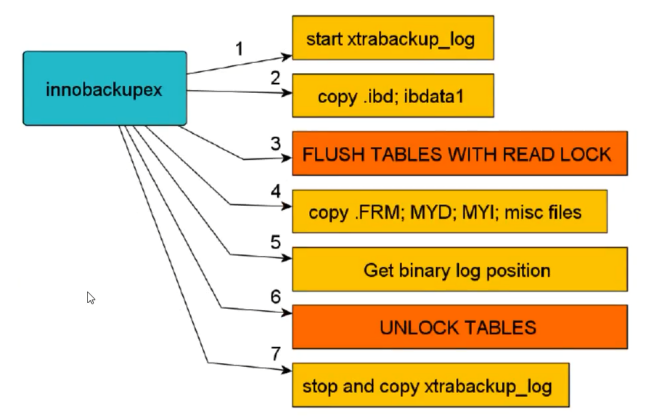
xtrabackup备份原理
安装xtrabackup
[root@mysql soft]# rpm -ivh libev-4.15-3.el7.x86_64.rpm
warning: libev-4.15-3.el7.x86_64.rpm: Header V3 RSA/SHA256 Signature, key ID 352c64e5: NOKEY
Preparing...                          ################################# [100%]
Updating / installing...
   1:libev-4.15-3.el7                 ################################# [100%]
[root@mysql soft]# rpm -ivh percona-xtrabackup-24-2.4.7-2.el7.x86_64.rpm
warning: percona-xtrabackup-24-2.4.7-2.el7.x86_64.rpm: Header V4 DSA/SHA1 Signature, key ID cd2efd2a: NOKEY
error: Failed dependencies:
    perl(DBD::mysql) is needed by percona-xtrabackup-24-2.4.7-2.el7.x86_64
    perl(Digest::MD5) is needed by percona-xtrabackup-24-2.4.7-2.el7.x86_64
    rsync is needed by percona-xtrabackup-24-2.4.7-2.el7.x86_64
安装报错,解决办法
# yum -y install perl perl-devel libaio libaio-devel perl-Time-HiRes perl-DBD-MySQL
# yum -y install rsync perl l perl-Digest-MD5
33、xtrabackup备份实战
准备测试数据
mysql> create database db_itheima default charset=utf8;
Query OK, 1 row affected (0.01 sec)

mysql> use db_itheima;
Database changed
mysql> create table t1(id int,name varchar(10)) engine=myisam;
Query OK, 0 rows affected (0.01 sec)

mysql> insert into t1 values (1,'吕布');
Query OK, 1 row affected (0.01 sec)

mysql> create table t2(id int,name varchar(10)) engine=innodb;
Query OK, 0 rows affected (0.04 sec)

mysql>  insert into t2 values (1,'貂蝉');
Query OK, 1 row affected (0.01 sec)
准备测试账号
mysql> grant reload,process,lock tables,replication client on *.* to 'admin'@'localhost' identified by 'root';
Query OK, 0 rows affected, 1 warning (0.01 sec)
开始备份
[root@mysql ~]# innobackupex --user=admin --password=root /full_xtrabackup
240103 22:22:18 innobackupex: Starting the backup operation

IMPORTANT: Please check that the backup run completes successfully.
           At the end of a successful backup run innobackupex
           prints "completed OK!".

240103 22:22:18  version_check Connecting to MySQL server with DSN 'dbi:mysql:;mysql_read_default_group=xtrabackup' as 'admin'  (using password: YES).
Failed to connect to MySQL server: DBI connect(';mysql_read_default_group=xtrabackup','admin',...) failed: Can't connect to local MySQL server through socket '/var/lib/mysql/mysql.sock' (2) at - line 1314.
240103 22:22:18 Connecting to MySQL server host: localhost, user: admin, password: set, port: not set, socket: not set
Failed to connect to MySQL server: Can't connect to local MySQL server through socket '/var/lib/mysql/mysql.sock' (2).
报错了
原因一:/etc/下有 my.cnf文件影响
原因二:innobackupex 拥有自己的默认配置,默认读取了/var/lib/mysql/mysql.sock
解决办法一、
[root@mysql etc]# mv my.cnf my.cnf.bak
解决办法二
[root@mysql ~]# mkdir /var/lib/mysql
[root@mysql ~]# ln -s /tmp/mysql.sock /var/lib/mysql/mysql.sock
之后开始备份,或者给 innobackupex 命令后加 -S /tmp/mysql.sock
[root@mysql ~]# innobackupex --user=admin --password=root /full_xtrabackup
240104 01:02:19 innobackupex: Starting the backup operation

IMPORTANT: Please check that the backup run completes successfully.
           At the end of a successful backup run innobackupex
           prints "completed OK!".

240104 01:02:19  version_check Connecting to MySQL server with DSN 'dbi:mysql:;mysql_read_default_group=xtrabackup' as 'admin'  (using password: YES).
240104 01:02:19  version_check Connected to MySQL server
240104 01:02:19  version_check Executing a version check against the server...
240104 01:02:19  version_check Done.
240104 01:02:19 Connecting to MySQL server host: localhost, user: admin, password: set, port: not set, socket: not set
Using server version 5.7.26-log
innobackupex version 2.4.7 based on MySQL server 5.7.13 Linux (x86_64) (revision id: 05f1fcf)
xtrabackup: uses posix_fadvise().
xtrabackup: cd to /mysql3306/data/
xtrabackup: open files limit requested 0, set to 1024
xtrabackup: using the following InnoDB configuration:
xtrabackup:   innodb_data_home_dir = .
把备份这段时间的日志整合到全量备份中
[root@mysql 2024-01-04_01-04-57]# innobackupex --user=admin --password=root --apply-log /full_xtrabackup/2024-01-04_01-04-57/
240104 01:10:41 innobackupex: Starting the apply-log operation

IMPORTANT: Please check that the apply-log run completes successfully.
           At the end of a successful apply-log run innobackupex
           prints "completed OK!".

innobackupex version 2.4.7 based on MySQL server 5.7.13 Linux (x86_64) (revision id: 05f1fcf)
xtrabackup: cd to /full_xtrabackup/2024-01-04_01-04-57/
xtrabackup: This target seems to be not prepared yet.
InnoDB: Number of pools: 1
模拟数据库故障
[root@mysql mysql3306]# mv data/ data.bak
[root@mysql mysql3306]# service mysqld status
重启数据库报错
[root@mysql mysql3306]# service mysqld start
Starting MySQL. ERROR! The server quit without updating PID file (/mysql3306/data/mysql.pid).
开始还原数据
[root@mysql mysql3306]# innobackupex --copy-back /full_xtrabackup/2024-01-04_01-04-57/
240104 01:20:00 innobackupex: Starting the copy-back operation

IMPORTANT: Please check that the copy-back run completes successfully.
           At the end of a successful copy-back run innobackupex
           prints "completed OK!".

innobackupex version 2.4.7 based on MySQL server 5.7.13 Linux (x86_64) (revision id: 05f1fcf)
Error: datadir must be specified.
报错了,解决办法加参数
[root@mysql mysql3306]# innobackupex --defaults-file=/mysql3306/my.cnf --copy-back /full_xtrabackup/2024-01-04_01-04-57/
240104 01:27:34 innobackupex: Starting the copy-back operation

IMPORTANT: Please check that the copy-back run completes successfully.
           At the end of a successful copy-back run innobackupex
           prints "completed OK!".

innobackupex version 2.4.7 based on MySQL server 5.7.13 Linux (x86_64) (revision id: 05f1fcf)
240104 01:27:34 [01] Copying ib_logfile0 to /mysql3306/data/ib_logfile0
240104 01:27:34 [01]        ...done
240104 01:27:35 [01] Copying ib_logfile1 to /mysql3306/data/ib_logfile1
查看恢复结果
[root@mysql mysql3306]# cd data
[root@mysql data]# ls
db1  db_itheima      ib_logfile0  liang               sys   xtrabackup_binlog_pos_innodb
db2  ib_buffer_pool  ib_logfile1  mysql               test  xtrabackup_info
db3  ibdata1         ibtmp1       performance_schema  wen
修改权限
[root@mysql mysql3306]# chown -R mysql:mysql data
启动测试
[root@mysql mysql3306]# service mysqld start
Starting MySQL. SUCCESS!
34、xtrabackup增量备份实战
准备数据
mysql> create database db_itheima default charset=utf8;
Query OK, 1 row affected (0.00 sec)

mysql> use db_itheima;
Database changed
mysql> create table t1(id int,name varchar(10)) engine=myisam;
Query OK, 0 rows affected (0.02 sec)

mysql> insert into t1 values (1,'吕布');
Query OK, 1 row affected (0.03 sec)

mysql> create table t2(id int,name varchar(10)) engine=innodb;
Query OK, 0 rows affected (0.03 sec)

mysql> insert into t2 values (1,'貂蝉');
Query OK, 1 row affected (0.01 sec)
准备账号
mysql> grant reload,process,lock tables,replication client on *.* to 'admin'@'localhost' identified by 'root';
Query OK, 0 rows affected, 1 warning (0.02 sec)
mysql> flush privileges;
Query OK, 0 rows affected (0.03 sec)
准备环境
[root@mysql ~]# cd /full_xtrabackup/
[root@mysql full_xtrabackup]# ls
2024-01-04_01-04-57
[root@mysql full_xtrabackup]# rm -rf 2024-01-04_01-04-57/
全备
[root@mysql full_xtrabackup]# innobackupex --user=admin --password=root /full_xtrabackup
240104 02:07:37 innobackupex: Starting the backup operation

IMPORTANT: Please check that the backup run completes successfully.
           At the end of a successful backup run innobackupex
           prints "completed OK!".

240104 02:07:37  version_check Connecting to MySQL server with DSN 'dbi:mysql:;mysql_read_default_group=xtrabackup' as 'admin'  (using password: YES).
240104 02:07:37  version_check Connected to MySQL server
240104 02:07:37  version_check Executing a version check against the server...
240104 02:07:37  version_check Done.
240104 02:07:37 Connecting to MySQL server host: localhost, user: admin, password: set, port: not set, socket: not set
把全备过程中产生的日子好进行整合
[root@mysql full_xtrabackup]# innobackupex --use=admin --password=root --apply-log --redo-only /full_xtrabackup/2024-01-04_02-07-37/
240104 02:13:58 innobackupex: Starting the apply-log operation

IMPORTANT: Please check that the apply-log run completes successfully.
           At the end of a successful apply-log run innobackupex
           prints "completed OK!".

innobackupex version 2.4.7 based on MySQL server 5.7.13 Linux (x86_64) (revision id: 05f1fcf)
xtrabackup: cd to /full_xtrabackup/2024-01-04_02-07-37/
xtrabackup: This target seems to be not prepared yet.
InnoDB: Number of pools: 1
--apply-log 表示整合日志
--redo-only 表示只应用已经提交的事务,不回滚未提交的事务(12:00 ~ 12:30产生很多事务操作,事务处理=>开启事务,成功了提交事务,写入硬盘;失败了回滚事务,不写入硬盘)注意:如果已经回滚了未提交事务,那么就无法再应用增量备份。
Preparing an Incremental Backup with innobackupex Preparing incremental backups is a bit different than full ones. This is, perhaps, the stage where more attention is needed: • First, only the committed transactions must be replayed on each backup. This will merge the base full backup with the incremental ones. • Then, the uncommitted transaction must be rolled back in order to have a ready-to-use backup. 对于增量备份的Prepare阶段,有2个需要注意的地方,一个是提交的事务需要replayed,一个未提交的事务需要rollback。
If you replay the committed transactions and rollback the uncommitted ones on the base backup, you will not be able to add the incremental ones. If you do this on an incremental one, you won’t be able to add data from that moment and the remaining increments. Having this in mind, the procedure is very straight-forward using the --redo-only option, starting with the base backup: 如果在Prepare阶段replay了已提交的事务以及回滚了未提交的事务,则后续的增量备份无法添加到当前全备。因此在Prepare阶段全备应使用--redo-only选项。
--redo-only should be used when merging all incrementals except the last one. That’s why the previous line doesn’t contain the --redo-only option. Even if the --redo-only was used on the last step, backup would still be consistent but in that case server would perform the rollback phase. 对于存在多次增量的情形,仅仅只有最后一个增量不需要使用--redo-only 选项。如果使用了的话,rollback将由服务器启动的时候来完成。
修改数据,让其产生增量数据
mysql> show tables;
+----------------------+
| Tables_in_db_itheima |
+----------------------+
| t1                   |
| t2                   |
+----------------------+
2 rows in set (0.00 sec)

mysql> select * from t1;
+------+--------+
| id   | name   |
+------+--------+
|    1 | 吕布   |
+------+--------+
1 row in set (0.03 sec)

mysql> insert into t1 values(2,'关羽');
Query OK, 1 row affected (0.01 sec)

mysql> select * from t2;
+------+--------+
| id   | name   |
+------+--------+
|    1 | 貂蝉   |
+------+--------+
1 row in set (0.02 sec)

mysql> insert into t2 values(2,'张飞');
Query OK, 1 row affected (0.01 sec)
开始做增量备份
[root@mysql /]# innobackupex --user=admin --password=root --incremental /incre_backup --incremental-basedir=/full_xtrabackup/2024-01-04_02-07-37
把增量备份整合到全量备份中
[root@mysql /]# innobackupex --user=admin --password=root --apply-log /full_xtrabackup/2024-01-04_02-07-37/ --incremental-dir=incre_backup/2024-01-04_02-35-05/
说明: 1.--redo-only除了最后一个不用加之外,其他的增量应用都要加,最后一个应用的时候可以直接进入回滚未提交事务阶段;如果加了也没事,服务启动的时候会进入recovery过程,来回滚
2.应用增量备份的时候只能按照备份的顺序来应用。如果应用顺序错误,那么备份就不可用。如果无法确定顺序,可以使用xtrabackup-checkpoints来确定顺序。
周天做了一个全量,周一、周二、周三、周四、周五、周六全部做增量
其实增量跟差异备份在这实际操作区别很小
增量备份:备份的数据是对上次备份(上次备份可以是全部备份、增量备份)到此时的数据备份
差异备份:备份的数据是对上次完全备份到此时的数据备份
所以差异备份恢复数据是利用上次完全备份文件和最近一次差异备份的数据就可以恢复最近的数据,而增量备份需要一次次的累加恢复数据。
34、MySQL集群
常用的集群架构
MySQL Replicaton
MySQL Cluster
MySQL Group Replication (MGR) 多主一从
MariaDB Galera Cluster
MHA | Keepalived | HeartBeat | Lvs,Haproxy等技术构建高可用集群
35、什么是MySQL复制
Replication可以实现将数据从一台服务器(Master)复制到多台服务器(Slave)
MySQL复制原理
简单来说,master将数据库的改变写入二进制日志,slave同步这些二进制日志,并根据这些二进制日志进行数据重演操作,实现数据的异步同步;
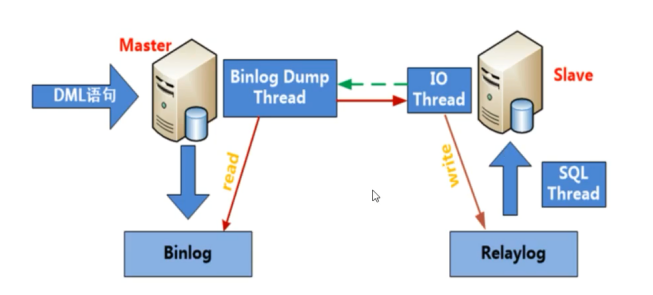
当主从同步配置完毕后:
- slave端的IO线程发送请求给master端的binlog dump线程
- master端binlog dump线程==获取二进制日志==信息(==文件名和位置信息==)发送给slave端的IO线程
- salve端IO线程获取到的内容==依次==写到slave端relay log(中继日志)里,并把master端的bin-log文件名和位置记录到master.info里
- salve端的SQL线程,检测到relay log中内容更新,就会解析relay log里更新的内容,并==执行这些操作==,从而达到和master数据一致
扩展:relay log中继日志
**作用:**记录从(slave)服务器接收来自主(master)服务器的二进制日志.
**场景:**用于==主从复制==
master主服务器将自己的二进制日志发送给slave从服务器,slave先保存在自己的==中继日志中==,然后再执行自己本地的relay log里的sql达到数据库更改和master保持一致。
36、MySQL的复制架构
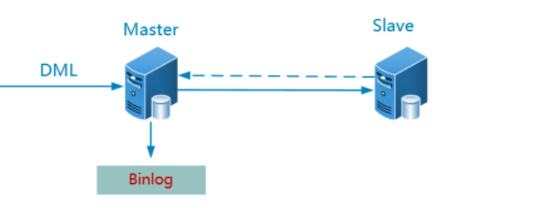
双机热备(默认情况下,master接收读写请求,slave只接受读请求以减轻master的压力)
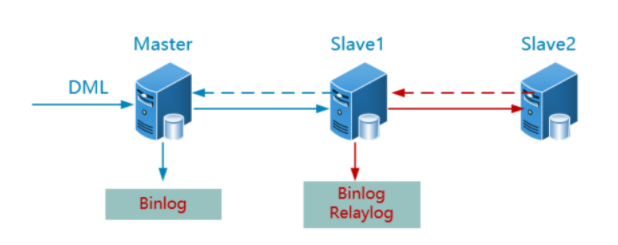
级联复制( 优点:进一步分担读压力;缺点:slave出现故障,后面的所有级联salve服务器都会失败)
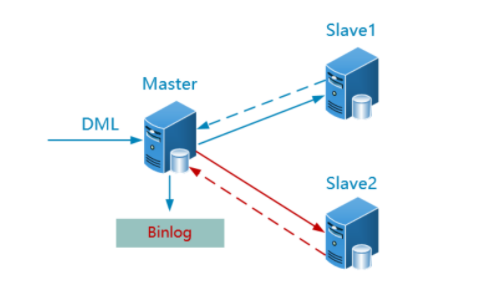
并连复制(一主多从;优点:解决上面的slave1的单点故障,同事也分担读压力;缺点:简介增加了master的压力,传输二进制日志的压力)
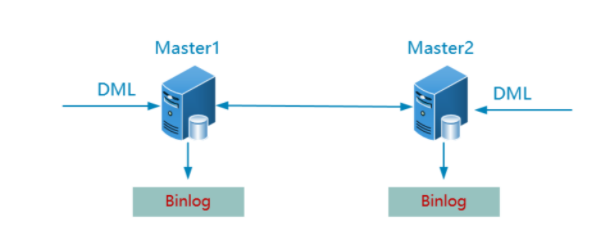
双主复制(从命名来看,两台master好像都能接受读、写请求,但实际上,往往运作的过程中,同一时刻只有其中一台master会接受写请求,另外一台接受读请求)
37、主从复制的搭建、传统AB复制架构(M-S)
主服务器 主机名
192.168.43.87 master
192.168.43.88 slave
master主机命名
[root@localhost ~]# hostnamectl set-hostname master
slave主机重命名
[root@localhost ~]# hostnamectl set-hostname slave
搭建在线yum
wget -O /etc/yum.repos.d/CentOS-Base.repo http://mirrors.cloud.tencent.com/repo/centos7_base.repo
网络设置
[root@master ~]# systemctl stop NetworkManager
[root@master ~]# systemctl disable NetworkManager
Removed symlink /etc/systemd/system/multi-user.target.wants/NetworkManager.service.
Removed symlink /etc/systemd/system/dbus-org.freedesktop.nm-dispatcher.service.
Removed symlink /etc/systemd/system/network-online.target.wants/NetworkManager-wait-online.service.
绑定服务IP与主机名称 /etc/hosts
192.168.43.87 master
192.168.43.88 slave
关闭防火墙
systemctl stop firewalld
systemctl disable firewalld
sed -i '/^SELINUX=/cSELINUX=disabled' /etc/selinux/config
setenforce 0
安装常用的软件包
yum install bash-completion vim net-tools ntpdate wget -y
配置时间同步
http://ntp.org.cn/pool
ntpdate 203.107.6.88
清理环境
[root@slave ~]# rpm -qa | grep mysql
[root@slave ~]# rpm -qa | grep mariadb*
mariadb-libs-5.5.64-1.el7.x86_64
yum remove mariadb-libs-5.5.64-1.el7.x86_64 -y
安装依赖环境
yum install libaio -y
编辑安装脚本(主从)
# vim mysql.sh
#!/bin/bash
tar -xf mysql-5.7.31-linux-glibc2.12-x86_64.tar.gz
rm -rf /usr/local/mysql
mv mysql-5.7.31-linux-glibc2.12-x86_64 /usr/local/mysql
useradd -r -s /sbin/nologin mysql
rm -rf /etc/my.cnf
cd /usr/local/mysql
mkdir mysql-files
chown mysql:mysql mysql-files
chmod 750 mysql-files
bin/mysqld --initialize --user=mysql --basedir=/usr/local/mysql &> /root/password.txt
bin/mysql_ssl_rsa_setup --datadir=/usr/local/mysql/data
cp support-files/mysql.server /etc/init.d/mysqld
service mysqld start
echo 'export PATH=$PATH:/usr/local/mysql/bin' >> /etc/profile
source /etc/profile
主节点查询密码
[root@master tmp]# service mysqld start
Starting MySQL.. SUCCESS!
[root@master tmp]#  cat /root/password.txt | grep password
2024-01-05T03:28:39.328678Z 1 [Note] A temporary password is generated for root@localhost: KM_nn3taq>ko
[root@master tmp]# mysql -uroot -p
Enter password:
主节点修改密码
mysql> set password='root';
Query OK, 0 rows affected (0.00 sec)
从节点修改密码
[root@slave ~]# service mysql start
Redirecting to /bin/systemctl start mysql.service
[root@slave ~]# cat /root/password.txt | grep password
2024-01-05T03:29:30.661385Z 1 [Note] A temporary password is generated for root@localhost: VudZr:NkC9io
[root@slave ~]# mysql -uroot -p
Enter password:
Welcome to the MySQL monitor.  Commands end with ; or \g.
Your MySQL connection id is 2
Server version: 5.7.31

Copyright (c) 2000, 2020, Oracle and/or its affiliates. All rights reserved.

Oracle is a registered trademark of Oracle Corporation and/or its
affiliates. Other names may be trademarks of their respective
owners.

Type 'help;' or '\h' for help. Type '\c' to clear the current input statement.

mysql> set password='root'
    -> ;
Query OK, 0 rows affected (0.01 sec)
主节点编辑my.cnf
[root@master ~]# cd /usr/local/mysql/
[root@master mysql]# ls
bin  data  docs  include  lib  LICENSE  man  mysql-files  README  share  support-files
[root@master mysql]# vi my.cnf
[mysqld]
basedir=/usr/local/mysql
datadir=/usr/local/mysql/data
socket=/tmp/mysql.sock
port=3306
log-error=/usr/local/mysql/data/master.err
log-bin=/usr/local/mysql/data/binlog
server-id=10
character_set_server=utf8mb4
从节点my.cnf
[mysqld]
basedir=/usr/local/mysql
datadir=/usr/local/mysql/data
socket=/tmp/mysql.sock
port=3306
log-error=/usr/local/mysql/data/slave.err
relay-log=/usr/local/mysql/data/relaylog
server-id=100
character_set_server=utf8mb4
主服务器创建账号
create user 'slave'@'192.168.43.%' identified by '123';
grant replication slave on *.* to 'slave'@'192.168.43.%';
flush privileges;
master节点锁表、查看二进制日志的状态
mysql> flush table with read lock;
Query OK, 0 rows affected (0.00 sec)

mysql> show master status;
+---------------+----------+--------------+------------------+-------------------+
| File          | Position | Binlog_Do_DB | Binlog_Ignore_DB | Executed_Gtid_Set |
+---------------+----------+--------------+------------------+-------------------+
| binlog.000001 |      154 |              |                  |                   |
+---------------+----------+--------------+------------------+-------------------+
1 row in set (0.00 sec)
从服务器执行
mysql> change master to master_host='192.168.43.87',master_user='slave',master_password='123',master_port=3306,master_log_file='binlog.000001',master_log_pos=154;
Query OK, 0 rows affected, 2 warnings (0.04 sec)

mysql>
master_host:主机的IP地址
master_user:主机的user账号
master_password:主机的user账号密码
master_port:主机MySQL的端口号
master_log_file:二进制日志文件名称
master_log_pos:二进制日志文件位置
从服务器开启同步
mysql> start slave;
Query OK, 0 rows affected (0.03 sec)
mysql> show slave status\G
*************************** 1. row ***************************
               Slave_IO_State: Waiting for master to send event
                  Master_Host: 192.168.43.87
                  Master_User: slave
                  Master_Port: 3306
                Connect_Retry: 60
              Master_Log_File: binlog.000001
          Read_Master_Log_Pos: 154
               Relay_Log_File: relaylog.000002
                Relay_Log_Pos: 317
        Relay_Master_Log_File: binlog.000001
             Slave_IO_Running: Yes
            Slave_SQL_Running: Yes
              Replicate_Do_DB:
          Replicate_Ignore_DB:
           Replicate_Do_Table:
       Replicate_Ignore_Table:
      Replicate_Wild_Do_Table:
  Replicate_Wild_Ignore_Table:
                   Last_Errno: 0
                   Last_Error:
                 Skip_Counter: 0
          Exec_Master_Log_Pos: 154
              Relay_Log_Space: 517
              Until_Condition: None
               Until_Log_File:
                Until_Log_Pos: 0
           Master_SSL_Allowed: No
           Master_SSL_CA_File:
           Master_SSL_CA_Path:
              Master_SSL_Cert:
            Master_SSL_Cipher:
               Master_SSL_Key:
        Seconds_Behind_Master: 0
Master_SSL_Verify_Server_Cert: No
                Last_IO_Errno: 0
                Last_IO_Error:
               Last_SQL_Errno: 0
               Last_SQL_Error:
  Replicate_Ignore_Server_Ids:
             Master_Server_Id: 10
                  Master_UUID: 83f3cfa8-ab7a-11ee-9cc5-000c29aa5c2f
             Master_Info_File: /usr/local/mysql/data/master.info
                    SQL_Delay: 0
          SQL_Remaining_Delay: NULL
      Slave_SQL_Running_State: Slave has read all relay log; waiting for more updates
           Master_Retry_Count: 86400
                  Master_Bind:
      Last_IO_Error_Timestamp:
     Last_SQL_Error_Timestamp:
               Master_SSL_Crl:
           Master_SSL_Crlpath:
           Retrieved_Gtid_Set:
            Executed_Gtid_Set:
                Auto_Position: 0
         Replicate_Rewrite_DB:
                 Channel_Name:
           Master_TLS_Version:
1 row in set (0.00 sec)
主服务器解锁
mysql> unlock tables;
Query OK, 0 rows affected (0.00 sec)
主服务器创建数据库
mysql> create database db01;
Query OK, 1 row affected (0.01 sec)
从服务器查看
mysql> show databases;
+--------------------+
| Database           |
+--------------------+
| information_schema |
| db01               |
| mysql              |
| performance_schema |
| sys                |
+--------------------+
5 rows in set (0.01 sec)
主从复制搭建总结
- 主从复制必须保证两台数据库实例的server-id不一致
- 主服务器必须开启二进制日志;从服务器必须开启中继日志
- 主从复制搭建必须保证初始数据一致
- 主服务器必须要给从服务器==创建一个复制用户,并授予复制权限
- Master—>Slave架构,主写会同步到从;而从写不会同步到主
slave不小心写入数据解决方案:
正常情况下:MASTER既可以读,也可以写。但是SLAVE从服务器,只能执行读取操作。一旦我们在SLAVE从服务器中写入数据,则主从架构会失败。
遇到以上问题:如果数量较少,还可以通过跳过当前语句的方式解决。但是如果从服务器写入数据过多,则以上架构必须要重新搭建了!
解决方案:
问:如果由于人为操作或者其他原因直接将数据更改到从服务器导致数据同步失效,怎么解决?
答:可以通过变量`sql_slave_skip_counter`临时跳过事务进行处理
SET GLOBAL sql_slave_skip_counter = N N代表跳过N个事务
举例说明:
mysql> SET GLOBAL sql_slave_skip_counter=1;
mysql> stop slave;
mysql> start slave;
注意:
1. 跳过事务应该在slave上进行
2. 传统的AB复制方式可以使用变量:sql_slave_skip_counter,基于GTIDs的方式不支持
37、基于GTIDs的主从复制搭建
什么是GTIDs以及有什么特点:
- GTIDs(Global transaction identifieers) 全局事务标识符,是MySLQ5.6新加入的一项技术;
- 当使用GTIDs时候,每一个事务都可以被识别并跟踪;
- 添加新的slave或者当发生故障需要将master身份或者角色迁移到slave上时,都无需考虑哪一个二进制日志及哪个position值,极大简化了相关的操作;
- GTIDs是完全基于事务的,因此不支持MYISAM存储引擎l;
- GTID是由source_id和transaction_id组成;
1)source_id来自于server_uuid,可以在auto.cnf中看到
2)transation_id是一个序列数字,自动生成.
38、基于GTIDs的主从复制搭建
修改主服务器的配置文件
[mysqld]
basedir=/usr/local/mysql
datadir=/usr/local/mysql/data
socket=/tmp/mysql.sock
port=3306
log-error=/usr/local/mysql/data/master.err
log-bin=/usr/local/mysql/data/binlog
server-id=10
character_set_server=utf8mb4
gtid-mode=on
log-slave-updates=1
enforce-gtid-consistency
从节点修改
[mysqld]
basedir=/usr/local/mysql
datadir=/usr/local/mysql/data
socket=/tmp/mysql.sock
port=3310
log-error=/usr/local/mysql/data/slave.err
relay-log=/usr/local/mysql/data/relaylog
server-id=100
character_set_server=utf8mb4
log-bin=/usr/local/mysql/data/binlog
gtid-mode=on
log-slave-updates=1
enforce-gtid-consistency
skip-slave-start
说明:
1)开启GITDs需要在master和slave上都配置gtid-mode,log-bin,log-slave-updates,enforce-gtid-consistency(该参数在5.6.9之前是--disable-gtid-unsafe-statement)
2)其次,slave还需要增加skip-slave-start参数,目的是启动的时候,先不要把slave起来,需要做一些配置
3)基于GTIDs复制从服务器必须开启二进制日志!
重新启动服务:
[root@master mysql]# service mysqld restart
Shutting down MySQL............ SUCCESS!
Starting MySQL. SUCCESS!
从重新启动
[root@slave data]# service mysqld restart
Shutting down MySQL.... SUCCESS!
Starting MySQL. SUCCESS!
主从配置只读模式
mysql> set @@global.read_only=ON;
Query OK, 0 rows affected (0.02 sec)
从节点停止,并重置
mysql> stop slave;
Query OK, 0 rows affected, 1 warning (0.00 sec)

mysql> reset slave;
Query OK, 0 rows affected (0.03 sec)
从节点从小配置主节点
change master to master_host='192.168.43.87',master_user='slave',master_password='123',master_port=3306,master_auto_position=1;
启动从节点
mysql> start slave;
Query OK, 0 rows affected (0.00 sec)
关闭主从的只读模式
38、半同步复制
所谓的半同步复制就是master每commit一个事务(简单来说就是做一个改变数据的操作),要确保slave接收完全接受完主服务器发送的binlog日志文件,并写入到自己的中继日志relylog里边,然后会给master信号,告诉对方已经接受完毕,这样maser才能把事务成功commit,这样就保证了master-slave的数据绝对一致,
半同步复制的实现
第一步:准备一套M-S的主从架构(建议使用基于GTIDs架构设计)
第二步:给MASTER与SLAVE安装plugins插件
mysql> install plugin rpl_semi_sync_master soname 'semisync_master.so';
Query OK, 0 rows affected (0.29 sec)
查看
mysql> show global variables like 'rpl_semi_sync%';
+-------------------------------------------+------------+
| Variable_name                             | Value      |
+-------------------------------------------+------------+
| rpl_semi_sync_master_enabled              | OFF        |  是否启用master的半同步复制
| rpl_semi_sync_master_timeout              | 10000      |  默认主等待从返回信息的超时时间
| rpl_semi_sync_master_trace_level          | 32         |  用于开启半同步复制模式的调试级别
| rpl_semi_sync_master_wait_for_slave_count | 1          |
| rpl_semi_sync_master_wait_no_slave        | ON         |   是否允许每个事务的提交都要等待slave的信号,on为每一个事务都等待,off则表示slave追赶上后
| rpl_semi_sync_master_wait_point           | AFTER_SYNC |
+-------------------------------------------+------------+
6 rows in set (0.00 sec)
从节点安装插件
mysql> install plugin rpl_semi_sync_slave soname 'semisync_slave.so';
Query OK, 0 rows affected (0.01 sec)
查看从节点的安装
mysql> show global variables like 'rpl_semi_sync%';
+---------------------------------+-------+
| Variable_name                   | Value |
+---------------------------------+-------+
| rpl_semi_sync_slave_enabled     | OFF   |  slave是否启用半同步复制
| rpl_semi_sync_slave_trace_level | 32    |
+---------------------------------+-------+
2 rows in set (0.01 sec)
激活MASTER与SLAVE的半同步复制
master:
mysql> set global rpl_semi_sync_master_enabled =on ;
Query OK, 0 rows affected (0.03 sec)
查看状态
mysql> show global status like 'rpl_semi_sync%';
+--------------------------------------------+-------+
| Variable_name                              | Value |
+--------------------------------------------+-------+
| Rpl_semi_sync_master_clients               | 0     |
| Rpl_semi_sync_master_net_avg_wait_time     | 0     |
| Rpl_semi_sync_master_net_wait_time         | 0     |
| Rpl_semi_sync_master_net_waits             | 0     |
| Rpl_semi_sync_master_no_times              | 0     |
| Rpl_semi_sync_master_no_tx                 | 0     |
| Rpl_semi_sync_master_status                | ON    |
| Rpl_semi_sync_master_timefunc_failures     | 0     |
| Rpl_semi_sync_master_tx_avg_wait_time      | 0     |
| Rpl_semi_sync_master_tx_wait_time          | 0     |
| Rpl_semi_sync_master_tx_waits              | 0     |
| Rpl_semi_sync_master_wait_pos_backtraverse | 0     |
| Rpl_semi_sync_master_wait_sessions         | 0     |
| Rpl_semi_sync_master_yes_tx                | 0     |
+--------------------------------------------+-------+
14 rows in set (0.01 sec)
slave:
mysql> set global rpl_semi_sync_slave_enabled=ON;
Query OK, 0 rows affected (0.00 sec)
查看状态
mysql> show global variables like 'rpl_semi_sync%';
+---------------------------------+-------+
| Variable_name                   | Value |
+---------------------------------+-------+
| rpl_semi_sync_slave_enabled     | ON    |
| rpl_semi_sync_slave_trace_level | 32    |
+---------------------------------+-------+
2 rows in set (0.01 sec)
从服务器重启IP线程:
mysql> stop slave IO_THREAD;
Query OK, 0 rows affected (0.00 sec)

mysql> start slave IO_THREAD;
Query OK, 0 rows affected (0.00 sec)
验证测试,在主服务器插入数据,看从服务器有没有成功返回,
mysql> create database db06;
Query OK, 1 row affected (0.01 sec)

mysql> show global status like 'rpl_semi_sync%_yes_tx';
+-----------------------------+-------+
| Variable_name               | Value |
+-----------------------------+-------+
| Rpl_semi_sync_master_yes_tx | 1     |
+-----------------------------+-------+
1 row in set (0.01 sec)
继续验证
mysql> create table test(id int);
Query OK, 0 rows affected (0.03 sec)

mysql> show global status like 'rpl_semi_sync%_yes_tx';
+-----------------------------+-------+
| Variable_name               | Value |
+-----------------------------+-------+
| Rpl_semi_sync_master_yes_tx | 2     |
+-----------------------------+-------+
1 row in set (0.01 sec)
模拟slave故障
停止从服务器
[root@slave ~]# service mysqld stop
Shutting down MySQL.. SUCCESS!
停止后在主服务器插入数据,插入数据的时候默认等待10s,10s后从服务器没有反映,才可以插入数据。
mysql> insert into test values(2);
Query OK, 1 row affected (10.05 sec)

mysql> show global status like 'rpl_semi_sync%_yes_tx';
+-----------------------------+-------+
| Variable_name               | Value |
+-----------------------------+-------+
| Rpl_semi_sync_master_yes_tx | 2     |
+-----------------------------+-------+
1 row in set (0.01 sec)
继续插入数据,是立马就查入了,从服务器已经没有响应了,自动转换为之前的异步模型;
mysql> insert into test values(3);
Query OK, 1 row affected (0.01 sec)
重新启动从节点,必须要启动从节点
[root@slave ~]# service mysqld start
Starting MySQL. SUCCESS!
mysql> start slave;
Query OK, 0 rows affected (0.01 sec)
重新启动从节点的半同步复制;
查看状态:
mysql>  show global variables like 'rpl_semi_sync%';
+---------------------------------+-------+
| Variable_name                   | Value |
+---------------------------------+-------+
| rpl_semi_sync_slave_enabled     | OFF   |
| rpl_semi_sync_slave_trace_level | 32    |
+---------------------------------+-------+
2 rows in set (0.03 sec)
启动
mysql> set global rpl_semi_sync_slave_enabled=on;
Query OK, 0 rows affected (0.00 sec)

mysql>  show global variables like 'rpl_semi_sync%';
+---------------------------------+-------+
| Variable_name                   | Value |
+---------------------------------+-------+
| rpl_semi_sync_slave_enabled     | ON    |
| rpl_semi_sync_slave_trace_level | 32    |
+---------------------------------+-------+
2 rows in set (0.01 sec)
重新启动IO的同步
mysql> stop slave IO_THREAD;
Query OK, 0 rows affected, 1 warning (0.00 sec)

mysql> start slave IO_THREAD;
Query OK, 0 rows affected (0.00 sec)
测试结果:
master需要等到slave确认后才能提交,如果等不到确认消息,master等待10s后自动变成异步同步,slave启动后,master上该表数据还是自动复制过来,数据又回到一致。
调整等待时间:
mysql> show global variables like 'rpl_semi_sync%';
+-------------------------------------------+------------+
| Variable_name                             | Value      |
+-------------------------------------------+------------+
| rpl_semi_sync_master_enabled              | ON         |
| rpl_semi_sync_master_timeout              | 10000      |
| rpl_semi_sync_master_trace_level          | 32         |
| rpl_semi_sync_master_wait_for_slave_count | 1          |
| rpl_semi_sync_master_wait_no_slave        | ON         |
| rpl_semi_sync_master_wait_point           | AFTER_SYNC |
+-------------------------------------------+------------+
6 rows in set (0.01 sec)
调整
mysql> set global rpl_semi_sync_master_timeout=90000;
Query OK, 0 rows affected (0.00 sec)

mysql> show global variables like 'rpl_semi_sync%';
+-------------------------------------------+------------+
| Variable_name                             | Value      |
+-------------------------------------------+------------+
| rpl_semi_sync_master_enabled              | ON         |
| rpl_semi_sync_master_timeout              | 90000      |
| rpl_semi_sync_master_trace_level          | 32         |
| rpl_semi_sync_master_wait_for_slave_count | 1          |
| rpl_semi_sync_master_wait_no_slave        | ON         |
| rpl_semi_sync_master_wait_point           | AFTER_SYNC |
+-------------------------------------------+------------+
6 rows in set (0.01 sec)
39、插件卸载
查看已经安装的插件
mysql> select plugin_name,load_option from information_schema.plugins;
+----------------------------+-------------+
| plugin_name                | load_option |
+----------------------------+-------------+
| binlog                     | FORCE       |
| mysql_native_password      | FORCE       |
| sha256_password            | FORCE       |
| PERFORMANCE_SCHEMA         | FORCE       |
| MEMORY                     | FORCE       |
| MRG_MYISAM                 | FORCE       |
| InnoDB                     | FORCE       |
| INNODB_TRX                 | FORCE       |
| INNODB_LOCKS               | FORCE       |
卸载命令(先停服务,后协助)
mysql> uninstall plugin rpl_semi_sync_master;
40、MHA搭建
MHA(Master High Availability)目前在MySQL高可用方面是一个相对成熟的解决方案,它由日本DeNA公司youshimaton(现就职于Facebook公司)开发,是一套优秀的作为MySQL高可用性环境下==故障切换和主从提升==的高可用软件。在MySQL故障切换过程中,MHA能做到在0~30秒之内自动完成数据库的故障切换操作,并且在进行故障切换的过程中,MHA能在==较大程度==上保证数据的一致性,以达到真正意义上的高可用。

MHA组件
- MHA Manager**(管理节点)
MHA Manager可以单独部署在一台独立的机器上管理多个==master-slave集群==,也可以部署在一台slave节点上。
- MHA Node**(数据节点)
MHA Node运行在==每台MySQL服务器==上,MHA Manager会定时探测集群中的master节点,当master出现故障时,它可以自动将数据的slave提升为新的master,然后将所有其他的slave重新指向新的master。整个故障转移过程对应用程序完全透明。
MHA组件介绍
- MHA Manager
运行一些工具,比如masterha_manager工具实现==自动监控MySQL Master==和实现==master故障切换==,其它工具手动实现master故障切换、在线mater转移、连接检查等等。一个Manager可以管理多 个master-slave集群
- MHA Node
部署在所有运行MySQL的服务器上,无论是master还是slave。主要有三个作用:
1)保存二进制日志
如果能够访问故障master,会拷贝master的二进制日志
2)应用差异中继日志
从拥有最新数据的slave上生成差异中继日志,然后应用差异日志。
3)清除中继日志
在不停止SQL线程的情况下删除中继日志
优点:
- 使用Perl脚本语言开发并且完全开源,开发者可以根据自己的需求进行二次开发
- 能够支持基于GTID和基于日志点的复制模式
- MHA在进行故障转移时更不易产生数据丢失
- 在一个监控节点上可以监控多个Replication集群
缺点:
- MHA默认不提供虚拟IP功能,需要自行编写脚本或利用第三方工具来实现虚拟IP的配置
- MHA启动后只会对Master进行监控,不会对Slave进行监控,也无法监控复制链路的情况
- 集群环境需要能够通过
ssh免密登录,存在一定的安全隐患 - MHA没有提供对Slave的读负载均衡功能,需要通过第三方工具来实现

 浙公网安备 33010602011771号