
kubernetes学习及搭建多master教程
1、简介
Kubernetes, also known as K8s, is an open-source system for automating deployment, scaling伸缩, and management of containerized applications.
It groups containers that make up an application into logical units for easy management and discovery它将组成应用程序的容器组合成逻辑单元,以便管理和服务发现.Kuberntes builds upon 15 years of experience of running production workloads at Google,combined with best-of-breed ideas and practies from the community.
2、主要特征
以服务为中心;
自动化;
用户容器化应用部署,扩展和管理,目的让容器化应用简单高效。
3、Kubernetes的主要组件

Control Plane Components
The control plane's components make global decisions about the cluster (for example, scheduling), as well as detecting and responding to cluster events (for example, starting up a new pod when a deployment's replicas field is unsatisfied).
Control plane components can be run on any machine in the cluster. However, for simplicity简单, set up scripts typically start all control plane components on the same machine, and do not run user containers on this machine. See Creating Highly Available clusters with kubeadm for an example control plane setup that runs across multiple machines.
Kube-apiserver 集群的访问入口 默认端口6443
The API server is a component组件 of the Kubernetes control plane that exposes暴露 the Kubernetes API. The API server is the front end前端 for the Kubernetes control plane.
The main implementation实施 of a Kubernetes API server is kube-apiserver(Kubernetes API 服务器的主要实现是kube-apiserver). kube-apiserver is designed to scale horizontally—that is, it scales by deploying more instances. You can run several instances of kube-apiserver and balance traffic between those在多个实例之间平衡流量。
Kubernetes API,集群的统一入口,各组件协调者,以RESTfulAPI提供接口服务,所有对象资源的增删改查和监听操作都交给APIServer处理后在提交给Etcd存储。
kube-scheduler 资源的调度
根据调度算法为新创建的Pod选择一个Node节点,可以任意部署,可以部署在同一节点上,也可以部署在不同节点上。
Control plane component that watches for newly created Pods with no assigned node, and selects a node for them to run on.
kube-scheduler是Control plane 组件负责监视新创建的,未指定运行的node的pods,并选择节点来让Pod在上面运行。
Factors taken into account for scheduling decisions include: individual单独的 and collective resource requirements, hardware/software/policy constraints, affinity and anti-affinity specifications, data locality, inter-workload interference, and deadlines.
kube-controller-manager 管理后台任务
处理集群中常规后台任务,一个资源对应一个控制器,而ControllerManager就是负责管理这些控制器的,例如Deployment,Service
Control plane component that runs controller processes.
Logically, each controller is a separate process, but to reduce complexity, they are all compiled into a single binary and
run in a single process.
Some types of these controllers are:
Node controller: Responsible for noticing and responding when nodes go down.负责在节点出现故障时进行通知和响应。
Job controller: Watches for Job objects that represent one-off tasks, then creates Pods to run those tasks to completion.
EndpointSlice controller: Populates EndpointSlice objects (to provide a link between Services and Pods).
ServiceAccount controller: Create default ServiceAccounts for new namespaces.
cloud-controller-manager
Etcd
存储集群的数据,k8s的数据库。分布式键值存储系统,用于保存集群状态数据,比如Pod,Service等对象信息。
Node Components(节点组件)
Node components run on every node,maintaining running pods and providing the Kubernetes runtime environment.
kubelet 相当于agent,管理容器
kubelet是Master在Node节点上的Agent,管理本机运行容器的生命周期,比如创建容器、Pod挂载数据卷,下载secret、获取容器和节点状态等工作。kubelet将每个pod转换成一组容器。
An agent that runs on each node in the cluster.It makes sure that containers are runing in Pod.
The kubelet takes a set of PodSpecs that are provided through varioous mechainisms and ensures that the containers described in those Podspecs are running and healthy.The kubelet doesn't manage containers which were not created by Kubernetes.
kubelet 接收一组通过各类机制提供给它的 PodSpecs, 确保这些 PodSpecs 中描述的容器处于运行状态且健康。 kubelet 不会管理不是由 Kubernetes 创建的容器。
kubelet-proxy 管理容器网络
在Node节点上实现Pod网路代理,维护网络规则和四层负载均衡工作。
第三方容器引擎,例如docker、containerd、podman
容器引擎,运行容器。
4、搭建基础环境
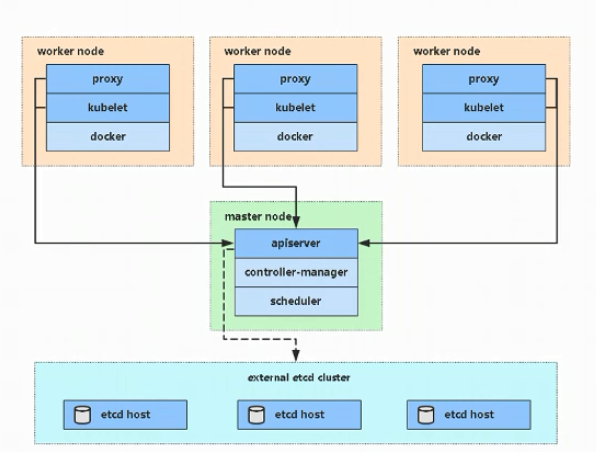
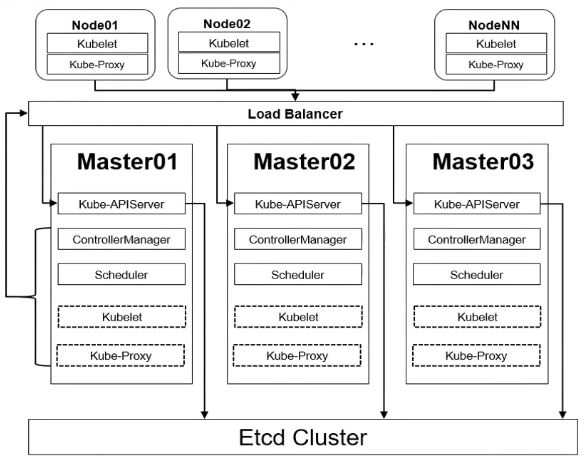
搭建架构展示
4.1 环境准备
三台主节点,两台台从节点,操作系统CentOS7.9,master节点VIP地址为 192.168.4.53
192.168.4.50   master01
192.168.4.51   master02
192.168.4.52   master03
192.168.4.53   masterlb
192.168.4.54   node1
192.168.4.55   node2
要每个节点的mac和uuid不一样
[root@master01 ens33]# cat /sys/class/net/ens33/address
[root@master01 ens33]# cat /sys/class/dmi/id/product_uuid
设置四五台主机名
[root@localhost ~]# hostnamectl set-hostname master01
[root@localhost ~]# hostnamectl set-hostname master02
[root@localhost ~]# hostnamectl set-hostname master03
[root@localhost ~]# hostnamectl set-hostname node01
[root@localhost ~]# hostnamectl set-hostname node02
4.2 配置hosts文件,五台都配置,不要删除hosts文件中之前的东西
[root@localhost ~]# vi /etc/hosts
192.168.4.50   master01
192.168.4.51   master02
192.168.4.52   master03
192.168.4.53   masterlb
192.168.4.54   node01
192.168.4.55   node02
4.3安装依赖包,四台都配置
首先搭建yum
cd /etc/yum.repos.d/
mkdir bak
mv *.repo bak
wget -O /etc/yum.repos.d/CentOS-Base.repo http://mirrors.aliyun.com/repo/Centos-7.repo
安装依赖包
[root@localhost ~]# yum install -y conntrack ipvsadm ipset jq sysstat curl iptables libseccomp utils device-mapper persistent-data lvm2 yum-utils device-mapper-persistent-data
4.4 关闭防火墙、SELINUX、SWAP,五台台都配置
[root@master01 ~]# systemctl  stop firewalld && systemctl disable firewalld
[root@node02 yum.repos.d]# systemctl stop --now NetworkManager
[root@node02 yum.repos.d]# systemctl disable NetworkManager
4.5 关闭DNS
[root@node02 zoneinfo]# systemctl disable dnsmasq
4.6 关闭SWAP
[root@master01 ~]# swapoff -a
[root@master01 ~]# sed -i '/swap/s/^\(.*\)$/#\1/g' /etc/fstab
4.7 关闭selinux防火墙
[root@master01 ~]# setenforce 0
setenforce: SELinux is disabled
[root@master01 ~]# systemctl disable firewalld
selinux设置为disabled
SELINUX=disabled
4.8 设置时间同步(所有节点)
[root@master01 ~]# yum install ntpdate -y
同步一次时间
[root@node02 ~]# ntpdate time.windows.com
将时间同步加入到定时任务
[root@node02 ~]# crontab -e
*/5 * * * *  ntpdate time.windows.com
第二中同步时间的方法:
vim /etc/chrony.conf
server ntp1.aliyun.com iburst
server ntp2.aliyun.com iburst
查看时区是否正确
[root@node01 ~]# timedatectl
      Local time: Sat 2023-02-18 00:01:57 EST
  Universal time: Sat 2023-02-18 05:01:57 UTC
        RTC time: Sat 2023-02-18 05:01:57
       Time zone: America/New_York (EST, -0500)
     NTP enabled: yes
NTP synchronized: yes
 RTC in local TZ: no
      DST active: no
 Last DST change: DST ended at
                  Sun 2022-11-06 01:59:59 EDT
                  Sun 2022-11-06 01:00:00 EST
 Next DST change: DST begins (the clock jumps one hour forward) at
                  Sun 2023-03-12 01:59:59 EST
                  Sun 2023-03-12 03:00:00 EDT
设置上海时区
[root@node01 ~]# timedatectl set-timezone 'Asia/Shanghai'
重启服务:
[root@node01 ~]# systemctl restart chronyd.service
systemctl restart chronyd.service
4.9升级内核
rpm --import https://www.elrepo.org/RPM-GPG-KEY-elrepo.org
rpm -Uvh http://www.elrepo.org/elrepo-release-7.0-2.el7.elrepo.noarch.rpm
查看内核升级包的版本
#yum --disablerepo="*" --enablerepo="elrepo-kernel" list available
yum --enablerepo=elrepo-kernel install kernel-ml -y
sed -i 's/saved/0/g' /etc/default/grub
检查默认内核
grubby --default-kernel

grub2-mkconfig -o /boot/grub2/grub.cfg
reboot
查看版本
 [root@master01 ~]# uname -r
6.1.12-1.el7.elrepo.x86_64
4.10 设置limit参数
cat >> /etc/security/limits.conf <<EOF
* soft nofile 655360
* hard nofile 131072
* soft nproc 655350
* hard nproc 655350
* soft memlock unlimited
* hard memlock unlimited
EOF
4.11 master节点一免密登陆其他节点(master01执行)
[root@master01 ~]# ssh-keygen -t rsa
将密钥拷贝到其他节点
[root@master01 ~]# for i in master01 master02 master03 node01 node02;do ssh-copy-id -i .ssh/id_rsa.pub $i;done
4.12配置 docker的yum源
yum-config-manager --add-repo http://mirrors.aliyun.com/docker-ce/linux/centos/docker-ce.repo
4.13 部署kubernetes的镜像源
cat > /etc/yum.repos.d/kubernetes.repo << EOF
[kubernetes]
name=Kubernetes
baseurl=https://mirrors.aliyun.com/kubernetes/yum/repos/kubernetes-el7-x86_64
enabled=1
gpgcheck=0
repo_gpgcheck=0
gpgkey=https://mirrors.aliyun.com/kubernetes/yum/doc/yum-key.gpg https://mirrors.aliyun.com/kubernetes/yum/doc/rpm-package-key.gpg
EOF
4.14 在安装一次依赖包
yum install -y wget jg pamisc vim net-tools telnet yum-utils device-mapper-persistent-data
4.15 安装ipvsadm
yum install -y wget jg pamisc vim net-tools telnet yum-utils device-mapper-persistent-data
配置ipvs模块,所有节点配置ipvs模块,在内核4.19+版本nf_conntrack_ipv4已经改为nf_conntrack, 4.18以下使用nf_conntrack_ipv4即可
modprobe -- ip_vs
modprobe -- ip_vs_rr
modprobe -- ip_vs_wrr
modprobe -- ip_vs_sh
modprobe -- nf_conntrack
创建文件
cat >> /etc/modules-load.d/ipvs.conf <<EOF
ip_vs
ip_vs_lc
ip_vs_wlc
ip_vs_rr
ip_vs_wrr
ip_vs_lblc
ip_vs_lblcr
ip_vs_dh
ip_vs_sh
ip_vs_fo
ip_vs_nq
ip_vs_sed
ip_vs_ftp
ip_vs_sh
nf_conntrack
ip_tables
ip_set
xt_set
ipt_set
ipt_rpfilter
ipt_REJECT
ipip
EOF
启动服务
systemctl enable --now systemd-modules-load.service
查看是否加载
[root@master01 modules-load.d]# lsmod | grep -e ip_vs -e nf_conntrack
ip_vs_sh 16384 0
ip_vs_wrr 16384 0
ip_vs_rr 16384 0
ip_vs 163840 6 ip_vs_rr,ip_vs_sh,ip_vs_wrr
nf_conntrack 167936 1 ip_vs
nf_defrag_ipv4 16384 1 nf_conntrack
nf_defrag_ipv6 24576 2 nf_conntrack,ip_vs
libcrc32c 16384 3 nf_conntrack,xfs,ip_vs
配置内核参数
cat <<EOF > /etc/sysctl.d/k8s.conf
net.ipv4.ip_forward = 1
net.bridge.bridge-nf-call-iptables = 1
net.bridge.bridge-nf-call-ip6tables = 1
fs.may_detach_mounts = 1
vm.overcommit_memory=1
vm.panic_on_oom=0
fs.inotify.max_user_watches=89100
fs.file-max=52706963
fs.nr_open=52706963
net.netfilter.nf_conntrack_max=2310720
net.ipv4.tcp_keepalive_time = 600
net.ipv4.tcp_keepalive_probes = 3
net.ipv4.tcp_keepalive_intvl =15
net.ipv4.tcp_max_tw_buckets = 36000
net.ipv4.tcp_tw_reuse = 1
net.ipv4.tcp_max_orphans = 327680
net.ipv4.tcp_orphan_retries = 3
net.ipv4.tcp_syncookies = 1
net.ipv4.tcp_max_syn_backlog = 16384
net.ipv4.ip_conntrack_max = 65536
net.ipv4.tcp_max_syn_backlog = 16384
net.ipv4.tcp_timestamps = 0
net.core.somaxconn = 16384
EOF
重新加载
sysctl --system
5、安装集群组件
5.1安装docker
查看可以安装的版本
[root@node02 ~]# yum list docker-ce --showduplicates|sort -r
安装docker
yum install docker-ce-19.03.* -y
开机启动
systemctl enable docker && systemctl start docker
设置镜像加速
cat  > /etc/docker/daemon.json  << EOF
{
      "registry-mirrors": ["https://j75wwuc0.mirror.aliyuncs.com"], "exec-opts": ["native.cgroupdriver=systemd"]
}
EOF
5.2 k8s安装
安装软件包,高版本的不支持docker
yum install -y kubelet-1.19.0 kubeadm-1.19.0 kubectl-1.19.0
设置开机启动
systemctl enable kubelet && systemctl start kubelet
查看隔离
[root@node02 ~]# DOCKER_CGROUPS=$(docker info | grep 'Cgroup' | cut -d' ' -f4)
[root@node02 ~]# echo $DOCKER_CGROUPS
cgroupfs
修改配置文件
cat >/etc/sysconfig/kubelet<<EOF
KUBELET_EXTRA_ARGS="--cgroup-driver=$DOCKER_CGROUPS --pod-infra-container-image=registry.cn-hangzhou.aliyuncs.com/google_containers/pause-amd64:3.1"
EOF
设置开机启动
systemctl daemon-reload && systemctl enable --now kubelet
这时候kubelet还不能正常启动,等待后续初始化K8s
6、安装高可用组件
6.1 master节点安装
yum install keepalived haproxy -y
6.2 配置HAProxy
mv /etc/haproxy/haproxy.cfg /etc/haproxy/haproxy.cfg.bak
重新创建一个配置文件,三台主节点都配置,注意修改结尾的地址及主机名
#---------------------------------------------------------------------
# Example configuration for a possible web application.  See the
# full configuration options online.
#
#   http://haproxy.1wt.eu/download/1.4/doc/configuration.txt
#
#---------------------------------------------------------------------
#---------------------------------------------------------------------
# Global settings
#---------------------------------------------------------------------
global
    # to have these messages end up in /var/log/haproxy.log you will
    # need to:
    #
    # 1) configure syslog to accept network log events.  This is done
    #    by adding the '-r' option to the SYSLOGD_OPTIONS in
    #    /etc/sysconfig/syslog
    #
    # 2) configure local2 events to go to the /var/log/haproxy.log
    #   file. A line like the following can be added to
    #   /etc/sysconfig/syslog
    #
    #    local2.*                       /var/log/haproxy.log
    #
    log         127.0.0.1 local2

    chroot      /var/lib/haproxy
    pidfile     /var/run/haproxy.pid
    maxconn     4000
    user        haproxy
    group       haproxy
    daemon

    # turn on stats unix socket
    stats socket /var/lib/haproxy/stats
#---------------------------------------------------------------------
# common defaults that all the 'listen' and 'backend' sections will
# use if not designated in their block
#---------------------------------------------------------------------
defaults
    mode                    http
    log                     global
    option                  httplog
    option                  dontlognull
    option http-server-close
    option forwardfor       except 127.0.0.0/8
    option                  redispatch
    retries                 3
    timeout http-request    10s
    timeout queue           1m
    timeout connect         10s
    timeout client          1m
    timeout server          1m
    timeout http-keep-alive 10s
    timeout check           10s
    maxconn                 3000
#######################################################################
#-------------------------------k8s master up------------------------------
frontend k8s-master
  bind 0.0.0.0:8443
  bind 127.0.0.1:6443
  mode tcp
  option tcplog
  tcp-request inspect-delay 5s
  default_backend k8s-master

backend k8s-master
  mode tcp
  option tcplog
  option tcp-check
  balance roundrobin
  default-server inter 10s downinter 5s rise 2 fall 2 slowstart 60s maxconn 250 maxqueue 256 weight 100
  server master01    192.168.4.50:6443  check
  server master02    192.168.4.51:6443  check
  server master03    192.168.4.52:6443  check
#-------------------------------k8s master end-----------------------------
#---------------------------------------------------------------------
# round robin balancing between the various backends
#---------------------------------------------------------------------
listen stats
    bind *:1080
    stats auth admin:Admin@123
    stats refresh 5s
    stats realm HAProxy\ Statistics
    stats uri /admin
6.3 、配置Keepalived
mv /etc/keepalived/keepalived.conf /etc/keepalived/keepalived.conf.bak
master01配置
vi /etc/keepalived/keepalived.conf
! Configuration File for keepalived
global_defs {
   router_id LVS_DEVEL
}
vrrp_script check_ha {
    script "/etc/keepalived/check_ha.sh"
    interval 5
    weight -5
    fall 2
    rise 1
}
vrrp_instance VI_1 {
    state MASTER
    interface ens33
    mcast_src_ip 192.168.4.50
    virtual_router_id 51
    priority 100
    advert_int 2
    authentication {
        auth_type PASS
        auth_pass K8SHA_KA_AUTH
    }
    virtual_ipaddress {
        192.168.0.200
    }
    track_script {
        check_ha
    }
}
master02
! Configuration File for keepalived
global_defs {
   router_id LVS_DEVEL
}
vrrp_script check_ha {
    script "/etc/keepalived/check_ha.sh"
    interval 5
    weight -5
    fall 2
    rise 1
}
vrrp_instance VI_1 {
    state MASTER
    interface ens33
    mcast_src_ip 192.168.4.51
    virtual_router_id 51
    priority 101
    advert_int 2
    authentication {
        auth_type PASS
        auth_pass K8SHA_KA_AUTH
    }
    virtual_ipaddress {
        192.168.0.200
    }
    track_script {
        check_ha
    }
}
master03
! Configuration File for keepalived
global_defs {
   router_id LVS_DEVEL
}
vrrp_script check_ha {
    script "/etc/keepalived/check_ha.sh"
    interval 5
    weight -5
    fall 2
    rise 1
}
vrrp_instance VI_1 {
    state MASTER
    interface ens33
    mcast_src_ip 192.168.4.52
    virtual_router_id 51
    priority 102
    advert_int 2
    authentication {
        auth_type PASS
        auth_pass K8SHA_KA_AUTH
    }
    virtual_ipaddress {
        192.168.0.200
    }
    track_script {
        check_ha
    }
}
三台主节点都配置健康检查
vi /etc/keepalived/check_ha.sh
#!/bin/bash
error_num=0
for k in $(seq 1 3)
do
    check_code=$(pgrep haproxy)
    if [[ $check_code == "" ]]; then
        error_num=$(expr $error_num + 1)
        sleep 1
        continue
    else
        error_num=0
        break
    fi
done

if [[ $error_num != "0" ]]; then
#    echo "systemctl stop keepalived"
    /usr/bin/systemctl stop keepalived
    exit 1
else
    exit 0
fi
启动
systemctl enable --now haproxy
systemctl enable --now keepalived
测试虚拟IP
[root@master03 ~]# ping 192.168.0.200
PING 192.168.0.200 (192.168.0.200) 56(84) bytes of data.
64 bytes from 192.168.0.200: icmp_seq=1 ttl=64 time=0.077 ms
^C64 bytes from 192.168.0.200: icmp_seq=2 ttl=64 time=0.142 ms

--- 192.168.0.200 ping statistics ---
2 packets transmitted, 2 received, 0% packet loss, time 1053ms
rtt min/avg/max/mdev = 0.077/0.109/0.142/0.034 ms
7、集群初始化
7.1查看所需的集群
[root@master01 ~]# kubeadm config images list
I0218 04:19:43.248212   19582 version.go:252] remote version is much newer: v1.26.1; falling back to: stable-1.19
W0218 04:19:44.526293   19582 configset.go:348] WARNING: kubeadm cannot validate component configs for API groups [kubelet.config.k8s.io kubeproxy.config.k8s.io]
k8s.gcr.io/kube-apiserver:v1.19.16
k8s.gcr.io/kube-controller-manager:v1.19.16
k8s.gcr.io/kube-scheduler:v1.19.16
k8s.gcr.io/kube-proxy:v1.19.16
k8s.gcr.io/pause:3.2
k8s.gcr.io/etcd:3.4.9-1
k8s.gcr.io/coredns:1.7.0
7.2 生产配置文件
kubeadm config print init-defaults > kubeadm.conf
修改配置文件
[root@master01 ~]# vi kubeadm.conf

apiVersion: kubeadm.k8s.io/v1beta2
bootstrapTokens:
- groups:
  - system:bootstrappers:kubeadm:default-node-token
  token: abcdef.0123456789abcdef
  ttl: 24h0m0s
  usages:
  - signing
  - authentication
kind: InitConfiguration
localAPIEndpoint:
  advertiseAddress: 192.168.4.50   #修改为本地地址
  bindPort: 6443
nodeRegistration:
  criSocket: /var/run/dockershim.sock
  name: master01
  taints:
  - effect: NoSchedule
    key: node-role.kubernetes.io/master
---
apiServer:
  timeoutForControlPlane: 4m0s
apiVersion: kubeadm.k8s.io/v1beta2
certificatesDir: /etc/kubernetes/pki
clusterName: kubernetes
controllerManager: {}
dns:
  type: CoreDNS
etcd:
  local:
    dataDir: /var/lib/etcd
imageRepository: registry.cn-hangzhou.aliyuncs.com/google_containers      #下载镜像时候是这个地址,初始化改回来k8s.gcr.io
controlPlaneEndpoint: "192.168.4.53:8443"        #修改为VIP地址
kind: ClusterConfiguration
kubernetesVersion: v1.19.0
networking:
  dnsDomain: cluster.local
  serviceSubnet: 10.96.0.0/12       #pod网络
scheduler: {}
下载镜像
[root@master01 ~]# kubeadm config images pull --config kubeadm.conf
W0218 09:00:10.347614 8316 configset.go:348] WARNING: kubeadm cannot validate component configs for API groups [kubelet.config.k8s.io kubeproxy.config.k8s.io]
[config/images] Pulled registry.cn-hangzhou.aliyuncs.com/google_containers/kube-apiserver:v1.19.0
[config/images] Pulled registry.cn-hangzhou.aliyuncs.com/google_containers/kube-controller-manager:v1.19.0
[config/images] Pulled registry.cn-hangzhou.aliyuncs.com/google_containers/kube-scheduler:v1.19.0
[config/images] Pulled registry.cn-hangzhou.aliyuncs.com/google_containers/kube-proxy:v1.19.0
[config/images] Pulled registry.cn-hangzhou.aliyuncs.com/google_containers/pause:3.2
[config/images] Pulled registry.cn-hangzhou.aliyuncs.com/google_containers/etcd:3.4.9-1
[config/images] Pulled registry.cn-hangzhou.aliyuncs.com/google_containers/coredns:1.7.0
查看下载的镜像
[root@master01 ~]# docker images
REPOSITORY                                                                    TAG       IMAGE ID       CREATED       SIZE
registry.cn-hangzhou.aliyuncs.com/google_containers/kube-proxy                v1.19.0   bc9c328f379c   2 years ago   118MB
registry.cn-hangzhou.aliyuncs.com/google_containers/kube-apiserver            v1.19.0   1b74e93ece2f   2 years ago   119MB
registry.cn-hangzhou.aliyuncs.com/google_containers/kube-controller-manager   v1.19.0   09d665d529d0   2 years ago   111MB
registry.cn-hangzhou.aliyuncs.com/google_containers/kube-scheduler            v1.19.0   cbdc8369d8b1   2 years ago   45.7MB
registry.cn-hangzhou.aliyuncs.com/google_containers/etcd                      3.4.9-1   d4ca8726196c   2 years ago   253MB
registry.cn-hangzhou.aliyuncs.com/google_containers/coredns                   1.7.0     bfe3a36ebd25   2 years ago   45.2MB
registry.cn-hangzhou.aliyuncs.com/google_containers/pause                     3.2       80d28bedfe5d   3 years ago   683kB
重新给镜像打标签
docker tag registry.cn-hangzhou.aliyuncs.com/google_containers/kube-scheduler:v1.19.0 k8s.gcr.io/kube-scheduler:v1.19.0
docker rmi registry.cn-hangzhou.aliyuncs.com/google_containers/kube-scheduler:v1.19.0

docker tag registry.cn-hangzhou.aliyuncs.com/google_containers/kube-proxy:v1.19.0 k8s.gcr.io/kube-proxy:v1.19.0
docker rmi registry.cn-hangzhou.aliyuncs.com/google_containers/kube-proxy:v1.19.0

docker tag registry.cn-hangzhou.aliyuncs.com/google_containers/kube-controller-manager:v1.19.0 k8s.gcr.io/kube-controller-manager:v1.19.0
docker rmi registry.cn-hangzhou.aliyuncs.com/google_containers/kube-controller-manager:v1.19.0

docker tag registry.cn-hangzhou.aliyuncs.com/google_containers/kube-apiserver:v1.19.0 k8s.gcr.io/kube-apiserver:v1.19.0
docker rmi registry.cn-hangzhou.aliyuncs.com/google_containers/kube-apiserver:v1.19.0

docker tag registry.cn-hangzhou.aliyuncs.com/google_containers/coredns:1.7.0 k8s.gcr.io/coredns:1.7.0
docker rmi registry.cn-hangzhou.aliyuncs.com/google_containers/coredns:1.7.0

docker tag registry.cn-hangzhou.aliyuncs.com/google_containers/etcd:3.4.9-1 k8s.gcr.io/etcd:3.4.9-1
docker rmi registry.cn-hangzhou.aliyuncs.com/google_containers/etcd:3.4.9-1

docker tag registry.cn-hangzhou.aliyuncs.com/google_containers/pause:3.2 k8s.gcr.io/pause:3.2
docker rmi registry.cn-hangzhou.aliyuncs.com/google_containers/pause:3.2
查看重新打标好镜像
[root@master01 ~]# docker images
REPOSITORY                           TAG       IMAGE ID       CREATED       SIZE
k8s.gcr.io/kube-proxy                v1.19.0   bc9c328f379c   2 years ago   118MB
k8s.gcr.io/kube-apiserver            v1.19.0   1b74e93ece2f   2 years ago   119MB
k8s.gcr.io/kube-controller-manager   v1.19.0   09d665d529d0   2 years ago   111MB
k8s.gcr.io/kube-scheduler            v1.19.0   cbdc8369d8b1   2 years ago   45.7MB
k8s.gcr.io/etcd                      3.4.9-1   d4ca8726196c   2 years ago   253MB
k8s.gcr.io/coredns                   1.7.0     bfe3a36ebd25   2 years ago   45.2MB
k8s.gcr.io/pause                     3.2       80d28bedfe5d   3 years ago   683kB
初始化之前重新修改配置文件
[root@master01 ~]# vi kubeadm.conf

apiVersion: kubeadm.k8s.io/v1beta2
bootstrapTokens:
- groups:
  - system:bootstrappers:kubeadm:default-node-token
  token: abcdef.0123456789abcdef
  ttl: 24h0m0s
  usages:
  - signing
  - authentication
kind: InitConfiguration
localAPIEndpoint:
  advertiseAddress: 192.168.4.50   #修改为本地地址
  bindPort: 6443
nodeRegistration:
  criSocket: /var/run/dockershim.sock
  name: master01
  taints:
  - effect: NoSchedule
    key: node-role.kubernetes.io/master
---
apiServer:
  timeoutForControlPlane: 4m0s
apiVersion: kubeadm.k8s.io/v1beta2
certificatesDir: /etc/kubernetes/pki
clusterName: kubernetes
controllerManager: {}
dns:
  type: CoreDNS
etcd:
  local:
    dataDir: /var/lib/etcd
imageRepository: k8s.gcr.io      #下载镜像时候是这个地址,初始化改回来k8s.gcr.io
controlPlaneEndpoint: "192.168.4.53:8443"        #修改为VIP地址
kind: ClusterConfiguration
kubernetesVersion: v1.19.0
networking:
  dnsDomain: cluster.local
  serviceSubnet: 10.96.0.0/12       #pod网络
scheduler: {}
开始初始化
[root@master01 ~]# kubeadm init --config /root/kubeadm.conf
出现如下报错
[kubelet-check] The HTTP call equal to 'curl -sSL http://localhost:10248/healthz' failed with error: Get "http://localhost:10248/healthz": dial tcp [::1]:10248: connect: connection refused.
[kubelet-check] It seems like the kubelet isn't running or healthy.
[kubelet-check] The HTTP call equal to 'curl -sSL http://localhost:10248/healthz' failed with error: Get "http://localhost:10248/healthz": dial tcp [::1]:10248: connect: connection refused.
[kubelet-check] It seems like the kubelet isn't running or healthy.
[kubelet-check] The HTTP call equal to 'curl -sSL http://localhost:10248/healthz' failed with error: Get "http://localhost:10248/healthz": dial tcp [::1]:10248: connect: connection refused.
[kubelet-check] It seems like the kubelet isn't running or healthy.
[kubelet-check] The HTTP call equal to 'curl -sSL http://localhost:10248/healthz' failed with error: Get "http://localhost:10248/healthz": dial tcp [::1]:10248: connect: connection refused.
[kubelet-check] It seems like the kubelet isn't running or healthy.
[kubelet-check] The HTTP call equal to 'curl -sSL http://localhost:10248/healthz' failed with error: Get "http://localhost:10248/healthz": dial tcp [::1]:10248: connect: connection refused.

    Unfortunately, an error has occurred:
        timed out waiting for the condition

    This error is likely caused by:
        - The kubelet is not running
        - The kubelet is unhealthy due to a misconfiguration of the node in some way (required cgroups disabled)

    If you are on a systemd-powered system, you can try to troubleshoot the error with the following commands:
        - 'systemctl status kubelet'
        - 'journalctl -xeu kubelet'

    Additionally, a control plane component may have crashed or exited when started by the container runtime.
    To troubleshoot, list all containers using your preferred container runtimes CLI.

    Here is one example how you may list all Kubernetes containers running in docker:
        - 'docker ps -a | grep kube | grep -v pause'
        Once you have found the failing container, you can inspect its logs with:
        - 'docker logs CONTAINERID'

error execution phase wait-control-plane: couldn't initialize a Kubernetes cluster
To see the stack trace of this error execute with --v=5 or higher
根据报错信息知道,是因为 k8s 和docker 的 cgroup driver 不一致导致的,解决办法:
[root@master01 ~]# vi /etc/docker/daemon.json
{
   "registry-mirrors": ["https://j75wwuc0.mirror.aliyuncs.com"],"exec-opts": ["native.cgroupdriver=systemd"]
}
修改完成重启docker
root@master01 ~]# systemctl restart docker
重置
[root@master01 ~]# kubeadm reset
重新初始化
[root@master01 ~]# kubeadm init --config /root/kubeadm.conf
有报错了
[kubelet-check] Initial timeout of 40s passed.

    Unfortunately, an error has occurred:
        timed out waiting for the condition

    This error is likely caused by:
        - The kubelet is not running
        - The kubelet is unhealthy due to a misconfiguration of the node in some way (required cgroups disabled)

    If you are on a systemd-powered system, you can try to troubleshoot the error with the following commands:
        - 'systemctl status kubelet'
        - 'journalctl -xeu kubelet'

    Additionally, a control plane component may have crashed or exited when started by the container runtime.
    To troubleshoot, list all containers using your preferred container runtimes CLI.

    Here is one example how you may list all Kubernetes containers running in docker:
        - 'docker ps -a | grep kube | grep -v pause'
        Once you have found the failing container, you can inspect its logs with:
        - 'docker logs CONTAINERID'

error execution phase wait-control-plane: couldn't initialize a Kubernetes cluster
To see the stack trace of this error execute with --v=5 or higher
https://blog.buwo.net/1509.html
https://blog.csdn.net/scwang18/article/details/100075236
https://zhuanlan.zhihu.com/p/465647563
https://www.bilibili.com/video/BV1m34y1Y74P?p=7&vd_source=a152087dca674715707126502292f55b
http://events.jianshu.io/p/b0138cf76882
k8s.gcr.io

 浙公网安备 33010602011771号