
安装MylSQL-rpm安装方式
1.Linux平台安装MySQL有以下几种方式,本文主要实验rpm包安装
(1)通过RPM包安装;
(2)直接使用编译好的二进制文件,通常是个tar包(或者是个tar.gz)解压后直接使用;
(3)下载源代码,采用自定义编译选项的方式安装,安装步骤最繁琐,但是编译选项配置得当,能够提升性能,而且这也是最灵活的一种方式。
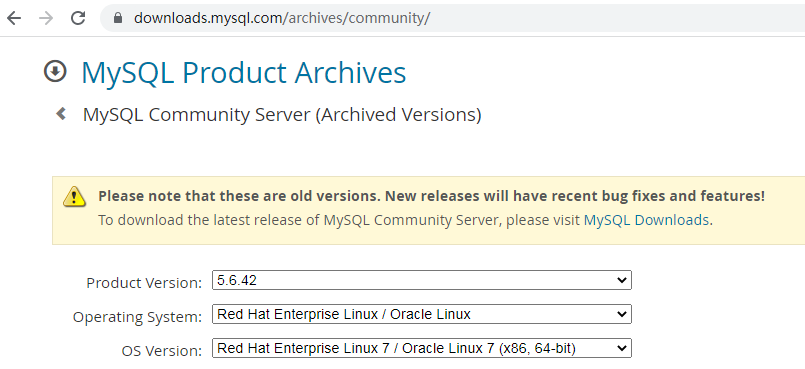
2.下载RPM包
https://downloads.mysql.com/archives/community/
3.清理环境
[root@localhost soft]# rpm -qa | grep mysql
[root@localhost soft]# rpm -qa | grep mariadb
mariadb-libs-5.5.64-1.el7.x86_64
[root@localhost soft]# rpm -qa | grep mysql
[root@localhost soft]# rpm -qa | grep mariadb
mariadb-libs-5.5.64-1.el7.x86_64
[root@localhost soft]# rpm -e mariadb-libs*
错误:未安装软件包 mariadb-libs*
[root@localhost soft]# rpm -e mariadb-libs-5.5.64-1.el7.x86_64
错误:依赖检测失败:
    libmysqlclient.so.18()(64bit) 被 (已安裝) postfix-2:2.10.1-7.el7.x86_64 需要
    libmysqlclient.so.18(libmysqlclient_18)(64bit) 被 (已安裝) postfix-2:2.10.1-7.el7.x86_64 需要
重新卸载
[root@localhost ~]# rpm -qa | grep mariadb
mariadb-libs-5.5.64-1.el7.x86_64
[root@localhost ~]# yum remove mariadb-libs-5.5.64-1.el7.x86_64
已加载插件:fastestmirror, langpacks
正在解决依赖关系
--> 正在检查事务
---> 软件包 mariadb-libs.x86_64.1.5.5.64-1.el7 将被 删除
--> 正在处理依赖关系 libmysqlclient.so.18()(64bit),它被软件包 2:postfix-2.10.1-7.el7.x86_64 需要
--> 正在处理依赖关系 libmysqlclient.so.18(libmysqlclient_18)(64bit),它被软件包 2:postfix-2.10.1-7.el7.x86_64 需要
--> 正在检查事务
---> 软件包 postfix.x86_64.2.2.10.1-7.el7 将被 删除
--> 解决依赖关系完成

依赖关系解决

=========================================================================================================================
 Package                       架构                    版本                             源                          大小
=========================================================================================================================
正在删除:
 mariadb-libs                  x86_64                  1:5.5.64-1.el7                   @anaconda                  4.4 M
为依赖而移除:
 postfix                       x86_64                  2:2.10.1-7.el7                   @anaconda                   12 M

事务概要
=========================================================================================================================
移除  1 软件包 (+1 依赖软件包)

安装大小:17 M
是否继续?[y/N]:y
Downloading packages:
Running transaction check
Running transaction test
Transaction test succeeded
Running transaction
  正在删除    : 2:postfix-2.10.1-7.el7.x86_64                                                                        1/2
  正在删除    : 1:mariadb-libs-5.5.64-1.el7.x86_64                                                                   2/2
  验证中      : 1:mariadb-libs-5.5.64-1.el7.x86_64                                                                   1/2
  验证中      : 2:postfix-2.10.1-7.el7.x86_64                                                                        2/2

删除:
  mariadb-libs.x86_64 1:5.5.64-1.el7

作为依赖被删除:
  postfix.x86_64 2:2.10.1-7.el7

完毕!
4.开始安装
[root@localhost soft3]# rpm -ivh mysql-community-common-5.7.15-1.el7.x86_64.rpm
警告:mysql-community-common-5.7.15-1.el7.x86_64.rpm: 头V3 DSA/SHA1 Signature, 密钥 ID 5072e1f5: NOKEY
准备中...                          ################################# [100%]
正在升级/安装...
   1:mysql-community-common-5.7.15-1.e################################# [100%]
[root@localhost soft3]# rpm -ivh mysql-community-libs-5.7.15-1.el7.x86_64.rpm
警告:mysql-community-libs-5.7.15-1.el7.x86_64.rpm: 头V3 DSA/SHA1 Signature, 密钥 ID 5072e1f5: NOKEY
准备中...                          ################################# [100%]
正在升级/安装...
   1:mysql-community-libs-5.7.15-1.el7################################# [100%]
[root@localhost soft3]# rpm -ivh mysql-community-server-5.7.15-1.el7.x86_64.rpm
警告:mysql-community-server-5.7.15-1.el7.x86_64.rpm: 头V3 DSA/SHA1 Signature, 密钥 ID 5072e1f5: NOKEY
错误:依赖检测失败:
    mysql-community-client(x86-64) >= 5.7.9 被 mysql-community-server-5.7.15-1.el7.x86_64 需要
[root@localhost soft3]# rpm -ivh mysql-community-client-5.7.15-1.el7.x86_64.rpm
警告:mysql-community-client-5.7.15-1.el7.x86_64.rpm: 头V3 DSA/SHA1 Signature, 密钥 ID 5072e1f5: NOKEY
准备中...                          ################################# [100%]
正在升级/安装...
   1:mysql-community-client-5.7.15-1.e################################# [100%]
[root@localhost soft3]# rpm -ivh mysql-community-server-5.7.15-1.el7.x86_64.rpm
警告:mysql-community-server-5.7.15-1.el7.x86_64.rpm: 头V3 DSA/SHA1 Signature, 密钥 ID 5072e1f5: NOKEY
准备中...                          ################################# [100%]
正在升级/安装...
   1:mysql-community-server-5.7.15-1.e################################# [100%]
6.启动mysql报错
[root@localhost log]# systemctl start mysqld
Job for mysqld.service failed because the control process exited with error code. See "systemctl status mysqld.service" and "journalctl -xe" for details.
原因是 /var/lib/mysql /这个目标路径已经存在/var/lib/mysql /,导致无法初始化。
解决办法
[root@localhost mysql]# rm -rf /var/lib/mysql/
启动成功
[root@localhost mysql]# systemctl status mysqld
● mysqld.service - MySQL Server
   Loaded: loaded (/usr/lib/systemd/system/mysqld.service; enabled; vendor preset: disabled)
   Active: active (running) since 三 2022-05-04 21:28:04 CST; 53s ago
  Process: 40961 ExecStart=/usr/sbin/mysqld --daemonize --pid-file=/var/run/mysqld/mysqld.pid $MYSQLD_OPTS (code=exited, status=0/SUCCESS)
  Process: 40867 ExecStartPre=/usr/bin/mysqld_pre_systemd (code=exited, status=0/SUCCESS)
 Main PID: 40964 (mysqld)
    Tasks: 27
   CGroup: /system.slice/mysqld.service
           └─40964 /usr/sbin/mysqld --daemonize --pid-file=/var/run/mysqld/mysqld.pid

5月 04 21:27:55 localhost.localdomain systemd[1]: Starting MySQL Server...
5月 04 21:28:04 localhost.localdomain systemd[1]: Started MySQL Server.
7.进入数据库修改密码
查看默认密码
[root@localhost lib]# cat /var/log/mysqld.log | grep password
进入数据库:
[root@localhost lib]# mysql -uroot -p
Enter password:
Welcome to the MySQL monitor.  Commands end with ; or \g.
Your MySQL connection id is 4
Server version: 5.7.15

Copyright (c) 2000, 2016, Oracle and/or its affiliates. All rights reserved.

Oracle is a registered trademark of Oracle Corporation and/or its
affiliates. Other names may be trademarks of their respective
owners.

Type 'help;' or '\h' for help. Type '\c' to clear the current input statement.

mysql>
修改密码:
mysql> alter user root@'localhost' identified by 'Password@123';
Query OK, 0 rows affected (0.00 sec)
开通远程连接权限
mysql> mysql> grant all privileges on *root'@'%' identified by 'Password@123' with grant option;
Query OK, 0 rows affected, 1 warning (0.00 sec)
刷新权限
mysql> flush privileges;
Query OK, 0 rows affected (0.01 sec)

 浙公网安备 33010602011771号