
微雪 esp32c3 墨水屏显示 demo
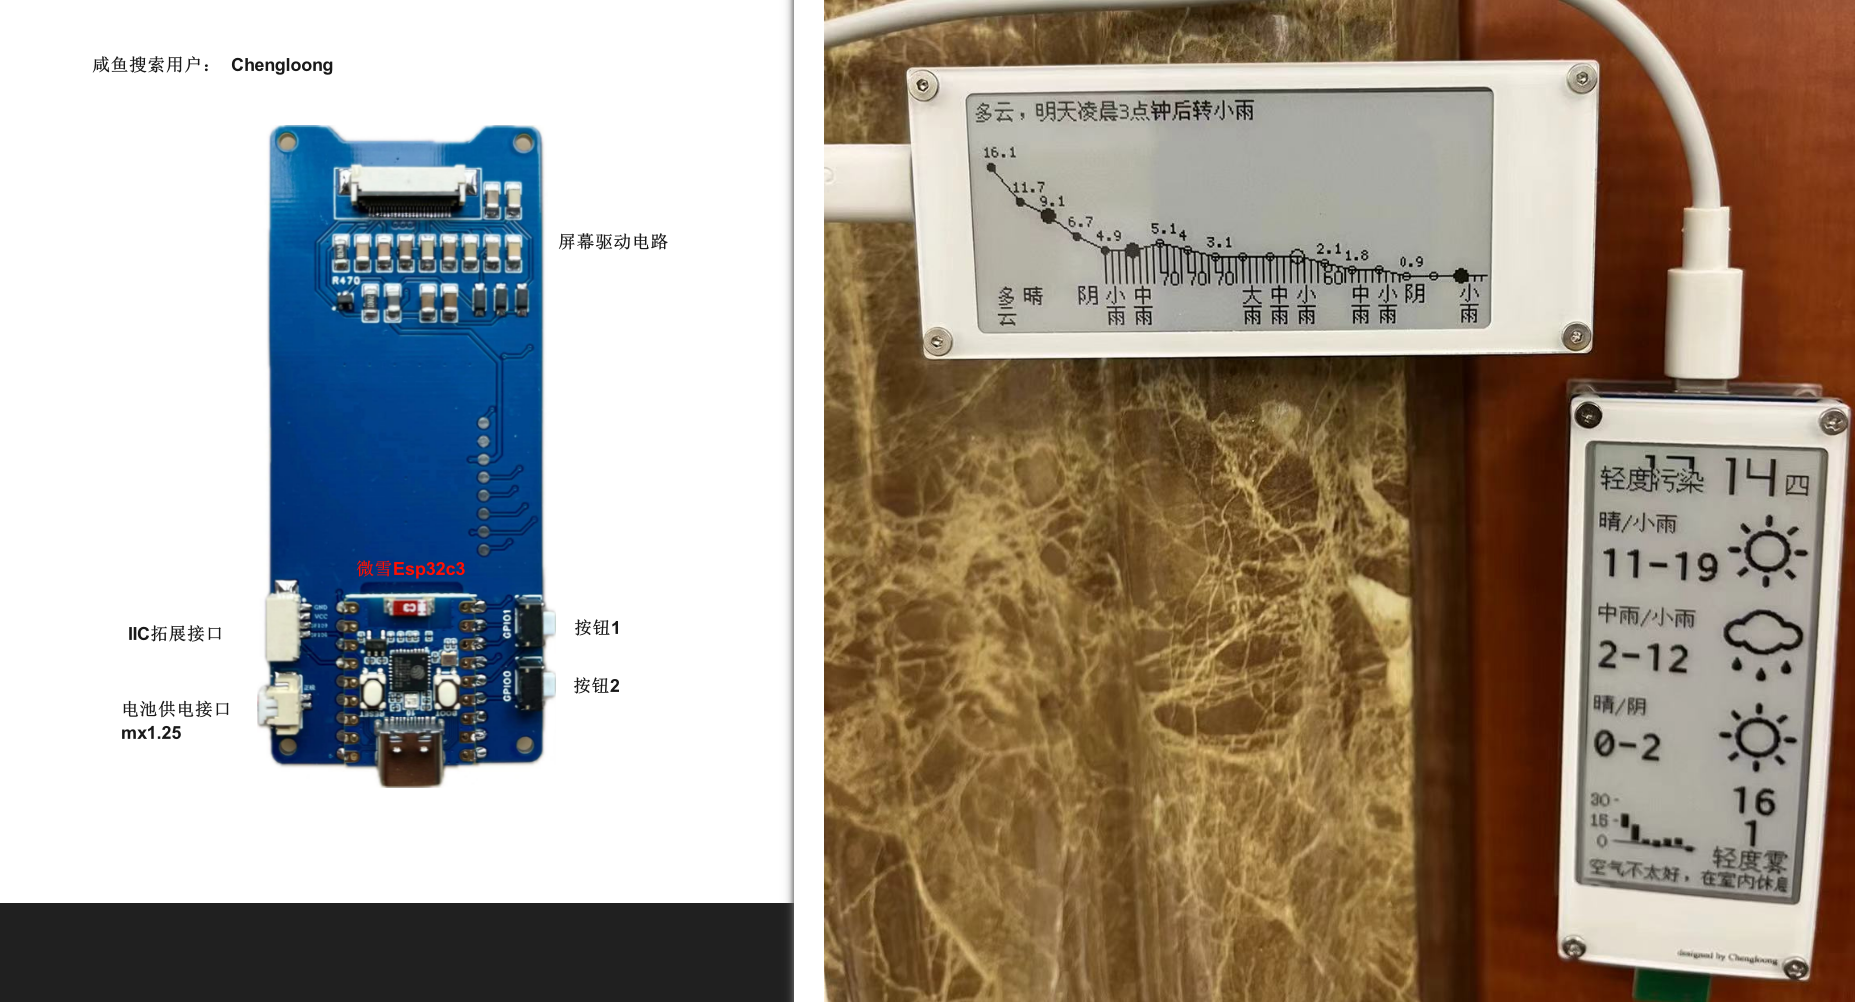
这个教程是提供给购买了我 esp32c3 墨水屏(微雪版本)开发板的朋友看的(需要成品的,小黄鱼搜索用户 Chengloong),也适用于 esp32c3 驱动墨水屏的项目。
安装 platformio 开发环境
这里就不赘述了,安装过程中如果下载很慢,看我的博客中有解决的方案。 https://www.cnblogs.com/manastudent/p/17116878.html
常见问题
编译后无法找到文件 no such file
检查项目是否在中文路径文件夹下,如果是则更换为英文路径文件夹
编译提示 #include <SPI.h> FAILED
platformio.ini 加一行 lib_ldf_mode = deep+
新建项目

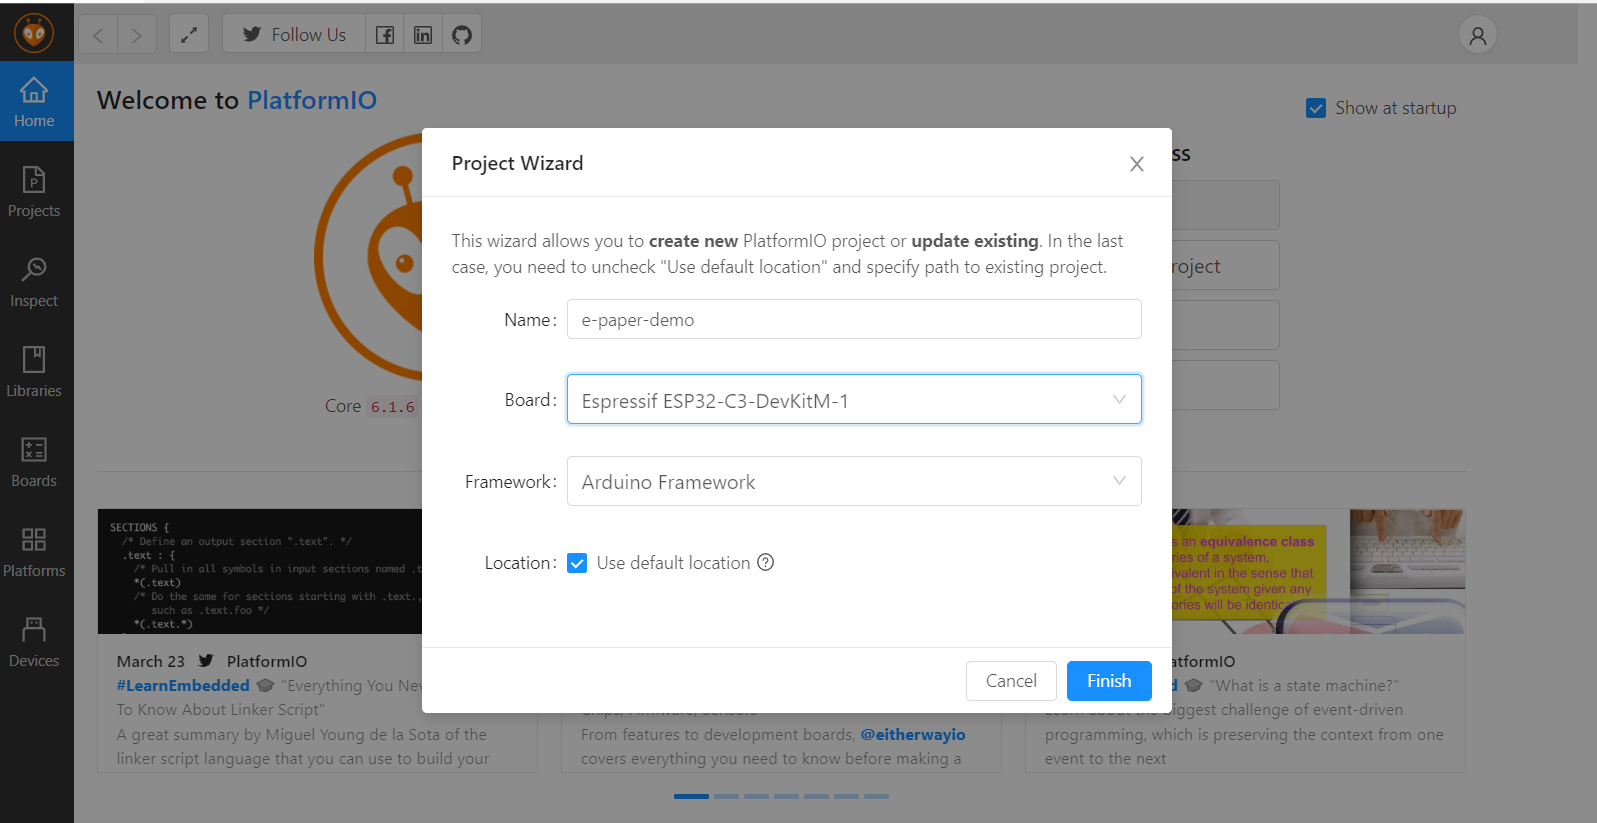
这里注意要选择 Espressif esp32-c3-devkitc-02 这个 Board,这个适用于微雪 esp32c3
微雪 esp32c3 官网资料:https://www.waveshare.net/wiki/ESP32-C3-Zero
配置开发库
编辑 platformio.ini 修改为以下配置
[env:esp32-c3-devkitc-02]
platform = espressif32
board = esp32-c3-devkitc-02
framework = arduino
monitor_speed = 115200
lib_deps =
    zinggjm/GxEPD2@^1.5.0
build_flags =
    -D ARDUINO_USB_MODE=1
    -D ARDUINO_USB_CDC_ON_BOOT=1
亮屏程序
这里注意第六行代码:
GxEPD2_290 这个是屏幕的驱动程序,不同屏幕对应的驱动是不一样的,不要选择错误。
屏幕的驱动到屏幕的生产厂商处可以找到,屏幕驱动对应代码关系到库的 github 上找,或者看源码。
https://github.com/ZinggJM/GxEPD2
platformio 对 esp32c3 设置的默认引脚定义为:(文件位置位于:C:\Users\用户名\.platformio\packages\framework-arduinoespressif32\variants\esp32c3\pins_arduino.h)建议不要修改,使用默认的即可。
Q:MOSI、SCK这些是什么意思啊? A:墨水屏幕和开发板通过 SPI 协议进行通信,SCK 是时钟信号
引脚关系
cs -> 7
dc -> 5
rst -> 3
busy -> 2
sck -> 4
mosi(din) -> 6
这里 demo 的引脚定义适配我制作的 esp32c3 墨水屏,其他的请进行相应的修改。
#include <Arduino.h>

#include <GxEPD2_BW.h>
#include <Fonts/FreeMonoBold9pt7b.h>

// H029A01   支持局部刷新
GxEPD2_BW<GxEPD2_290, GxEPD2_290::HEIGHT> display(GxEPD2_290(SS, 5, 2, 3));

const char HelloWorld[] = "Hello World!";

// 显示 HelloWorld
void helloWorld()
{
  // Serial.println("helloWorld");
  display.setRotation(1);
  display.setFont(&FreeMonoBold9pt7b);
  display.setTextColor(GxEPD_BLACK);
  int16_t tbx, tby;
  uint16_t tbw, tbh;
  display.getTextBounds(HelloWorld, 0, 0, &tbx, &tby, &tbw, &tbh);
  // center bounding box by transposition of origin:
  uint16_t x = ((display.width() - tbw) / 2) - tbx;
  uint16_t y = ((display.height() - tbh) / 2) - tby;
  // full window mode is the initial mode, set it anyway
  display.setFullWindow();
  display.fillScreen(GxEPD_WHITE);
  display.setCursor(x, y);
  display.print(HelloWorld);
  display.display(false); // full update
  Serial.println("helloWorld done");
}

// 局部刷新
void showPartialUpdate()
{
  // use asymmetric values for test
  uint16_t box_x = 10;
  uint16_t box_y = 15;
  uint16_t box_w = 70;
  uint16_t box_h = 20;
  uint16_t cursor_y = box_y + box_h - 6;
  if (display.epd2.WIDTH < 104)
    cursor_y = box_y + 6;
  float value = 13.95;
  uint16_t incr = display.epd2.hasFastPartialUpdate ? 1 : 3;
  display.setFont(&FreeMonoBold9pt7b);
  if (display.epd2.WIDTH < 104)
    display.setFont(0);
  display.setTextColor(GxEPD_BLACK);
  // show where the update box is
  for (uint16_t r = 0; r < 4; r++)
  {
    display.setRotation(r);
    display.setPartialWindow(box_x, box_y, box_w, box_h);
    display.firstPage();
    do
    {
      display.fillRect(box_x, box_y, box_w, box_h, GxEPD_BLACK);
      // display.fillScreen(GxEPD_BLACK);
    } while (display.nextPage());
    delay(2000);
    display.firstPage();
    do
    {
      display.fillRect(box_x, box_y, box_w, box_h, GxEPD_WHITE);
    } while (display.nextPage());
    delay(1000);
  }
}

void setup() {
  display.init(115200);
  helloWorld();
  showPartialUpdate();
  display.hibernate();
}

void loop() {
}
上传程序
点击 vscode 底部菜单栏中 port 选择按钮,选择到相应的开发板的 com 口,如果没有开发板,请先安装驱动。https://files.cnblogs.com/files/manastudent/CP210x_Universal_Windows_Driver.zip?t=1680739380
解压后 鼠标右键 silabser.inf 文件,选择安装。
选择后点击上传按钮,等待片刻即可看到墨水屏显示。

天气预报项目
请先运行上面的 DEMO 后再看天气预报项目
请先运行上面的 DEMO 后再看天气预报项目
请先运行上面的 DEMO 后再看天气预报项目
天气预报链接使用【彩云天气】作为数据支持。对于长期使用,您需要申请API。注意替换 platformio.ini 中开发版类型。
项目地址:
https:github.com/ManaStuDent/esp32_weather
电池选择建议
重要提示,微雪esp32c3 只支持电池供电,不能给电池充电。电池和typec输入二选一,不同同时接入
重要提示,微雪esp32c3 只支持电池供电,不能给电池充电。电池和typec输入二选一,不同同时接入
重要提示,微雪esp32c3 只支持电池供电,不能给电池充电。电池和typec输入二选一,不同同时接入
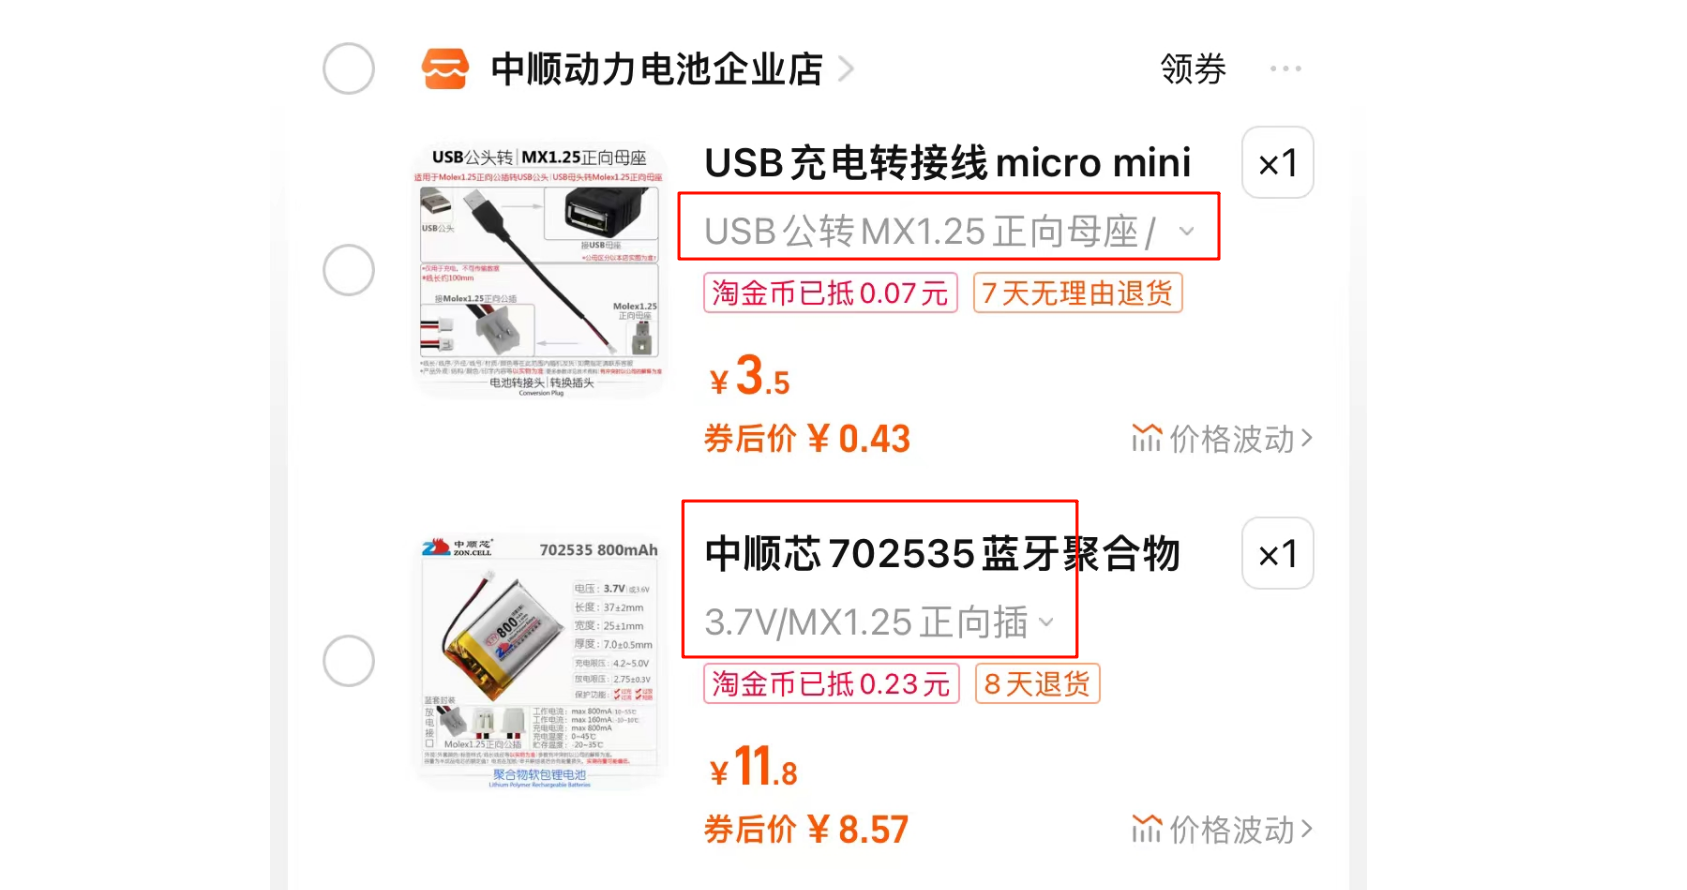
3.7V/MX1.25 正向插
USB公转MX1.25正向母座,别忘记一起购买,不然没法充电呢

