Kaggle猫狗图像分类竞赛Baseline
Kaggle的数据大部分时候和实际应用场景相去甚远。除了简历上的项目经历,Kaggle项目以及相应被分享出来的代码不会直接有助于工作本身。Kaggle更多是一种算法与实际问题结合的实验。
尽管如此,Kaggle仍然是目前所能找到的最接近工作和业务场景的平台。而且它不失为一个非常好的练习编程能力的工具。同时,它为数据科学提供了趣味性和专业性,甚至为程序员、数据工作者们提供了一个社交平台。
这次分享的是找工作前一段时间做的经典cv赛的baseline,它和我从事的工作关系不大但私以为非常有趣。Kaggle仍然会成为我长期驻守的平台,不过由于工作性质的原因,今后我会将更多精力聚集在CTR竞赛上面。
猫狗识别是计算机视觉和卷积神经网络的入门项目。通过这个项目,初学者(我这种)能够很好地理解图像数据的结构,比如图像数据是如何保存在4D张量中的。一般而言,n幅32x32像素的图像保存在(n, height, width, channels)的数据结构里。其中,彩色图像的channels=3,灰度(黑白)图像的channels=1.
这个项目的整体流程如下:
-
数据读入
-
数据清理
- 将图片与label对应
- 图片尺寸归一化
- 划分验证集、训练集
-
数据扩增
-
数据训练、观察学习过程、计算本地cv分数
-
预测、提交
数据介绍
数据从Kaggle上下载:
https://www.kaggle.com/c/dogs-vs-cats-redux-kernels-edition
%matplotlib inline
%config InlineBackend.figure_format = 'svg'

import warnings
warnings.filterwarnings('ignore')
import os, cv2, re, random, time
import numpy as np
import pandas as pd
import seaborn as sns
import matplotlib.pyplot as plt
from sklearn.metrics import log_loss
from sklearn.model_selection import train_test_split
from keras.preprocessing.image import ImageDataGenerator, load_img
from keras import layers, models, optimizers
from tensorflow.keras.callbacks import EarlyStopping, ReduceLROnPlateau
from tensorflow.keras.optimizers import RMSprop, Adam
损失函数是logloss:
这里我手动将图片解压好了分别存在了train和test文件夹里。事实上也可以使用Python来自动解压。文末分享的notebook链接给出了如何这么做。
我们首先要定义训练集和测试集的路径。然后分别用一个list存储所有的文件名:
start = time.time()
TRAIN_DIR = '../input/train/'
TEST_DIR = '../input/test/'
train_images = [TRAIN_DIR+i for i in os.listdir(TRAIN_DIR)]
test_images = [TEST_DIR+i for i in os.listdir(TEST_DIR)]
下面我们定义2个函数用于排列文件名的顺序。因为我们的训练图片文件名都遵循cat.2.jpg这样的格式,表示猫-第2张图片。我们的提交格式是按其中的数字排序的,如果测试集不排列好最后预测出来的标签将会是乱的!
def txt_dig(text):
    '''输入字符串,如果是数字则输出数字,如果不是则输出原本字符串'''
    return int(text) if text.isdigit() else text

def natural_keys(text):
    '''输入字符串,将数字与文字分隔开,将数字串转化为int'''
    return [ txt_dig(c) for c in re.split('(\d+)', text) ]

train_images.sort(key=natural_keys) # 依据编号进行重新排序
test_images.sort(key=natural_keys)
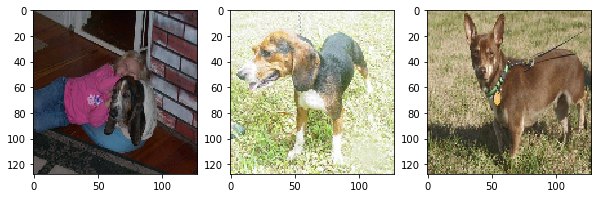
看下数据长啥样吧,从训练集中随机抽取3张图片进行展示,可以发现原始的数据大小尺寸不一:
random.seed(558)
plt.subplots(facecolor='white',figsize=(10,20))
sample = random.choice(train_images)
image = load_img(sample)
plt.subplot(131)
plt.imshow(image)

sample = random.choice(train_images)
image = load_img(sample)
plt.subplot(132)
plt.imshow(image)

sample = random.choice(train_images)
image = load_img(sample)
plt.subplot(133)
plt.imshow(image)

由于数据太多,我们可以不使用所有数据进行训练。我们可以从训练集25000张图片中抽取2500张猫的图片和2500张狗的图片来训练。
#抽样,分别得到1300个狗图片和1300个猫图片。共2600张图片
train_images = train_images[0:2500] + train_images[22500:25000]
random.seed(558) # 打乱
random.shuffle(train_images)
预处理
下面使用cv2库来循环读取文件名对应的图片,并将所有图像resize为128x128的正方形格式:
IMG_WIDTH = 128
IMG_HEIGHT = 128
x = []
for img in train_images:
    x.append(cv2.resize(cv2.imread(img),
                        (IMG_WIDTH, IMG_HEIGHT),
                        interpolation=cv2.INTER_CUBIC))

test = []
for img in test_images:
    test.append(cv2.resize(cv2.imread(img),
                        (IMG_WIDTH, IMG_HEIGHT),
                        interpolation=cv2.INTER_CUBIC))

print('The shape of train data is {}'.format(np.array(x).shape))
print('The shape of test data is {}'.format(np.array(test).shape))
The shape of train data is (5000, 128, 128, 3)
The shape of test data is (12500, 128, 128, 3)
测试集包含了12500个样本。
我们从处理后的数据中抽取三张图片进行展示
plt.subplots(facecolor='white',figsize=(10,20))
plt.subplot(131)
plt.imshow(cv2.cvtColor(x[1024,:,:,:], cv2.COLOR_BGR2RGB))
plt.subplot(132)
plt.imshow(cv2.cvtColor(x[546,:,:,:], cv2.COLOR_BGR2RGB))
plt.subplot(133)
plt.imshow(cv2.cvtColor(x[742,:,:,:], cv2.COLOR_BGR2RGB))
可以看出图片因为统一尺寸而被拉伸。
下一步是从文件名字符串中读取是猫还是狗的标签。并且我们画个条形图看看分类是否平衡:
plt.rcParams['figure.facecolor'] = 'white'
y = []
for i in train_images:
    if 'dog' in i:
        y.append(1)
    elif 'cat' in i:
        y.append(0)
len(y)

x = np.array(x)
y = np.array(y)
test = np.array(test)
sns.countplot(y)

嗯,数据完全平衡。
训练
强烈建议调用GPU进行训练。
首先用sklearn划分出验证集吧:
x_train, x_val, y_train, y_val = train_test_split(x, y, test_size = 0.2)
我们使用卷积神经网络来提取特征,我们分别堆叠32、128和128的卷积层-池化层。
def compile_model():
    model = models.Sequential()
    model.add(layers.Conv2D(32, (3, 3), activation='relu',
                                        input_shape=(IMG_WIDTH, IMG_HEIGHT, 3)))
    model.add(layers.MaxPooling2D((2, 2)))
    model.add(layers.Conv2D(128, (3, 3), activation='relu'))
    model.add(layers.MaxPooling2D((2, 2)))
    model.add(layers.Conv2D(128, (3, 3), activation='relu'))
    model.add(layers.MaxPooling2D((2, 2)))
    model.add(layers.Flatten())
    model.add(layers.Dense(512, activation='relu'))
    model.add(layers.Dense(1, activation='sigmoid'))
    opt1 = RMSprop(lr=3e-5, decay=1e-4)
    opt2 = Adam(lr=0.0005)
    model.compile(loss = 'binary_crossentropy',
                  optimizer = opt1,
                  metrics = ['accuracy'])
    model.summary()
    return model

model = compile_model()
嗯,当然是使用喜闻乐见的keras了
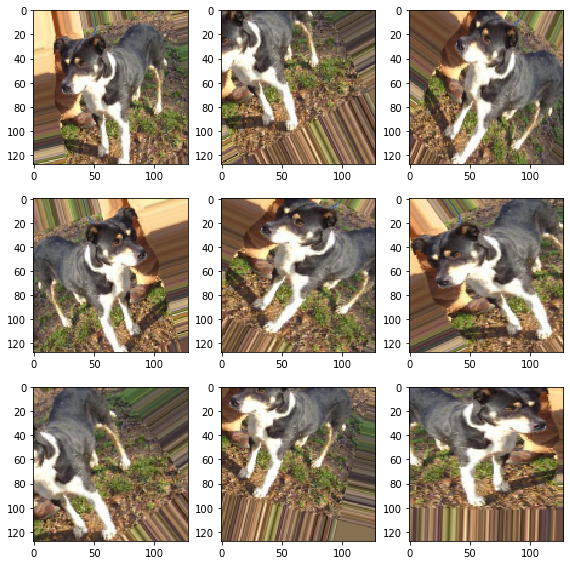
总共有13,031,553个参数待训练,可以理解为神经网络的权重。为了防止过拟合的发生,需要使用数据扩增方法生成更多的训练数据。这么做的好处是让模型在每轮训练时不会查看同样的图像,让模型具有更好的泛化能力。
datagen = ImageDataGenerator(
            rescale=1. / 255,       # 将数据放缩到0-1范围内
            rotation_range=40,      # 图像随机旋转的角度范围
            width_shift_range=0.2,  # 图像在水平方向上平移的范围
            height_shift_range=0.2, # 图像在垂直方向上平移的范围
            shear_range=0.2,        # 随机错切变换的角度
            zoom_range=0.2,         # 图像随机缩放的范围
            horizontal_flip=True,   # 随机将一半图像水平翻转
            fill_mode='nearest')    # 填充新创建像素的方法

val_datagen = ImageDataGenerator(rescale=1./255)
datagen 和 val_datagen可以为我们不断生成经过变换后的训练数据和验证数据。处理后的效果大概如下:
BATCH_SIZE = 16
datagen = datagen.flow(x_train, y_train, batch_size=BATCH_SIZE)
val_datagen = val_datagen.flow(x_val, y_val, batch_size=BATCH_SIZE)
这里生成器设置batch_size=16,每个批量包含16个样本。
后面就是训练了,这里我们设置15轮训练,一般轮数越多模型越准(当然训练时间也越长)。
这里我根据喜好设置了两种EarlyStopping监测器用来抑制过拟合。
fit()方法中的参数最好注意一下,epochs为训练轮数,steps_per_epoch设置将一轮训练分成多少个batch。我们共有4000个训练样本,batch_size=16,所以steps_per_epoch设为250 (16*250=4000). 最后validation_steps 指定需要从验证生成器中抽取多少个批次用于评估。validation_data则指定验证集的数组或生成器。
如果你对epoch和batch的概念不够了解。大概可以总结为:
-
1个epoch等于使用所有样本训练一次
-
深度学习中,一般采用SGD训练,即每次训练在训练集中取一个batch的样本训练
-
训练时一个batch的样本会被计算一次梯度下降,使目标函数优化一步
这些参数设置和你的计算资源有关。
earlystop1 = EarlyStopping(patience=10)
earlystop2 = ReduceLROnPlateau(monitor = 'val_accuracy', min_lr = 0.001,
                               patience = 10, mode = 'min',
                               verbose = 1)

def fit_generate(model, datagen):
    '''fit after processing'''
    history = model.fit(datagen,
                    steps_per_epoch = 250,
                    epochs = 15,
                    validation_data=val_datagen,
                    callbacks=[earlystop1, earlystop2],
                    validation_steps = 50)
    return model, history
# model.save('../model/cats_and_dogs.h5')
model, history = fit_generate(model, datagen)
训练过程略。可以画出每一轮的准确率和Logloss
plt.rcParams['figure.facecolor'] = 'white'
model_loss = pd.DataFrame(history.history)
#model_loss.head()
model_loss[['accuracy','val_accuracy']].plot(ylim=[0.4,1]);
model_loss[['loss','val_loss']].plot(ylim=[0.4,1]);
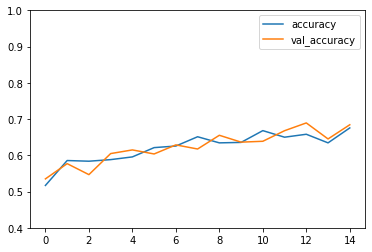

可以看出虽然准确率没上去,但并没有过拟合的情况,二者趋势同步。
模型训练好后可以预测并计算下交叉验证分数,这里记得任何预测的部分都不能使用数据生成器,而必须使用原始数据。否则预测出来的结果对不上。
x_val = x_val.astype('float32') / 255 # 归一化
val_preds = model.predict(x_val)
val_preds_class = np.where(val_preds.ravel()>0.5,1,0)

print('Out of Fold Accuracy is {:.5}'.format(accuracy_score(y_val, val_preds_class)))
print('Out of Fold log loss is {:.5}'.format(log_loss(y_val, val_preds.ravel())))
Out of Fold Accuracy is 0.686
Out of Fold log loss is 0.57176
这里准确率其实很低,但我不想调了。毕竟这篇文章的重点是提供正确并有用的代码。
预测 / 提交结果
这一步是对测试集进行预测,并把结果提交到Kaggle上看分数。同样要注意的是千万不能使用数据生成器处理测试数据。我们仅仅对数据进行归一化处理就行。此外,Kaggle要求提交类别概率值,这里不需要将概率转化为类别。
test = test.astype('float32') / 255 # 归一化
test_pred = model.predict(test)
submission = pd.DataFrame({'id': range(1, len(test_images) + 1), 'label': test_pred.ravel()})
submission.to_csv('../output/submission.csv', index = False)
print('This program costs {:.2f} seconds'.format(time.time()-start))
结语
猫狗识别是CV类比赛入门的一个很好的数据。它比只包含灰度图像的Minst手写数字识别要更加进阶一些。主要表现在:
-
Kaggle的Minst数据集以数字格式保存在
.csv文件中,不需要从原始的.jpg图片中进行读取 -
猫狗识别图片尺寸大小不一
-
猫狗识别数据量大,且需要进行数据扩增
嗯嗯,其实目前的分数很低,我也并不想把这个模型调到很高了。你可以在它之上进行自由改动,比如纳入一些预训练的模型,如VGG16等。尽管计算机视觉并不是我的专长,但借此了解一下神经网络的构建也是好的。我在代码中加入了我在建模中想看到的东西,比如local cv分数的计算、训练过程、程序运行时间、数据本身长啥样等等。这些是比较重要的。
基于这个baselined的另一个notebook发在了Kaggle上(为了蹭GPU)。请点击“阅读原文”或复制如下链接查看:

 浙公网安备 33010602011771号